
Subscribe to Our Youtube Channel
Related Manuals for Meyra ORTOPEDIA Solero Light 9.072


Summary of Contents for Meyra ORTOPEDIA Solero Light 9.072
- Page 1 Multifunctional and lying and positioning wheelchair Model 9.072, Solero Light Operating manual...
-
Page 2: Table Of Contents
Contents Meaning of the applied markers Introduction List of models Indications / contraindications Acceptance Intended purpose Folding/unfolding the wheelchair Adjustment Combination with manufacturer foreign products Reinstallment Life span Overview Brake Pressure brake - user Locking the brakes Releasing the brakes Service brake Drum brake for accompanying persons Function as operating brakes... - Page 3 Mechanically height-adjustable leg supports Lifting/lowering the leg support Lifting/lowering the amputee leg support Adjusting the height of the footplate Height adjustment of the calf pad Arm supports Removing the arm support Inserting the arm support Adjustment of the armrest height Depth adjustment of the arm support cushions Repositioning the arm support cushion Back support with angle adjustment...
- Page 4 Therapy table Folding/Unfolding Folding the wheelchair Unfolding the wheelchair Basic safety information Accompanying person Transfer out of the wheelchair Reaching for objects Driving on falling, rising or transverse gradients Crossing obstacles Loading the wheelchair Transport in vehicles Transport safety of the unoccupied multifunction and bearing wheelchair Transport of people inside a motor vehicle Transport in public methods of transportation Driving on public highways...
- Page 5 Technical data Tyre pressure of pneumatic tyres Applied norms Data according to ISO for model 9.072 Solero light Further technical data for model 9.072 Solero light Meaning of the symbols on the washing instruction Meaning of the labels on the wheelchair Meaning of the symbols on the type plate Inspection certificate Warranty / Guarantee...
-
Page 6: Meaning Of The Applied Markers
( ) Reference to a function element within vere accident that can still not be ruled out a picture. completely, please use our E-mail address < info@meyra.de > and inform the respon- INTRODUCTION sible governmental agency of your country. Read and observe this manual before first LIST OF MODELS operation. -
Page 7: Acceptance
– Extreme to fully pronounced limitations the increased venous backflow from in mobility/walking with structural and/ the lower extremities. or functional damages of the lower ex- ☞ Please ask your doctor, therapist or tremities (u.o. amputation, after-effects specialist dealer to these and possi- of injuries, musculoskeletal/neuromus- ble other risks in combination with culoskeletally caused motion limita-... -
Page 8: Use
– Never expose the multifunction and bearing wheelchair to extreme temper- Do not reach into the spokes or grip the atures and damaging environmental tyres of the rotating wheels. – Danger of conditions, such as sunlight, extreme injury! cold or salty water. Do not reach into the space between the –... -
Page 9: Adjustment
COMBINATION WITH MAN- If necessary remove the drive wheels. UFACTURER FOREIGN To unfold the multifunction and bearing PRODUCTS wheelchair proceed in reverse order. Ensure the correct fit of all parts. Any combination of your multifunction and bearing wheelchair with components ADJUSTMENT not supplied by us generally results in an amendment to your multifunction and... -
Page 10: Reinstallment
REINSTALLMENT The multifunction and bearing wheelchair is suited for reinstallment. With the building block system the multifunction and bearing wheelchair can be fit to accommodate dif- ferent handicaps body sizes. Before reimple- mentation the multifunction and bearing wheelchair is to undergo a complete clean- ing and inspection. -
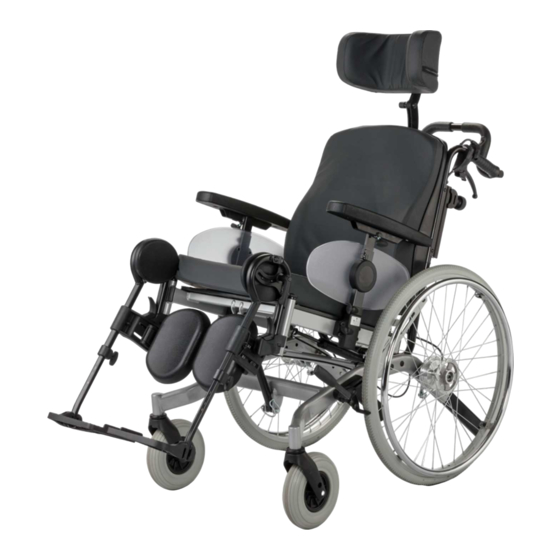
Page 11: Overview
OVERVIEW The overview shows, representative for all models, the most important components of the multifunction and bearing wheelchair. Pos. Description (8) Footplate (1) Push handle (9) Steering wheel (2) Pushing bar (10) Type plate (3) Head support (11) Brake lever – pressure brake (4) Back support (12) Locking knob –... -
Page 12: Brake
BRAKE Arrange an immediate repair of the brakes by your specialist workshop if the braking performance reduces. Multifunction and bearing wheelchairs with PU-tyres when stored for longer pe- riods of time, should be put away safely without activated pressure brakes, since otherwise permanent deformations to the tyre surface could occur. -
Page 13: Drum Brake For Accompanying Persons
Drum brake for accompanying persons The drum brake is activated by the accom- panying person through the brake levers (1). Check the locking points! Function as operating brakes Use both brake levers evenly and only light- ly in order to achieve a controlled decel- eration of the multifunction and bearing wheelchair. -
Page 14: Leg Supports
LEG SUPPORTS Before any actions on the leg supports the multifunction and bearing wheelchair is to be secured against unintentional roll- ing motions. ☞ Therefore observe chapter Brake on page 12. Lower leg support For entry into, exiting or "scuttling" (forward motion of the multifunction and bearing wheelchair with the feet) the footplates (1) are to be folded up and the calf pads (2) -
Page 15: Leg Support Upper Part
LEG SUPPORT UPPER PART The upper leg support with an inserted lower leg support is termed leg support [1]. Turning the leg supports to the side Leg supports turned to the side are re- leased automatically and can easily come off. -
Page 16: Swivelling In The Leg Supports
Swivelling in the leg supports For inward swivelling, let the leg supports swivel forward until the lock audibly engag- es [1]. ☞ After audibly swivelling the leg sup- ports inward check the respective lock- ing device. ☞ Afterwards observe the chapter Lower leg support on page 14. -
Page 17: Mechanically Height-Adjustable Leg Supports
Mechanically height-adjustable leg supports Never put the free hand into the adjust- ment mechanism. Have the leg support secured by an accompanying person against unintentionally falling down. Do not let the leg support drop on its own weight. – Danger of injury! Lifting/lowering the leg support Before lifting/lowering relieve the leg sup- port by an accompanying person by slightly... -
Page 18: Adjusting The Height Of The Footplate
Adjusting the height of the footplate Loosen the clamping screw (1) to adjust the height. ☞ Loosen the clamping screw (1) so far that no damage to the coating occurs during the adjustment. ☞ Observe the maximum extension mark (2). Telescope the footplate to the desired height and then retighten the clamping screw (1). -
Page 19: Arm Supports
ARM SUPPORTS Do not use the arm supports [1] to lift or carry the multifunction and bearing wheelchair. Do not drive without the arm supports. No not grab between the frame and arm support. – Danger of squashing! When the multifunction and bearing wheelchair is being pushed by an accom- panying person the user is to place his hands onto the arm cushions or in his lap... -
Page 20: Adjustment Of The Armrest Height
Adjustment of the armrest height For height adjustment of the arm support secure the support pad with one hand to prevent it from falling down. The maximum arm support height has been reached when the marking on the square tube is visible. First loosen the clamping screw (1) of the height stopper before adjusting the height of the arm support. -
Page 21: Back Support With Angle Adjustment
BACK SUPPORT WITH AN- GLE ADJUSTMENT A back support with a gas-pressure spring may only be reclined to the rear when the multifunction and bearing wheelchair is parked on an even and firm surface. Before any actions on the back support adjustment the multifunction and bear- ing wheelchair is to be secured against unintentional rolling motions. -
Page 22: Folding Down The Back Support
Folding down the back support Fold open the safety latch (2) first for folding over the back support [1], then remove the pin (3). ☞ All the while hold the back support in position with one hand on the push bar or handle in order to prevent it from tilt- ing over to the back. -
Page 23: Back Support Upholstery
Back support upholstery The back support upholstery is attached to the back shell with velcro straps [1] and can be pulled off for cleaning or maintenance [2]. ☞ The cover can be removed with the zip- per for washing. ☞ Therefore observe the label with the washing instruction (3). -
Page 24: Head Support
HEAD SUPPORT A head support attached to the multi- function and bearing wheelchair serves to support the position of the head, not as a transport safety. The upper edge of the adjustable head support [1] should always be close to the back of the head at about eye level. -
Page 25: Seat Inclination
SEAT INCLINATION Before any actions on the seat unit the multifunction and bearing wheelchair is to be secured against unintentional roll- ing motions. ☞ Therefore observe chapter Brake on page 12. The seat unit is continuously tiltable through the gas pressure spring [1]. ☞... -
Page 26: Rising Aid
RISING AID Before using the rising aid, secure the multifunction and bearing wheelchair and fold up the footplates. ☞ Therefore observe chapter Brake on page 12. The seat is angled forward for the stand-up aid [1] (negative seat inclination). ☞ The negative seat angle setting serves as support for getting up when the multifunction and bearing wheelchair is standing. -
Page 27: Wheels
WHEELS Tyres are made of a rubber mixture and can leave permanent or difficult-to-re- move marks on some surfaces (e.g. plas- tic, wooden or parquet flooring, carpets, mats). Drive wheels Do not use the multifunction and bear- ing wheelchair without mounted drive Tyre damage on pneumatic tyres wheels. -
Page 28: Handrim
Handrim Take care that you do not squash your hands when driving narrow routes, e.g. building entrances, doorways, etc.. – Dan- ger of injury to the hands! Replace damaged handrims immediately in order to prevent your hands being in- jured by such handrims and in order to always have full control of your multifunc- tion and bearing wheelchair. -
Page 29: Retaining Strap
RETAINING STRAP Make sure that no objects are trapped be- tween belt and the body! The retaining strap is not part of the re- taining system for the multifunction and bearing wheelchair and/or the driver dur- ing transport in motor vehicles. The retaining strap [1] is screwed onto the respective lateral back brace with latches. -
Page 30: Folding/Unfolding
FOLDING/UNFOLDING The multifunction and bearing wheel- chair is to be secured before folding/un- folding. ☞ Therefore observe chapter Brake on page 12. Folding the wheelchair Proceed as follows to fold the multifunction and bearing wheelchair [2]: In necessary remove the seat cushion. 2. -
Page 31: Basic Safety Information
When driving on slopes the height adjust- that can be found on our website: < www. able leg supports are to be brought into meyra.com >. the initial position. When driving on slopes, the seatsur face Do not insert fingers into open frame... -
Page 32: Accompanying Person
ACCOMPANYING PERSON ☞ This low gradient value is valid for per- sons that are not able to effect even The accompanying person must be made the smallest centre of gravity change aware of all possible danger situation before by changing the position of their upper the start of his/her supportive involvement. -
Page 33: Crossing Obstacles
an accompanying person must compen- obstacles sufficient for reaction, braking and sate for this drift by a counter-steering. turning. If possible, let one or more helpers lift you Crossing obstacles out of the multifunction and bearing wheel- chair and carry you to the destination point. After having overcome stairs, support cas- tors that were previously removed need The crossing of stairs is only possible with... -
Page 34: Transport In Vehicles
Meaning of the la- bels on the wheelchair on page 44. ☞ Observe the guideline < Safety with Meyra-wheelchairs, also during transport in motor vehicles >! – This document and further information are available in the < Information center > on our web-... -
Page 35: Driving On Public Highways
☞ In case of physical handicaps, such as Further information to cleaning can be blindness the use of the multifunction found in the < Infozentrum > on our website: and bearing wheelchair is only permit- < www.meyra.com >. ted with an accompanying person. -
Page 36: Finish
REPAIRS Finish The high quality finish ensures an optimum Repairs are generally to be carried out by of protection against corrosion. a specialist dealer. ☞ Should the coating be damaged with Repairs scratches or similar, these areas can be touched up with our paint pen availa- Trustingly contact your specialist dealer for ble at the specialist dealer. -
Page 37: Information For Extended Pauses Of Use
Information for extended pauses nance is to be carried out with the in- dicated care. of use No special measures are required during ex- tended pauses of use. Nevertheless storage temperatures are to be observed. ☞ For this observe chapter Technical data on page 40. -
Page 38: Maintenance Schedule
Maintenance schedule WHEN WHAT REMARK Before starting out General Carry out test yourself or with a helper. Test for faultless operation. Before starting out Test brakes for fault- Carry out test yourself or less operation with a helper. The locked wheels should Activate brake lever to the not be able to turn un- limit. - Page 39 WHEN WHAT REMARK Before starting out Check the back tubes Carry out the test yourself and frame tubes for or by a helper. damages If deformations or cracks occur in the welding seams, contact a specialist workshop immediately for repairs. – Danger of acci- dent! Especially before driving in Check the lighting...
-
Page 40: Technical Data
TECHNICAL DATA Tyre pressure of pneumatic tyres Maximum tyre pressure is printed on the All data given in the < Technical data > refers tyres on each side. to the standard version. Full tyre pressure – steering wheel The overall length depends on the position and size of the drive wheels. -
Page 41: Data According To Iso For Model 9.072 Solero Light
Data according to ISO for model 9.072 Solero light min. max. Overall length with leg support 1180 mm 1740 mm Overall width 620mm 690 mm Overall dimensions – kg 198 kg User weight (incl. additional load) (SW 43/46) – kg 130 kg User weight (incl. -
Page 42: Further Technical Data For Model 9.072 Solero Light
Further technical data for model 9.072 Solero light min. max. Length without leg support 910 mm 910 mm Overall height 1040 mm 1130 mm Seat cushion thickness 70 mm 70 mm Length without leg supports, drive wheels 720 mm 1240 mm (Tilting protection removed) Additional load –... -
Page 43: Meaning Of The Symbols On The Washing Instruction
Meaning of the symbols on the washing instruction (the symbols correspond to European standard) Wash as delicates with the indicated maximum temperature in °C. Wash as regular laundry with the indicated maximum temperature in °C. Do not bleach. Not suited for the dryer. Do not iron. -
Page 44: Meaning Of The Labels On The Wheelchair
Meaning of the labels on the wheelchair Attention! Read the operating manuals and other provided documen- tation. Do not lift the wheelchair at the arm supports or leg sup- ports. Removable parts are not suitable for carrying. Attention Readjust the brakes. Lever for seat angle / tilt. -
Page 45: Meaning Of The Symbols On The Type Plate
Meaning of the symbols on the type plate Manufacturer Order number Serial number Production date Permitted user weight max. permissible total weight Permitted axle weights Max. permissible rising gradient Max. permissible falling gradient Permitted maximum speed The product is approved as a seat within a motor vehicle. Max. -
Page 46: Inspection Certificate
INSPECTION CERTIFICATE Recommended safety inspection 1st year (at least every 12 months) Care wheelchair data: Stamp of specialist dealer: Model: Signature: Delivery note no.: Place, date: Serial-no.(SN): Next safety inspection in 12 months Date: Recommended safety inspection 3rd year Recommended safety inspection 2nd year (at least every 12 months) (at least every 12 months) Stamp of specialist dealer:... -
Page 47: Warranty / Guarantee
< Infozentrum > sector < PMS > on our description, delivery note number with de- website < www.meyra.com >. livery date and serial number (SN). We reserve the right to make technical im- The serial number (SN) can be read off of provements. -
Page 48: Warrantee / Guarantee Section
Warrantee / Guarantee section Please fill out! Copy if necessary and send the copy to the specialist dealer. Warranty / Guarantee Model designation: Delivery note no.: SN (view type plate): Date of delivery: Stamp of the specialist dealer: Inspection certificate for transfer Vehicle data: Serial-no.(SN): Stamp of specialist dealer:... -
Page 49: Notes
NOTES... - Page 50 NOTES...
- Page 51 NOTES...
- Page 52 Your specialist dealer MEYRA GmbH Meyra-Ring 2 32689 Kalletal Kalldorf GERMANY +49 5733 922 - 311 +49 5733 922 - 9311 info@meyra.de www.meyra.de 205 338 401 (Status: 2020-12) All technical modifications reserved.
Need help?
Do you have a question about the ORTOPEDIA Solero Light 9.072 and is the answer not in the manual?
Questions and answers