
Related Manuals for Meyra 2.432


Summary of Contents for Meyra 2.432
- Page 1 WHEELCHAIRS AND REHABILITATION EQUIPMENT ELECTRONIC WHEELCHAIR POWER PRIMUS II Model 2.432 OPERATING MANUAL...
-
Page 2: Table Of Contents
TABLE OF CONTENTS Introduction Acceptance Assembly Specifications / Utilization General overview Safety instructions Driving behavior Brakes Preparing the wheelchair for operation Pre-operation checks Control box Legrests Side parts Backrest Seat belt Push mode Folding/unfolding Dismantling for transportation Safety belt Lighting code 932 Loading and transportation of the wheelchair Service Maintenance... -
Page 3: Introduction
INTRODUCTION ACCEPTANCE ASSEMBLY The "POWER PRIMUS II" Electronic All MEYRA wheelchairs are tested in our Our specialist workshop supplies your Wheelchair, Model 2.432, is ideal for factory for fault-free operation, and are wheelchair ready for use and adjusted persons who require maximum mobility packed in special boxes. -
Page 4: General Overview
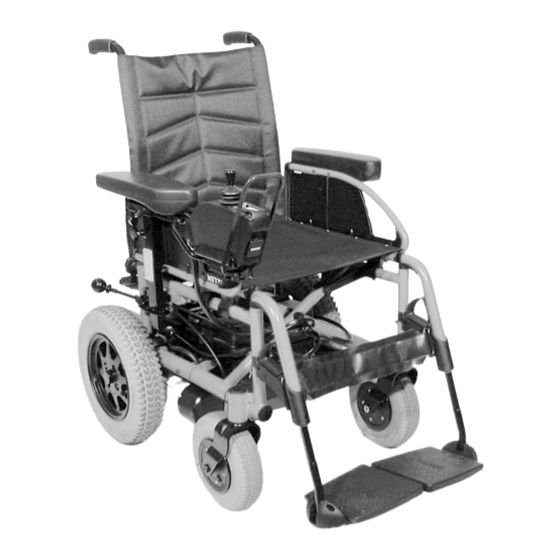
GENERAL OVERVIEW SAFETY INSTRUCTIONS • When negotiating narrow spaces POWER PRIMUS II, Model 2.432 Please also refer to S_01 - S_12 in the e.g. building entrances, doors etc., illustration section. The model shown in Fig. 1 is the stan- take care not to trap the lower arms. - Page 5 • Select a low final speed in driving • To ensure safe lateral support, espe- • When working on the battery, remo- situations which you do not feel com- cially when negotiating corners, ne- ve the main safety fuse and ensure fortable with (e.g.
-
Page 6: Driving Behavior
The shortest braking distance for the important for a safe journey! Drive with extreme caution during "POWER PRIMUS II" Model 2.432 is these first trips. approx. 1m for the 6 km/h – versi- See the section entitled "Pre-Operati-... -
Page 7: Brakes
Pull the knob on the brake release lever failure. and pull the brake release lever back The POWER PRIMUS II, Model 2.432 as far as it will go (Fig. 4). is not fitted with an additional drum bra- Note! ke for parking. -
Page 8: Preparing The Wheelchair For Operation
PREPARING THE P R E - O P E R A T I O N WHEELCHAIR FOR CHECKS OPERATION PRE-SELECTION OF FINAL SPEED 5. Switch on control box Follow the instructions below in the The pre-selectable maximum final Press the I/O button (17) on the stated order. -
Page 9: Control Box
P R E - O P E R A T I O N CONTROL BOX CHECKS JOYSTICK This can be highlighted by two ex- Turning to the left and right You determine the speed and direction amples: of travel while in motion by activating Move the lever to the left the joystick (16), (Fig. -
Page 10: Legrests
CONTROL BOX LEGRESTS Battery display Turning the legrests to the side Attention: • 1-10 LEDs (permanently illumina- The legrests are adjustable and de- Benefits: ted), – operational, batteries fully tachable parts and are not suitable as a – Easy transfer into and out of the charged. - Page 11 LEGRESTS Taking off the legrests Adjusting the length of the legrests Height adjustable legrests The legrests can be adjusted via a tele- Code 91 (Fig.16) Benefits: scopic tube. – Easy transfer into and out of the Benefits: Benefits: wheelchair. – Adjustment to accommodate stiff –...
-
Page 12: Side Parts
LEGRESTS ARMRESTS Continuous legrests The armrests (3) generally have padded Adjustment of seat width armrests. They are lockable and de- Code 54 (Fig.18+19) – Switch off the wheelchair and move tachable, as well as adjustable in the brake release lever to the "drive" The continuous legrests can be folded up height, (Fig. -
Page 13: Backrest
ARMRESTS BACKREST ADJUSTABLE BACKREST CODE 632/ Benefits: Removing the back – Simple adjustment to suit your perso- – Loosen the screws via hand wheel The tensioning of the backrest is adjusta- nal requirements (A, Fig. 26) ble (Fig. 20). – Reduces muscle tension in the shoul- –... -
Page 14: Seat Belt
SEAT BELT PUSH MODE FOLDING/UNFOLDING The seat (4) can be folded up to enable The POWER PRIMUS II can also be swit- POWER PRIMUS II is also collapsible for better access to the battery holder (fol- ched to push mode. car transportation (Fig. -
Page 15: Dismantling For Transportation
FOLDING/UNFOLDING DISMANTLING TRANSPORTATION Lifting out the battery holder: UNFOLDING THE WHEELCHAIR The wheelchair can be dismantled into 7) Release the battery holder locking – Tilt wheelchair to the side towards several light components for simple mechanism (A, Fig. 45). – To carry you. -
Page 16: Safety Belt
SAFETY BELT LIGHTING CODE 932 Opening the safety belt Code 833 Function – Unfasten the safety belt by pressing The purpose of the safety belt is to strap The following functions can be selected the red release key on the latch me- in the wheelchair user. -
Page 17: Loading And Transportation Of The Wheelchair
• Only use ramps and lifting equipment refer to the section entitled "Folding/ which is approved by MEYRA. Unfolding". Suitable fixing points can usually be found in the car and in the vehicle ope- USING LOOSE RAMPS rating manual. -
Page 18: Service
Spots can any assistance, please contact your local Attention: be removed with a sponge or a soft MEYRA specialized dealer, who has The 100% charging of maintenance- brush. been trained in our factory in accordan- free batteries is only possible for phy-... - Page 19 BATTERIES Charging via the battery charger: Batteries should be replaced by Replacing the batteries: your specialist workshop only be- – Insert the battery charger plug (A, 1 Switch off the wheelchair and move cause it is aware of the associated Fig.
-
Page 20: Lighting Code 932
SERVICE LIGHTING CODE 932 Front indicator Back light Ball lamp: Filament bulb: Before replacing a faulty bulb, turn off 24V/10W BA15s Festoon bulb 24 V/C5W S8.5 the light and pull out connector plug Tools: Phillips screw driver Tools: Phillips screw driver (B, Fig. -
Page 21: Maintenance Instructions
Do it yourself or with the aid of a hel- – Secure screw connections. Do it yourself or with the aid of a hel- – Fixing elements on the chassis. MEYRA recommendation: Safety inspection To be carried out by the specialist Every 2 years dealer. -
Page 22: Fuses
SERVICE FUSES FAULT CLEARANCE Lighting fuse The supplementary box contains the fol- Replacing a defective safety fuse If treated properly, your wheelchair will lowing fuse (E, Fig. 60): not malfunction. To ensure that your Main safety fuse for the battery cir- –... -
Page 23: Technical Specifications
TECHNICAL DATA All information contained in the table Kilometric performance pertain to the standard model. Dimen- Hill climbing ability Kilometric performance depends to a sional tolerance is ± 1.5 cm. We have released this vehicle for ope- large extent on the following factors: ration on hills, transverse slopes and –... - Page 24 TECHNICAL DATA Table 1 , I I i l i – – – " l l i i l i – –...
-
Page 25: Inspection Certificate
INSPECTION CERTIFICATE Vehicle details: Model Delivery note no.: Vehicle identification No. Recommended safety inspection Pre-delivery inspection (at least every 12 months) Retailer stamp: Retailer stamp: Signature Signature Place, date Place, date Next safety inspection in 12 months Next safety inspection in 12 months Date Date Recommended safety inspection... - Page 26 Recommended safety inspection Recommended safety inspection (at least every 12 months) (at least every 12 months) Retailer stamp: Retailer stamp: Signature Signature Place, date Place, date Next safety inspection in 12 months Next safety inspection in 12 months Date Date Recommended safety inspection Recommended safety inspection (at least every 12 months)
-
Page 27: Guarantee
– 6 months for the battery Damage to the surface, tyres, damage of MEYRA will lead to general loss of – 2 years for the electronics and drive due to screws and washers which have guarantee and product liability. - Page 28 Retailer stamp WHEELCHAIRS AND REHABILITATION EQUIPMENT MEYRA Wilhelm Meyer GmbH & Co. KG • Company address: Meyra-Ring 2 D-32689 Kalletal-Kalldorf Telephone +49 (0) 5733 922-0 Telefax: +49 (0) 5733 922-143 e-mail: info@meyra.de Internet: http://www.meyra.de Postal address: P.O. Box 1703 D-32591 Vlotho...
-
Page 29: Illustration Section Of The Operating Manual
ROLLSTÜHLE UND REHABILITATIONSMITTEL ELEKTRO-ROLLSTUHL Bildteil zur Betriebsanleitung Illustration Section of the Operating Manual Illustration du mode d`emploi Illustrazioni relative alle istruzioni d’uso Fotos para las instrucciones de funcionamiento Afbeelding voor Gebruiksaanwijzing... - Page 31 POWER PRIMUS II, MODELL 2.432 Abb.1 Abb.2...
- Page 32 S_02 S_03 S_01 S_04 S_05 S_06 S_07 S_08 S_09 S_10 S_11 S_12...
- Page 33 Abb.3 Abb.4 Abb.5 Abb.6 Abb.7 Abb.8 Abb.9 Abb.10 Abb.11 Abb.12 Abb.13 Abb.14...
- Page 34 Abb.15 Abb.16 Abb.17 Abb.18 Abb.19 Abb.20 Abb.21 Abb.22 Abb.23 Abb.24 Abb.25 Abb.26...
- Page 35 Abb.29 Abb.27 Abb.28 Abb.32 Abb.30 Abb.31 Abb.35 Abb.33 Abb.34 Abb.38 Abb.36 Abb.37...
- Page 36 Abb.39 Abb.40 Abb.41 Abb.42 Abb.43 Abb.44 Abb.45 Abb.46 Abb.47 Abb.48 Abb.49 Abb.50...
- Page 37 Abb.51 Abb.52 Abb.53 Abb.54 Abb.55 Abb.56 Abb.57 Abb.58 Abb.59 Abb.60...
- Page 38 Abb.62 Abb.63 Abb.61 Abb.64 Abb.65 Abb.66 Abb.67 Abb.68 ROLLSTÜHLE UND REHABILITATIONSMITTEL MEYRA Wilhelm Meyer GmbH & Co. KG • Firmensitz: Meyra-Ring 2 D-32689 Kalletal-Kalldorf Telefon (05733) 922-0 Telefax: (05733) 922143 Email: info@meyra.de Internet: http://www.meyra.de Postanschrift: Postfach 1703 D-32591 Vlotho •...
Need help?
Do you have a question about the 2.432 and is the answer not in the manual?
Questions and answers