Table of Contents
Advertisement
Quick Links
LPL601XLDBZRC/LPL601XLGRC/LPL601XLBRC Owner's Manual
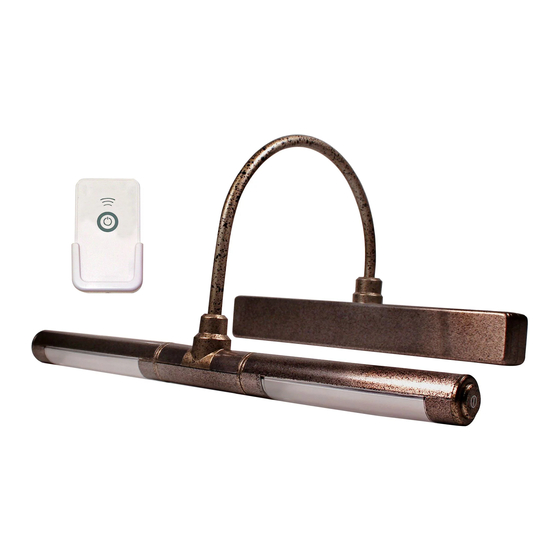
Location of Controls
1. 8 Super Bright LEDs
2. ON/OFF Switch with Selectable Dimmer
3. Folding Neck
4. Dual Adjustable Light Heads
5. Remote Control Signal Receiver
6. EZ-Mount Bracket
7. Built-In Bubble Level
8. Battery Compartment*
9. Remote Control
10. Remote Control Signal Transmitter
11. Battery Compartment*
12. ON/OFF Switch with Selectable Dimmer
13. EZ-Mount Bracket
*behind EZ-Mount Bracket
Getting Started: Remove plastic insulator tab from battery compartment.
EZ-Mount Bracket
1. First remove printed paper mounting template from back of unit.
2. Drill two (2) pilot holes in the location where you want to mount the picture light.
Place screws (included) in pre-drilled holes. Tighten slightly until secure, but do not tighten all the way.
Slide EZ-Mount Bracket keyhole slots over screw heads and into position.
3. Use the built-in bubble level to make sure the mounting bracket is level before securing it to the wall.
4. Once you confirm that the bracket is level, tighten the screws to secure it to the wall.
Take care to not over tighten.
5. To hang the picture light on the mounting bracket, align the picture light with the mounting bracket and slide
the unit down. Light will lock into position.
6. To remove the picture light from the mounting bracket;
A) Hold the picture light by the base (not light head).
B) Slide the unit up.
C) Once the body releases from mounting bracket, pull the unit towards you.
Mounting the Remote Control Hook and Loop Tape (included):
1. Check the location of where you want to place the Remote. Make sure it is clean and that there is no debris or dust.
2. The two sides of the hoop and loop tape come pre-attached for ease of mounting. Remove the paper covering on one
sticky side of the tape.
NOTE: Hook and loop tape may be cut to desired size for easier removal.
3. Place the tape in the recessed area in the center on the back of the Mounting Bracket.
4. Remove the paper covering on the other sticky side of the tape.
5. Place the Mounting Bracket in the desired location. Press firmly and hold for five (5) seconds so that the tape adheres to
the surface.
CAUTION: Be cautious of what surface the hook and loop adhesive is attached to, as it may remove paint or damage surface.
Screws (included):
You can secure the EZ-Mount Bracket to almost any surface using 2 screws. To do so, remove the Remote from the bracket by sliding it up and out of the bracket. Use the
printed paper mounting template for pilot hole positions.
1. Drill two (2) pilot holes in the location where you want to mount the Remote Control
making sure you are within 16 feet (5 meters) of the LED lighting system.
2. Place screws (included) in pre-drilled holes. Tighten slightly until secure, but do not tighten all the way. Slide the EZ-Mount Bracket keyhole slots over screw heads and
into position.
3. Tighten screws to secure the bracket to the wall. Take care to not over tighten.
4. Place the Remote Control in the mounting bracket.
Operating Directions
Light Positioning
Your wireless LED picture light ships flat. To extend light head into proper position hold base in one hand and hold
light head at center with other hand (where neck attaches to light head). Rotate base backward until base and light
head are at farthest point from each other. Pivot each light head independently to desired angle.
NOTE: Each light head can only be turned 180° up or down
(Fig 1). To prevent damage to the unit, do NOT overturn the light heads. Doing so may damage the unit and will void the warranty.
YOU CAN OPERATE AND CONTROL THE WIRELESS PICTURE LIGHT TWO WAYS:
Manual Operation Using ON/OFF Switch On Light
1. Press once for full brightness.
2. Press and hold until the LEDs reach the desired brightness then release the button.
3. Press a third time to turn the light OFF.
REMOTE CONTROLLED
WIRELESS LED PICTURE LIGHT
5
4
3
2
1
UNIT BACK
10
11
13
Unit Back
6
7
Mounting Bracket
Built-In
Bubble Level
Keyhole Slots
UNIT
Mounting Bracket
Unit Slides Down
Onto Mounting Bracket
Screw
Picture Frame
9
12
8
MOUNTING
SURFACE
Fig 1
Advertisement
Table of Contents

Related Manuals for Ritelite LPL601XLDBZRC


Summary of Contents for Ritelite LPL601XLDBZRC
- Page 1 REMOTE CONTROLLED WIRELESS LED PICTURE LIGHT LPL601XLDBZRC/LPL601XLGRC/LPL601XLBRC Owner’s Manual Location of Controls 1. 8 Super Bright LEDs 2. ON/OFF Switch with Selectable Dimmer 3. Folding Neck 4. Dual Adjustable Light Heads 5. Remote Control Signal Receiver 6. EZ-Mount Bracket 7. Built-In Bubble Level 8.
- Page 2 Remote Operation Using Wireless Remote Control Where you mount the remote control in relation to the picture light will determine how is best to control the light using the remote control. The remote uses Infra Red technology. This is the same type of technology used in most TV remote controls. As such, physically removing the remote from its mounting bracket and pointing it at the picture light may be necessary.
Need help?
Do you have a question about the LPL601XLDBZRC and is the answer not in the manual?
Questions and answers