Advertisement
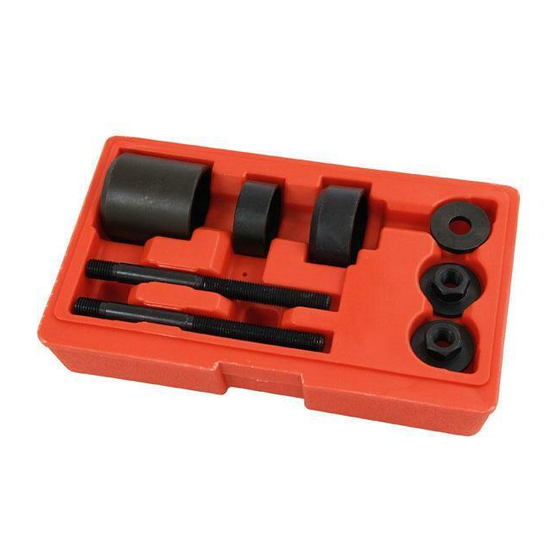
REAR SUSPENSION BUSH REMOVAL TOOL
- OPEL VAUXHALL
CT2909
INSTRUCTION MANUAL
GENERAL
For removing and replacing rear and
upper and lower bushes (rose bushes)
on trailing arm suspensions and 2 rear
anti roll bar bushes.
Specifically designed for the rear axle
mounting bushes, it eliminates any
need to remove the rear axle assembly
making it a must have tool for this job.
Allows bushes to be fitted quickly and
easily without damage.
Suitable for Vauxhall vectras
1.6 / 1.8 / 2.0 models (95>) and
2.5 models (96>).
SAFETY INSTRUCTIONS
1. WARNING! Ensure Health & Safety, local authority, and general workshop
practice regulations are adhered to when using this tool.
2. WARNING! Familiarise yourself with the specific applications and limitations
of this tool, as well as any potential hazards.
3. This tool should be used in conjunction with inspection maintenance
Advertisement
Table of Contents

Related Manuals for Neilsen OPEL VAUXHALL CT2909


Summary of Contents for Neilsen OPEL VAUXHALL CT2909
- Page 1 REAR SUSPENSION BUSH REMOVAL TOOL - OPEL VAUXHALL CT2909 INSTRUCTION MANUAL GENERAL For removing and replacing rear and upper and lower bushes (rose bushes) on trailing arm suspensions and 2 rear anti roll bar bushes. Specifically designed for the rear axle mounting bushes, it eliminates any need to remove the rear axle assembly making it a must have tool for this job.
- Page 2 procedures recommended in the vehicle manufacturer’s manual. 4. Ensure that this tool is the correct tool for the task. 5. Ensure that the vehicle is properly supported with axle stands before working under the vehicle. 6. Ensure that there is adequate lighting prior to using this tool. 7.
- Page 3 1. Screw the nut with washer attached (D) onto the short threaded portion of threaded rod (G). Slide the pushing cup (C) onto the threaded rod in the orientation shown above in fig.1. 2. Push the threaded rod through the centre of the bush to be removed until the pushing cup bears against the bush.
- Page 4 other side. 3. Slide the new bush onto the threaded rod and align it with the hole in the arm. Place the pushing cup (C) up against the bush and slide on the washer (E). Retain the whole assembly by screwing on the nut with washer (F). Before commencing insertion ensure that the assembly is aligned with the hole in the suspension arm as shown in fig.3.
Need help?
Do you have a question about the OPEL VAUXHALL CT2909 and is the answer not in the manual?
Questions and answers