Table of Contents
Advertisement
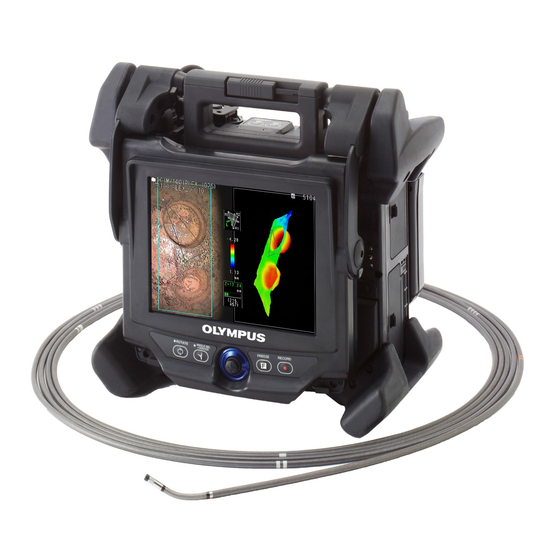
IPLEX NX Operation Manual
Before handling this product, please read through and follow the instructions and precautions in
the instruction manual of the IPLEX NX.
This operation manual is an excerpt from the descriptions and instructions in the instruction
manual of the IPLEX NX, which include the setup procedures during the use of the product, the
functions of the basic operating components, descriptions on the indicator and menu displays,
and safety precautions.
The symbols used in the texts of this manual have following meanings:
[ ] indicates the words on the user interface of the product displayed in English.
< > indicates the words on the user interface of the product and the language displayed is selectable by user settings.
Intended use
This instrument is intended for inspecting and observing the interior of machinery, equipment, materials,
and other objects,without damaging the object being inspected.
Setting up the IPLEX NX
This product can be set up easily for inspection to be performed immediately.
Simply follow the six steps below to complete the setup.
1. Remove components from the carrying case
Hold the handle of the NX main unit to take out from the carrying case.
Handle of the NX main unit
MM2693 05
Industrial Endoscope
1
Advertisement
Table of Contents

Related Manuals for Olympus IPLEX NX


Summary of Contents for Olympus IPLEX NX
- Page 1 This operation manual is an excerpt from the descriptions and instructions in the instruction manual of the IPLEX NX, which include the setup procedures during the use of the product, the functions of the basic operating components, descriptions on the indicator and menu displays, and safety precautions.
-
Page 2: Preparing The Power Supply
2. Preparing the power supply • Using battery: Check to ensure that the battery is charged, followed by setting it to the main unit. 1 Open the battery cover. 2 Noting the orientation of the battery, insert it. 3 Make sure that the battery is locked and close the cover. Confirm that the battery cover is locked completely. - Page 3 Rotate the nut of the optical adapter clockwise to attach the con- necting screw thread to the second screw thread. Tighten the nut until it stops completely. NOTE • When using the stereo optical adapter, refer to the IPLEX NX instruction manual.
-
Page 4: Using The Strap
6. Turning on power To turn ON the power, press the [POWER] button ( ) [LIGHT] indicator [POWER] indicator of the main unit approx. one second. After pressing the [POWER] button approx. one sec- ond, the [POWER] indicator lights up and the power turns on. - Page 5 If you are using the image recording media (SDHC card or USB flash drive) for the fiirst time, format it with the base unit before you start recording. For more details on the procedure, please refer to the instruction manual of the IPLEX NX. Record still images 1.
-
Page 6: Menu Screen Display
• Touch in the upper right corner of the LCD monitor to show button and touch to hide button. Menu screen display Tap the icon on the screen. Tap the [MENU] button. (This displays the main menu.) - Page 7 Using the live screen/freeze screens Main menu Sub menu Available settings <TITLE> – Inputs a title. Puts a title on the live screen and recorded images. Up to 30 characters can be inputted. <WHITE BALANCE> – Adjusts the white balance (Live screen only). When replacing parts like the optical adapter, adjust the white balance by capturing an image of a white object such as a piece of paper, from a distance of 50 to 60 mm.
- Page 8 Main menu Sub menu Available settings <SYSTEM SETUP> <VERSION> Displays the software version. <FINE MODE SPEED> Specifies the angulation speed for the angulation lock. The angulation speed can be selected from <SLOW>, <STANDARD> and <FAST> (3 levels). <WIRELESS> Specifies the wireless communication. <NETWORK>...
- Page 9 Inputting a title Input text from the on-screen keyboard Select the input mode. Select the text buttons you want. Select <EXECUTE>. Selecting a preset title for input Select <PRESET>. Select the strings you want to input as titles from the preset title list. Select <EXECUTE>.
-
Page 10: General Safety Precautions
If you use them in combination that is not specified by Olympus, the unexpected accidents that may deteriorate the performance may result. • Use only the power cord and the AC adapter specified by Olympus and connect the power cord to the 3P power outlet within the rated range. - Page 11 Otherwise, the LCD monitor may be cracked or scratched, or the damaged monitor may cause personal injury. • When tilting the handle, be careful not to pinch your hands or any objects. • Use SDHC card and microSDHC card recommended by Olympus to record images. This instrument comes with an SDHC card.
- Page 12 CAUTION • Do not remove the battery or the AC adapter during operation. Otherwise, the recorded data may be damaged. • Do not remove the SDHC card or the USB flash drive while recording or replaying the image. Otherwise, the recorded data or the image recording media may be damaged or lost. •...
- Page 13 Your eyes may be poked by the ends of the hook assembly. • Do not insert any tool that is not specified by Olympus into the channel. The tool may not be pulled out or the loose parts of the tool may fall off.
-
Page 14: Battery Precautions
Battery precautions Should you experience any problems when using the instrument with batteries, contact Olympus. Observe the precautions described below when handling the battery. Otherwise, battery fluid leakage, exces- sive heat generation, smoke, battery burst, electric shock and/or burns may result. - Page 15 • If you are experiencing problems in removing the battery from the instrument, do not attempt to remove it forcibly. Contact Olympus. • Contact the airlines in advance if you plan to transport the battery by aircraft. • When replacing the battery, do not repeat inserting or removing it rapidly.
- Page 16 Illumination light precautions This product is equipped with high intensity illumination in order to obtain sufficient brightness for observ- ing the inspection object. When the illumination of this product is turned ON, the intense light comes out from the distal end of the insertion tube of the scope unit. Comply strictly with the precautions described below when using this product.
Need help?
Do you have a question about the IPLEX NX and is the answer not in the manual?
Questions and answers
How do I enter the insertion tube information (distance) on the Endoscope display.