Blackmagicdesign Cintel Installation And Operation Manual
Hide thumbs
Also See for Cintel:
- Installation and operation manual (1730 pages) ,
- Installation and operation manual (1074 pages) ,
- Installation and operation manual (81 pages)
Table of Contents
Advertisement
Quick Links
Advertisement
Table of Contents

Related Manuals for Blackmagicdesign Cintel


Summary of Contents for Blackmagicdesign Cintel
- Page 1 March 2021 Installation and Operation Manual Cintel Scanner Cintel Scanner...
- Page 2 Languages To go directly to your preferred language, simply click on the hyperlinks listed in the contents below. English 日本語 Français Deutsch Español 中文 한국어 Русский Italiano Português 1046 Türkçe 1162...
- Page 3 DaVinci Resolve has many more features than is possible to do in hardware. Plus because Cintel takes advantage of the power of the DaVinci Resolve system and the GPU or eGPU of the host computer, this scanner itself does not need to be cluttered with bulky expensive electronics assemblies.
-
Page 4: Table Of Contents
Standby Mode Quick Export Capturing from Cintel The Deliver Page using DaVinci Resolve Automatic Dirt Removal The Cintel Scanner Interface Main Controls Film Scanning Workflows Fine Controls Adjusting the Color of the Scanner Dead Pixel Fixer Scanning One or More Sections of Film... - Page 5 Patch Type Specifications Patch Options Regulatory Notices Advanced Controls Safety Information Noise Reduction Help Temporal NR Controls How to Get the Latest Updates Temporal Threshold Controls Creating a Status Report Spatial NR Controls USB Recovery Spatial Threshold Controls Warranty Cintel Scanner...
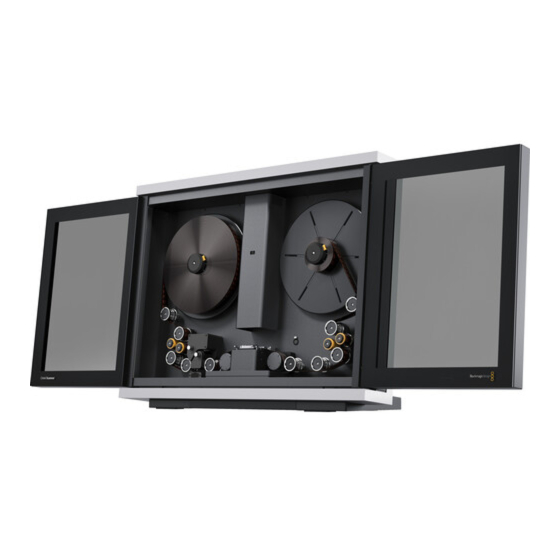
- Page 6 1. Core clamp 2. Roller 3. Particle transfer roller 4. Optional Audio and KeyKode Reader attached via left options interface 5. Tensioner wheel 6. Skid plate 7. Light source 8. Drive wheel 9. Pin registration expansion port 10. Compliance arm 11.
-
Page 7: Unpacking And Mounting
Please note that Cintel weighs over 130 pounds, or 60kg, and is clearly too heavy to be unpacked by one person. You will need to make sure that all lifting is performed by 2 people using correct lifting techniques, such as bending your knees, keeping a straight back and lifting with careful, controlled movements. -
Page 8: Wall Mounting
Cintel scanner. Wall Mounting Cintel’s elegant industrial design and narrow profile make it ideal for wall mounting. To do this, the first thing you’ll need to do is remove the feet and support strut from the base of your scanner. -
Page 9: Warning For Safely Installing Your Scanner
400mm Warning for Safely Installing your Scanner The Cintel Scanner weighs up to 70kg, or 155 pounds, when loaded with film. This is significantly heavier than a large screen television. If you are unsure of the structural capability of the wall or desk to support the total weight of the scanner and film loaded then you must obtain the advice of a qualified engineer to correctly analyze the mounting to ensure safety. -
Page 10: Getting Started
Now simply run the installer files contained within the setup folder and follow the prompts to install the software on your computer. You can also use the Cintel Scanner SDK to develop your own software to control Cintel Scanner and integrate it with your workflow. For more information, see the ‘Software Development Kit’... -
Page 11: Launching Davinci Resolve
Click ‘save’, and restart DaVinci Resolve. For detailed information on how to use all the control features in DaVinci Resolve’s film scanner panel, refer to the section in this manual called “Capturing from Cintel using DaVinci Resolve”. DaVinci Resolve’s film scanner panel controls all capture settings. -
Page 12: Firmware Updates
Firmware Updates Cintel Scanner and Audio and KeyKode Reader both have internal firmware that may need an update after you install the Cintel Scanner software on your computer. Cintel Scanner After you install the Cintel Scanner software on your computer and connect the Cintel Scanner, it will determine whether your scanner’s firmware needs an update. -
Page 13: Software Development Kit
DaVinci Resolve, but from a command line. You can use the Cintel Scanner SDK to develop software to control your scanner, change settings, initiate scans, and process clips. DaVinci Resolve Studio is included with your scanner, however, you can use the SDK to develop software to run your scanner on computers that may not match recommended specification for DaVinci Resolve. -
Page 14: Drive Wheel Types
The symmetrical arrangement of drive wheels in Cintel Scanner means it can transport film forward or backward with equal care and precision at a wide range of speeds. -
Page 15: Lacing Film
Lacing Film Now that your scanner and DaVinci Resolve are communicating with each other, you can lace up your film. Accessing the Scanner Open your scanner’s sliding doors. On the internal front panel you’ll see a feeding spool on the left, and a taking spool on the right. - Page 16 Loading Film Load your film reel or core onto the feeder spindle following the same procedure in step 3. Note that the procedure differs slightly depending on whether your film is on a core or a reel, and whether it is 35 or 16mm. For example, when loading a core, you’ll need to insert the provided backing plate, whereas loading a reel only requires the use of spacers.
- Page 17 Tensioning Film To secure your film to the taking spool, insert the end of your film into the small notch provided in the spool, then gently hand wind the spool a few times to hold the film in place. If you don’t want to bend the end of the film inside the notch, you can easily use the friction of the film winding onto itself to secure your film to the spool.
- Page 18 Simply turn the focus assist feature on by enabling the checkbox in DaVinci Resolve’s film scanner panel, then watch the HDMI output from your Cintel scanner, or the viewer in the film scanner panel, as you adjust the focus dial. Film grain is a terrific indicator.
-
Page 19: Using Your Scanner
Now that you have laced your film, set the tension, focused your image and closed the scanner doors, you can start capturing! Please refer to the Cintel section of the DaVinci Resolve reference manual for details on calibrating the light source, setting the stabiliser, and the capture palette settings for capturing images. - Page 20 The default wind type for your scanner is a B/A wind, meaning the feeding spool unloads from the bottom and the taking spool loads across the top. If the film you are working with has been wound a different way, other combinations of A and B winds are supported; simply select the appropriate wind type via the ‘feed’...
-
Page 21: Switching To 16Mm
Switching to 16mm The optional Cintel Scanner 16mm gate kit contains all the parts you’ll require and making the changes to your scanner’s setup are minimal. 16mm skid plate Inner spacer Outer spacer The 16mm kit contains a 16mm skid plate, two inner spacers and two outer spacers. -
Page 22: Skid Plate Tension Screws
Inserting the 16mm Inner Spacer Insert the rubber 16mm inner spacer at the base of the feeding and taking spools. The rubber spacer goes on grooved side inwards prior to a backing plate, spool or reel. Additional Spacers (optional) Additional 1mm rubber spacers are included in the 16mm Gate Kit for when mounting a reel. -
Page 23: Playback Controls
Playback Controls The following playback controls are available in DaVinci Resolve and on your scanner. Your scanner has built in controls for loading, unloading, and previewing scans. Load Pressing ‘load’ will tension the film loaded onto your scanner’s feeding and taking spools as described in the section ‘lacing film.’... -
Page 24: Standby Mode
Play Plays the film. The default frame rate is 24 frames per second. You can set the playback frame rate and ‘play reverse’ in DaVinci Resolve’s film scanner panel. Step Forward Advances the film one frame. You can also hold down the ‘step forward’ button to play the film forward at slow speed. -
Page 25: Capturing From Cintel Using Davinci Resolve
If you want more room for viewing the Cintel scanner controls, click the full height button that’s all the way to the right of the UI toolbar, and turn off the ‘metadata’ panel. - Page 26 The transport controls under the viewer, while similar in ‚ appearance to those used while in playback mode, now work to control the Cintel scanner. Additional controls appear for moving forward or backward a frame at a time. In and Out Controls: In Cintel Scanner mode, the In and Out buttons to the right of the ‚...
- Page 27 Focus Assist: Enables luminance peaking on your scanner’s HDMI monitor output, plus ‚ the viewer inside DaVinci Resolve’s film scanner panel, which makes it easy to obtain optimum focus adjustments. Capturing from Cintel using DaVinci Resolve...
- Page 28 Optionally, you can choose to put this control into ‘color bars’ mode using the mode pop-up to the right of the ‘light source’ title bar, which changes this control to three vertical red, green, and blue color channel sliders. Capturing from Cintel using DaVinci Resolve...
- Page 29 If the results are unsatisfactory with both axes enabled, you can turn off the axis that’s causing issues with stabilization. Horizontal Position slider: Your Cintel scanner attempts to automatically place the ‚ stabilization detection overlay at the best location, with reference to the perforation shown on the currently loaded frame, for the best stabilization result.
- Page 30 It’s worth mentioning that this setting will remain set until you change it back to your previous setting. Full resolution is very GPU intensive and may result in some frame lag. For best performance, turn full resolution off after checking stabilization. Capturing from Cintel using DaVinci Resolve...
- Page 31 Film Protection These controls are intended to allow delicate film to be handled gently by the Cintel Scanner. Fast acceleration and shuttle speeds can be hard on archival footage, so it’s recommended to lower both of these sliders from their defaults whenever you’re scanning older film.
- Page 32 ‘browse’ button and choose a location from the file destination dialog. It’s good to do this first, as this step is easy to forget. Capture: When you have a Cintel Audio and KeyKode Reader fitted, this menu gives ‚ you options for ‘audio only’ so no images will be captured, or ‘image and sound’.
-
Page 33: Film Scanning Workflows
Cintel Scanner, open DaVinci Resolve and create the project you’ll be using to scan film, and then click the ‘Cintel scan’ button on the media page. Now click the ‘Film Scanner’ tab to select DaVinci Resolve’s film scanner panel. - Page 34 Simply monitor the Ultra HD output of the scanner while you turn the Cintel scanner’s focus wheel. Your image will be in focus when the grain running throughout the image displays peaking outlines.
- Page 35 CRI clip. Check the Codec DaVinci Resolve selects the ‘Cintel Raw’ codec by default, or you can choose ‘Cintel Raw 3:1’. The Cintel Raw Format The Cintel Raw Format Bayer pattern of each film frame scanned with your Cintel scanner’s sensor is saved with embedded scanner metadata as a 12-bit linear Cintel...
-
Page 36: Adjusting The Color Of The Scanner
This is visually lossless compression and achieves approximately 3:2 reduction in file size depending on image content. However, Cintel Raw 3:1 uses lossy compression with a ratio of approximately 3:1. This is still very high quality but may not always be visually lossless. -
Page 37: Scanning One Or More Sections Of Film
With all of this accomplished, you can scan the film in one of four ways: Capture Now: Use the capture now button to capture long sections of a reel all at ‚ once. Clicking ‘capture now’ begins scanning near the current frame, ending whenever you click ‘stop’. Capturing from Cintel using DaVinci Resolve... - Page 38 NOTE When you click the ‘log clip’ button, Cintel Scanner applies the same project settings to all clips in the batch, and uses the newest project settings at the time of capture.
-
Page 39: Extracting Audio
If the ‘timestamp prefix’ checkbox was deselected in the ‘capture info’ section when your clips were scanned, and you want to have extracted audio automatically embedded in your clips, always remember to extract audio from the clips inside the media pool. Capturing from Cintel using DaVinci Resolve... -
Page 40: Audio Extraction Settings
If this happens, you can bypass the automatic features and make adjustments manually. For manual adjustments, simply open the ‘Audio Extraction’ settings window by clicking on ‘Show Cintel Audio Settings’ in the inspector options near the top right of the viewer. The Audio Extraction settings let you make manual adjustments if needed. - Page 41 When ‘show audio scan area’ setting is turned on, the audio area guides will be visible so you can see exactly what information is being used and monitor the extraction process. Capturing from Cintel using DaVinci Resolve...
- Page 42 If you haven’t used variable density audio before, you can visually identify it as a tight sequence of shaded lines, similar to a bar code with the lines squeezed closer together. By comparison, ‘variable area’ soundtracks appear as an audio waveform. Capturing from Cintel using DaVinci Resolve...
-
Page 43: Color Space And Sizing
Color Space and Sizing A pair of 1D LUTs, ‘Cintel Negative to Linear,’ and ‘Cintel Print to Linear,’ have been provided to help you convert scanned media to a color space in which you can do further work. You can apply these LUTs via a node in the ‘color’ page to convert the original scans to a Linear color space. -
Page 44: Optional Audio And Keykode Reader
Creating a sizing preset in the Sizing palette of the Color page Optional Audio and KeyKode Reader The optional Audio and KeyKode Reader expands your Cintel scanner’s capabilities by capturing optical and magnetic soundtracks at any speed, from slow to faster than real time. -
Page 45: Attaching The Audio And Keykode Reader
The scanned information is saved as metadata within each Cintel Raw frame. Your Cintel scanner can still capture optical soundtrack information without the Audio and KeyKode Reader attached. Simply use the extract audio feature in the DaVinci Resolve film scanner panel after you have scanned your film. - Page 46 Remove the four M4 screw plugs from your Cintel scanner using a 2mm Allen key. The correct screws are the top left screw, and bottom two screws located beneath the left options interface XLR connector.
- Page 47 Fasten the Audio and KeyKode Reader to your scanner using the 3 x captive M3 screws, ensuring it is seated flat to the deckplate before tightening. Plug the reader into the left options interface XLR connector and fasten the reader to your Cintel scanner using the three captive M3 screws. Optional Audio and KeyKode Reader...
-
Page 48: Reading Audio
Lace film through the Audio and KeyKode Reader’s upper section to read audio NOTE When scanning optical audio pay particular attention to the position of the 16mm and 35mm scanning LEDs. 35mm is closer to the Cintel chassis, while 16mm is further away. Optional Audio and KeyKode Reader... -
Page 49: Setting The Reader For Audio Scanning
When film is laced through the reader’s audio path, DaVinci Resolve will automatically record audio and add it to your clips. Alternatively, if it is laced through the lower path no audio will be recorded. Setting the Reader for Audio Scanning Once your film is laced, go to DaVinci Resolve’s film scanner panel and set the ‘use film’... - Page 50 Optical Audio Narrow Track: When scanning optical audio, film shrinkage and the ‚ variables inherent in printing will occasionally mean that your film’s optical soundtrack is smaller than the area scanned by your Audio and KeyKode Reader. This can result in the audio reader scanning perforations or image data on either side of the sound track, which causes interference in the audio.
- Page 51 Format The XLR audio inputs on the side panel of Cintel Scanner can accept analog audio or AES/EBU digital audio. Select an appropriate option from the ‘format’ menu: ‚ Analog: Choose this setting if you are using balanced analog audio.
- Page 52 When the Audio and KeyKode Reader is installed and configured to capture audio, your Cintel scanner’s maximum scan speed will be capped to 125% of your film’s target frame rate. For example, when scanning film intended for 24 frame per second playback, your scanner’s maximum scan speed will be 30 frames per second.
- Page 53 Previewing Audio via HDMI and the Headphones Jack Film soundtracks are printed several frames ahead of the images they sync to, therefore, your Cintel scanner automatically delays the audio so it is synced to the picture via the HDMI output and also synced in the scanned clip.
-
Page 54: Reading Keykode
For most users, these changes will never be necessary. For information on these advanced adjustments, contact your Blackmagic Support Center at www.blackmagicdesign.com/support Commencing your scan Once you have set your audio type and adjusted the tracking, simply commence your scan as detailed in the section ‘Scanning One or More Sections of Film.’... -
Page 55: Setting The Reader For Keykode Scanning
After you lace film through the KeyKode reader and tension it, you need to configure your Cintel scanner to read KeyKode. Go to the DaVinci Resolve film scanner panel and in the ‘use film’ menu select ‘KeyKode Perforations’ or ‘KeyKode Frames’. When you export a DPX file, KeyKode information will be represented in frames or perforations accordingly. -
Page 56: Transcoding To Dpx Including Keykode Metadata
Set the viewer to display KeyKode data by clicking on the viewer options in the top right corner and selecting ‘KeyKode’ from the menu KeyKode information is often captured for inclusion in DPX digital intermediates, as detailed in the next section, but this metadata is also available for use in the ‘edit’ and ‘color’ panes of DaVinci Resolve just like any other metadata. -
Page 57: Servicing
For more information about transcoding your Cintel Raw files to other formats, refer to the Media Management section of the DaVinci Resolve manual. You can also render your Cintel Raw files as DPX files with embedded KeyKode by going to DaVinci Resolve’s ‘Deliver’ page and exporting your files as DPX files. Make sure you select ‘individual source clips’... - Page 58 Cleaning the Capstans Clean the capstans as needed, ideally prior to scanning every new roll of film. Allow the capstans to air dry before use. NOTE Caution must be observed to prevent damage by liquids to electronics near the capstans. Apply only a small amount of water to a lint free cloth. Do not use solvents or sprays when cleaning the capstans.
- Page 59 Cleaning the Audio and KeyKode Reader Roller The Audio and KeyKode Reader contains a rubber roller for film laced through its upper track. This should be cleaned from time to time with a damp cloth. Simply remove any film laced through the upper track and hold a damp cloth against the roller while turning the cleaning knob to get rid of any dust buildup.
- Page 60 Spare Parts for your Cintel Scanner Spares of major Cintel scanner components are available through your local Blackmagic Design support office. Servicing your Cintel Scanner is generally quite easy and intuitive, but if required, documentation can be provided from your local sales office to assist.
-
Page 61: Working With Clips In Davinci Resolve
You can identify HDR clips via the HDR icon in the bottom left corner of the clip thumbnail. Because your Cintel Scanner captures a CRI raw image format with a wide dynamic range, DaVinci Resolve will help you adjust your shots to get any kind of look you are after. DaVinci Resolve is the same tool used on most major blockbuster movies, so it’s much more than a... -
Page 62: Editing With The Cut Page
The project manager shows all projects belonging to the current user For more information about the Project Manager, refer to the DaVinci Resolve manual which is available to download on the Blackmagic Design website support page. Editing with the Cut Page The ‘cut’... - Page 63 For more information on the Cut page, see the ‘The Cut Page’ chapter in the DaVinci Resolve manual. Media Tabs At the top left corner of the user interface you will see five tabs. Click on these tabs to open the media toolsets you will use when creating your edit. For example, the first tab is the media pool and you can see it is already selected.
- Page 64 Source Clip The source clip viewer displays a single clip from the media pool and you can set in and out points along the entire length of the viewer timeline. This gives you greater control. Select a source clip to view by double clicking on a clip in the media pool, or dragging it into the viewer.
-
Page 65: Adding Clips To The Timeline
Adding Clips to the Timeline Now that you are familiar with the media tabs and viewer mode buttons, you can open the media pool and quickly start adding clips to your timeline. The timeline of the cut page, comprising the upper timeline and the zoomed in timeline below The timeline is where you will build your edit and is like a board with tracks you can attach clips to, move them around and trim their edits. -
Page 66: Trimming Clips On The Timeline
Repeat steps 1 to 3 to keep adding more clips and they will automatically append, ensuring there are no gaps in the timeline. Appending clips ensures there are no gaps between them on the timeline You can speed up the process further by assigning a keyboard shortcut to the ‘append’... -
Page 67: Adding Titles
Now when you trim an edit you will see an expanded waveform in the timeline. When you finish trimming, the clips in the timeline will return to their normal size. Audio trim view expands the audio waveform in the timeline. After you have finished editing clips using the ‘cut’... -
Page 68: Working With Blackmagic Raw Files
To add a standard title: Click on the title and drag it onto the timeline. It doesn’t matter which timeline, but for greater accuracy we recommend using the detailed timeline. The title will automatically create a new video track for the title and will snap to the playhead. Release the mouse and the title will appear on the new track. - Page 69 The great thing about shooting Blackmagic RAW is that you’re not tied to these settings at all! The breadth of available post processing options when working with Blackmagic RAW files mean that you’ll develop your own workflow over time. Experimenting with the ‘clip’ settings for each clip in the ‘camera raw’...
- Page 70 Midpoint In Blackmagic Design Film, your middle gray value defaults to 0.38, or 38.4%. Drag the slider to the left to lower your midpoint or to the right to raise it to 100. When contrast is adjusted away from the default setting, you can modify your highlight and shadow rolloff. Highlight Rolloff Adjust the highlights by dragging the slider to the left to lower the value to 0, or to the right to increase the highlights to 2.
-
Page 71: Color Correcting Your Clips With The Color Page
A ‘sidecar’ file will now be created in the same folder as your .braw file. When another user imports the Blackmagic RAW files, the sidecar files will automatically be read by DaVinci Resolve. If you make additional adjustments, press ‘update sidecar’ again. To remove your sidecar file, you can simply delete it from its location on your media drive. - Page 72 features in front of you, they are all there to help you get the most amazing looking pictures. This getting started section will show the basics, but for more detailed information refer to the relevant sections in the manual. They will show you exactly what all the tools are for and how to use them in easy to follow steps.
- Page 73 The primaries bars make color adjustments easier when using a mouse. For more accurate control of each color using a mouse, you can change the color wheels to ‘primaries bars’ which let you adjust each color and luminance channel for the lift, gamma and gain controls separately.
- Page 74 The curves palette is another tool you can use to make primary color corrections, or enhance specific areas of your clip when using a power window Secondary Color Correction If you want to adjust a specific part of your image then you need to use secondary corrections. The adjustments you have been doing up until now using the lift, gamma and gain adjustments affect the whole image at the same time and so they are called primary color corrections.
-
Page 75: Adding A Power Window
Experiment with the high, low and softness controls to see how to refine your selection. Now you can make corrections to your selected color using the color wheels or custom curves. Sometimes your selection can spill into areas of the shot you don’t want to affect. You can easily mask out the unwanted areas using a power window. - Page 76 Power windows let you make secondary corrections to specific parts of your image Tracking a Window The camera, object or area in your shot may be moving, so to make sure your window stays on your selected object or area, you can use DaVinci Resolve’s powerful tracking feature. The tracker analyzes the pan, tilt, zoom and rotation of the camera or object in your clip so you can match your windows to that movement.
-
Page 77: Using Plugins
Most of the time automatic tracking is successful, but scenes can be complex and sometimes an object can pass in front of your selected area, interrupting or affecting your track. This can be solved manually using the keyframe editor. Refer to the DaVinci Resolve manual to find out more. - Page 78 To Add an Audio Track to the Edit Page Right click next to the name of any audio track on your timeline and select ‘add track’ and choose from the options, including ‘mono’, ‘stereo’, and ‘5.1’. This will add the track to the bottom of the track list.
- Page 79 This guide provides a basic overview of the features on the Fairlight page, but to learn more about all the details for each feature, refer to the DaVinci Resolve manual. The DaVinci Resolve manual provides details on the purpose of each tool and describes how to use them in easy to follow steps.
- Page 80 If your edit is a bit more complex you can create more buses and combine multiple tracks of audio that belong to the same category such as dialogue, music or effects so that everything in that category can be mixed as a single audio signal. For example, if you have five dialogue tracks, you can route the output of all five dialogue tracks to a separate bus, and the level of all dialogue can then be mixed with a single set of controls.
- Page 81 graphical and numeric controls for boosting or attenuating different ranges of frequencies, and different filter types allow you to define the shape of the EQ curve. The four band equalizer can be applied to every clip in the timeline Outer bands let you make band filter adjustments using hi-shelf, lo-shelf, hi-pass and lo-pass filters.
-
Page 82: Adding Vfx And Compositing On The Fusion Page
The EQ section in the mixer panel indicating an EQ curve has been applied to track one The 6 Band parametric equalizer that can be applied to every track Once you have added EQ to your clip or track, you can adjust the EQ for each band. Note that controls may vary depending on which band filter type is selected. - Page 83 The Fusion Page The Fusion page features 2 viewer windows across the top with transport controls to view your media, an inspector window to the right to access tool settings, and a nodes window at the bottom where you build your composition. While the viewers and transport controls are always visible, clicking on the icons on the interface toolbar at the very top of the display will let you show or hide the nodes and inspector windows, or reveal or hide additional windows including the effects library and editors for spline and keyframes.
- Page 84 Viewers: The viewers are always visible and let you see the different views of your ‚ composition, for example an overall 3D perspective via the merge 3D node, a camera output, or your final render output. These viewers also let you see how your changes are affecting a specific element.
- Page 85 The text inspector contains additional tabs for text, layout, transform, shading, image and settings. Getting Started with Fusion To get started with Fusion, simply position your playhead over any clip on your timeline and click on the ‘Fusion’ tab to open the Fusion page. On the Fusion page, your clip is immediately available in a media input node labelled ‘MediaIn’.
- Page 86 Arrows on the line between connected nodes are a great visual indicator to show you which direction the image data is flowing. Adding Nodes to the Node Editor Adding effects is as simple as placing nodes on the line between the ‘mediain’ and ‘mediaout’...
- Page 87 Selected nodes appear with a red border. Here the inspector panel is displaying the layout tab controls for the text node. There are different parameters and settings you can adjust for every node depending on its task, from sizing and center positions to changing the number of particles in an emitter node. Setting keyframes and changing the settings over time will animate the effect.
- Page 88 Using the Motion Tracker and Adding Text To get a better idea of how to use Fusion, we have included the following examples to show how to use the tracker tool to track an element in a clip, plus add text and attach it to the element using the tracking data.
- Page 89 Click on the ‘tracker’ node and type ‘1’ so you can see the merged results on your left hand viewer. In the ‘tracker’ inspector panel, click on the ‘operations’ tab. Click the menu next to operation and select ‘match move’. Click the ‘text’...
- Page 90 Click on the keyframes tab above the inspector to open the keyframes editor. Any nodes with keyframes applied will have a small arrow next to the node label, and only the parameter with keyframes added will appear in the list below. Click on the magnify icon and drag a box around the area you want to edit.
-
Page 91: Mastering Your Edit
We believe you will have lots of fun with Fusion and exploring Fusion’s visual effects with the power of DaVinci Resolve’s edit, color, and Fairlight pages. With all these tools at your finger tips, DaVinci Resolve is incredibly powerful and there is really no limit to what you can create! Mastering Your Edit Now you’ve edited, graded, added vfx and mixed your audio, you’ll want to share it with others. -
Page 92: The Deliver Page
In DaVinci Resolve Studio, the following ‘ResolveFX Revival’ plugins can help you restore footage you have scanned with your Cintel Scanner. These powerful tools can reduce noise, repair scratches and blemishes, and help remove other visible damage and artifacts from your film clips. -
Page 93: Automatic Dirt Removal
Automatic Dirt Removal The Automatic Dirt Removal plugin uses optical flow technology to target and repair temporally unstable bits of dust, dirt, hair, tape hits, and other unwanted artifacts that last for one or two frames and then disappear. All repairs are made while maintaining structurally consistent detail in the underlying frame, resulting in a high quality restoration of the image. -
Page 94: Dead Pixel Fixer
Motion Threshold: This slider lets you choose the threshold at which pixels in ‚ motion are considered to be dirt and artifacts. At lower values more dirt may escape correction, but you’ll experience fewer motion artifacts. At higher values, more dirt will be eliminated, but you may experience more motion artifacts in footage with camera or subject motion. -
Page 95: Patch Type
– Draw Ellipse: Click and drag to place an elliptical patch of any size from one corner to the opposite corner. Once drawn, you can click on any edge of the overlay and drag to reposition it. – Place Patch: Lets you place small patches specifically for tiny details such as dead pixels. -
Page 96: Patch Options
Patch Options These options let you customize the effect of a patch filling over a blemish. Mute: Lets you turn a particular patch on or off via keyframing. Useful for blemishes that ‚ only show up for a few pixels of a shot. Variability: (Spatial patches only) Raising this parameter lets you make the fill method ‚... -
Page 97: Deflicker
Deflicker The Deflicker plugin handles such diverse issues as flickering exposure in timelapse clips, flickering fluorescent lighting, flickering in archival film sources, and in certain subtle cases even the ‘rolling bars’ found on video screens shot with cameras having mismatched shutter speeds. Two key aspects to this filter are that it only targets rapid, temporally unstable variations in lightness, and that it’s able to target only the areas of an image where flickering appears, leaving all other parts of the image untouched. -
Page 98: Speed Optimization Options
Luma threshold: Determines the threshold above which changes in luma will not be ‚ considered flicker. The range is 0–100, 0 deflickers nothing, 100 applies deflickering to everything. The default is 100. Chroma Threshold: Determines the threshold above which changes in chroma will not ‚... -
Page 99: Dust Buster
Dust Buster This plugin is also designed to eliminate dust, dirt, and other imperfections and artifacts from clips, but it does so only with user guidance, for clips where the Automatic Dirt Removal plugin yields unsatisfactory results. This guidance consists of moving through the clip frame-by-frame and drawing boxes around imperfections you want to eliminate. -
Page 100: Patch Type
Hide During Interaction : Hides the onscreen outline of every patch in the viewer while ‚ you’re moving a patch; this makes it easier to see the effect of moving the patch on the image, without the outline getting in the way. Patch Type There are six methods you can use to attempt to fix the contents of a selected patch. -
Page 101: Patch Options
Patch Options These options let you customize the effect of a patch filling over a blemish. Mute: Lets you turn a particular patch on or off via keyframing. Useful for blemishes that ‚ only show up for a few pixels of a shot. Variability: (Spatial patches only) Raising this parameter lets you make the fill method ‚... -
Page 102: Temporal Threshold Controls
Motion Est. Type: Picks the method DaVinci Resolve uses to detect motion in the ‚ image. The default, ‘faster’, is less processor intensive, but less accurate. Choosing ‘better’ can effectively exclude motion more accurately, but is more processor intensive. None lets you disable motion estimation altogether, resulting in the application of temporal NR to the entire image. -
Page 103: Spatial Threshold Controls
Mode: The ‘mode’ menu lets you switch spatial NR between three different algorithms. ‚ All three modes of operation use the same controls, so you can switch between modes using the same settings to compare your results. – Faster: Uses a computationally lightweight method of noise reduction that’s good at lower settings, but may produce artifacts when applied at higher values. -
Page 104: Global Blend
Blend: Lets you dissolve between the image as it’s being affected by the spatial NR ‚ parameters (at 0.0) and the image with no noise reduction (100.0). This parameter lets you easily split the difference when using aggressive spatial noise reduction. Global Blend Blend: Lets you dissolve between the image with no noise reduction (1.0) and the... -
Page 105: Object Removal
If you’ve had to use a high spatial NR luma or chroma threshold setting to reduce noise visibly, and areas of detail look a bit chunky or aliased, you can choose a larger setting from the ‘radius’ menu to enable a more detailed analysis of the scene. This will result in higher visual quality, but larger NR radius settings are more processor- intensive and may reduce real-time performance if you don’t have adequate GPU resources available to your system. - Page 106 The original shot with a drone that needs to be removed In simple cases, it’s often easiest to apply the object removal effect to a corrector node, so you can use a window or qualifier within that node to isolate the feature you want to remove.
- Page 107 The result after object removal analysis is complete The object removal plugin is highly footage dependent, and you won’t always get this good a result this easily. Problems with the result are shown via gray, either gray fringing or solid gray filling the replacement window.
-
Page 108: Specifications
Specifications 1055mm 360mm 880mm 2010mm Weight: 60 kg (132 lb) unloaded. Dimensions wall mounted: (H) 785mm, (D) 265mm Scanner Features Film Stocks Effective Resolutions Dirt and Scratch Reduction - Print, Negative, 3840 x 2880 - Super 35 - Diffuse light source Interpositive, Internegative. - Page 109 10dBV levels. charging with 15W at 5V. - PCI Express 4 lane generation 2. Resolution of the cropped image only area. Cintel Scanner has a Thunderbolt 2 port only. Cintel Scanner 2 or later. Power Requirements Voltage Range Power...
- Page 110 Audio and KeyKode Reader Equalisation Optical Audio 35mm Full Modulation Level Optical audio SMPTE, -18dBFS Bandwidth Magnetic audio IEC 40Hz-16kHz +-2dB Headphones Level SnR Signal to Noise Ratio Supported KeyKode -18dBu at 50Ω load Transparent film base -65dB Scan Speeds All scanner speeds Wow and Flutter Audio Connection <...
-
Page 111: Regulatory Notices
Regulatory Notices Disposal of waste of electrical and electronic equipment within the European union. The symbol on the product indicates that this equipment must not be disposed of with other waste materials. In order to dispose of your waste equipment, it must be handed over to a designated collection point for recycling. The separate collection and recycling of your waste equipment at the time of disposal will help conserve natural resources and ensure that it is recycled in a manner that protects human health and the environment. -
Page 112: Safety Information
Use only at altitudes not more than 2000m above sea level. WARNING The Cintel Scanner weighs up to 70kg / 155 pounds when loaded with film. This is significantly heavier than a large screen television. If you are unsure of... - Page 113 State of California statement This product can expose you to chemicals such as trace amounts of polybrominated biphenyls within plastic parts, which is known to the state of California to cause cancer and birth defects or other reproductive harm. For more information go to www.P65Warnings.ca.gov. Warning for Authorized Service Personnel Disconnect power from both power inlets before servicing! Safety Information...
-
Page 114: Help
Reader attached, you can generate a status report for it. To create a status report, run the Cintel Setup utility, click on the settings icon and then go to the ‘about’ tab. In the ‘device information’ section, click ‘create’. This makes an HTML file so you can easily read the status for both the Cintel Scanner and Audio and KeyKode Reader. -
Page 115: Usb Recovery
Remove the rear panel of your Blackmagic Cintel Scanner. The USB port for system recovery is in the centre near the top. It is on the side of the circuit board facing the front of the Cintel Scanner and is visible when you look at the top of the Cintel scanner. NOTE If you don’t have immediate access to the rear panel and need to move... - Page 116 Cintel Scanner software will detect your computer is plugged into Cintel’s USB recovery port After the update recovery is complete, your Cintel Scanner should now be running the latest software and operating normally. You can check this by disconnecting the USB cable, connecting the thunderbolt cable, and then power cycling your scanner.
-
Page 117: Warranty
THIS PRODUCT AT OWN RISK. © Copyright 2021 Blackmagic Design. All rights reserved. ‘Blackmagic Design’, ‘Cintel’, ‘DeckLink’, ‘DaVinci Resolve’ are registered trademarks in the US and other countries. All other company and product names may be trademarks of the respective companies with which they are associated.
Need help?
Do you have a question about the Cintel and is the answer not in the manual?
Questions and answers