Beurer BR 10 Instructions For Use Manual
Insect bite healer
Hide thumbs
Also See for BR 10:
- Instructions for use manual (182 pages) ,
- User manual ,
- Instructions for use manual (88 pages)
Table of Contents
Advertisement
Available languages
Available languages
Quick Links
BR 10
DE Insektenstichheiler
Gebrauchsanweisung ..........................4
EN Insect bite healer
Instructions for use ............................31
FR Appareil soulageant les piqûres
d'insectes
Mode d'emploi ..................................57
ES Aparato contra picaduras de
insectos
Instrucciones de uso .........................85
IT Dopopuntura
Istruzioni per l'uso ............................113
TR Böcek sokması iyileştirme cihazı
Kullanım kılavuzu .............................139
RU Прибор для заживления кожи
от укусов насекомых
Инструкция по применению ..........164
Advertisement
Chapters
Table of Contents

Subscribe to Our Youtube Channel
Related Manuals for Beurer BR 10


Summary of Contents for Beurer BR 10
- Page 1 BR 10 DE Insektenstichheiler Gebrauchsanweisung ......4 EN Insect bite healer Instructions for use ......31 FR Appareil soulageant les piqûres d’insectes Mode d’emploi ........57 ES Aparato contra picaduras de insectos Instrucciones de uso ......85 IT Dopopuntura Istruzioni per l’uso ......113 TR Böcek sokması iyileştirme cihazı...
- Page 2 DE Klappen Sie vor dem Lesen der Gebrauchsanweisung die Seite 3 aus. EN Unfold page 3 before reading the instructions for use. FR Dépliez la page 3 avant de lire le mode d’emploi. ES Despliegue la página 3 antes de leer las instrucciones de uso. Prima di leggere le istruzioni per l‘uso aprire la pagina 3.
-
Page 4: Table Of Contents
DEUTSCH Lesen Sie diese Gebrauchsanweisung sorgfältig durch, bewahren Sie sie für den späteren Ge- brauch auf, machen Sie sie anderen Benutzern zugäng- lich und beachten Sie die Hinweise. Inhaltsverzeichnis 1. Lieferumfang ........ 5 7. Anwendung ........ 19 2. Zeichenerklärung ......5 8. -
Page 5: Lieferumfang
Verpackungsmaterial entfernt wird. Benutzen Sie es im Zweifelsfall nicht und wenden Sie sich an Ihren Händler oder an die an- gegebene Kundendienstadresse. 1 x BR 10 1 x Karabiner 2 x Batterien Typ AAA (LR03 1,5V) 1 x Gebrauchsanweisung 2. - Page 6 WARNUNG Warnhinweis auf Verletzungsgefahren oder Gefahren für Ihre Gesundheit ACHTUNG Sicherheitshinweis auf mögliche Schäden an Gerät Produktinformation Hinweis auf wichtige Informationen Anleitung beachten Vor Beginn der Arbeit und /oder dem Bedienen von Geräten oder Maschinen die Anleitung lesen Isolierung der Anwendungsteile Typ BF Galvanisch isoliertes Anwendungsteil (F steht für floating), erfüllt die Anforderungen an Ableitströme für den Typ B...
- Page 7 Entsorgung gemäß Elektro- und Elektronik-Altgeräte EG- Richtlinie – WEEE (Waste Electrical and Electronic Equip- ment) Schadstoffhaltige Batterien nicht im Hausmüll entsorgen Hersteller Verpackungskomponenten trennen und entsprechend der kommunalen Vorschriften entsorgen. Kennzeichnung zur Identifikation des Verpackungsmaterials. A = Materialabkürzung, B = Materialnummer: 1-7 = Kunststoffe, 20-22 = Papier und Pappe Produkt und Verpackungskomponenten trennen und entspre- chend der kommunalen Vorschriften entsorgen.
- Page 8 IP-Klasse Gerät geschützt gegen feste Fremdkörper ≥ 1 mm Durch- IP 42 messer und gegen Tropfwasser, wenn das Gehäuse bis zu 15° geneigt ist Storage/Transport Zulässige Lagerungstemperatur und -luftfeuchtigkeit Operating Zulässige Betriebstemperatur und -luftfeuchtigkeit CE-Kennzeichnung Dieses Produkt erfüllt die Anforderungen der geltenden europäischen und nationalen Richtlinien.
-
Page 9: Bestimmungsgemäßer Gebrauch
3. BESTIMMUNGSGEMÄSSER GEBRAUCH Zweckbestimmung Der Insektenstichheiler ist dazu bestimmt Juckreiz und Schwellungen, bedingt durch Insektenstiche oder -bisse mittels Wärmeentwicklung (lokaler Hyper- thermie) zu lindern. Zielgruppe Der Insektenstichheiler ist zur medizinischen Versorgung in häuslicher Um- gebung, nicht in professionellen Einrichtungen zur Gesundheitsfürsorge,vor- gesehen. -
Page 10: Warn- Und Sicherheitshinweise
Indikation Eine Behandlung mittels des Insektenstichheilers wird empfohlen bei: - Juckreiz - Schwellung, verursacht durch Insektenbisse oder -stiche. 4. WARN- UND SICHERHEITSHINWEISE Kontraindikationen • Wenden Sie das Gerät nicht an, falls Sie unter Diabetes leiden. Das Schmerzempfinden könnte unter Umständen herabgesetzt sein und Diabetiker könnten sich selbst Verbrennungen zufügen. - Page 11 • Verwenden Sie das Gerät nicht auf akut oder chronisch erkrankter (ver- letzter oder entzündeter) Haut (z.B. bei schmerzhaften und schmerzlosen Entzündungen, Rötungen, Hautausschlägen (z.B. Allergien), Verbren- nungen, Erfrierungen, Prellungen, Schwellungen (ohne Anzeichen eines Insektenstichs/biss) und offenen/blutenden sich im Heilungsprozess befindlichen Wunden, an Operationsnarben, die in der Heilung begriffen sind).
- Page 12 Allgemeine Warnhinweise • Bei Eigenanwendung muss die Person älter als 12 Jahre sein. Die Anwen- dung bei Kindern unter 12 Jahren sollte nur unter Beaufsichtigung oder Unterstützung durch einen Erwachsenen erfolgen. • Halten Sie vor einer Anwendung des Geräts Rücksprache mit Ihrem behandelnden Arzt bei allen Hauterkrankungen, akuten Erkrankungen (insbesondere bei Neigung zu thromboembolischen Erkrankungen sowie bei bösartigen Neubildungen), nicht abgeklärten chronischen Schmerz-...
- Page 13 • Holen Sie sich unmittelbar ärztlichen Rat ein, falls es sich um einen Ze- ckenbiss handelt. Der Stich kann zur Übertragung von Krankheitserregern wie z.B. Frühsommer-Meningoenzephalitis (FSME) oder Borreliose führen. • Holen Sie sich unmittelbar ärztlichen Rat ein, falls erste Anzeichen von verstärktem Hautjucken, -rötung, -schwellung, Schwindel, Übelkeit, Atemnot, Quaddelbildung, Blutdruckabfall oder -anstieg auftreten.
- Page 14 • Sollte das Gerät nicht korrekt funktionieren, sich Unwohlsein oder Schmerzen einstellen, brechen Sie die Anwendung sofort ab. Allgemeine Vorsichtsmaßnahmen • Das Gerät nicht mit feuchten Händen anfassen. Es darf kein Wasser auf das Gerät spritzen. Das Gerät darf nur im vollständig trockenen Zustand betrieben werden.
- Page 15 • Achten Sie darauf, dass kein Wasser in das Gerät eindringt. Falls dies doch einmal der Fall sein sollte, entfernen Sie die Batterien und verwen- den Sie das Gerät erst dann wieder, wenn es völlig trocken ist. • Wenn Sie das Gerät aufbewahren, dürfen keine schweren Gegenstände auf dem Gerät stehen.
- Page 16 Maßnahmen zum Umgang mit Batterien • Wenn Flüssigkeit aus einer Batteriezelle mit Haut oder Augen in Kontakt kommt, die betroffene Stelle mit Wasser auswaschen und ärztliche Hilfe aufsuchen. • Verschluckungsgefahr! Kleinkinder könnten Batterien verschlucken und daran ersticken. Daher Batterien für Kleinkinder unerreichbar aufbewahren! •...
- Page 17 • Immer alle Batterien gleichzeitig auswechseln. • Keine Akkus verwenden! Hinweis zu elektromagnetischer Verträglichkeit • Das Gerät ist für den Betrieb in allen Umgebungen geeignet, die in dieser Gebrauchsanweisung aufgeführt sind, einschließlich der häuslichen Um- gebung. • Das Gerät kann in der Gegenwart von elektromagnetischen Störgrößen unter Umständen nur in eingeschränktem Maße nutzbar sein.
-
Page 18: Gerätebeschreibung
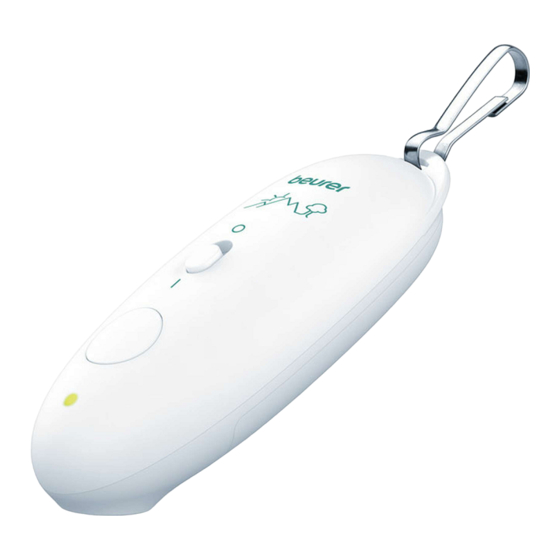
5. GERÄTEBESCHREIBUNG Die zugehörigen Zeichnungen sind auf Seite 3 abgebildet. Aktivierungsknopf Heizplättchen EIN/AUS-Schalter Batteriefachdeckel Gerätestatus-LED Karabiner 6. INBETRIEBNAHME Batterien einsetzen 1. Schieben Sie den Batteriefachdeckel auf. 2. Legen Sie die im Lieferumfang enthaltenen Batterien, wie im Batteriefach aufgedruckt, in das Batteriefach ein. Achten Sie beim Einlegen auf die kor- rekte Polarität (+/-) der Batterien. -
Page 19: Anwendung
7. ANWENDUNG WARNUNG Achten Sie vor jeder Anwendung darauf, dass sich kein Insektenstachel mehr in der Stichstelle befindet. Entfernen Sie den Stachel vor der Anwendung vorsichtig. Eine Anwendung unmittelbar nach dem Insektenstich oder -biss bringt die besten Erfolge. Warten Sie zu lange mit einer Behandlung der Einstich- oder Bissstelle und ist es bereits zu Juckreiz und Schwellung gekommen, kann der Insektenstichheiler nur noch eingeschränkt wirken. - Page 20 2. Setzen Sie das Gerät mit dem Heizplättchen auf die Einstich- oder Bissstelle. Drücken Sie den Aktivierungsknopf einmal. Die Geräte- status-LED leuchtet blau und signalisiert Ihnen, dass die Anwendung beginnt. 3. Nach Beendigung der Anwendung ertönt ein akustisches Signal, das Er- wärmen des Heizplättchens wird automatisch gestoppt und die Ge- rätestatus-LED...
- Page 21 auch sofort bei einem weiteren Stich/Biss an einer anderen Stelle. Die ma- ximale Anzahl von 5 Anwendungen pro Stunde an der gleichen Behand- lungsstelle darf nicht überschritten werden. 5. Wird das Gerät nicht mehr benötigt, stellen Sie es mittels des EIN/AUS- Schalters wieder auf „AUS“.
-
Page 22: Reinigung Und Pflege
8. REINIGUNG UND PFLEGE Befolgen Sie nachfolgende Hygienevorschriften, um eine Gesundheitsgefähr- dung zu vermeiden: • Das Gerät ist für eine Mehrfachverwendung vorgesehen. • Es wird empfohlen, das Gerät vor dem ersten Gebrauch und vor jedem weiteren Gebrauch zu reinigen. • Vor jeder Reinigung muss das Gerät ausgeschaltet, abgekühlt und die Batterien entfernt sein. -
Page 23: Ersatzteile
• Bei Anwendung des Gerätes auf mehreren Einstich- oder Bissstellen wird empfohlen, das Heizplättchen jedes Mal zu reinigen. So vermindert sich die Möglichkeit, dass Keime und Bakterien von einer Hautstelle zur nächsten übertragen werden. Verwenden Sie zur Desinfektion des Heiz- plättchens ein mit einem Desinfektionsmittel befeuchtetes Küchenpapier. -
Page 24: Was Tun Bei Problemen
10. WAS TUN BEI PROBLEMEN? Problem Mögliche Ursache Behebung Das Gerät geht nicht Der EIN/AUS- Schalter Schieben Sie den EIN/ ist in AUS-Position. AUS-Schalter in die EIN-Position. Die Batterien sind leer. Wechseln Sie beide Batterien so wie in dieser Gebrauchsanweisung beschrieben aus. - Page 25 Problem Mögliche Ursache Behebung Gerät gibt 3 Signaltöne Batteriespannung ist Wechseln Sie beide / die Gerätestatus-LED zu niedrig, sodass Batterien so wie in dieser das Gerät ggf. nicht Gebrauchsanweisung blinkt – auch nach mehr betrieben werden beschrieben aus. erneutem AUS- und kann.
-
Page 26: Entsorgung
Problem Mögliche Ursache Behebung Das Gerät geht Das Gerät ist mög- Bitte wenden Sie sich nicht an, obwohl die licherweise defekt. an den Kundendienst. Batterien gewechselt wurden und der EIN/ AUS-Schalter EIN gestellt wurde. 11. ENTSORGUNG Reparatur und Entsorgung des Gerätes •... - Page 27 • Reparaturen dürfen nur vom Kundenservice oder autorisierten Händlern durchgeführt werden. Prüfen Sie jedoch vor jeder Reklamation zuerst die Batterien und tauschen Sie diese gegebenenfalls aus. • Im Interesse des Umweltschutzes darf das Gerät am Ende seiner Lebensdauer nicht mit dem Hausmüll entfernt werden. Die Entsorgung kann über entsprechende Sammelstellen in Ihrem Land erfolgen.
-
Page 28: Technische Angaben
Pb = Batterie enthält Blei, Cd = Batterie enthält Cadmium, Hg = Batterie enthält Quecksilber. 12. TECHNISCHE ANGABEN BR 60 Model BR 10 Abmessungen (L x B x H) 86 x 35 x 25 mm Gewicht (mit Batterien) 44,5 g Stromversorgung 2 x 1,5 V AAA LR03 Batterien Max. - Page 29 Zulässige Lagerungs- und -10 °C bis 50 °C, relative Luftfeuchtigkeit Transporttemperatur und -luft- 30 % bis 85 % feuchtigkeit Zulässige Betriebstemperatur 10 °C bis 40 °C, relative Luftfeuchtigkeit 30 % und -luftfeuchtigkeit bis 85 % Die Seriennummer befindet sich auf dem Gerät oder im Batteriefach. Technische Änderungen vorbehalten.
-
Page 30: Garantie / Service
13. GARANTIE / SERVICE Nähere Informationen zur Garantie und den Garantiebedingungen finden Sie im mitgelieferten Garantie-Faltblatt. - Page 31 ENGLISH Read these instructions for use carefully and keep them for later use, be sure to make them accessible to other users and observe the information they contain. Table of contents 1. Included in delivery ....32 8. Cleaning and maintenance ..48 2.
-
Page 32: Included In Delivery
In case of any doubt, do not use the device, and contact your retailer or the specified Customer Service address. 1 x BR 10 1 x Carabiner 2 x batteries, type AAA (LR03 1.5 V) 1 x instructions for use 2. - Page 33 WARNING Warning notice indicating a risk of injury or damage to health IMPORTANT Safety note indicating possible damage to the device Product information Note on important information Observe the instructions Read the instructions before starting work and/or operating devices or machines Isolation of applied parts Type BF Galvanically isolated applied part (F stands for “floating”);...
- Page 34 Disposal in accordance with the Waste Electrical and Electronic Equipment EC Directive – WEEE Do not dispose of batteries containing harmful substances with household waste Manufacturer Separate the packaging elements and dispose of them in accordance with local regulations. Marking to identify the packaging material. A = Material code, B = Material number: 1-7 = Plastics, 20-22 = Paper and cardboard...
- Page 35 Separate the product and packaging elements and dispose of them in accordance with local regulations. Serial number IP class Device protected against solid foreign objects ≥ 1 mm in IP 42 diameter and against drops of water when the housing is angled up to 15˚...
-
Page 36: Proper Use
CE labelling This product satisfies the requirements of the applicable European and national directives. Medical device Extra-small design which is particularly suitable for use on the move 3. PROPER USE Intended use The insect bite healer is intended for relieving itching and swelling caused by insect bites or stings by applying heat (local hyperthermia). -
Page 37: Warnings And Safety Notes
anyone over 3 years of age under supervision; can be used for self-treatment by anyone over 12 years of age. Clinical benefits Treatment and relief of itching and swelling caused by insect bites or stings. Indication Treatment with the insect bite healer is recommended for: - itching - swelling caused by insect bites or stings. - Page 38 • Do not use the device on people with disabilities, children under 3 years old or people with reduced sensitivity to heat. This includes people with skin alterations due to illness or scarred tissue in the application area, after taking pain relief medication, drinking alcohol or taking drugs. •...
- Page 39 General warnings • Any person using it on themselves must be over 12 years old. The prod- uct should only be used on children under 12 years old if supervised or assisted by an adult. • Before using the device, consult your doctor if you have any skin condi- tions, serious illness (in particular if you have a propensity to thrombo- embolic conditions or recurrent malignant growths), unexplained chronic pain in any part of the body.
- Page 40 • Seek medical advice immediately if the first signs of increased itching, skin redness, swelling, dizziness, nausea, shortness of breath, formation of wheals or a drop or increase in blood pressure occur. • Do not use near to the eyes, on the eyelids, mouth or on mucous mem- branes.
- Page 41 General precautions • Do not touch the device with wet hands. Do not allow water to spray onto the device. Only operate the device if it is completely dry. • Do not use any detergents or solvents to clean and maintain the device. If liquid penetrates the device this could cause damage to the electronics or other device parts and lead to a malfunction.
- Page 42 • Store the device in a location protected against climatic influences. The device must be stored in the environmental conditions specified. • Do not leave the device unattended while in use. If the device malfunc- tions, switch it off and stop using it. Measures for handling batteries •...
- Page 43 • If the device is not to be used for a relatively long period, take the batteries out of the battery compartment. • Use identical or equivalent battery types only. • Always replace all batteries at the same time. • Do not use rechargeable batteries! Note on electromagnetic compatibility •...
-
Page 44: Device Description
• Failure to comply with the above can impair the performance of the device. 5. DEVICE DESCRIPTION The associated drawings are shown on page 3. Activation button Heating plate ON/OFF switch Battery compartment lid Device status LED Carabiner... -
Page 45: Initial Use
6. INITIAL USE Inserting the batteries 1. Push open the battery compartment lid 2. Insert the batteries included in delivery into the battery compartment as shown inside the battery compartment. When inserting the batteries, en- sure that the correct polarity (+/-) is observed. 3. - Page 46 the area that has been stung or bitten and itching and swelling have already started, the insect bite healer can only have a limited effect. Nevertheless, treat the area with the insect bite healer. Usually, itching can be relieved and healing can be sped up.
- Page 47 IMPORTANT Depending on the sensitivity of the person using the device and of the area of skin, the treatment temperature may feel unpleasant and cause slight skin redness and, in rare cases, irritated skin. If the heat function feels too hot, stop treatment immediately.
-
Page 48: Cleaning And Maintenance
Battery warning Before the battery level becomes too low for other applications, the device status LED starts to flash 3x and an acoustic signal sounds 3x. Replace both batteries soon, as described in section 6. 8. CLEANING AND MAINTENANCE Observe the following hygiene instructions to avoid health risks: •... -
Page 49: Replacement Parts
• Do not clean the device and karabiner in the dishwasher! • Avoid mechanical cleaning with brushes or similar, as this could result in irreparable damage. • When using the device on multiple areas that have been stung and bitten, it is recommended that you clean the heating plate each time. This reduces the possibility of germs and bacteria being transferred from one area of skin to the next. -
Page 50: What If There Are Problems
10. WHAT IF THERE ARE PROBLEMS? Problem Possible cause Solution The device does not The ON/OFF switch Slide the ON/OFF switch switch on. is in the OFF into the ON position. position. The batteries are flat. Replace both batteries as described in these instructions for use. - Page 51 Problem Possible cause Solution Device outputs Battery level is too Replace both batteries 3 acoustic signals/ low, meaning that as described in these the device status LED the device may no instructions for use. longer be able to be flashes – even after operated.
-
Page 52: Disposal
Problem Possible cause Solution The device does not The device may be Please contact Customer switch on, even though faulty. Services. the batteries have been replaced and the ON/ OFF switch been set to ON. 11. DISPOSAL Repairing and disposing of the device •... - Page 53 • Repairs must only be carried out by Customer Services or authorised retailers. Before making a claim, please check the batteries first and replace them if necessary. • For environmental reasons, do not dispose of the device in the household waste at the end of its useful life.
-
Page 54: Technical Specifications
Cd = Battery contains cadmium, Hg = Battery contains mercury. 12. TECHNICAL SPECIFICATIONS Type BR 60 Model BR 10 Dimensions (L x W x H) 86 x 35 x 25 mm Weight (with batteries) 44.5 g Power supply 2 x 1.5 V AAA LR03 batteries Max. - Page 55 Permissible storage and -10 °C to 50 °C, relative humidity transport temperature and 30% to 85% humidity Permissible operating 10 °C to 40 °C, relative humidity temperature and humidity 30% to 85% The serial number is located on the device or in the battery compartment. Subject to technical changes.
-
Page 56: Warranty/Service
13. WARRANTY/SERVICE Further information on the warranty and warranty conditions can be found in the warranty leaflet supplied. - Page 57 FRANÇAIS Lisez attentivement ce mode d’emploi, conservez-le pour un usage ultérieur, mettez-le à disposition des autres utilisateurs et suivez les consignes qui y figurent. Table des matières 1. Contenu ........58 7. Utilisation ........73 2. Symboles utilisés ....... 58 8.
-
Page 58: Contenu
1. CONTENU Vérifiez si l’emballage carton extérieur du kit est intact et si tous les éléments sont inclus. Avant l’utilisation, assurez-vous que l’appareil et le mousqueton ne présentent aucun dommage visible et que la totalité de l’emballage a bien été retirée. En cas de doute, ne l’utilisez pas et adressez-vous à votre reven- deur ou au service client indiqué. - Page 59 AVERTISSEMENT Ce symbole vous avertit des risques de blessures ou des dangers pour votre santé ATTENTION Ce symbole vous avertit des éventuels dommages au niveau de l’appareil Information sur le produit Indication d’informations importantes Suivre le mode d’emploi Lire le mode d’emploi avant de commencer le travail et/ou de faire fonctionner les appareils ou les machines Isolation de l’appareil de type BF Isolation galvanique (F signifie floating), répond aux...
- Page 60 Arrêt Élimination conformément à la directive européenne WEEE (Waste Electrical and Electronic Equipment) relative aux déchets d’équipements électriques et électroniques Ne pas jeter les piles à substances nocives avec les déchets ménagers Fabricant Séparer les composants d’emballage et les éliminer confor- mément aux prescriptions communales.
- Page 61 Séparer le produit et les composants d’emballage et les éliminer conformément aux prescriptions communales. Numéro de série Classe IP Appareil protégé contre les corps solides de diamètre ≥ IP 42 1 mm et contre les gouttes d’eau si le boîtier n’est pas incliné à...
-
Page 62: Utilisation Conforme Aux Recommandations
Dispositif médical Design extra compact particulièrement adapté à une utilisa- tion en déplacement 3. UTILISATION CONFORME AUX RECOM- MANDATIONS Utilisation L’appareil soulageant les piqûres d’insectes est conçu pour atténuer les dé- mangeaisons et les gonflements dus aux piqûres ou aux morsures d’insectes, par production de chaleur (hyperthermie locale). - Page 63 convient à toutes les personnes de plus de 3 ans sous surveillance, tandis que l’utilisation personnelle est possible pour toutes les personnes âgées de plus de 12 ans. Avantages cliniques Traitement et soulagement des démangeaisons et du gonflement provoqués par les piqûres ou les morsures d’insectes. Indication Un traitement au moyen de l’appareil soulageant les piqûres d’insectes est recommandé...
-
Page 64: Consignes D'avertissement Et De Mise En Garde
4. CONSIGNES D’AVERTISSEMENT ET DE MISE EN GARDE Contre-indications • N’utilisez pas l’appareil si vous souffrez de diabète. Chez les diabétiques, la sensation de douleur peut être réduite et ils présentent donc plus de risques de se brûler. • N’utilisez pas l’appareil sur des personnes dépendantes, des enfants de moins de 3 ans ou des personnes peu sensibles à... - Page 65 • N’utilisez pas l’appareil sur une peau atteinte d’une maladie chronique ou aiguë (blessée ou enflammée) (par ex. en cas d’inflammations doulou- reuses et indolores, rougeurs, éruptions cutanées (par ex. allergies), brûlures, gelures, contusions, gonflements (sans signes de piqûre ou de morsure d’insecte) ou blessures ouvertes ou sanglantes, des cicatrices d’opération impliquées dans la guérison).
- Page 66 Avertissements généraux • Pour utiliser l’appareil seul, l’utilisateur doit avoir au moins 12 ans. L’uti- lisation chez les enfants de moins de 12 ans ne doit se faire que sous la surveillance ou l’assistance d’un adulte. • Avant d’utiliser l’appareil, consultez votre médecin traitant en cas de : mala- dies cutanées, maladies aiguës (en particulier la prédisposition aux maladies thromboemboliques ainsi qu’en cas de néoplasmes malins), les douleurs chroniques non expliquées, indépendamment de la zone du corps.
- Page 67 • Consultez immédiatement un médecin en cas de premiers signes de dé- mangeaison, de rougeur ou de gonflement, de vertiges, de nausées, de détresse respiratoire, de papules, de pression artérielle basse ou élevée apparaissent. • N’utilisez pas l’appareil au niveau des yeux, des paupières, de la bouche ou des muqueuses.
- Page 68 Précautions générales • Ne manipulez pas l’appareil avec les mains humides. L’appareil ne doit en aucun cas recevoir des éclaboussures d’eau. L’appareil ne doit être utilisé que lorsqu’il est complètement sec. • N’utilisez pas de détergent ni de solvant pour nettoyer et entretenir l’ap- pareil.
- Page 69 • Assurez-vous que l’eau ne s’infiltre pas à l’intérieur. Si cela devait se produire, retirez les piles et utilisez de nouveau l’appareil uniquement lorsqu’il est complètement sec. • Lors de son stockage, ne posez pas d’objets lourds sur l’appareil. • Avant l’utilisation, assurez-vous que l’appareil et le mousqueton ne présentent aucun dommage visible.
- Page 70 • Risque d’ingestion ! Les enfants en bas âge pourraient avaler des piles et s’étouffer. Conserver les piles hors de portée des enfants en bas âge ! • Risque d’explosion ! Ne pas jeter les piles dans le feu. • Si une pile a coulé, enfiler des gants de protection et nettoyer le compartiment à...
- Page 71 Informations sur la compatibilité électromagné- tique • L’appareil est prévu pour fonctionner dans tous les environnements indiqués dans ce mode d’emploi, y compris dans un environnement domestique. • En présence d’interférences électromagnétiques, vous risquez de ne pas pouvoir utiliser toutes les fonctions de l’appareil. Vous pouvez alors ren- contrer, par exemple, des messages d’erreur ou une panne de l’appareil.
-
Page 72: Description De L'appareil
5. DESCRIPTION DE L’APPAREIL Les schémas correspondants sont illustrés à la page 3. Bouton d’activation Disque chauffant Touche MARCHE/ARRÊT Couvercle du compartiment à piles Voyant LED d’état de l’appareil Mousqueton 6. MISE EN SERVICE Insérer les piles 1. Ouvrez le couvercle du compartiment à piles 2. -
Page 73: Utilisation
7. UTILISATION AVERTISSEMENT Avant chaque utilisation, assurez-vous que le dard a bien été enlevé. Retirez soigneusement le dard avant d’utiliser l’appareil. L’utilisation de l’appareil immédiatement après la piqûre ou la morsure de l’insecte offre de meilleurs résultats. Si vous attendez trop longtemps avant de traiter la piqûre ou la morsure et que des démangeaisons et un gonflement se sont déjà... - Page 74 2. Placez le disque chauffan de l’appareil sur la zone de la piqûre ou de la morsure. Appuyez une fois sur le bouton d’activation . Le voyant LED d’état de l’appareil s’allume en bleu pour indiquer que l’application démarre. 3. Une fois l’utilisation terminée, un signal sonore retentit, le disque chauffant cesse automatiquement de chauffer et le voyant LED d’état de l’appa- reil s’allume à...
- Page 75 en cas de piqûre à un autre endroit. Il est déconseillé de dépasser 5 appli- cations par heure sur la même zone de traitement. 5. Lorsque vous avez terminé l’utilisation, éteignez l’appareil en plaçant l’in- terrupteur MARCHE/ARRÊT sur le symbole « O ». Le voyant LED bleu d’état de l’appareil s’éteint.
-
Page 76: Nettoyage Et Entretien
8. NETTOYAGE ET ENTRETIEN Afin d’éviter tout risque pour la santé, veillez à observer les prescriptions d’hygiène suivantes : • L’appareil est prévu pour une utilisation répétée. • Il est recommandé de nettoyer l’appareil avant la première utilisation et avant toute autre utilisation. •... -
Page 77: Pièces De Rechange
• Si vous utilisez l’appareil sur plusieurs zones de piqûres ou de morsure, il est recommandé de nettoyer le disque chauffant entre chaque utilisation. Vous réduisez ainsi la possibilité de transfert de germes ou de bactéries d’une zone de la peau à une autre. Pour désinfecter le disque chauffant, utilisez un essuie-tout humidifié... -
Page 78: Que Faire En Cas De Problèmes
10. QUE FAIRE EN CAS DE PROBLÈMES ? Problème Cause possible Solution L’appareil ne s’allume Placer le bouton Placez le bouton pas. MARCHE/ARRÊT MARCHE/ARRÊT en position ARRÊT. position MARCHE. Les piles sont vides. Remplacez les deux piles comme décrit dans ce mode d’emploi. - Page 79 Problème Cause possible Solution L’appareil émet Les piles sont trop Remplacez les deux piles 3 signaux sonores/le faibles et l’appareil comme décrit dans ce voyant LED d’état de risque donc de ne mode d’emploi. plus pouvoir fonc- l’appareil clignote, tionner. même après avoir été éteint et rallumé.
-
Page 80: Élimination
Problème Cause possible Solution L’appareil ne s’allume L’appareil est défec- Adressez-vous au service pas alors que les piles tueux. client. ont été remplacées et l’interrupteur MARCHE/ ARRÊT est en position MARCHE. 11. ÉLIMINATION Réparation et élimination de l’appareil • Vous ne devez pas réparer ou ajuster l’appareil vous-même. Le bon fonc- tionnement de l’appareil n’est plus garanti si tel était le cas. - Page 81 • Seuls le service client ou les opérateurs autorisés peuvent procéder à une réparation. Cependant, avant toute réclamation, veuillez contrôler au préalable l’état des piles et les remplacer le cas échéant. • Dans l’intérêt de la protection de l’environnement, l’appareil ne doit pas être jeté...
-
Page 82: Caractéristiques Techniques
• Ces pictogrammes se trouvent sur les piles à substances nocives : Pb = pile contenant du plomb, Cd = pile contenant du cadmium, Hg = pile contenant du mercure. 12. CARACTÉRISTIQUES TECHNIQUES Type BR 60 Model BR 10 Dimensions (L/l/H) 86 x 35 x 25 mm Poids (avec piles) 44,5 g Alimentation électrique... - Page 83 Durée de fonctionnement env. 300 utilisations (par pile) prévue Température et taux d’humidité de -10 °C à 50 °C, humidité de l’air relative de stockage et de transport 30 % à 85 % admissibles Température et taux d’humidité de 10 °C à 40 °C, humidité de l’air relative d’utilisation admissibles 30 % à...
-
Page 84: Garantie/Maintenance
13. GARANTIE/MAINTENANCE Pour plus d’informations sur la garantie et les conditions de garantie, consul- tez la fiche de garantie fournie. - Page 85 ESPAÑOL Lea atentamente estas instrucciones de uso, consérvelas para su futura utilización, póngalas a disposición de otros usuarios y respete las indicaciones. Índice 1. Artículos suministrados ....86 7. Utilización ......... 101 2. Explicación de los símbolos ..86 8. Limpieza y cuidado ....104 3.
-
Page 86: Artículos Suministrados
1. ARTÍCULOS SUMINISTRADOS Compruebe que el embalaje de los artículos suministrados esté intacto y que su contenido esté completo. Antes de utilizar el aparato deberá asegurarse de que ni este ni el mosquetón presentan daños visibles y de que se retira el material de embalaje correspondiente. - Page 87 ADVERTENCIA Indicación de advertencia sobre peligro de lesiones u otros peligros para la salud ATENCIÓN Indicación de seguridad sobre posibles daños del aparato Información sobre el producto Indicación de información importante Seguir las instrucciones Leer las instrucciones antes de empezar a trabajar o a manejar aparatos o máquinas Aislamiento de las piezas de aplicación tipo BF Pieza de aplicación aislada galvánicamente (F significa...
- Page 88 Encendido Apagado Eliminación según la Directiva europea sobre residuos de aparatos eléctricos y electrónicos (WEEE) No desechar con la basura doméstica pilas que contengan sustancias tóxicas Fabricante Separe los componentes del envase y elimínelos conforme a las disposiciones municipales. Etiquetado para identificar el material de embalaje. A = abreviatura del material, B = número de material: 1-7 = plásticos, 20-22 = papel y cartón...
- Page 89 Separe el producto y los componentes del envase y elimíne- los conforme a las disposiciones municipales. Número de serie Clase IP Aparato con protección contra cuerpos extraños sólidos con IP 42 un diámetro ≥1 mm y contra goteo de agua con la carcasa inclinada hasta 15°.
-
Page 90: Uso Correcto
Marcado CE Este producto cumple los requisitos de las directivas europeas y nacionales vigentes. Producto sanitario Diseño extrapequeño especialmente adecuado para el uso fuera de casa 3. USO CORRECTO Finalidad El aparato contra picaduras de insectos se ha diseñado para aliviar el picor y la hinchazón causados por mordeduras o picaduras de insectos mediante el desarrollo de calor (hipertermia local). - Page 91 Grupo objetivo El aparato contra picaduras de insectos está previsto para los cuidados médi- cos en el entorno doméstico, no en instalaciones profesionales de asistencia sanitaria. La aplicación del aparato contra picaduras de insectos es adecuada en personas mayores de 3 años bajo supervisión. El uso individual es apto para personas mayores de 12 años.
-
Page 92: Indicaciones De Advertencia Y De Seguridad
4. INDICACIONES DE ADVERTENCIA Y DE SEGURIDAD Contraindicaciones • No utilice el aparato si sufre diabetes. En determinadas circunstancias, la sensación de dolor podría reducirse y las personas diabéticas podrían quemarse. • No utilice el aparato en personas que carezcan de autonomía, niños menores de 3 años ni personas con sensibilidad limitada al calor. - Page 93 • No utilice el aparato sobre piel con enfermedades agudas o crónicas (lesionada o inflamada) (p. ej., con inflamaciones dolorosas o indoloras, enrojecimiento, erupciones cutáneas (como alergias), quemaduras, con- gelación, contusiones, hinchazones (sin signos de picadura de insecto), heridas abiertas/sangrantes o en proceso de curación, o en cicatrices posoperatorias en fase de curación).
- Page 94 Indicaciones de advertencia generales • Para el uso propio la persona debe ser mayor de 12 años. El uso en niños menores de 12 años de edad debe realizarse únicamente bajo la supervi- sión o con la ayuda de un adulto. •...
- Page 95 • Consulte inmediatamente a un médico si aparecen los primeros signos de picor, enrojecimiento o hinchazón intensos, mareos, náuseas, dificul- tad para respirar, ronchas, aumento o descenso de la presión arterial. • No utilice el aparato cerca de los ojos, en los párpados, la boca ni las mucosas.
- Page 96 Medidas de precaución generales • No toque el aparato con las manos húmedas. No rocíe el aparato con agua. El aparato solo se debe utilizar cuando esté completamente seco. • No utilice detergentes ni disolventes para la limpieza y el mantenimiento del aparato.
- Page 97 • Cuando el aparato esté guardado, no se deben colocar objetos pesados sobre él. • Antes de utilizar el aparato deberá asegurarse de que ni este ni el mos- quetón presentan daños visibles. En caso de duda, no lo use y póngase en contacto con su distribuidor o con la dirección del servicio de aten- ción al cliente indicada.
- Page 98 • ¡Peligro de explosión! No arroje pilas al fuego. • Si se derrama el líquido de una pila, póngase guantes protectores y limpie el compartimento de las pilas con un paño seco. • No despiece, abra ni triture las pilas. •...
- Page 99 Indicación relativa a la compatibilidad electromag- nética • El aparato está diseñado para usarse en todos los entornos que se espe- cifican en estas instrucciones de uso, incluido el ámbito doméstico. • En presencia de perturbaciones electromagnéticas, el aparato solo se puede usar de forma restringida y en determinadas circunstancias.
-
Page 100: Descripción Del Aparato
5. DESCRIPCIÓN DEL APARATO Los esquemas correspondientes se muestran en la página 3. Botón de activación Plaquita calentadora Interruptor de encendido y Tapa del compartimento de apagado las pilas LED de estado Mosquetón 6. PUESTA EN FUNCIONAMIENTO Colocar las pilas 1. -
Page 101: Utilización
7. UTILIZACIÓN ADVERTENCIA Antes de cada aplicación, asegúrese de que no quede ningún resto del aguijón del insecto en el lugar donde se ha producido la picadura. Retire con cuidado el aguijón antes de la aplicación. Una aplicación inmediatamente después de la mordedura o picadura del insecto da los mejores resultados. Si espera demasiado tiempo para tratar la zona de la mordedura o picadura y ya se ha producido el picor y la hinchazón, el aparato contra picaduras de insectos solo podrá... - Page 102 2. Coloque el aparato con la plaquita calentadora sobre el lugar donde se ha producido la mordedura o picadura. Pulse el botón de activación una vez. El LED de estado se ilumina en azul y le indica que la aplica- ción se está...
- Page 103 4. Si es necesario, puede volver a aplicar la función de calor del aparato contra picaduras de insectos sobre la picadura o mordedura tras una pausa de 2 minutos, o también inmediatamente sobre otra picadura o mordedura en otro lugar. No debe superarse la cantidad máxima de 5 aplicaciones por hora en el mismo lugar.
-
Page 104: Limpieza Y Cuidado
8. LIMPIEZA Y CUIDADO Siga las medidas de higiene que se detallan a continuación para evitar ries- gos para la salud: • El aparato se ha diseñado para un uso repetido. • Se recomienda limpiar el aparato antes de usarlo por primera vez y antes de cada uso posterior. -
Page 105: Piezas De Repuesto
• Si el aparato se utiliza sobre varias picaduras o mordeduras, se reco- mienda limpiar la plaquita calentadora cada vez. Así se reduce la posibi- lidad de que los gérmenes y las bacterias se transfieran de una zona de la piel a otra. Para desinfectar la plaquita calentadora, utilice un papel de cocina humedecido con un desinfectante. -
Page 106: Resolución De Problemas
10. RESOLUCIÓN DE PROBLEMAS Problema Posible causa Solución El aparato no se El interruptor de Desplace el interruptor de enciende. encendido y apa- encendido y apagado gado está en la a la posición ON. posición OFF. Las pilas están Cambie las dos pilas tal gastadas. - Page 107 Problema Posible causa Solución El aparato emite 3 La carga de las pilas Cambie las dos pilas tal señales acústicas/ es demasiado baja, como se describe en estas por lo que el aparato instrucciones de uso. el LED de estado ya no se puede parpadea –...
-
Page 108: Eliminación
Problema Posible causa Solución El aparato no se Es posible que el Diríjase al servicio de enciende aunque se aparato esté ave- atención al cliente. han cambiado las riado. pilas y el interruptor de encendido y apagado se ha situado en la posición ON. - Page 109 • Las reparaciones solo deben ser realizadas por el servicio de atención al cliente o distribuidores autorizados. Antes de realizar cualquier reclama- ción, compruebe el estado de las pilas y sustitúyalas si es necesario. • Para proteger el medio ambiente, el aparato no se debe desechar al final de su vida útil junto con la basura doméstica.
-
Page 110: Datos Técnicos
Cd = la pila contiene cadmio, Hg = la pila contiene mercurio. 12. DATOS TÉCNICOS Tipo BR 60 Modelo BR 10 Dimensiones (L x An x Al) 86 x 35 x 25 mm Peso (con pilas) 44,5 g Alimentación 2 pilas de 1,5 V AAA LR03 Temperatura máx. - Page 111 Tiempo de funcionamiento aprox. 300 aplicaciones (mediante pilas) previsto Temperatura y humedad de de -10 °C a 50 °C, humedad relativa del aire almacenamiento y transporte del 30 al 85 % admisibles Temperatura y humedad de de 10 °C a 40 °C, humedad relativa del aire funcionamiento admisibles del 30 al 85 % El número de serie se encuentra en el aparato o en el compartimento de las...
-
Page 112: Garantía/Asistencia
medidas especiales de precaución relativas a la compatibilidad electromag- nética. 13. GARANTÍA/ASISTENCIA Encontrará más información sobre la garantía y yas condiciones de la misma en el folleto de garantía suministrado. - Page 113 ITALIANO Leggere attentamente le presenti istruzioni per l'uso, conservarle per impieghi futuri, renderle accessibili ad altri utenti e attenersi alle indicazioni. Indice 1. Fornitura ........114 8. Pulizia e cura ......131 2. Spiegazione dei simboli ... 114 9. Ricambi ........132 3.
-
Page 114: Fornitura
In caso di dubbio, non utilizzare l’apparecchio e consultare il proprio rivenditore o contattare l’Assistenza clienti indicata. 1x BR 10 1x Moschettone 2x batterie di tipo AAA (LR03 da 1,5 V) 1x Le presenti istruzioni per l’uso... - Page 115 AVVERTENZA Avvertimento di pericolo di lesioni o di pericoli per la salute ATTENZIONE Indicazione di sicurezza per possibili danni all'apparecchio Informazioni sul prodotto Indicazione di informazioni importanti Seguire le istruzioni Prima dell'inizio dei lavori e/o dell'utilizzo di apparecchi o macchine, leggere le istruzioni Isolamento delle parti applicate di tipo BF Parte applicata isolata galvanicamente (F sta per floating), soddisfa i requisiti delle correnti di dispersione per il tipo B...
- Page 116 Smaltimento secondo la direttiva europea sui rifiuti di apparecchiature elettriche ed elettroniche (RAEE) Non smaltire le batterie contenenti sostanze tossiche insieme ai rifiuti domestici Produttore Separare i componenti dell‘imballaggio e smaltirli secondo le norme comunali. Etichetta di identificazione del materiale di imballaggio. A = abbreviazione del materiale, B = codice materiale: 1-7 = plastica, 20-22 = carta e cartone...
- Page 117 Separare il prodotto e i componenti dell‘imballaggio e smal- tirli secondo le norme comunali. Numero di serie Classificazione IP Apparecchio protetto contro la penetrazione di corpi solidi IP 42 di diametro ≥1 mm e contro le gocce d’acqua se il corpo è inclinato fino a 15°...
-
Page 118: Uso Conforme
Marchio CE Il presente prodotto soddisfa i requisiti delle direttive europee e nazionali vigenti. Dispositivo medico Design extra-piccolo particolarmente adatto per l‘uso in viaggio 3. USO CONFORME Ambito di applicazione Il dopopuntura è studiato per alleviare il prurito e gonfiori provocati da punture o morsi di insetti mediante lo sviluppo di calore (ipertermia locale). - Page 119 di età superiore ai 3 anni, sotto sorveglianza, mentre l’utilizzo in proprio è possibile per tutte le persone di età superiore ai 12 anni. Vantaggi clinici Trattamento e alleviamento di prurito e gonfiore causati da morsi o punture di insetti. Indicazione Si consiglia il trattamento con il dopopuntura in caso di: - Prurito...
-
Page 120: Avvertenze E Indicazioni Di Sicurezza
4. AVVERTENZE E INDICAZIONI DI SICUREZZA Controindicazioni • Non utilizzare l’apparecchio se si soffre di diabete. I soggetti diabetici, in- fatti, potrebbero procurarsi ustioni poiché in alcuni casi la loro percezione del dolore può essere ridotta. • Non utilizzare l’apparecchio su persone non autosufficienti, bambini di età inferiore a 3 anni o persone con ridotta sensibilità... - Page 121 • Non utilizzare l’apparecchio in presenza di febbre. • Non utilizzare l’apparecchio su zone della pelle sensibili. • Non utilizzare l’apparecchio in caso di disturbi della sensibilità che implichino una ridotta sensazione di dolore (come ad es. i disturbi del metabolismo).
- Page 122 • Prima di utilizzare l’apparecchio, consultare il proprio medico curante in presenza di affezioni della pelle, malattie acute (in particolare in caso di tendenza a malattie tromboemboliche nonché in presenza di neoplasie maligne), stati dolorosi cronici non definiti, indipendentemente dalla zona del corpo.
- Page 123 • Richiedere immediatamente la consulenza di un medico ai primi segni di: aumento di prurito, arrossamento o gonfiore della pelle, capogiro, nausea, insufficienza respiratoria, formazione di pomfi, abbassamento o aumento della pressione sanguigna. • Non utilizzare nelle zone vicino a occhi, palpebre, bocca e sulle mucose. •...
- Page 124 Misure precauzionali generali • Non toccare l’apparecchio con le mani umide. Non versare acqua sull’apparecchio. Utilizzare l’apparecchio solo quando è completamente asciutto. • Non utilizzare detergenti o solventi per la pulizia e la cura dell’apparec- chio. Eventuali liquidi all’interno dell’apparecchio possono danneggiare i componenti elettronici o altri componenti dell’apparecchio e pregiudicar- ne il funzionamento.
- Page 125 • Non posizionare oggetti pesanti sull’apparecchio. • Prima dell’uso assicurarsi che l’apparecchio e il moschettone non presen- tino nessun danno palese. In caso di dubbio, non utilizzare l’apparecchio e consultare il proprio rivenditore o contattare l’Assistenza clienti indicata. • Conservare l’apparecchio in un luogo al riparo dagli agenti atmosferici. L’apparecchio deve essere conservato alle condizioni ambientali previste.
- Page 126 • Non smontare, aprire o frantumare le batterie. • Prestare attenzione alla polarità positiva (+) e negativa (-). • Proteggere le batterie dal caldo eccessivo. • Le batterie non devono essere ricaricate o mandate in cortocircuito. • Qualora l’apparecchio non dovesse essere utilizzato per un periodo prolungato, rimuovere le batterie dal vano batterie.
-
Page 127: Descrizione Dell'apparecchio
• Evitare di utilizzare il presente apparecchio nelle immediate vicinanze di altri apparecchi o con apparecchi in posizione impilata, poiché ciò potrebbe determinare un funzionamento non corretto. Laddove si renda tuttavia necessario un utilizzo di questo tipo, è opportuno tenere sotto controllo questo apparecchio e gli altri apparecchi in modo da assicurarsi che funzionino correttamente. -
Page 128: Messa In Funzione
6. MESSA IN FUNZIONE Inserimento delle batterie 1. Far scorrere il coperchio vano batterie 2. Inserire le batterie in dotazione nell’apposito vano, come stampato nel va- no batterie. Prestare attenzione a rispettare la polarità corretta (+/-). 3. Richiudere il coperchio vano batterie facendolo scorrere finché... - Page 129 ha un effetto limitato. Tuttavia, è possibile trattare la zona con il dopopuntu- ra. La maggior parte delle volte è possibile alleviare il prurito e accelerare la guarigione. 1. Spingere l’interruttore ON/OFF in direzione della piastrina riscaldante con il simbolo “I” per ON. Il LED di stato dell‘apparecchio si illumi- na in verde e segnala che l‘apparecchio è...
- Page 130 ATTENZIONE! A seconda della sensibilità di chi utilizza il prodotto e della zona della pelle trattata, la temperatura di trattamento può essere percepita come sgradevole e provocare leggeri arrossamenti, e in rari casi anche irritazioni. Se si dovesse sentire troppo calore, interrompere immediatamente il trattamento! 4.
-
Page 131: Pulizia E Cura
Batteria scarica Prima che la tensione della batteria sia troppo bassa per poter eseguire altre applicazioni, il LED di stato dell’apparecchio inizia a lampeggiare 3 volte ed emette 3 volte un segnale acustico. Sostituire le due batterie non appena possibile, come descritto nel capitolo 6. 8. -
Page 132: Ricambi
• Non utilizzare mai sostanze che, in caso di contatto con la pelle o con le mucose, di ingestione o di inalazione, potrebbero risultare potenzialmente tossiche. Non utilizzare detergenti aggressivi e non immergere mai l’appa- recchio in acqua. • Non lavare l’apparecchio e il moschettone in lavastoviglie. •... -
Page 133: Che Cosa Fare In Caso Di Problemi
Denominazione Cod. art. o cod. ordine Moschettone 164.395 10. CHE COSA FARE IN CASO DI PROBLEMI? Problema Possibile causa Soluzione L'apparecchio non si L'interruttore ON/ Spingere l'interruttore ON/ accende. è in posizio- in posizione ON. ne OFF. Le batterie sono Sostituire le due batterie scariche. - Page 134 Problema Possibile causa Soluzione L'apparecchio emette Tensione della bat- Sostituire le due batterie 3 segnali acustici / il teria troppo bassa: come descritto nelle pre- LED di stato dell'appa- non è più possibile senti istruzioni per l'uso. accendere l'appa- recchio lampeggia recchio.
-
Page 135: Smaltimento
Problema Possibile causa Soluzione L'apparecchio non si L'apparecchio proba- Rivolgersi al Servizio accende, sebbene le bilmente è difettoso. clienti. batterie siano state sostituite e l'interrut- tore ON/OFF posizionato su ON. 11. SMALTIMENTO Riparazione e smaltimento dell’apparecchio • L’apparecchio non deve essere riparato o tarato personalmente. In tal caso non si garantisce più... - Page 136 • A tutela dell’ambiente, al termine del suo ciclo di vita l’apparecchio non deve essere smaltito nei rifiuti domestici, ma conferito negli appositi centri di raccolta. Smaltire l’apparecchio secondo la direttiva europea sui rifiuti di apparecchiature elettriche ed elettroniche (RAEE). In caso di dubbi, rivolgersi alle autorità comunali competenti per lo smaltimento.
-
Page 137: Dati Tecnici
12. DATI TECNICI Tipo BR 60 Model BR 10 Dimensioni (lungh. x largh. x alt.) 86 x 35 x 25 mm Peso (con batterie) 44,5 g Alimentazione 2 batterie AAA LR03 da 1,5 V Max. temperatura 50 °C ± 2 °C (122 °F ± 3,6 °F) -
Page 138: Garanzia / Assistenza
Salvo modifiche tecniche. L’apparecchio è conforme ai requisiti della direttiva europea per i dispositi- vi medici 93/42/ , alla legge sui dispositivi medici e alla norma europea EN 60601-1-2 (in accordo con CISPR 11, CISPR 14-1, CISPR-32, IEC 61000-3-2, IEC 61000-3-3, IEC 61000-4-2, IEC 61000-4-3, IEC 61000-4-4, IEC 61000-4-5, IEC 61000-4-6, IEC 61000-4-8, IEC 61000-4-11) e necessita di precauzioni d’impiego particolari per quanto riguarda la compatibilità... - Page 139 TÜRKÇE Lütfen bu kullanım kılavuzunu dikkatle okuyun, ileride gerekebileceği için saklayın, diğer kullanı- cıların erişebilmesini sağlayın ve içindeki yönergelere uyun. İçindekiler 1. Teslimat kapsamı ...... 140 7. Kullanım ........154 2. İşaretlerin açıklaması ....140 8. Temizlik ve bakım ..... 156 3.
-
Page 140: Teslimat Kapsamı
çıkarıldığın- dan emin olun. Şüpheli durumlarda kullanmayın ve satıcınıza veya belirtilen müşteri hizmetleri adresine başvurun. 1x adet BR 10 1x Karabina 2x adet AAA tip pil (LR03 1,5 V) 1x adet kullanım kılavuzu 2. - Page 141 UYARI Yaralanma tehlikelerine veya sağlığınızla ilgili tehlikelere yönelik uyarı DİKKAT Cihazda ve meydana gelebilecek hasarlara yönelik güvenlik uyarısı Ürün bilgileri Önemli bilgilere yönelik not Kullanım kılavuzunu dikkate alın Çalışmaya ve/veya cihazları ya da makineleri kullanmaya başlamadan önce kılavuzu okuyun Kullanım parçalarının korunması Tip BF Galvanik korumalı...
- Page 142 Kapalı Elektrikli ve elektronik atık cihazlarla ilgili AB direktifine (WEEE - Waste Electrical and Electronic Equipment) uygun şekilde bertaraf edilmelidir Zararlı madde içeren piller evsel atıklarla birlikte bertaraf edilmemelidir Üretici Ambalaj bileşenlerini ayırın ve belediyenin kurallarına uygun olarak bertaraf edin. Ambalaj malzemesinin tanımlanması...
- Page 143 Ürünü ve ambalaj bileşenlerini ayırın ve belediyenin kurallarına uygun olarak bertaraf edin. Seri numarası IP sınıfı Cihaz, çapı 1 mm ve üzerinde olan yabancı cisimlere karşı ve IP 42 gövde maks. 15˚ eğimli konumdayken damlayan suya karşı korumalıdır Storage/Transport İzin verilen depolama sıcaklığı ve hava nemi Operating İzin verilen çalışma sıcaklığı...
-
Page 144: Amacına Uygun Kullanım
CE işareti Bu ürün geçerli Avrupa Birliği yönergelerinin ve ulusal yönergelerin gereklerini yerine getirmektedir. Tıbbi ürün Ekstra küçük tasarımı sayesinde hareket hâlindeyken kullanım için idealdir 3. AMACINA UYGUN KULLANIM Kullanım alanı Böcek sokması iyileştirme cihazı, böcek sokmaları veya ısırıkları nedeniyle oluşan kaşınma, şişme veya iltihapları... - Page 145 Hedef grup Böcek sokmalarını iyileştirici, sağlık hizmeti verilen profesyonel tesislerde değil, ev ortamında tıbbi bakım sağlamak amacıyla kullanılmak üzere tasarlan- mıştır. Böcek sokmalarını iyileştirici, gözetim altında olmak şartıyla 3 yaşından büyük herkeste kullanılabilir. 12 yaşından büyük kişiler, cihazı kendileri kullanabilir. Klinik fayda Böcek sokması...
-
Page 146: Uyarılar Ve Güvenlik Yönergeleri
4. UYARILAR VE GÜVENLİK YÖNERGELERİ Kontrendikasyonlar • Diyabet hastasıysanız cihazı kullanmayın. Ağrı hassasiyetinde azalma ola- bileceği için diyabet hastalarının kendilerini yakması söz konusu olabilir. • Cihazı yardıma muhtaç kişilerde, 3 yaş altındaki çocuklarda ve ısı has- sasiyeti sınırlı kişilerde kullanmayın. Bunlar arasında hastalığa bağlı cilt değişiklikleri olan kişiler, uygulama bölgesindeki ciltte yarası... - Page 147 • Cihazı, ağrı hassasiyetini azaltan duyusal bozukluklarda (örn. metabolizma rahatsızlıkları) kullanmayın. • Cihazı merhem, krem veya jeller ile birlikte aynı anda kullanmayın. • Aynı cilt bölgesine uzun süre ısı uygulanması nedeniyle kalıcı bir cilt tahrişi oluşursa cihazı kullanmayın. Genel uyarılar •...
- Page 148 • Böcek sokması iyileştirme cihazı ile uygulama yaparken veya uygulama sonrasında şikayetleriniz artarsa uygulamaya son verin ve derhal tıbbi yardım alın. • Kene ısırığı söz konusuysa derhal tıbbi yardım alın. Kene ısırığı, ansefalit (TBE) veya laym hastalığı gibi hastalıkların ısırılan veya sokulan kişiye aktarılmasına neden olabilir.
- Page 149 • Cihazın kullanımı, tıbbi muayenenin ve tedavinin yerine geçmez. Bu nedenle her türlü ağrı veya hastalık durumunda her zaman doktorunuza danışın. • Cihazın çalışmaması, rahatsızlık hissetme veya ağrıların söz konusu olma- sı durumunda uygulamayı derhal durdurun. Genel güvenlik önlemleri • Cihaz ıslak elle tutulmamalıdır. Cihazın üzerine su sıçramamalıdır. Cihaz sadece tamamen kuru durumdayken kullanılmalıdır.
- Page 150 • Cihazı darbelerden, nemden, tozdan, kimyasallardan, aşırı sıcaklık deği- şikliklerinden ve çok yakın ısı kaynaklarından (soba, kalorifer radyatörü) koruyun. • Cihazın içine su girmemesine dikkat edin. Yine de içine su girecek olursa, derhal pilleri çıkarın ve cihazı ancak tamamen kuruduğunda tekrar kulla- nın.
- Page 151 Pillerin kullanımına yönelik önlemler • Pilden sızan sıvı cilt veya gözlerle temas ettiğinde, ilgili yeri suyla yıkayın ve bir doktora başvurun. • Yutma tehlikesi! Küçük çocuklar pilleri yutabilir ve bunun sonucunda boğulabilir. Bu nedenle pilleri küçük çocukların erişemeyeceği bir yerde saklayın! •...
- Page 152 Elektromanyetik uyumluluk ile ilgili bilgi • Cihaz, konutlar dahil olmak üzere bu kullanım kılavuzunda belirtilen tüm ortamlarda çalıştırılabilir. • Elektromanyetik parazit olan ortamlarda cihazın fonksiyonları duruma bağlı olarak yalnızca kısıtlı ölçüde kullanılabilir. Bunun sonucunda örneğin hata mesajları görülebilir veya cihaz devre dışı kalabilir. •...
-
Page 153: Cihaz Açıklaması
5. CİHAZ AÇIKLAMASI İlgili çizimler 3. sayfadadır. Etkinleştirme düğmesi Isıtma plakası Açma/kapatma düğmesi Pil bölmesi Cihaz durumu LED’i Karabina 6. İLK ÇALIŞTIRMA Pillerin takılması 1. Pil bölmesi kapağını kaydırarak açın. 2. Teslimat kapsamında verilen pilleri, pil bölmesinin üzerinde gösterilen şe- kilde bölmeye yerleştirin. -
Page 154: Kullanım
7. KULLANIM UYARI Uygulamaya başlamadan önce, sokulan yerde böceğin iğnesinin olmadığın- dan emin olun. Varsa uygulamaya başlamadan önce iğneyi dikkatlice çıkartın. En iyi sonuçlar böcek sokmasından veya ısırmasından hemen sonra uygulama yapıldığında elde edilir. Sokulan veya ısırılan yere uygulama yapmak için çok beklemeniz ve kaşınma, kızarma ve şişme gibi durumların oluşması... - Page 155 2. Isıtma plakalı cihazı , sokulan veya ısırılan yerin üzerine gelecek şekilde yerleştirin. Etkinleştirme düğmesine bir kez basın. Cihaz durumu LED‘i mavi yanar ve uygulamanın başladığını gösterir. 3. Uygulama sona erdikten sonra sesli bir sinyal duyulur, ısıtma plakasının ısıtılması otomatik olarak durdurulur ve cihaz durumu LED’i tekrar yeşil yanar.
-
Page 156: Temizlik Ve Bakım
kullanabilirsiniz. Aynı noktaya bir saat içinde 5 defadan çok uygulama ya- pılmamasına dikkat edilmelidir. 5. Uygulama tamamlandığında açma/kapatma düğmesini tekrar kapalı konumuna getirin. Bu konum “O” simgesi ile işaretlenmiştir. Mavi cihaz durumu LED’i söner. 6. Cihazı saklayacağınız yere koymadan önce cihazın kapalı ve ısıtma plaka- sının soğumuş... - Page 157 • Cihazın ilk kullanımdan ve her kullanımdan önce temizlenmesi tavsiye edilir. • Temizlenmeden önce cihazın kapatılmış ve soğumuş olması ve pillerinin çıkartılmış olması gerekir. • Cihazın gövdesini temizlemek için sadece yumuşak ve kuru bezler kullanın. • Temizlik için cilt veya mukoza ile temas ettiğinde, yutulduğunda veya solunduğunda zararlı...
-
Page 158: Yedek Parçalar
9. YEDEK PARÇALAR Yedek parçayı belirtilen malzeme numarasıyla ilgili servis adresinden satın alabilirsiniz. Tanım Ürün veya sipariş numarası Karabina 164.395 10. SORUNLARIN GİDERİLMESİ Sorun Olası neden Çözüm Cihaz çalışmıyor. Açma/kapatma Açma/kapatma düğmesini düğmesi kapalı açık konumuna itin. konumunda. Piller tükenmiştir. Her iki pili de bu kullanım kılavuzunda açıklandığı... - Page 159 Sorun Olası neden Çözüm Cihaz artık yeterince Pil voltajı çok düşük. Her iki pili de bu kullanım ısınmıyor. kılavuzunda açıklandığı gibi değiştirin. Cihazdan 3 sinyal sesi Pil seviyesi cihazın Her iki pili de bu kullanım geliyor / cihaz durumu artık kullanılamaya- kılavuzunda açıklandığı...
-
Page 160: Bertaraf Etme
Sorun Olası neden Çözüm Piller değiştirilmiş ve Cihaz arızalanmış Lütfen müşteri hizmetleri- açma/kapatma düğmesi olabilir. ne başvurun. açık konumuna geti- rilmiş olmasına rağmen cihaz çalışmıyor. 11. BERTARAF ETME Cihazın onarılması ve bertaraf edilmesi • Cihaz kullanıcı tarafından onarılmamalı veya kalibre edilmemelidir. Aksi halde cihazın kusursuz çalışması... - Page 161 • Kullanım ömrü sona eren cihazlar, çevrenin korunması için evsel atıklarla birlikte bertaraf edilmemelidir. Cihaz, ülkenizdeki uygun atık toplama merkezleri aracılığıyla bertaraf edilebilir. Cihazı elektrikli ve elektronik atık cihazlarla ilgili AB direktifine (WEEE - Waste Electrical and Electronic Equipment) uygun şekilde bertaraf edin. Bertaraf işlemiyle ilgili sorularınız olduğunda bölgenizdeki yetkili makamlara başvurun.
-
Page 162: Teknik Veriler
12. TEKNİK VERİLER BR 60 Model BR 10 Ölçüler (U x G x Y) 86 x 35 x 25 mm Ağırlık (piller dahil) 44,5 g Güç kaynağı 2 x 1,5 V AAA LR03 pil Maks. Sıcaklık 50 °C ± 2 °C (122 °F ± 3,6 °F) Fonksiyonlar 1 süre seçeneği (3 sn) -
Page 163: Garanti/Servis
Teknik değişiklik hakkı saklıdır. Cihaz, tıbbi cihazlarla ilgili 93/42/ sayılı AB direktifine, tıbbi ürünler kanununa ve EN 60601-1-2 Avrupa normuna uygundur (CISPR 11, CISPR 14-1, CISPR-32, IEC 61000-3-2, IEC 61000-3-3, IEC 61000-4-2, IEC 61000-4-3, IEC 61000-4-4, IEC 61000-4-5, IEC 61000-4-6, IEC 61000-4-8, IEC 61000-4-11 ile uyumluluk) ve elektromanyetik uyumluluk bakımından özel önlemlere tabidir. - Page 164 РУССКИЙ Внимательно прочтите инструкцию по приме- нению, сохраните ее для последующего ис- пользования, храните в доступном для других пользо- вателей месте и следуйте ее указаниям. Содержание 1. Комплект поставки ....165 8. Очистка и уход ......183 2. Пояснения к символам ..165 9. Запасные детали ....185 3.
-
Page 165: Комплект Поставки
1. КОМПЛЕКТ ПОСТАВКИ Проверьте комплектность поставки и убедитесь в том, что на картонной упаковке нет внешних повреждений. Перед использованием убедитесь в том, что прибор и карабин не имеют видимых повреждений и все упако- вочные материалы удалены. В случае сомнений не используйте прибор и обратитесь к продавцу или в сервисную службу по указанному адресу. 1x прибор... - Page 166 ПРЕДУПРЕЖДЕНИЕ Предупреждает об опасности травмирования или нанесения вреда здоровью. ВНИМАНИЕ Указывает на возможные повреждения прибора Информация о продукте Содержит важную информацию. Соблюдайте инструкцию Перед началом работы и/или использованием прибора или устройства изучите инструкцию. Изоляция рабочих частей Тип BF Гальванически изолированная рабочая часть (F обозначает...
- Page 167 Выключение Утилизация прибора в соответствии с директивой ЕС по отходам электрического и электронного оборудования — WEEE (Waste Electrical and Electronic Equipment). Не утилизируйте батарейки вместе с бытовым мусором: они содержат токсичные вещества. Производитель Удалите элементы упаковки и утилизируйте их в соответствии с местными предписаниями. Маркировка для идентификации упаковочного материала. A = сокращенное обозначение материала, B = номер...
- Page 168 Снимите упаковку с изделия и утилизируйте ее в соответствии с местными предписаниями. Серийный номер Степень защиты IP Прибор защищен от проникновения твердых тел IP42 диаметром ≥ 1 мм, а также от капель воды при максимальном наклоне корпуса на 15° Storage/Transport Допустимая температура хранения и влажность воздуха Operating Допустимая...
-
Page 169: Использование По Назначению
Знак СЕ Это изделие соответствует требованиям действующих европейских и национальных директив. Медицинское изделие Очень компактный дизайн, подходит для использования в дороге 3. ИСПОЛЬЗОВАНИЕ ПО НАЗНАЧЕНИЮ Целевое назначение Прибор для заживления кожи от укусов насекомых предназначен для снятия зуда и отеков, возникших из-за укусов насекомых, посред- ством... - Page 170 Целевая группа Прибор для заживления кожи от укусов насекомых предназначен для ухода в домашних условиях, а не в профессиональных медицинских учреждениях. Прибор для заживления кожи от укусов насекомых подхо- дит для применения лицами старше 3 лет под присмотром взрослых, а самостоятельное...
-
Page 171: Предупреждения И Указания По Технике Безопасности
4. ПРЕДУПРЕЖДЕНИЯ И УКАЗАНИЯ ПО ТЕХНИКЕ БЕЗОПАСНОСТИ Противопоказания • Откажитесь от использования прибора, если Вы страдаете диа- бетом. Восприятие боли может при некоторых обстоятельствах ослабнуть, и диабетики могут сами причинить себе ожоги. • Не используйте прибор для воздействия на лиц в беспомощном состоянии, детей до 3 лет или лиц с пониженной чувствительностью к теплу. - Page 172 • Не используйте прибор на коже с острыми или хроническими заболеваниями (повреждениями или воспалениями), например, при болезненных и безболезненных воспалениях, покраснениях, сыпи (например, аллергии), обморожениях, ожогах, ушибах, опу- холях (без признаков укусов насекомых), открытых и заживающих ранах, а также на послеоперационных рубцах, находящихся в стадии заживления. •...
- Page 173 Общие предупреждения • Самостоятельно применять прибор могут только лица старше 12 лет. Применение детьми младше 12 лет возможно только под контролем или с помощью взрослого. • Перед использованием прибора проконсультируйтесь с лечащим вра- чом при наличии у Вас любых заболеваний кожи, острых заболеваний (в частности, при склонности к тромбоэмболическим заболеваниям, а также...
- Page 174 • Если речь идет об укусе клеща, проконсультируйтесь с врачом. При таком укусе могут передаваться возбудители болезней, напри- мер клещевого энцефалита или боррелиоза. • При первых признаках усиленного зуда, покраснения кожи, опухоли, головокружения, тошноты, удушья, сыпи, снижения или повышения кровяного давления проконсультируйтесь с врачом. • Не применяйте вблизи глаз, на веках, во рту и на слизистых оболоч- ках.
- Page 175 • Применение прибора не заменяет консультации у врача и лечения. Поэтому при любых болях или при наличии заболевания проконсуль- тируйтесь с врачом. • Если прибор работает некорректно или появились признаки недомо- гания или боли, сразу же прекратите процедуру. Общие меры предосторожности • Запрещается прикасаться к прибору влажными руками. Не допу- скайте попадания жидкости внутрь прибора. Прибор разрешается использовать...
- Page 176 • Предохраняйте прибор от ударов, влажности, пыли, химикатов, сильных колебаний температуры и храните вдали от источников тепла (печей, радиаторов отопления). • Следите за тем, чтобы в прибор не попала вода. В случае попадания в прибор воды сразу же извлеките из него батарейки и используйте его только после полного высыхания. • При хранении на приборе не должны стоять тяжелые предметы. •...
- Page 177 Указания по обращению с батарейками • При попадании жидкости из батарейки на кожу или в глаза необходимо промыть пораженный участок большим количеством воды и обратиться к врачу. • Опасность проглатывания мелких деталей! Маленькие дети могут проглотить батарейки и подавиться ими. Поэтому батарейки необходимо хранить в недоступном для детей месте! •...
- Page 178 • Используйте батарейки одного типа или равноценных типов. • Заменяйте все батарейки сразу. • Не используйте перезаряжаемые аккумуляторы! Указания по электромагнитной совместимости • Прибор предназначен для работы в условиях, перечисленных в настоящей инструкции по применению, в том числе в домашних условиях. • При наличии электромагнитных помех возможности использования прибора...
-
Page 179: Описание Прибора
• Не используйте данный прибор рядом с другими устройствами и не устанавливайте его на другие приборы. Это может привести к сбоям в работе. Если прибор все же приходится использовать в описанных выше условиях, следует наблюдать за ним и другими устройствами, чтобы убедиться, что они работают надлежащим образом. • Несоблюдение данного указания может отрицательно сказаться на рабочих... -
Page 180: Подготовка К Работе
6. ПОДГОТОВКА К РАБОТЕ Установка батареек 1. Сдвиньте крышку отсека для батареек 2. Вставьте входящие в комплект батарейки в отсек для батареек, как показано на отсеке для батареек. При установке соблюдайте правильную полярность (+/-) батареек. 3. Снова задвиньте крышку отсека для батареек до щелчка. 7. ПРИМЕНЕНИЕ ПРЕДУПРЕЖДЕНИЕ Перед каждым использованием прибора убедитесь в том, что в месте укуса... - Page 181 появились, действие прибора для заживления кожи от укусов насекомых ограничено. Все же обработайте место укуса прибором для заживления кожи от укусов насекомых. Как правило, удается снизить зуд и ускорить заживление. 1. Чтобы включить прибор, сдвиньте переключатель ВКЛ./ВЫКЛ. (2) в направлении нагревательной пластины с символом «I». Светодиод состояния прибора светится...
- Page 182 ВНИМАНИЕ! В зависимости от чувствительности пользователя и участка кожи тем- пература обработки может восприниматься как неприятная и вызывать небольшие покраснения, а в редких случаях — даже раздражения кожи. Если Вы почувствуете, что прибор слишком сильно нагрелся и доставля- ет дискомфорт, немедленно прекратите его использование! 4. При необходимости Вы можете снова использовать функцию прогревания...
-
Page 183: Очистка И Уход
6. Перед тем как убрать прибор на хранение, убедитесь в том, что он выключен и нагревательная пластина охлаждена. Заряд батареек Прежде чем заряд батареек станет слишком низким для дальнейшего применения, светодиод состояния прибора трижды мигнет и триж- ды раздастся звуковой сигнал. Замените обе батарейки, как описано в главе 6. - Page 184 • Для очистки корпуса используйте только мягкие, сухие салфетки. • Ни в коем случае не используйте для очистки вещества, которые могут быть опасны при попадании на кожу или слизистую оболочку, проглатывании или вдыхании. Не используйте едкие чистящие сред- ства и ни в коем случае не погружайте прибор в воду. • Не мойте прибор и карабин в посудомоечной машине! •...
-
Page 185: Запасные Детали
9. ЗАПАСНЫЕ ДЕТАЛИ Запасные детали можно приобрести в соответствующих сервисных центрах, указав номер детали в каталоге. Обозначение Артикул или номер для заказа Карабин 164.395... -
Page 186: Что Делать При Возникновении Проблем
10. ЧТО ДЕЛАТЬ ПРИ ВОЗНИКНОВЕНИИ ПРОБЛЕМ? Проблема Возможные Меры по устранению причины Прибор не включа- Переключатель Сдвиньте переключатель ется. ВКЛ./ВЫКЛ. ВКЛ./ВЫКЛ. в поло- находится в поло- жение ВКЛ. жении ВЫКЛ. Батарейки разряже- Замените обе батарейки, ны. как описано в настоящей инструкции по приме- нению. - Page 187 Проблема Возможные Меры по устранению причины Прибор недостаточно Слишком низкий Замените обе батарейки, нагревается. заряд батареек. как описано в настоящей инструкции по приме- нению. Прибор выдает три Слишком низкий Замените обе батарейки, звуковых сигнала/ заряд батареек, как описано в настоящей светодиод состояния поэтому прибор инструкции...
- Page 188 Проблема Возможные Меры по устранению причины Прибор не запускает- Прибор автоматиче- Сначала выключите ся, хотя переключа- ски отключился, т. к. прибор, переведя пере- кнопка активации ключатель ВКЛ./ВЫКЛ. тель ВКЛ./ВЫКЛ. установлен в положе- была случайно в положение ВЫКЛ., ние ВКЛ. нажата в течение затем снова включите более двух секунд. его.
-
Page 189: Утилизация
11. УТИЛИЗАЦИЯ Ремонт и утилизация прибора • Ни в коем случае не ремонтируйте и не настаивайте прибор самосто- ятельно. В противном случае надежность работы прибора больше не гарантируется. • Не разбирайте прибор. Несоблюдение данного требования ведет к потере гарантии. • Ремонтные работы должны проводиться только сервисной службой или авторизованными торговыми представителями. Перед предъявлением претензий... -
Page 190: Технические Характеристики
• Батарейки нельзя утилизировать вместе с бытовым мусором. Они могут содержать тяжелые металлы, поэтому их следует утилизиро- вать отдельно. • Следующие знаки предупреждают о наличии в батарейках токсичных веществ: Pb — батарейка содержит свинец, Cd — батарейка содержит кадмий, Hg — батарейка содержит ртуть. 12. ТЕХНИЧЕСКИЕ ХАРАКТЕРИСТИКИ Тип BR 60 Model BR 10... - Page 191 Размеры (Д x Ш x В) 86 x 35 x 25 мм Вес (с батарейками) 44,5 г Электропитание 2 батарейки ААА LR03, 1,5 В Макс. температура 50 °C ± 2 °C (122 °F ± 3,6 °F) Функции 1 ступени времени (3 с) Предполагаемый срок ок. 300 процедур (на каждую батарейку) службы Допустимая температура от –10 до 50 °C, относительная влажность и влажность воздуха для воздуха 30–85 % хранения...
-
Page 192: Гарантия/Сервисное Обслуживание
Прибор соответствует требованиям директивы ЕС об изделиях медицинского назначения 93/42/ , Закону об изделиях медицин- ского назначения, а также стандартам EN 60601-1-2 (в соответствии с CISPR 11, CISPR 14-1, CISPR-32, IEC 61000-3-2, IEC 61000-3-3, IEC 61000-4-2, IEC 61000-4-3, IEC 61000-4-4, IEC 61000-4-5, IEC 61000-4-6, IEC 61000-4-8, IEC 61000-4-11) и подчиняется специаль- ным... - Page 194 BEURER GmbH • Söflinger Str. 218 • 89077 Ulm (Germany) www.beurer.com • www.beurer-gesundheitsratgeber.com www.beurer-healthguide.com...
Need help?
Do you have a question about the BR 10 and is the answer not in the manual?
Questions and answers