Advertisement
Quick Links
Advertisement

Summary of Contents for Bitronics DualBus
- Page 1 Bitronics DualBus Switch Kit User M anual F1U128-KIT P73045...
- Page 3 Introduction Thank you for p urchasing the Be lkin Comp one nts Bitronics DualBus Switch Kit! Now, you and your colle ag ue s can share and se le ct b e twe e n two d iffe re nt p aralle l d e vice s from your d e sktop . And , if you are using Wind ows ®...
-
Page 4: Technical Specifications
Technical Specifications Compatible Standards: IEEE 1284-1994 Paralle l Port Communication Stand ard Electrical: Input Voltage 9VDC M ax Input Current 600mA M ax Power Consumption 5.4W M ax Heat Dissipation 0.31 BTU/min Dimensions: Width : 7.0” (17.8cm) Height: 3.75” (9.5cm) Depth: 1.25”... -
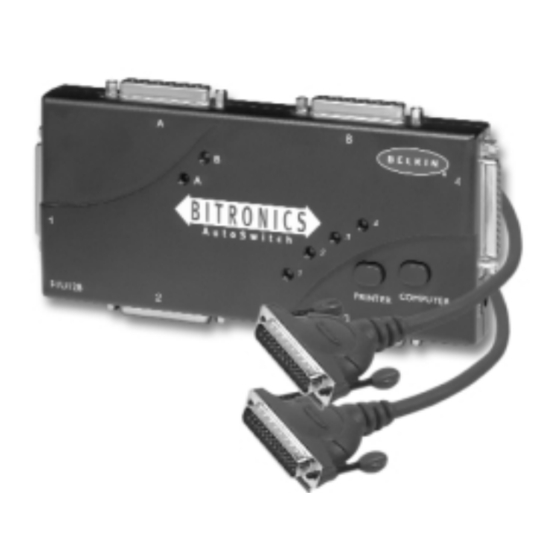
Page 5: Product Detail
Product Detail De vice activity LEDs Conne ctor to De vice A Conne ctor to De vice B Conne ctor Conne ctor to PC1 to PC4 DC p owe r jack (sid e ) Conne ctor to PC2 Conne ctor to PC3 Comp ute r b utton PC activity LEDs Printe r b utton... - Page 6 In manual mod e , you can se le ct a p ort manually throug h the b uttons on the Bitronics switch. Y ou can also use this mod e in conjunction with software to se e your switch in action! •...
- Page 7 Whe n installing software on any op e rating syste m, the software must b e installe d on all the comp ute rs conne cte d to the Bitronics switch so that e ach machine can control the switch p rop e rly.
-
Page 8: Software Installation: Windows
Software installation: Windows ® Inse rt the d iske tte lab e le d P27236 in your flop p y d rive . In the Prog ram Manag e r, click on File the n click Run. In the sp ace , typ e in " a:\se tup .e xe " . Follow the installation instruction p romp ts. - Page 9 At this p oint, the cab le s and the Bitronics switch act as if it was a file transfe r cab le . Y ou can now run p rog rams such as Wind ows‚...
- Page 10 BEFORE YOU INSTALL THE BELKIN BITRONICS SOFTWARE, YOU M UST FIRST M AKE SURE THAT EACH DEVICE WORKS PROPERLY ON ITS OWN WITH EACH COM PUTER. DO NOT CONNECT THE BITRONICS SWITCH TO THE COM PUTERS OR INSTALL THE SOFTWARE UNTIL INSTRUCTED BY THIS PROCEDURE! Make sure that the p rinte r p ort on your comp ute r is se t to ECP mod e .
- Page 11 ® (continued) Conne ct four comp ute rs and the d e vice s to b e share d to the Bitronics Switch as shown b e low. Two cab le s that conne ct comp ute rs to the Bitronics switch are includ e d .
- Page 12 Windows ® 95 / 98 and NT ® (continued) In ord e r for all comp ute rs to p rop e rly share the d e vice s, the software must b e installe d on all four comp ute rs. 4.1.
- Page 13 ® (continued) 4.4. Se le ct the mod e l of the Bitronics Switch you have , which is the F1U127 / F1U128. Click Ne xt. 4.5. Se le ct De stination Fold e r. The d e fault fold e r is re comme nd e d .
- Page 14 ® (continued) 4.6. Se le ct Prog ram Fold e r. The d e fault, Be lkin Bitronics Switch, is the re comme nd e d . Click Ne xt. 4.7. Whe n d one installing , the p rog ram will ask you to re start your comp ute r.
- Page 15 ® (continued) O nce your comp ute r has re b oote d , the Bitronics icon will ap p e ar in your syste m tray. This is how you can e asily control and config ure the Bitronics Switch.
- Page 16 If you are using a p rinte r, use the p rinte r d rive r use d for that p articular p rinte r on that p ort of the Bitronics switch. If it d oe s not show up in this me nu, that me ans the p rinte r d rive rs have not b e e n installe d .
- Page 17 Windows ® 95 / 98 and NT ® (continued) Disp lay Name is a fre e te xt fie ld . Y ou can e nte r any d e scrip tion he re for the attache d d e vice s. For instance , Port A has the Zip ®...
- Page 18 . 8.1. Click on Start, se le ct Se tting s, and d oub le -click on Printe rs. 8.2. Rig ht-click on the p rinte r installe d on the Bitronics switch, and click on Prop e rtie s:...
- Page 19 In the imag e ab ove , the p rinte r is conne cte d to Port B of the Bitronics switch. The re fore , LPx1 – PB (autoswitch) is se le cte d . Whe n finishe d , click O K.
- Page 20 The Bitronics Software automatically hand le s p rinting chore s b y d ire cting your p rint job s to the corre ct p ort on the Bitronics switch b ase d on the se tting s you se t in the Printe r Prop e rtie s and the Se tting s in ste p 7 p re viously.
-
Page 21: How Does It Work
(continued) How does it work? With the Bitronics Software load e d and the p orts p rop e rly config ure d for the ® p rinte rs as shown in ste p 8 ab ove , whe n you p rint in Wind ows , the p rint job g oe s to the Bitronics software first. - Page 22 Port A of the AutoSwitch. Whe n the p rint job is se nt, the Bitronics software te lls the Bitronics switch to switch to Port A, the n le ts the p rint job g o throug h to the Lase rJe t...
- Page 23 E:) such as a Zip ® d rive , the Bitronics Software in the syste m tray must b e config ure d so that the Bitronics switch is d e faulte d to the Port ® attache d to the Zip Drive .
- Page 24 The n, whe n you p rint to the Ink Je t Printe r on Port B (as shown ab ove ), the Bitronics switch will switch to Port B te mp orarily to se nd the p rint job , the n ®...
- Page 25 LEDs will b e lit. The n, click on the Bitronics software icon in the taskb ar and chang e p orts. Y ou will se e the LED of the Bitronics switch to the p ort you chose .
- Page 26 Scanne rs), you can conne ct a p rinte r to the p ass-throug h p ort and use the othe r d e vice p ort on the Bitronics switch to conne ct to anothe r d e vice . Just b e sure that the p rinte r d rive r has its Port se t to the corre ct d e vice p ort.
- Page 27 Ne xt, the se cond PC must also p e rform the same op e ration. Whe n b oth se ts of PC LEDs on the Bitronics switch are g re e n, the n the comp ute rs are re ad y for file transfe r.
- Page 28 98 p roce d ure ab ove . Make sure the p owe r sup p ly is conne cte d to the Bitronics switch, othe rwise , the re may b e a sig nificant d e lay in the p roce ssing of re q ue sts from NT ®...
- Page 29 Windows ® 95 / 98 and NT ® (continued) To se t the sp ool se tting s corre ctly, click on the SCHEDULING tab . Make sure " Start p rinting afte r last p ag e is sp oole d " is se le cte d . Also, se t " Priority" to hig he st: Click O K whe n d one .
- Page 30 Windows ® First UNINSTALL the Bitronics software . Y ou can d o this b y rig ht-clicking on the taskb ar icon and answe ring YES to the p romp t. The n, click on START, PRO GRAMS, BELKIN BITRO NICS SWITCH, the n UNINSTALLSHIELD.
- Page 31 Chang ing your comp ute r’s p aralle l p ort mod e to ECP incre ase s sp e e d and re liab ility of d ata transfe rs with the Bitronics Switche s. Be low are the ste p s on chang ing the se tting s on ce rtain comp ute rs.
-
Page 32: Hewlett-Packard
Appendix (continued) Hewlett-Packard Steps for HP Pavillion PC M odels At the HP Blue Scre e n, p re ss F1 to e nte r Se tup . Se le ct Ad vance d from the me nu b ar. Following the le g e nd d ire ctions, se le ct Pe rip he ral Config uration and the n use the arrow-d own ke y to move to Paralle l Port Mod e . - Page 33 Appendix (continued) Steps for IBM Aptiva 2176-C33, IBM BIOS v BSTUS4B NOTE: The steps for this computer are not included in the document received in the box. While the comp ute r is b ooting , follow the d ire ctions on the scre e n: Pre ss F1 to e nte r Se tup .
- Page 34 Appendix (continued) Sony M odels PCV-70/ 90/ 100/ 120: Re start your comp ute r. During the first b lack and white Sony scre e n, p re ss F3 to e nte r the b oot scre e n. Pre ss F1 to e nte r the BIO S Se tup .
- Page 35 Appendix (continued) 1. Normal (O utp ut only) 2. Bi-d ire ctional (d e fault) 3. ECP (re q uire s IEEE 1284 p rinte r/p aralle l cab le ) Se le ct ECP and click O K to save re sults and close the wind ow. Click Y e s to re start the comp ute r.
-
Page 36: Fcc Statement
Information FCC Statement DECLARATION OF CONFORM ITY WITH FCC RULES FOR ELECTROM AGNETIC COM PATIBILITY We , Be lkin Comp one nts, of 501 We st Walnut Stre e t, Comp ton CA 90220, d e clare und e r our sole re sp onsib ility that the p rod uct: F1U128-KIT to which this d e claration re late s:...
Need help?
Do you have a question about the DualBus and is the answer not in the manual?
Questions and answers