Motorola MOTONAV TN30 User Manual
Motorola car gps receiver user's guide
Hide thumbs
Also See for MOTONAV TN30:
- Getting started manual (13 pages) ,
- User manual (60 pages) ,
- Installation instructions (3 pages)
Table of Contents
Advertisement
Quick Links
welcome
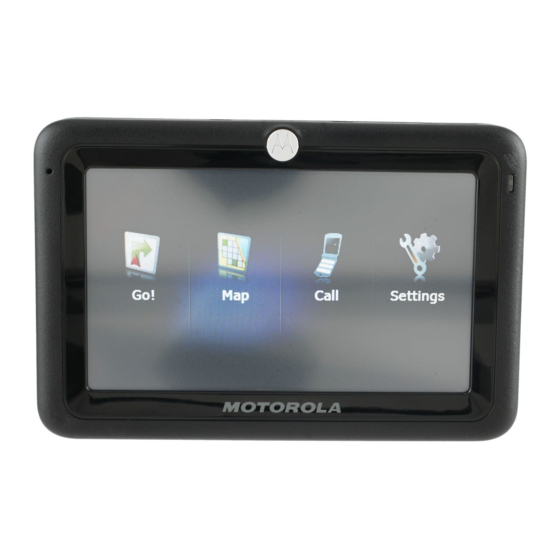
The MOTONAV™ TN30 helps you find the best route with GPS accuracy.
Clear turn-by-turn directions and spoken street names eliminate second-
guessing when making a turn. Works as a speakerphone connecting with
your compatible Bluetooth
enabled phone for hands-free calls. Locate your
®
favorite restaurant, nearest bank, or see businesses and other locations
along your route. Save time and gas, and leave getting lost to the past. The
MOTONAV TN30 includes:
• Large, 4.3-inch anti-glare touch screen
• Turn-by-turn navigation with 2D and 3D display modes
• Bluetooth handsfree calling
• Clear spoken street names and directions
• Businesses and other listings shown on map
• SD memory card slot for adding additional maps
Note:
Before using your device for the first time, be sure to review the
important safety and legal pamphlet and follow instructions. Periodically
review this information so you remember how to safely use your device.
1
Advertisement
Table of Contents

Related Manuals for Motorola MOTONAV TN30


Summary of Contents for Motorola MOTONAV TN30
- Page 1 Save time and gas, and leave getting lost to the past. The MOTONAV TN30 includes: • Large, 4.3-inch anti-glare touch screen • Turn-by-turn navigation with 2D and 3D display modes •...
-
Page 2: Before You Begin
For traffic safety reasons, it is recommended that routes should be planned in a stationary vehicle before starting a trip. MOTOROLA IS NOT RESPONSIBLE FOR ANY DIRECT, INDIRECT, INCIDENTAL, CONSEQUENTIAL, EXEMPLARY, SPECIAL, OR PUNITIVE DAMAGES, OR OTHER DAMAGE ARISING OUT OF THE USE OF, OR INABILITY TO USE, THIS PRODUCT. - Page 3 You can safety secure your MOTONAV TN30 in your car using the included mounting holder. Slide holder down onto the extension arm. Affix suction cup on extension arm to the windshield (push up on lever). mount it You can also affix suction cup to the dashboard using the included Note: circular disc (not shown).
- Page 4 Once mounted, apply power to your MOTONAV TN30 using the included car charger. Plug the charger into the power outlet in your vehicle. Plug the charger into the USB port on your device. When plugged into a charger, the indicator light is orange to indicate the device’s internal battery is charging.
-
Page 5: Get Started
To get started, you need to turn on your MOTONAV TN30 and configure initial device settings: Press and hold the Power button to turn on the device until the display becomes active. After a few moments, a configuration wizard appears to provide step-by-step setup instructions. - Page 6 If you see Finding Your GPS Location at bottom of the screen, the MOTONAV TN30 is searching for GPS satellites. Move device to an open location with a clear view of the sky and wait a few minutes to obtain satellite GPS signal.
-
Page 7: Find An Address
find an address To create a route to an address: From the map view screen, tap Menu to access the main menu screen. Tap Go!. Tap Address. You see: Note: To change state of destination, tap Change and select new state. Tap the Address button. -
Page 8: Receive A Call
Tap Go. A route is calculated to your selected destination. receive a call To make and receive calls using the MOTONAV TN30, a Bluetooth handsfree (HF) connection must be established with your phone (see step 7 on page 9 for details). -
Page 9: While On A Call
To transfer call to your phone, tap Talk on Phone. When the call is transferred, the icon changes to Talk on TN30. To transfer the call back to your MOTONAV TN30, tap Talk on TN30. The icon changes back to Talk on Phone. -
Page 10: Make A Call
To place a call using the MOTONAV TN30, tap the Call icon from the map view screen, or tap Call from the main menu screen). You see: From this screen, you can do the following: • To call a recent incoming /outgoing number, tap Recent Calls. -
Page 11: Power And Charging
Power button. • If your MOTONAV TN30 is not used for more than 7 days, it enters a power saving mode that requires a Power button press to exit.
Need help?
Do you have a question about the MOTONAV TN30 and is the answer not in the manual?
Questions and answers