Table of Contents
Advertisement
Advertisement
Table of Contents

Related Manuals for Hwasung HMK-072


Summary of Contents for Hwasung HMK-072
- Page 1 User Manual HMK-072...
- Page 2 Please ventilate the air circulation in closed area. Please install the product away from the near interferences. Please install the wiring in a safe place. Please follow the directed terms of compliance in using the electrical product. Title Rev. Page HMK-072 Ver1.0...
-
Page 3: Table Of Contents
6-1) Printer Function Configuration ..............58 6-2) Paper Supply Configuration ..............59 6-3) Making New Paper Format ................ 60 7. Ticket Standard ....................62 8. USB Communication User Interface ..............64 *Manual Update Records ..................67 Title Rev. Page HMK-072 Ver1.0... -
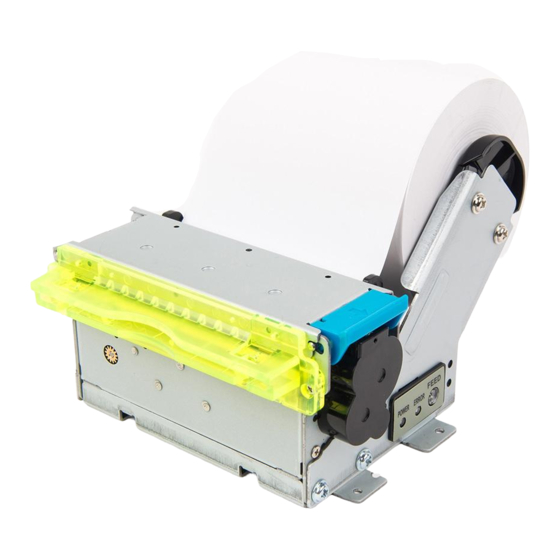
Page 4: Printer Features & External Dimension
2. Error LED [Image 1-2] 3. Power LED 4. Power Switch 5. DC (24VDC) 6. Comm. Connector (USB, Type B) 7. Comm. Connector (Serial, Female 4 pin) 8. Near End Sensor Connector REAR [Image 1-3] Title Rev. Page HMK-072 Ver1.0... -
Page 5: 1-2) External Dimension
1-2) External Dimension 1-2-1) STANDARD TYPE Title Rev. Page HMK-072 Ver1.0... - Page 6 1-2-2) SHAFT TYPE Title Rev. Page HMK-072 Ver1.0...
-
Page 7: 1-3) Model Number
1-3) Model Number HM□-072 ※ Frame Type : Kiosk (Fixture) Type : Control Board Type Title Rev. Page HMK-072 Ver1.0... -
Page 8: Operation
Paper Lever of Left side, and install the Paper Roll to the Paper Lever of Right side. [Image 2-1] 2. Release the spread Paper Lever of Left side, then the Paper Roll is installed. [Image 2-2] Title Rev. Page HMK-072 Ver1.0... -
Page 9: 2-1-1) Clamshell Method
[Image 2-4]. After changing the rolls, press the feed button to check if the paper is feeding properly. *If paper does not feed out properly, open the cover and insert the paper again. [Image 2-4] Title Rev. Page HMK-072 Ver1.0... -
Page 10: 2-1-2) Auto-Loading Method
※ Deeply push the paper into the feeding entrance. ※ You may hear the motor work noise but that is [Image 2-6] normal. [Image 2-7] Title Rev. Page HMK-072 Ver1.0... -
Page 11: 2-2) Jam Removal
(When cutter’s blade is blocked) 2. If cutter’s blade is blocked, you can recycle the printer’s power to return the blade to the proper place. ※HMK-072 does not suffer from the cutter jam phenomenon. Title Rev. Page HMK-072 Ver1.0... -
Page 12: 2-3) Self-Test
●Sample Print Interface and Setting information Interface : USB & RS-232C Baud Rate : 19200 Data Bit : 8 Bit Parity : None Stop Bit : 1 or 2 Peripheral & Setting Information USB Status Title Rev. Page HMK-072 Ver1.0 P.11... -
Page 13: 2-4) Hex Dump Print
41 42 43 44 45 46 47 47 49 A B C D E F G H I 30 31 32 33 34 35 36 37 38 0 1 2 3 4 5 6 7 8 FF 1B 69 ^ . i Title Rev. Page HMK-072 Ver1.0 P.12... -
Page 14: 2-5) On-Board Update
1) after checking the abnormalities on the device. 5) The printer will reset automatically after the update and will return to the ready to use status. Title Rev. Page HMK-072 Ver1.0 P.13... -
Page 15: 2-6) Firmware Restoration (Rebooting Firmware)
(You can reduce the load time if you use USB port) 5) Please release the jumper short after running the Booting Program. (If you skip this process, the data will get wiped after the firmware restoration) Title Rev. Page HMK-072 Ver1.0 P.14... - Page 16 ‘Send File’ Button (※Caution: Do not modify other parameter’s value) ① ② 7) There will be a prompt after the file transmit is complete, Click (YES) button on the prompt. Title Rev. Page HMK-072 Ver1.0 P.15...
- Page 17 8) Under Scripts field, set the value to ‘Boot from Flash(GPNVM1)’ and then click on Execute. 9) Restart the printer by turning the power off and back on. Title Rev. Page HMK-072 Ver1.0 P.16...
-
Page 18: 2-7) Communication Setting
Meaning, (->) indicates the current setting. When changing the settings, select from the list and if you want to move to the next menu without making any changes, then just confirm without selecting from the list. Title Rev. Page HMK-072 Ver1.0 P.17... - Page 19 Baudrate to 9600, and click on the Communication Test button. When succeeding in communication, the Start transmit button will activate. ① ② ③ -> When configuring with USB interface, set the Port to USB. Title Rev. Page HMK-072 Ver1.0 P.18...
- Page 20 3) After Clicking on the Memory Switch tab, select HMK-072 under ‘Special Model Option’ drop down menu. Then select the relevant contents in each appearing forms and click on the ‘Start Transmit’ Button. Turn off the power to the printer then back on after finishing the configuration and the printer will work in the configured value.
-
Page 21: 2-8) Memory Sw
2byte code will set the default from Korean (24x24), Korean (16x16), Japanese(24x24), Chinese(24x24). 1byte code will set the default from ASCII(12x24), ASCII(8x16,9x16). Reserve Reserve Reserve Paper Setting Code Page Mesnu Font Menu Click on the transmit button after setting all variables Title Rev. Page HMK-072 Ver1.0 P.20... - Page 22 1page ※Left Blackmark Cutting (Backside) Position 2page Blackmark Blackmark point Point 2page Cutting position When SW1 = p, SW2 = 100 When SW1 = m, SW2 = 100 [Front, Printing Side] [Front, Printing Side] Title Rev. Page HMK-072 Ver1.0 P.21...
- Page 23 [Memory Switch information] ================================ Code Page = PC437(U.S) 2Byte Font = Korean(24x24) 1Byte Font = ASCII(12x24) Mem1:FFh Mem2:FFh,FFh Mem3:FFh,FFh Mem4:00h Mem5:00h Mem6:FFh Mem7:FFh Mem8:FFh (Example of memory switch content checking Mem9:FFh self test printing) Mem10:FFh Title Rev. Page HMK-072 Ver1.0 P.22...
-
Page 24: General Specification
2)Humidity : 40∼80%RH(Non-precipitated status) ※Print Quality may differ with running environment 2-6) Storing Temperature / Humidity 1)Temperature : -25∼40℃ 2)Humidity : 40∼90%RH 2-7) MCBF 1)Thermal Head : 100Km(100 million pulse) 2)Auto Cutter : 1 million cycle Title Rev. Page HMK-072 Ver1.0 P.23... -
Page 25: Interface Specification
: USB2.0 Standard Cable 4)Data Methods : Bulk IN, Bulk OUT Bulk IN : End point 6, Bulk OUT : End point 2 Full Speed : Max Packet Size 64 Byte(Bulk OUT),64 Byte(Bulk IN) Title Rev. Page HMK-072 Ver1.0 P.24... -
Page 26: Commands
GS (K (fn=49) Character Density GS (K (fn=97) Operating in Low Power GS B Black and White Cross Character GS H Barcode Text GS L Left Margin GS V Paper Cutting GS W Print Area Setting Title Rev. Page HMK-072 Ver1.0 P.25... - Page 27 SUB W Data Line WRITE SUB C Data Line CLEAR SUB O Line ON SUB F Line OFF SUB P Line 1 Dotline Character ESC t International Codepage Setting Highspeed Baudrate Real Time Status Check Title Rev. Page HMK-072 Ver1.0 P.26...
- Page 28 The print data will be deleted in print area [Function] Horizontal tab [Code] ASCII Decimal [Range] [Description] Moves the print position to the next tab position [Caution] Horizontal tab positions are to set in ESC+’D’+n. Title Rev. Page HMK-072 Ver1.0 P.27...
- Page 29 : Feeds in reversed direction until the sensor passes the blackmark. n=3 : Feeds in reversed direction until it detects the blackmark. [Caution] The feeding range is restricted in 30cm. Once the detection distance is over in 30Cm, it could be jammed. Title Rev. Page HMK-072 Ver1.0 P.28...
- Page 30 : Prints in Speed 150mm/s. n=10 : Prints in Speed 160mm/s. [Caution] As the print speed lowers, the print density becomes dim, so you’d need to control the density using the density command. Title Rev. Page HMK-072 Ver1.0 P.29...
- Page 31 0: Font 12x24, 24x24 1: Font 8x16, 16x16 0: Stress Cancel 1: Stress Setting 0: Cancel Vertical Extension 1: Vertical Extension Setting 0: Cancel Horizontal Extension 1: Horizontal Extnesion Setting 0: Cancel Underline 1: Underline Setting Title Rev. Page HMK-072 Ver1.0 P.30...
- Page 32 [Range] 0≤nL+nH×256≤65535, 0≤nL≤255, 0≤nH≤255 [Initial Value] nL=0, nH=0 [Description] Move the position from the space of left ending to (nL+nH×256)×0.125mm. Move the position into the space of left ending, if the area is over. Title Rev. Page HMK-072 Ver1.0 P.31...
- Page 33 Mode Dots in Data (k) horizontal vertical nL+nH×256 8dots Single Density nL+nH×256 8dots Double Density (nL+nH×256)×3 24dots Single Density (nL+nH×256)×3 24dots Double Density •8 dots Mode 2배 1배 3배 3배 Single Double Density Density Title Rev. Page HMK-072 Ver1.0 P.32...
- Page 34 Set underline in thick 0.125mm Set underline in thick 0.25mm Set underline in thick 0.375mm Set underline in thick 0.5mm Set underline in thick 0.625mm Set underline in thick 0.75mm Set underline in thick 0.875mm Title Rev. Page HMK-072 Ver1.0 P.33...
- Page 35 [Descript] Clear buffer & Initialize all parameter ESC+’E’+n [Name] Set the font in thick [Format] ASCII Decimal 0≤n≤255, [Range] [Initial Value] [Descript] n=0, cancel the font in thick n=1, set the font in thick Title Rev. Page HMK-072 Ver1.0 P.34...
- Page 36 : In case of Big Font as 56x88, it would be possible to extend font size as much as Double (Width and Length) and other fonts would be possible to extend the font size as 8 times Title Rev. Page HMK-072 Ver1.0 P.35...
- Page 37 England Denmark1 Sweden Italian Spain1 Japanese Norway Denmark2 Spain2 Latin America Korea ESC+’a’+n [Name] Align the printing [Format] ASCII Decimal 0≤n≤2 [Range] [Initial Value] [Descript] Align the printing position Printing Position Left Middle Right Title Rev. Page HMK-072 Ver1.0 P.36...
- Page 38 Move the standard from the left to the right Function Cancel 180° Set 180° ESC+’i’ [Name] Full Cutting [Format] ASCII Decimal [Descript] Cutting the paper completely ESC+’m’ [Name] Partial Cutting [Format] ASCII Decimal [Descript] Cutting the paper partially Title Rev. Page HMK-072 Ver1.0 P.37...
- Page 39 [Format] ASCII Decimal [Descript] Cancel Korean mode (2Bytes mode) [Caution] In case of cancel 2 bytes mode in extended graphic mode Appointment is not required due to auto detection in Korean mode (Ref.SUB+’x’+n command) Title Rev. Page HMK-072 Ver1.0 P.38...
- Page 40 Set the font size in Korean [Format] ASCII Decimal 0≤n1≤255 [Range] [Initial Value] [Descript] Set the Korean font size twice (HorizontalxVertical) in Korean n=0, Cancel the font size two times n=1, Set the font size two times Title Rev. Page HMK-072 Ver1.0 P.39...
- Page 41 [Initial Value] m : printing the registered N/V in ‘m’ mode [Descript.] n : indicating the regsitered logo in the ‘n’. Printing mode Standard Horizontal extension Vertical extension Horizontal,vertical extension in the same time Title Rev. Page HMK-072 Ver1.0 P.40...
- Page 42 Level –2 Level +4 Level -1 Level +5 [Caution] In case of setting the density above the standard level will shorten the thermalhead’s life cycle. It is recommended to use within the standard density range. Title Rev. Page HMK-072 Ver1.0 P.41...
- Page 43 Select the printing position of HRI characters (Barcode) [Format] ASCII Decimal 0≤n≤3 [Range] [Initial Value] [Descript] Select the printing positions of numerical value & characters Printing Position Non printing Above the barcode Below the barcode Both above & below barcode Title Rev. Page HMK-072 Ver1.0 P.42...
- Page 44 Set printing area width from the left margin in (nL+nH×256)×0.125mm Printing area Left Margin Printing area width GS+’h’+n [Name] Select barcode height [Format] ASCII Decimal 1≤n≤255 [Range] [Initial Value] n=162 (20.25mm) [Descript] Select barcode height by n×0.125mm Title Rev. Page HMK-072 Ver1.0 P.43...
- Page 45 Please add up the initial character of CODE A, CODE B, CODE C at the first, so that you could know the kind of CODE128. CODE128 Initial character Example of barcode “gABCD" CODE A “hABCD" CODE B “iABCD" CODE C Title Rev. Page HMK-072 Ver1.0 P.44...
- Page 46 If the receiver buffer is full at the printer offline, this command is not able to receive, and is not able to respond to the status. Therefore we recommend the real time command (DLE+EOT).. Title Rev. Page HMK-072 Ver1.0 P.45...
- Page 47 0: No paper in the Support Sensor 1: Paper in the Support Sensor ※ the status of bit 4 will be effective when the realtime command DLE + EOT + n, The others are fixed ‘0’. Title Rev. Page HMK-072 Ver1.0 P.46...
- Page 48 Set the Standard mode [Format] ASCII Decimal [Descript] Swtiches from page mode to standard mode. ESC+’L’ [Name] Select page mode [Format] ASCII Decimal 0≤n≤255 [Range] [Initial Value] [Descript] Switches from standard mode to page mode Title Rev. Page HMK-072 Ver1.0 P.47...
- Page 49 [Name] Select print direction in page mode [Format] ASCII Decimal 0≤n≤3 [Range] [Initial Value] [Descript] Select the print direction & start position in page mode •n=0(Left→Right), •n=1(Bottom→Top), ABCD Feeding Feeding •n=2(Right→Left), •n=3(Top→Bottom), Feeding Feeding Title Rev. Page HMK-072 Ver1.0 P.48...
- Page 50 : Barcode or Graphic Paper Paper EFGH Printing before Standard line ABCD (x,y) moving the standard line Move the standard line Printing Area by CR or LF Printing after EFGH (x+dx,y+dy) moving the standard line ABCD Title Rev. Page HMK-072 Ver1.0 P.49...
- Page 51 Please edit the received data at the page area. The page area will be printed all at once, when you use this command. [Descript] The page area remains. Please use the command ESC+S, If you want all clear. Title Rev. Page HMK-072 Ver1.0 P.50...
- Page 52 0 : Print complete 1 : Print or Feeding 0 : Cutter no- error (jam) 1 : Cutter error (jam) 0 (unused) 0: No paper in the Support Sensor 1: Paper in the Support Sensor Title Rev. Page HMK-072 Ver1.0 P.51...
- Page 53 = 32 byte, 32 × 8 = 256 dot …… …… yL+yH×256 dots a line …… …… …… …… …… …… …… …… k-31 k-30 k-29 7 6 5 4 3 2 1 0 Title Rev. Page HMK-072 Ver1.0 P.52...
- Page 54 0≤n1≤50 or 0≤n2≤50, [Description] Setting the buzzer sound length in 100msec(0.1sec) unit. (Max 5sec) n1=Buzzer ON time n2=Buzzer OFF time Buzzer will not sound when n1 is set to 0. (Buzzer Sound Cancel Setting) Title Rev. Page HMK-072 Ver1.0 P.53...
- Page 55 SW1, SW2 to cut the paper at the designated position. ※Refer to 2-8) Memory Switch for the detailed information. ※Use the provided Memory Switch Utility Program to register data on the Memory Switch. Title Rev. Page HMK-072 Ver1.0 P.54...
- Page 56 If you need to speed up the processing, you use the command on/off. SUB+’O’ [Name] Rule ON [Format] ASCII Decimal [Descript] Once you set up the command, the rull will be printing with the character or font. Title Rev. Page HMK-072 Ver1.0 P.55...
- Page 57 You can set up the code page according to the following table. [Caution] SUB + x command 1 byte valid. Korean mode is not invalid. Code Page PC437(US) KANA(JAPAN) GREEK Windows1251 PC866(Cyllic #2) Windows1250(Poland) PC850(Multilingual) PC860(Portugal) Windows1252 Iran System Encoding Standard PC857(Turkish) PC864(ARABIC) Title Rev. Page HMK-072 Ver1.0 P.56...
- Page 58 0 : Print complete 1 : Print or Feeding 0 : Cutter no- error (jam) 1 : Cutter error (jam) 0 (unused) 0: No paper in the Support Sensor 1: Paper in the Support Sensor Title Rev. Page HMK-072 Ver1.0 P.57...
-
Page 59: Windows Driver
Print Width 60mm: Set the speed to 150mm. 80mm: Set the speed to 130mm. Title Rev. Page HMK-072 Ver1.0 P.58... -
Page 60: 6-2) Paper Supply Configuration
' dummy print for form feeding Printer.EndDoc 4) page length Feeder : After print, execute form feeding up to the set page length. Set when the printed materials are fixed to a certain length. Title Rev. Page HMK-072 Ver1.0 P.59... -
Page 61: 6-3) Making New Paper Format
5) Save the form after creating a custom name for the size. (i.e, Ticket(Size 60 x 150mm)). 6) Go to Basic Print Setting -> Advance then Select the newly created Ticket(Size 60 x 150mm) Title Rev. Page HMK-072 Ver1.0 P.60... - Page 62 Title Rev. Page HMK-072 Ver1.0 P.61...
-
Page 63: Ticket Standard
L+B < 15 meaning, it should range within L < 15 - B. [*Note2] When cutting position is front of blackmark, condition should be the same as Note 1. [*Note3] In case of cutting position is behind the blackmark. Title Rev. Page HMK-072 Ver1.0 P.62... - Page 64 L+B < 15 meaning, it should range within L < 15 - B. [*Note2] When cutting position is front of blackmark, condition should be the same as Note 1. [*Note3] In case of cutting position is behind the blackmark. Title Rev. Page HMK-072 Ver1.0 P.63...
-
Page 65: Usb Communication User Interface
Prints 1 byte of data. When printing big data spool, use the following PrintPacket Value to increase the transfer Speed. Parameters: data : 1 byte data (0~255) Return : Print Normal : 1 Print Error Title Rev. Page HMK-072 Ver1.0 P.64... - Page 66 Return : Normal Output : 1 Output Error ※ Do not use functions other than those listed above as they are for debug. ※ For more information, download the sample program from our website. Title Rev. Page HMK-072 Ver1.0 P.65...
- Page 67 There won’t be an error during the receiving because it would only work through USB interface when receiving. ※ Windows Application Data Flow Chart Window Driver (Graphic) Window Application Printer USB port DLL Interface OCX Driver (Command, Character) Transmit Receive(Print Status Data) Title Rev. Page HMK-072 Ver1.0 P.66...
-
Page 68: Manual Update Records
Date History Page Ver. 2018-08-24 Created New Title Rev. Page HMK-072 Ver1.0 P.67...
Need help?
Do you have a question about the HMK-072 and is the answer not in the manual?
Questions and answers