Table of Contents
Advertisement
Quick Links
Advertisement
Table of Contents

Related Manuals for Hwasung HPP-240


Summary of Contents for Hwasung HPP-240
- Page 1 User Manual HPP-240...
-
Page 2: Table Of Contents
6-2) Paper Supply Configuration .................. 51 6-3) Making New Paper Format ................... 52 7. USB Communication User Interface ................54 7-1) Function ......................... 54 7-2) Caution when using USB interface ..............55 *Manual Update Records ....................71 Title Rev. Page HPP-240 Ver1.0... - Page 3 Please ventilate the air circulation in closed area. Please install the product away from the near interferences. Please install the wiring in a safe place. Please follow the directed terms of compliance in using the electrical product. Title Rev. Page HPP-240 Ver1.0...
-
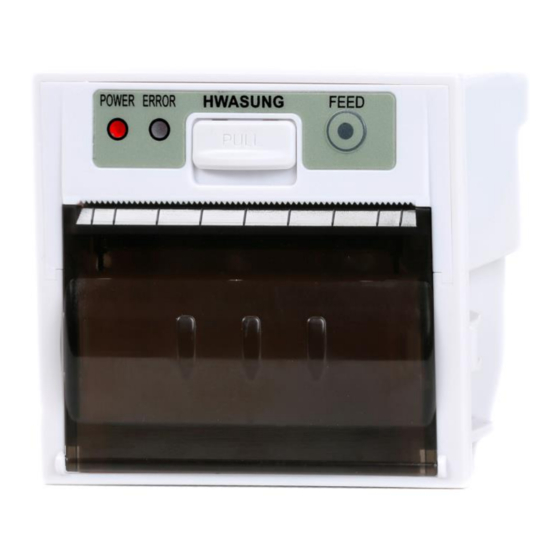
Page 4: Printer Features & External Dimension
2. Front Indicator Panel (LED, FEED) 3. Fixture Hook 4. Dip switch(Option) 5. I/F USB Connector 6. I/F Serial Connector 7. Power Connector 8. Fixture Hole 9. Manual Cutter 10. Thermal Head 11. Paper Sensor Title Rev. Page HPP-240 Ver1.0... -
Page 5: 1-2) External Dimension
1-2) External Dimension Title Rev. Page HPP-240 Ver1.0... -
Page 6: 1-3) Product Composition
1-3) Product Composition 1. Printer 2. Power Cable (20Cm) 3. Communication Cable (20Cm USB Optional) Title Rev. Page HPP-240 Ver1.0... -
Page 7: 1-4) Model Specification
1-4) Model Number HPP-240 □□ ※Interface Type : RS-232C or USB or Combo : Serial(TTL) ※Power Input : 9 ~ 24V : 5 ~ 8.5V Ex)Ordered Model Name HPP-240HS --- 9 ~ 24V, Serial(RS-232C) HPP-240LS --- 5 ~ 8.5V, Serial(RS-232C) HPP-240LT --- 5 ~ 8.5V, Serial(TTL) -
Page 8: Operation
Pull out ③ Paper direction should not be flipped as ④ Close the cover, press feedswitch, feed shown on the picture a certain amount, then cut it manually. Feed Switch Title Rev. Page HPP-240 Ver1.0... -
Page 9: 2-2) Self-Test
You can start the self test by turning on the printer while pressing down on the feed button, and the suggested material on the self test print is shown below. ****************************** ●Model Name HPP-240 Control Board ●Firmware Version and Created Firmware :: VerX .XX Date... -
Page 10: 2-3) Hex Dump Print
41 42 43 44 45 46 47 47 49 A B C D E F G H I 30 31 32 33 34 35 36 37 38 0 1 2 3 4 5 6 7 8 FF 1B 69 ^ . i Title Rev. Page HPP-240 Ver1.0... -
Page 11: 2-4) On-Board Update
1) after checking the abnormalities on the device. 5) The printer will reset automatically after the update and will return to the ready to use status. Title Rev. Page HPP-240 Ver1.0 P.10... -
Page 12: 2-5) Dip Sw
Operation Mode Factory Mode NORMAL Mode ※When shipped out, the Dip Switch is not included in the factory default and it will be set on 19200 baudrate, 8 bit, non-parity mode as a default. Title Rev. Page HPP-240 Ver1.0 P.11... -
Page 13: 2-5-1) Manual Configuration
Meaning, (->) indicates the current setting. When changing the settings, select from the list and if you want to move to the next menu without making any changes, then just confirm without selecting from the list. Title Rev. Page HPP-240 Ver1.0 P.12... - Page 14 Displayed when the selected item is invalid or moved to another menu without changing the item. 5) You may find the configuration results by checking the position of the arrow character (->), after printing the test page or entering preferences mode, by selecting one of the list Title Rev. Page HPP-240 Ver1.0 P.13...
-
Page 15: 2-6) Memory Sw
2byte code will set the default from Korean (24x24), Korean (16x16), Japanese(24x24), Chinese(24x24). 1byte code will set the default from ASCII(12x24), ASCII(8x16,9x16). Reserve Reserve Reserve Reserve Code Page Mesnu Font Menu Click on the transmit button after setting all variables Title Rev. Page HPP-240 Ver1.0 P.14... - Page 16 [Memory Switch information] ================================ Code Page = PC437(U.S) 2Byte Font = Korean(24x24) 1Byte Font = ASCII(12x24) Mem1:FFh Mem2:FFh,FFh Mem3:FFh,FFh Mem4:00h Mem5:00h Mem6:FFh Mem7:FFh Mem8:FFh (Example of memory switch content checking Mem9:FFh self test printing) Mem10:FFh Title Rev. Page HPP-240 Ver1.0 P.15...
-
Page 17: 2-7) Internal Connector
Pin No. Circuit Type Note Motor PS_OUT Collector Paper Existance Sensor PS_GND Emitter PS_GND Cathode PS_IN Anode 5 ~ 8.5V Thermal Head /LATCH Low Active STB1 STB2 STB3 Thermistor Thermistor GND STB4 STB5 STB6 CLOCK Title Rev. Page HPP-240 Ver1.0 P.16... - Page 18 -- Housing : YMH025-04R(Yunho) or 5264-04A(Molex) Circuit Note RTS or DTR ※Refer to Interface Specification in page 16 for the connecting method. 4)CN4 : USB Communication Connector(Option) USB MINI-B type Circuit Note Data- Data+ Not Connected Title Rev. Page HPP-240 Ver1.0 P.17...
-
Page 19: General Specification
1 head) 3-5)Operating Temperature / Humidity 1)Temperature : 0∼40℃ 2)Humidity : 40∼50%RH ※Print Quality may subject to change with the condition above. 3-6)MCBF 1)Mechanism : 15,000,000 Lines. 2)Thermal Head : 50Km, 100 million pulse. Title Rev. Page HPP-240 Ver1.0 P.18... -
Page 20: Interface Specification
: USB2.0 standard cable 4)Data Method : Bulk IN, Bulk OUT Bulk IN : End point 6, Bulk OUT : End point 2 Full Speed : Max Packet Size 64 Byte(Bulk OUT),64 Byte(Bulk IN) Title Rev. Page HPP-240 Ver1.0 P.19... -
Page 21: Commands
Print Range ESC d Print and Row Unit FEED ESC { 180° Rotation ESC t International Codepage Setting ESC S STANDARD MODE Setting ESC L PAGE MODE Setting ESC FF Execute Page Area’s Character Title Rev. Page HPP-240 Ver1.0 P.20... - Page 22 GS w Barcode Expand / Minimize GS r Status Check GS a Status Check Auto Reply GS v Roster Bit Image (Horizontal) DLE ENQ Real Time Buffer Clear DLE EOT Transmit Real Time Printer Status Title Rev. Page HPP-240 Ver1.0 P.21...
- Page 23 Print and return to standard mode and page mode [Code] ASCII Decimal [Range] [Description] Print the data in the print buffer and returns to standard mode [Caution] When it does not return to STANDARD MODE then use ESC+FF. Title Rev. Page HPP-240 Ver1.0 P.22...
- Page 24 : cancel outline (border) of character in tetragon. n=1 : Set outilne (border) of charcater in tetragon. [Caution] When expanding in horizontal it is effective up to 8 times, however It is only effective up to 2 times for vertical expansion. Title Rev. Page HPP-240 Ver1.0 P.23...
- Page 25 Size of barcode n3=9 Horizontal 3 Horizontal 4 Horizontal 5 Size of barcode Horizontal 6 Version 1 Horizontal 7 Version 3 Horizontal 8 Version 5 Horizontal 9 Version 9 ※PDF417 Vertial size automatic setting. Title Rev. Page HPP-240 Ver1.0 P.24...
- Page 26 If you need to speed up the processing, you use the command on/off. SUB+’O’ [Name] Rule ON [Format] ASCII Decimal [Descript] Once you set up the command, the rull will be printing with the character or font.. Title Rev. Page HPP-240 Ver1.0 P.25...
- Page 27 Please do not use this command if you print the character or the graphic. Please use the Rule ON if you print the character or the graphic. Please use this command if you print the rule between row and row at the space. Title Rev. Page HPP-240 Ver1.0 P.26...
- Page 28 0: Font 12x24, 24x24 1: Font 8x16, 16x16 0: Stress Cancel 1: Stress Setting 0: Cancel Vertical Extension 1: Vertical Extension Setting 0: Cancel Horizontal Extension 1: Horizontal Extnesion Setting 0: Cancel Underline 1: Underline Setting Title Rev. Page HPP-240 Ver1.0 P.27...
- Page 29 [Range] 0≤nL+nH×256≤65535, 0≤nL≤255, 0≤nH≤255 [Initial Value] nL=0, nH=0 [Description] Move the position from the space of left ending to (nL+nH×256)×0.125mm. Move the position into the space of left ending, if the area is over. Title Rev. Page HPP-240 Ver1.0 P.28...
- Page 30 Mode Dots in Data (k) horizontal vertical nL+nH×256 8dots Single Density nL+nH×256 8dots Double Density (nL+nH×256)×3 24dots Single Density (nL+nH×256)×3 24dots Double Density •8 dots Mode 2배 1배 3배 3배 Single Double Density Density Title Rev. Page HPP-240 Ver1.0 P.29...
- Page 31 Set underline in thick 0.125mm Set underline in thick 0.25mm Set underline in thick 0.375mm Set underline in thick 0.5mm Set underline in thick 0.625mm Set underline in thick 0.75mm Set underline in thick 0.875mm Title Rev. Page HPP-240 Ver1.0 P.30...
- Page 32 [Descript] Clear buffer & Initialize all parameter ESC+’E’+n [Name] Set the font in thick [Format] ASCII Decimal 0≤n≤255, [Range] [Initial Value] [Descript] n=0, cancel the font in thick n=1, set the font in thick Title Rev. Page HPP-240 Ver1.0 P.31...
- Page 33 : In case of Big Font as 56x88, it would be possible to extend font size as much as Double (Width and Length) and other fonts would be possible to extend the font size as 8 times Title Rev. Page HPP-240 Ver1.0 P.32...
- Page 34 England Denmark1 Sweden Italian Spain1 Japanese Norway Denmark2 Spain2 Latin America Korea ESC+’a’+n [Name] Align the printing [Format] ASCII Decimal 0≤n≤2 [Range] [Initial Value] [Descript] Align the printing position Printing Position Left Middle Right Title Rev. Page HPP-240 Ver1.0 P.33...
- Page 35 [초기치] [설명] 각각의 Code Page의 국제문자를 아래표와 같이 설정함. [주의] SUB + “x”커맨드로 1바이트 Mode로 설정시 유효. 2바이트 Mode로 설정시 무효. Code Page PC437(US) KANA(JAPAN) PC850(Multilingual) PC860(Portugal), PC863(Canadian-French) PC865(Nordic) Windows1250(Poland) Windows1251 Windows1252 PC866(Cyrillic #2) Title Rev. Page HPP-240 Ver1.0 P.34...
- Page 36 Please edit the received data at the page area. The page area will be printed all at once, when you use this command. [Descript] The page area remains. Please use the command ESC+S, If you want all clear. Title Rev. Page HPP-240 Ver1.0 P.35...
- Page 37 [Name] Select print direction in page mode [Format] ASCII Decimal 0≤n≤3 [Range] [Initial Value] [Descript] Select the print direction & start position in page mode •n=0(Left→Right), •n=1(Bottom→Top), ABCD Feeding Feeding •n=2(Right→Left), •n=3(Top→Bottom), Feeding Feeding Title Rev. Page HPP-240 Ver1.0 P.36...
- Page 38 : Barcode or Graphic Paper Paper EFGH Printing before Standard line ABCD (x,y) moving the standard line Move the standard line Printing Area by CR or LF Printing after EFGH (x+dx,y+dy) moving the standard line ABCD Title Rev. Page HPP-240 Ver1.0 P.37...
- Page 39 [Format] ASCII Decimal [Descript] Cancel Korean mode (2Bytes mode) [Caution] In case of cancel 2 bytes mode in extended graphic mode Appointment is not required due to auto detection in Korean mode (Ref.SUB+’x’+n command) Title Rev. Page HPP-240 Ver1.0 P.38...
- Page 40 Set the font size in Korean [Format] ASCII Decimal 0≤n1≤255 [Range] [Initial Value] [Descript] Set the Korean font size twice (HorizontalxVertical) in Korean n=0, Cancel the font size two times n=1, Set the font size two times Title Rev. Page HPP-240 Ver1.0 P.39...
- Page 41 [Initial Value] m : printing the registered N/V in ‘m’ mode [Descript.] n : indicating the regsitered logo in the ‘n’. Printing mode Standard Horizontal extension Vertical extension Horizontal,vertical extension in the same time Title Rev. Page HPP-240 Ver1.0 P.40...
- Page 42 Level –2 Level +4 Level -1 Level +5 [Caution] In case of setting the density above the standard level will shorten the thermalhead’s life cycle. It is recommended to use within the standard density range. Title Rev. Page HPP-240 Ver1.0 P.41...
- Page 43 Select the printing position of HRI characters (Barcode) [Format] ASCII Decimal 0≤n≤3 [Range] [Initial Value] [Descript] Select the printing positions of numerical value & characters Printing Position Non printing Above the barcode Below the barcode Both above & below barcode Title Rev. Page HPP-240 Ver1.0 P.42...
- Page 44 Set printing area width from the left margin in (nL+nH×256)×0.125mm Printing area Left Margin Printing area width GS+’h’+n [Name] Select barcode height [Format] ASCII Decimal 1≤n≤255 [Range] [Initial Value] n=162 (20.25mm) [Descript] Select barcode height by n×0.125mm Title Rev. Page HPP-240 Ver1.0 P.43...
- Page 45 Please add up the initial character of CODE A, CODE B, CODE C at the first, so that you could know the kind of CODE128. CODE128 Initial character Example of barcode “gABCD" CODE A “hABCD" CODE B “iABCD" CODE C Title Rev. Page HPP-240 Ver1.0 P.44...
- Page 46 If the receiver buffer is full at the printer offline, this command is not able to receive, and is not able to respond to the status. Therefore we recommend the real time command (DLE+EOT).. Title Rev. Page HPP-240 Ver1.0 P.45...
- Page 47 0: No paper in the Support Sensor 1: Paper in the Support Sensor ※ the status of bit 4 will be effective when the realtime command DLE + EOT + n, The others are fixed ‘0’. Title Rev. Page HPP-240 Ver1.0 P.46...
- Page 48 = 32 byte, 32 × 8 = 256 dot …… …… yL+yH×256 dots a line …… …… …… …… …… …… …… …… k-31 k-30 k-29 7 6 5 4 3 2 1 0 Title Rev. Page HPP-240 Ver1.0 P.47...
- Page 49 0 : Print complete 1 : Print or Feeding 0 : Cutter no- error (jamm) 1 : Cutter error (jamm) 0 (unused) 0: No paper in the Support Sensor 1: Paper in the Support Sensor Title Rev. Page HPP-240 Ver1.0 P.48...
-
Page 50: Windows Driver
Print Width 60mm: Set the speed to 150mm. 80mm: Set the speed to 130mm. Title Rev. Page HPP-240 Ver1.0 P.49... -
Page 51: 6-1) Printer Function Configuration
' dummy print for form feeding Printer.EndDoc 4) page length Feeder : After print, execute form feeding up to the set page length. Set when the printed materials are fixed to a certain length. Title Rev. Page HPP-240 Ver1.0 P.50... -
Page 52: 6-2) Paper Supply Configuration
5) Save the form after creating a custom name for the size. (i.e, Ticket(Size 60 x 150mm)). 6) Go to Basic Print Setting -> Advance then Select the newly created Ticket(Size 60 x 150mm) Title Rev. Page HPP-240 Ver1.0 P.51... -
Page 53: 6-3) Making New Paper Format
Title Rev. Page HPP-240 Ver1.0 P.52... - Page 54 Print Error : 0 4)long NewRealRead(void); Reads 1 byte of print status data using USB port. Parameters: None Return : Read Normal : Print Status Value Read Error : -1(Negative) Title Rev. Page HPP-240 Ver1.0 P.53...
-
Page 55: Usb Communication User Interface
There won’t be an error during the receiving because it would only work through USB interface when receiving. ※ Windows Application Data Flow Chart Window Driver (Graphic) Window Application USB port Printer DLL Interface OCX Driver (Command, Character) Transmit Title Receive(Print Status Data) Rev. Page HPP-240 Ver1.0 P.54... -
Page 56: 7-2) Caution When Using Usb Interface
Date History Page Ver. 2018-02-21 신규작성 Title Rev. Page HPP-240 Ver1.0 P.55...
Need help?
Do you have a question about the HPP-240 and is the answer not in the manual?
Questions and answers