Table of Contents

Related Manuals for Hwasung HMC-060


Summary of Contents for Hwasung HMC-060
- Page 1 Technical Manual (Model : HMC-060 /HMK-060) *Technical Manual = User manual / Relese 2 <NOTICE> . All features and specifications described are subject to charge without notice. . If you have any questions, please contact us. HWASUNG SYSTEM CO.,LTD...
- Page 2 · Please clear the air / open the disclosed place. · Please set the product without damage enviornment. · Please set the product at the stable place. · Pleaes keep the requires as necessary as general electrics. Title Rev. Page HMC-060, HMK-060 Release 2 Ver2.0...
-
Page 3: Table Of Contents
6. Ticket Version Compality mode Specificiation 6-1) Firmware 6-2) Command 7. USB User Interface 7-1) DLL Interface 7-2) Caution of using DLL 7-3) OCX Driver 7-4) Caution of using OCX Driver 7-5) Memory Switch Title Rev. Page HMC-060, HMK-060 Release 2 Ver2.0... -
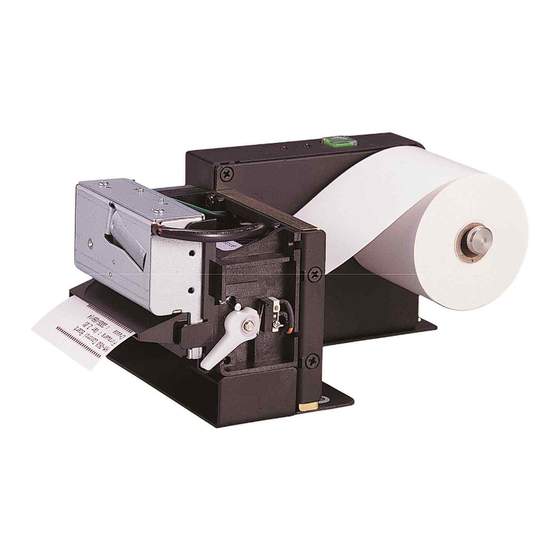
Page 4: Printer Features & External Dimension
11. Power LED(Green) 3. Headup lever 12. Error LED(Red) 4. Near end sensor 13. Dip switch 5. Paper holder 6. Power connector 7. RS232C connector, 8. USB Connector. (+) : up (-) : down Title Rev. Page HMC-060, HMK-060 Release 2 Ver2.0... -
Page 5: 1-2) Name Of Model
1-2) Model number HM□-060□□ ※Interface S : RS-232C U : USB combo ※ Frame : KIOSK Frame type. : Board type. Title Rev. Page HMC-060, HMK-060 Release 2 Ver2.0... -
Page 6: 1-3) Dimension
1-3) Dimension [HMK-060] ø7 Ø3.5 Control board [HMC-060U] Title Rev. Page HMC-060, HMK-060 Release 2 Ver2.0... -
Page 7: Operation
① [PAPER DIRECTION] ① 3.① Please make sure if the head-up lever is down. ② Please insert the paper, and make sure if the auto loading is working, and the paper cuts. Title Rev. Page HMC-060, HMK-060 Release 2 Ver2.0... -
Page 8: 2-2) Removing The Paper Jam
: 8 Bit Parity : None Stop Bit : 1 or 2 Peripheral & Setting Information USB Status : Full Speed Auto Cutter :: BuiIt-in Jam sensor :: Disabled Compatible Mode : Ticket Version Title Rev. Page HMC-060, HMK-060 Release 2 Ver2.0... -
Page 9: 2-4) Hex Dump
41 42 43 44 45 46 47 47 49 A B C D E F 30 31 32 33 34 35 36 37 38 0 1 2 3 4 5 6 7 8 1 B 69 ^ . i Title Rev. Page HMC-060, HMK-060 Release 2 Ver2.0... -
Page 10: 2-5) Update (On Board)
Please repeat these steps again, and check the interface cable, and the connections. 5) You can use the updated printer after update, it will be reset automatically then power off & on. Title Rev. Page HMC-060, HMK-060 Release 2 Ver2.0... -
Page 11: 2-6) Rebooting Firmware
(If using the USB port, Save the time to set up) 5) Atfer rebooting, Please remove JP2(Jumper Pins) * If pass this step, it would not be rebooted after recover the firmware. Header Jumper Title Rev. Page HMC-060, HMK-060 Release 2 Ver2.0 P.10... - Page 12 6) Click the “ Icon “ in the Send file Name then atfer open the firmware file for Target model, Then, Click “Send File Button” *Notice : Do not revise the Parameter value. ① ② 7) Atfer the file is complete to transfer, Click “Yes “ Title Rev. Page HMC-060, HMK-060 Release 2 Ver2.0 P.11...
- Page 13 8) Click “Excute” button, atfer checking for stting up “Boot from Flash(GPNVM1) in Scripts. 9) To re-operate printer, Tune off and on Title Rev. Page HMC-060, HMK-060 Release 2 Ver2.0 P.12...
-
Page 14: 2-7) Dip Sw
JAM SENSOR Valid memory switch. JAM SENSOR Invalid ※ Please take a note the memory switch at 7-5). d)SW4 : SW4 Factory Mode Factory Mode Standard Mode Title Rev. Page HMC-060, HMK-060 Release 2 Ver2.0 P.13... -
Page 15: 2-8) Internal Connector
Once ERROR LED is mounted, Please connect Cathode with Pin no.4, and Anode with VDD(+5V). 3)CN3 : Thermal Head Control Connector (20010WS-15,Yeonho:or S15B-PH-K-S, JST) Circuit Remark +24V +24V Thermistor /STROBE1 Low Active /STROBE2 Low Active CLOCK /LATCH Low Active +24V +24V Title Rev. Page HMC-060, HMK-060 Release 2 Ver2.0 P.14... - Page 16 Headup detect signal 8)CN8 ( USB TYPE B) : Circuit Remark VBUS Vbus Data - Data + 9)SW2 : GW250-02,Geoyung or 5267-02A, Molex Circuit Remark +24V Power switch input +24V Power switch output Title Rev. Page HMC-060, HMK-060 Release 2 Ver2.0 P.15...
-
Page 17: General Specification
The conditions above can be subjeted to change the print quality. 3-6)Storage environment 1)Temperature : -25∼40℃ 2)Humidity : 40∼90%RH 3-7)MCBF 1)Thermal head : 100Km (10million pulse) 2)Auto cutter : 1 million cuts 3-8)Weight about 1.30kg (HMK-060) Title Rev. Page HMC-060, HMK-060 Release 2 Ver2.0 P.16... -
Page 18: Interface Specification
: Bulk IN, Bulk OUT Bulk IN : End point 6, Bulk OUT : End point 2 Full Speed : Max Packet Size 64 Byte(Bulk OUT),64 Byte(Bulk IN) Signal In/out VBus In/out In/out Title Rev. Page HMC-060, HMK-060 Release 2 Ver2.0 P.17... -
Page 19: Command
Set the printing all korean FS & Set the korean in extended graphic mode FS . Cancel the korean in extended graphic mode FS - Set the underline of Korean FS S Space Korean Title Rev. Page HMC-060, HMK-060 Release 2 Ver2.0 P.18... - Page 20 Set the printing area in page mode ESC FF Printing the page area DLE ENQ Realtime buffer clear DLE EOT Realtime status check DC3 i Cutting after it detects the black mark. Title Rev. Page HMC-060, HMK-060 Release 2 Ver2.0 P.19...
- Page 21 The print data will be deleted in print area. [Name] Horizontal tab [Format] ASCII Decimal [Range] [Descript] Moves the print position to the next tab poisition [Caution] Horizontal tab position are to set in ESC+’D’+n.. Title Rev. Page HMC-060, HMK-060 Release 2 Ver2.0 P.20...
- Page 22 : the feeding in reverse directoin till black mark is detected [Caution] the feeding range is restricted in 30Cm Once the detection distance is over in 30Cm, it could be jammed Title Rev. Page HMC-060, HMK-060 Release 2 Ver2.0 P.21...
- Page 23 Cutting the black mark at the next range if the range is exceed. Please do not use the command, if you don’t use the paper without blackmark. It causes a jam error. Title Rev. Page HMC-060, HMK-060 Release 2 Ver2.0 P.22...
- Page 24 Size of data Horizontal 3 Horizontal 4 Size of data Horizontal 5 Version 1 Horizontal 6 Version 3 Horizontal 7 Version 5 Horizontal 8 Version 9 Horizontal 9 ※ Vertical is set automatically. Title Rev. Page HMC-060, HMK-060 Release 2 Ver2.0 P.23...
- Page 25 0: Cancel the extension in Vertical 1: Set the extension in Vertical 0: Cancel the extension in Horizontal 1: Set the extension in Horizontal 0: Cancel the underline 1: Set the underline Title Rev. Page HMC-060, HMK-060 Release 2 Ver2.0 P.24...
- Page 26 [Range] 0≤nL+nH×256≤65535, 0≤nL≤255, 0≤nH≤255 [Initial Value] nL=0, nH=0 [Descript] Move the printing position from left ending space to (nL+nH×256)×0.125mm Move the printing position in left ending once printing position is over Title Rev. Page HMC-060, HMK-060 Release 2 Ver2.0 P.25...
- Page 27 Data (k) vertical horizontal nL+nH×256 8dots Single Density 8dots Double Density nL+nH×256 24dots Single Density (nL+nH×256)×3 (nL+nH×256)×3 24dots Double Density •8 dots Mode Twice once Three Three times times Single Double Title Rev. Page HMC-060, HMK-060 Release 2 Ver2.0 P.26...
- Page 28 Set underline in thick 0.125mm Set underline in thick 0.25mm Set underline in thick 0.375mm Set underline in thick 0.5mm Set underline in thick 0.625mm Set underline in thick 0.75mm Set underline in thick 0.875mm Title Rev. Page HMC-060, HMK-060 Release 2 Ver2.0 P.27...
- Page 29 Set the printing double for font thickness [Format] ASCII Decimal [Range] 0≤n≤255, [Initial Value] [Descript] n=0, cancel the printing twice for font thickness n=1, set the printing twice for font thickeness Title Rev. Page HMC-060, HMK-060 Release 2 Ver2.0 P.28...
- Page 30 * Caution : In case of Big Font as 56x88, it would be possible to extend font size as much as Double(Width and Length) and other fonts would be possible to extend the font size as octuple Title Rev. Page HMC-060, HMK-060 Release 2 Ver2.0 P.29...
- Page 31 It's valid, once It's 1 byte by the command SUB + x. It's not valid, once it's Korean mode. code page code page PC437(US) Windows1250 (Poland) KANA(JAPAN) PC850((Multilingual) GREEK PC860(Portugal) Windows1251 Windows1252 Iran System Encoding PC866(Cyrllic #2) Standard 10 PC857(Turkish) Title Rev. Page HMC-060, HMK-060 Release 2 Ver2.0 P.30...
- Page 32 Set the reverse image [Caution] Move the standard from the left to the right Function Cancel 180° Set 180° ESC+’i’ [Name] Full Cutting [Format] ASCII Decimal [Descript] Cutting the paper completely Title Rev. Page HMC-060, HMK-060 Release 2 Ver2.0 P.31...
- Page 33 Set to print Korean mode (2bytes Mode) [Caution] Set to print Korean mode in extended graphic mode Appointment is not required in Korean mode, due to auto detection (Pls refer the command of SUB+’x’+n) Title Rev. Page HMC-060, HMK-060 Release 2 Ver2.0 P.32...
- Page 34 Set the space between Korean characters [Format] ASCII Decimal [Range] 0≤n1≤255, 0≤n2≤255 [Initial Value] [Descript] Set the space between Korean characters Set the left space in n1×0.125mm Set the right space in n2×0.125mm Title Rev. Page HMC-060, HMK-060 Release 2 Ver2.0 P.33...
- Page 35 It’s not recommended frequent registeration / deletion, due to memory damage * Please download “Logo Utility Program or request us about it to set up easily. <Register Image > (x×8-1)×y+1 (x×8)×y Title Rev. Page HMC-060, HMK-060 Release 2 Ver2.0 P.34...
- Page 36 (Horizontal Rate), x3(Vertical Rate) : n=32+2=34 Function Set the extension proportion in vertical Set the extension proportion in horizontal Extension in Horizontal Extension in Vertical n(Hex) n(Decimal) Rate n(Hex) n(DecimaL) Rate Title Rev. Page HMC-060, HMK-060 Release 2 Ver2.0 P.35...
- Page 37 Initial setting (first division) First Division Second Division GS+’B’+n [Name] Reverse printing in black [Format] ASCII Decimal [Range] 0≤n≤255 [Initial Value] [Descript] Reverse printing in black n=0, standard printing n=1, reverse printing in black Title Rev. Page HMC-060, HMK-060 Release 2 Ver2.0 P.36...
- Page 38 The left margin is set in (nL+nH×256)×0.125mm. GS+’V’+m [Name] Select cut mode and cut paper [Format] ASCII Decimal [Range] 0≤m≤1 [Initial Value] [Descript] Select a mode for cutting paper Function Full Cutting Partial Cutting Title Rev. Page HMC-060, HMK-060 Release 2 Ver2.0 P.37...
- Page 39 1≤n (Start & Stop characteres is 48≤d≤57, 65≤d≤90 automatically added d=32,36,37,43,45,46,47 ITF(I of 2/5) 1≤n (Only even number) 48≤d≤57 CODABAR 1≤n 48≤d≤57, 65≤d≤68 d=36,43,45,46,47,58 CODE128 2≤n≤255 (Check digit , Stop character 0≤d≤127 Is automatically added) Title Rev. Page HMC-060, HMK-060 Release 2 Ver2.0 P.38...
- Page 40 Module width Narrow Wide 0.25mm 0.125mm 0.375mm 0.375mm 0.25mm 0.625mm 0.5mm 0.375mm 0.625mm 0.5mm 1.25mm * Multi Level barcode : UPC-E, EAN13, EAN8 * 2 level barcode : CODE39, ITF, CODABAR Title Rev. Page HMC-060, HMK-060 Release 2 Ver2.0 P.39...
- Page 41 4 will be effective when the realtime command DLE + EOT + n, ※ The others are fixed ‘0’. If the near end sensor is not available, the bit 3 is 1 all the time. Title Rev. Page HMC-060, HMK-060 Release 2 Ver2.0 P.40...
- Page 42 = 32 byte, 32 × 8 = 256 dot …… …… yL+yH×256 dot line …… …… …… …… …… …… …… k-31 k-30 k-29 …… 7 6 5 4 3 2 1 0 Title Rev. Page HMC-060, HMK-060 Release 2 Ver2.0 P.41...
- Page 43 [Format] ASCII Decimal [Descript] Swtiches from page mode to standard mode ESC+’L’ [Name] Select page mode [Format] ASCII Decimal [Range] 0≤n≤255 [Initial Value] [Descript] Switches from standard mode to page mode Title Rev. Page HMC-060, HMK-060 Release 2 Ver2.0 P.42...
- Page 44 [Format] ASCII Decimal [Range] 0≤n≤3 [Initial Value] [Descript] Select the print direction & start position in page mode •n=0 (Left→Right), •n=1 (Bottom→Top), ABCD Feeding Feeding •n=2 (Right→Left), •n=3 (Top→Bottom), Feeding Feeding Title Rev. Page HMC-060, HMK-060 Release 2 Ver2.0 P.43...
- Page 45 Paper EFGH Standard line Printing before ABCD (x,y) moving the standard line Move the standard line Printing Area by CR or LF Printing after EFGH (x+dx,y+dy) moving the standard line ABCD Title Rev. Page HMC-060, HMK-060 Release 2 Ver2.0 P.44...
- Page 46 It is only valid, once the DIP SW1 is *up. *up : on. The command ESC+@ will be reset. However, it doesn’t work at the paper jam,cutting jam, has to reset compulsory. Title Rev. Page HMC-060, HMK-060 Release 2 Ver2.0 P.45...
- Page 47 If you register the information at SW1,SW2, the black mark detects automatically, Then it cuts the registerd points. - Please use the provided program - ‘Memory swtich setting utility program’. - Please refer the 7-5)Memory switch. Title Rev. Page HMC-060, HMK-060 Release 2 Ver2.0 P.46...
-
Page 48: Ticket Version Compality Mode Specificiation
※ You could know the mode of ticket or standard by self test. 1) Ticket compatiblity Mode 2) Standard Mode ABCD ABCD Direction1 Direction Direrction 3 [Ticket Printing Form] [Standard Priting Form] (page mode) (line mode) Title Rev. Page HMC-060, HMK-060 Release 2 Ver2.0 P.47... -
Page 49: 6-2) Command
The value of x,y is not Decimal, Hex, but it’s String. For example, the coordinate is (430,1200), it has to be ‘0430’, ‘1200’. The command ESC T can be fixed n=1 or 3. (Example of coordinate) FEEDING Title Rev. Page HMC-060, HMK-060 Release 2 Ver2.0 P.48... - Page 50 The next printing will be positioned, after it cuts at the blacmark automatically. [Caution] The error of cutting position will be happen about ±1mm. Please recognize it is different with ESC+” i ”. Title Rev. Page HMC-060, HMK-060 Release 2 Ver2.0 P.49...
- Page 51 ' back feeding ‘----------- PAGE AREA CLEAR AND TO STANDARD MODE -------------- MSComm1.Output = CHR$(&H1B) & "S" ‘ return to standard mode and clear page area MSComm1.PortOpen = False End Sub Title Rev. Page HMC-060, HMK-060 Release 2 Ver2.0 P.50...
-
Page 52: Usb User Interface
Please use the ‘PrintPackage function’ as below, if there are a lot of datas to print. Then you are able to increase the speed of the transmission. Parameters: data : one (1) byte data (0~255) Return : Print normal : 1 Print error : 0 Title Rev. Page HMC-060, HMK-060 Release 2 Ver2.0 P.51... -
Page 53: 7-1) Dll Interface
If you use Windows driver together, when you use OCX driver, the data of Windows driver, and the data of OCX driver can not be delivered properly. Please do not use the spool to print. Please refer the following image. Title Rev. Page HMC-060, HMK-060 Release 2 Ver2.0 P.52... - Page 54 You don’t have to use the driver of window. * OCX driver : HwaUSB.OCX 7-3-1) How to use It is to used for Visual Basic. Please follows the steps as the images. Title Rev. Page HMC-060, HMK-060 Release 2 Ver2.0 P.53...
-
Page 55: 7-2) Caution Of Using Dll
※ Please ask the person in charge of sample program. Title Rev. Page HMC-060, HMK-060 Release 2 Ver2.0 P.54... - Page 56 Return : Read normal : Printer status Read error : -1(minus) ※ Please do not use the functions which are not commented. ※ Please ask the person in charge of sample program. Title Rev. Page HMC-060, HMK-060 Release 2 Ver2.0 P.55...
-
Page 57: 7-3) Ocx Driver
If you release the spool, the data receipt is only made by USB Interface. ※ Data flow chart of window application Window driver (Graphic) Window application USB port Printer OCX driver DLL Interface (command, transmission Character) Receipt (data status of printer) Title Rev. Page HMC-060, HMK-060 Release 2 Ver2.0 P.56... - Page 58 If the value is 100 : 100 x 0.125 = 12.5mm ABCD First page ※Blackmark (Backside) Print direction Black mark Point Cutting Point Second Page SW2 = 100 [Front side,Printing side] Title Rev. Page HMC-060, HMK-060 Release 2 Ver2.0 P.57...
-
Page 59: 7-4) Caution Of Using Ocx Driver
ABCD First page Print direction Black mark ※Blackmark (Backside) Second page [Front side,Printing side] Setting paper position Code Page Font After setting, Press the button Title Rev. Page HMC-060, HMK-060 Release 2 Ver2.0 P.58... -
Page 60: 7-5) Memory Switch
* Atfer change “Memory Switch Value”, Please do self-test. [Memory Switch information] ============================= === Code Page = PC437(U.S) 2Byte Font = Korean(24x24) 1Byte Font = ASCII(12x24) Mem1:FFh Mem2:FFh,FFh Mem3:FFh,FFh Mem4:00h Mem5:00h Mem6:FFh Mem7:FFh Mem8:FFh Mem9:FFh Mem10:FFh Title Rev. Page HMC-060, HMK-060 Release 2 Ver2.0 P.59... - Page 61 Date Remark Ref. Ver. 2015/04/21 Release2.0 Title Rev. Page HMC-060, HMK-060 Release 2 Ver2.0 P.60...
Need help?
Do you have a question about the HMC-060 and is the answer not in the manual?
Questions and answers