Table of Contents
Advertisement
Available languages
Available languages
Quick Links
ASSEMBLY AND OWNER'S MANUAL | ASSEMBLAGE ET FONCTIONNEMENT
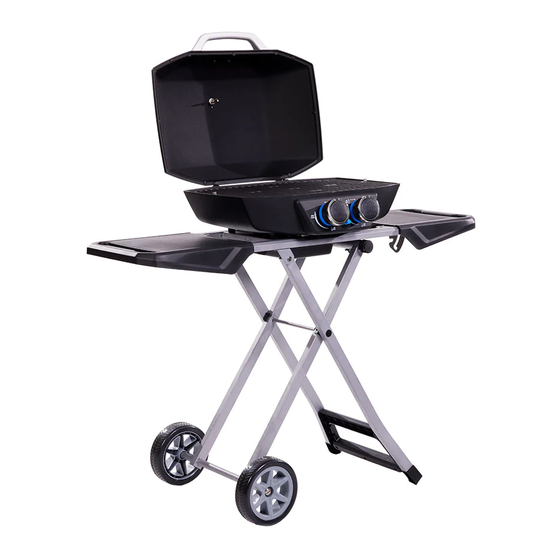
2-BURNER PORTABLE GAS GRILL
IMPORTANT, READ CAREFULLY, RETAIN FOR FUTURE
REFERENCE. MANUAL MUST BE READ BEFORE OPERATING!
GRIL AU GAZ PORTATIF À 2 BRLEURS
IMPORTANT, À LIRE ATTENTIVEMENT, À CONSERVER POUR
L'AVENIR RÉFÉRENCE. LE MANUEL DOIT ÊTRE
LU AVANT L'UTILISATION !
For outdoor and household use only. Not for commercial use.
Pour usage extérieur et domestique uniquement. Pas pour un usage commercial.
WARNING: PLEASE READ THE ENTIRE MANUAL BEFORE INSTALLATION AND USE OF THIS
GAS APPLIANCE. FAILURE TO FOLLOW THESE INSTRUCTIONS COULD RESULT IN PROPERTY
DAMAGE, BODILY INJURY OR EVEN DEATH. CONTACT LOCAL BUILDING OR FIRE OFFICIALS
ABOUT RESTRICTIONS AND INSTALLATION INSPECTION REQUIREMENTS IN YOUR AREA.
AVERTISSEMENT: VEUILLEZ LIRE L'INTÉGRALITÉ DU MANUEL AVANT L'INSTALLATION ET
L'UTILISATION DE CET APPAREIL ÉLECTRONIQUE À GRANULES. LE NON-RESPECT DE CES
INSTRUCTIONS PEUT ENTRAÎNER DES DOMMAGES AUX BIENS, DES BLESSURES OU MÊME
LA MORT. COMMUNIQUEZ AVEC LES AUTORITÉS LOCALES EN MATIÈRE D'INCENDIE ET DE
BÂTIMENT CONCERNANT LES RESTRICTIONS ET LES EXIGENCES D'INSTALLATION DANS
VOTRE RÉGION.
MODEL / MODÈLE : PB2BPCG2
PART / PIÈCE : 10919
300522
Advertisement
Chapters
Table of Contents

Related Manuals for Pit Boss PB2BPCG2


Summary of Contents for Pit Boss PB2BPCG2
- Page 1 ASSEMBLY AND OWNER'S MANUAL | ASSEMBLAGE ET FONCTIONNEMENT MODEL / MODÈLE : PB2BPCG2 PART / PIÈCE : 10919 300522 2-BURNER PORTABLE GAS GRILL IMPORTANT, READ CAREFULLY, RETAIN FOR FUTURE REFERENCE. MANUAL MUST BE READ BEFORE OPERATING! GRIL AU GAZ PORTATIF À 2 BRLEURS IMPORTANT, À...
-
Page 2: Safety Information
SAFETY INFORMATION MAJOR CAUSES OF APPLIANCE FIRES ARE A RESULT OF POOR MAINTENANCE AND A FAILURE TO MAINTAIN REQUIRED CLEARANCE TO COMBUSTIBLE MATERIALS. IT IS OF UTMOST IMPORTANCE THAT THIS PRODUCT BE USED ONLY IN ACCORDANCE WITH THE FOLLOWING INSTRUCTIONS. This instruction manual contains important information necessary for the proper assembly and safe use of the appliance. - Page 3 3. Do not use an LP gas cylinder if it has a damaged valve or shows signs of dents, gouges, bulges, fire damage, corrosion, leakage, excessive rust, or other forms of visual external damage; it may be hazardous and should be checked immediately by a liquid propane supplier.
- Page 4 In accordance with the procedures and specifications listed in the ANS Z21.58-2018 / CSA 1.6-2018 / OUTDOOR COOKING SPECIALTY GAS APPLIANCE. Pit Boss® Grills cooking appliances have been independently tested and listed by CSA (an accredited testing laboratory) to CSA standards.
-
Page 5: Table Of Contents
TABLE OF CONTENTS COPYRIGHT NOTICE Safety Information ............2 Parts & Specs ..............6 Copyright 2021. All right reserved. No part of this manual may be copied, transmitted, transcribed, stored in a retrieval Assembly Preparation ............7 system, in any form or by any means without expressed Assembly Instructions written permission of, Installing Control Knobs ............. -
Page 6: Parts & Specs
Customer Care if parts are missing when assembling the unit. MODEL ASSEMBLED (WxDxH) WEIGHT COOKING AREA 1145 X 465 X 1000 MM PB2BPCG2 19.0 KG / 41.89 LB 1,870.96 CM / 290 IN 13,500 / 45.08 X 18.31 X 39.37 IN... -
Page 7: Assembly Preparation
ASSEMBLY PREPARATION Parts are located throughout the shipping carton, including underneath the grill. Inspect the grill, parts, and hardware blister pack after removing from the protective shipping carton. Review and inspect all parts by referencing the parts list. If any part is missing or damaged, do not attempt to assemble. -
Page 8: Attach Wheels To The Cart Legs
3. ATTACH WHEELS TO CART LEGS Parts Required: Left Cart Foot Tube Assembly (#7) Wheels (#8) Wheel Lock Screw (#B) Installation: • Insert the Wheel into the axle, then insert the Wheel Locking Screw into the axle hole and fasten into place. Note illustration 3. -
Page 9: Attach Cart Legs To Cooking Box Assembly
5. ATTACH CART LEGS TO COOKING BOX ASSEMBLY Parts Required: Cooking Box Assembly (#2) Large Step Screws (#E) Installation: • Flip the Cooking Box Assembly on its lid into the cardboard packaging it came in. Note 5A. • Open the Cart Leg Assembly with the handle on one side and the wheel on the other. -
Page 10: Installing The Thermometer
7. INSTALLING THE THERMOMETER Parts Required: Thermometer Assembly (#1) Installation: • Open the lid and unscrew the butterfly nut from the Thermometer Assembly. Place the Thermometer Base over the hole on top of the lid. Insert the Thermometer's pin through the base and lid. •... -
Page 11: Connecting To A Gas Supply
CONNECTING TO A GAS SUPPLY GAS CYLINDER REQUIREMENTS The grill is set and tested with liquid propane gas only. Use a standard 1-lb. propane cylinder, with dimensions of 8” (20.32 cm) high, 3.88”(9.85 cm) diameter. Contact your gas supplier for a special regulator for bulk gas that fuels other appliances. WARNING: Using larger cylinders could cause the unit to tip over, resulting in injuries. -
Page 12: Operating Instructions
With all outdoor appliances, outside weather conditions play a big part in the performance of your grill and the cooking time needed to perfect your meals. All Pit Boss® units should keep a minimum clearance of 610 mm (24 inches) from combustible constructions and this clearance must be maintained while the grill is operational. -
Page 13: Lighting Procedure
LIGHTING PROCEDURE Open lid during lighting. 2. Set all control knobs to the “OFF” position. 3. Open the cylinder/gas valve according to the operating instructions on tank. Slight Yellow Flame 4. Push and turn the control knob counter-clockwise to “HIGH “. 5. -
Page 14: Manual Lighting Procedure
MANUAL LIGHTING PROCEDURE Open lid during lighting. 2. Set all control knobs to the "OFF" position. 3. Open the cylinder/gas valve according to the operating instructions on tank. 4. Quickly and carefully, use a lit match secured with the lighting rod (included with the grill) to light the burner. -
Page 15: Tailgating And Travel Position
TAILGATING AND TRAVEL POSITION Collapsing your grill into the travel and tailgating position allows the grill to be used in very limited space and can easily be tucked away for storage. Built with its own carrying handle, you just became a griller-on-the-go! Get fired up for the game, enjoy a weekend away, or start grilling on your home patio;... -
Page 16: Care & Maintenance
CLEANING FREQUENCY Any Pit Boss® unit will give you many years of flavorful service with minimum cleaning. Follow these cleaning and maintenance tips to service your grill: 1. -
Page 17: Tips & Techniques
TIPS & TECHNIQUES Follow these helpful tips and techniques, passed on from Pit Boss® owners, our staff, and customers just like you, to become more familiar with your grill: 1. FOOD SAFETY • Keep everything in the kitchen and cooking area clean. Use different platters and utensils for the cooked meat than the ones you used to prepare or transport the raw meat out to the grill. -
Page 18: Troubleshooting
TROUBLESHOOTING Proper cleaning and maintenance will prevent common operational problems. When your grill is operating poorly, or on a less frequent basis, the following troubleshooting tips may be helpful. For FAQ, please visit www.pitboss-grills.com . You may also contact your local dealer or Customer Care for assistance. WARNING: Always ensure the grill is completely cooled to avoid injury. -
Page 19: Grill Replacement Parts
GRILL REPLACEMENT PARTS Part# Description Thermometer (x1) Thermometer Base (x1) Lid (x1) Lid Handle (x1) Cooking Grid (x1) Left Burner (x1) Right Burner (x1) Flame Carryover Bracket (x1) Ignition Needle (x1) Valve and Regulator Assembly (x1) Knob (x2) Igniter (x1) Cooking Box (x1) Thermal Baffle (x1) Control Panel (x1) -
Page 20: Warranty
CONDITIONS All gas grills by Pit Boss® Grills, manufactured by Dansons, carry a limited warranty from the date of sale by the original owner. The warranty coverage begins on the original date of purchase and proof of date of purchase, or copy of original bill of sale, is required to validate the warranty. Customers will be subject to parts, shipping, and handling fees if unable to provide proof of the purchase or after the warranty has expired. -
Page 21: Information Sur La Sécurité
INFORMATION SUR LA SÉCURITÉ LES PRINCIPALES CAUSES D'INCENDIE D'APPAREILS SONT LE RÉSULTAT D'UN MAUVAIS ENTRETIEN ET D'UN ÉCHEC À MAINTENIR LES DÉGAGEMENTS REQUIS PAR RAPPORT AUX MATÉRIAUX COMBUSTIBLES. IL EST DE LA PLUS GRANDE IMPORTANCE QUE CE PRODUIT SOIT UTILISÉ UNIQUEMENT CONFORMÉMENT AUX INSTRUCTIONS SUIVANTES. - Page 22 une bouteille de gaz propane liquide standard de 20 lb (9 kg), aux dimensions de 18-1/4" (46,35 cm) de haut, 12-1/4" (31 cm) de diamètre. , non inclus avec le gril. Ne connectez jamais votre gril à gaz à une bouteille de gaz GPL qui dépasse cette capacité. 2.
- Page 23 Conformément aux procédures et spécifications répertoriées dans la norme ANS Z21.58- 2018 / CSA 1.6-2018 / OUTDOOR COOKING SPECIALITY GAZ APPAREIL. Les appareils de cuisson Pit Boss® Grills ont été testés de manière indépendante et répertoriés par CSA (un laboratoire d'essais accrédité) selon les normes CSA.
- Page 24 TABLE DES MATIÈRES Information sur la sécurité ...........21 COPYRIGHT Pièces et spécifications ..........25 Copyright 2021. Tous droits réservés. Aucune partie de ce manuel ne peut être copiée, transmise, transcrite, Préparation du montage ..........26 stockée dans un système de récupération, sous quelque forme ou par quelque moyen que ce soit Instructions de montage sans l'autorisation écrite expresse de,...
-
Page 25: Pièces Et Spécifications
Contactez le service client si des pièces sont manquantes lors de l'assemblage de l'unité. MODÈLE APPAREIL MONTÉ (L x P x H) POIDS ZONE DE CUISSON 1145 X 465 X 1000 MM PB2BPCG2 19.0 KG / 41.89 LB 1,870.96 CM / 290 PO 13,500 / 45.08 X 18.31 X 39.37 PO. -
Page 26: Préparation Du Montage
Les dommages dus au transport ne sont pas couverts par la garantie. Contactez votre revendeur ou le service client Pit Boss® Grills pour les pièces. service@pitboss-grills.com | ÉTATS-UNIS: (480) 923-9630 | Canada (SANS FRAIS): 1-877-942-2246 IMPORTANT: Pour faciliter l'installation, l'utilisation de deux personnes est utile (mais pas nécessaire) lors de... -
Page 27: Attachez Les Roues Aux Pieds Du Chariot
2. ASSEMBLER LES PIEDS DU CHARIOT Pièces Requises: Tube de pied de chariot droit - Arrière (#4) Tube de pied de chariot droit - Avant (#5) Poignée de chariot (#6) Vis (#A) Installation: • Poussez le tube du pied du chariot droit avant et arrière sur les chevilles sur le bord extérieur de la poignée du chariot. -
Page 28: Fixez Les Pieds Du Chariot À L'assemblage De La Boîte De
4. CONNECTEZ LES PIEDS DU CHARIOT Pièces Requises: Vis de verrouillage du chariot (#C) Bouchon à vis (#D) Installation: • Croisez l'assemblage de tube de chariot droit avec l'assemblage de tube de chariot gauche, illustré à l'illustration 4, avec l'assemblage de tube de chariot droit à... -
Page 29: Fixez La Tablette Latérale Au Gril
6. FIXEZ LA TABLETTE LATÉRALE AU GRIL Pièces Requises: Vis à petit pas (#F) Installation: • Retournez l'assemblage à l'endroit et reportez-vous à la section Position de talonnage et de déplacement pour étendre le gril en position debout. • Tirez la table latérale droite vers le haut, comme indiqué... -
Page 30: Connexion À Une Alimentation En Gaz
RACCORDEMENT À UNE ALIMENTATION EN GAZ BOUTEILLE DE GAZ EXIGENCES Le gril est réglé et testé uniquement avec du gaz propane liquide. Utilisez un 1-lb standard. bouteille de propane, avec des dimensions de 8" (20,32 cm) de haut, 3,88" (9,85 cm) de diamètre. Contactez votre fournisseur de gaz pour un régulateur spécial pour le gaz en vrac qui alimente d'autres appareils. -
Page 31: Mode D'emploi
Avec tous les appareils d'extérieur, les conditions météorologiques extérieures jouent un grand rôle dans les performances de votre gril et le temps de cuisson nécessaire pour parfaire vos repas. Toutes les unités Pit Boss® Grills doivent conserver un dégagement minimum de 610 mm (24 pouces) des constructions combustibles, et ce dégagement doit être maintenu pendant que le gril est opérationnel. -
Page 32: Procédure D'éclairage
PROCÉDURE D'ÉCLAIRAGE Ouvrir le couvercle pendant l'allumage. 2. Réglez tous les boutons de commande sur la position « OFF ». Légèrement 3. Ouvrir la bouteille/le robinet de gaz selon les instructions d'utilisation sur le réservoir. jaune Flamme Poussez et tournez le bouton de commande dans le sens inverse des aiguilles d'une montre jusqu'à... -
Page 33: Procédure D'allumage Manuel
PROCÉDURE D'ALLUMAGE MANUEL Ouvrir le couvercle pendant l'allumage. 2. Réglez tous les boutons de commande sur la position « OFF ». 3. Ouvrir la bouteille/le robinet de gaz selon les instructions d'utilisation sur le réservoir. 4. Rapidement et avec précaution, utilisez une allumette allumée fixée avec la tige d'allumage (incluse avec le gril) pour allumer le brûleur. -
Page 34: Position De Talonnage Et De Déplacement
POSITION DE TALONNAGE ET DE DÉPLACEMENT Le fait de replier votre gril en position de déplacement et de talonnage permet au gril d'être utilisé dans un espace très limité et peut facilement être rangé pour le rangement. Construit avec sa propre poignée de transport, vous venez de devenir un gril-on- the-go ! Préparez-vous pour le jeu, profitez d'un week-end ou commencez à... -
Page 35: Soins Et Entretien
L'utilisation d'un tel matériel annulera votre garantie et peut entraîner un incendie, une explosion et des blessures corporelles. FRÉQUENCE DE NETTOYAGE Toute unité Pit Boss® vous offrira de nombreuses années de service savoureux avec un minimum de nettoyage. Suivez ces conseils de nettoyage et d'entretien pour entretenir votre gril : 1. COMPOSANTS DU BRÛLEUR •... -
Page 36: Conseils & Techniques
CONSEILS & TECHNIQUES Suivez ces conseils et techniques utiles, transmis par les propriétaires de Pit Boss®, notre personnel et des clients comme vous, pour vous familiariser avec votre gril : 1. LA SÉCURITÉ ALIMENTAIRE • Gardez tout dans la cuisine et la zone de cuisson propres. Utilisez des plats et des ustensiles différents pour la viande cuite que ceux que vous avez utilisés pour préparer ou transporter la viande crue vers le gril. -
Page 37: Dépannage
DÉPANNAGE Un nettoyage et un entretien appropriés permettront d'éviter les problèmes de fonctionnement courants. Lorsque votre gril fonctionne mal ou moins fréquemment, les conseils de dépannage suivants peuvent être utiles. Pour la FAQ, veuillez visiter www. pitboss-grills.com. Vous pouvez également contacter votre revendeur local ou le service client pour obtenir de l'aide. AVERTISSEMENT : Assurez-vous toujours que le gril est complètement refroidi pour éviter les blessures. -
Page 38: Pièces De Rechange De Gril
GRILL REPLACEMENT PARTS Description Thermomètre (x1) Base de thermomètre (x1) Couvercle (x1) Couvercle Poignée (x1) Grille de cuisson (x1) Brûleur gauche (x1) Brûleur droit (x1) Support de transfert de flamme (x1) Aiguille d'allumage (x1) Ensemble vanne et régulateur (x1) Bouton (x2) Allumeur (x1) Boîte de cuisine (x1) Déflecteur thermique (x1) -
Page 39: Garantie
CONDITIONS Tous les grils à gaz de Pit Boss® Grills, fabriqués par Dansons, sont couverts par une garantie limitée à compter de la date de vente par le propriétaire original. La couverture de la garantie commence à la date d'achat originale et une preuve de la date d'achat, ou une copie de l'acte de vente original, est requise pour valider la garantie. - Page 40 IMPORTANT DO NOT RETURN PRODUCT TO STORE For all questions, comments, or inquiries, please contact Dansons directly. USA: (480) 923-9630 CANADA (TOLL FREE): 1-877-942-2246 IMPORTANT NE RETOURNEZ PAS LE PRODUIT AU MAGASIN Pour toutes questions, commentaires ou demandes de renseignements, veuillez communiquer directement avec Dansons.
Need help?
Do you have a question about the PB2BPCG2 and is the answer not in the manual?
Questions and answers