Table of Contents
Advertisement
Quick Links
Advertisement
Table of Contents

Related Manuals for Sirona SIROlaser


Summary of Contents for Sirona SIROlaser
- Page 1 MVKOMMT kÉï=~ë=çÑW= pfoli~ëÉê léÉê~íáåÖ=fåëíêìÅíáçåë båÖäáëÜ...
- Page 2 Sirona Dental Systems GmbH, Fabrikstrasse 31, 64625 Bensheim, Germany. Sirona Dental Systems GmbH reserves the right to correct or modify the present document without prior notice. SIROLaser is manufactured in compliance with the provisions of Council Directive 93/42/EEC concerning medical devices (MDD).
-
Page 3: Table Of Contents
Intended use ................Instructions on use of the laser protective goggles...... Wireless phone interference ............Disposal ..................Glossary, symbols and abbreviations ......Symbols on the SIROLaser ............Glossary..................10 Abbreviations ................11 Introduction..............12 Classification................12 Safety precautions ............... 12 Transport and storage .............. - Page 4 Index Operating Instructions ............ 28 Warning and error messages ............28 Switching the laser unit on and off..........30 Key panel..................30 Electronic access key ..............30 Setting up the software interface language ......... 31 Main menu ................... 31 “SURGERY”, “PERIODONTICS”...
- Page 5 List of Figures List of Figures Figure 1: “LASER STOP” button ..............Figure 2: Plugging the Y-connector into the laser unit ....... Figure 3: Plugging the interlock connector into the Y-connector ....Figure 4: Connection of the interlock jumper to the interlock socket ..Figure 5: Foot switch ..................
-
Page 6: Warning And Safety Information
Nominal Ocular Hazards Distance (NOHD) is 1.5 m from the distal end of the fibre. NOTICE For the installation and use of the SIROLaser, Sirona Dental Systems GmbH requires : • compliance with IEC 60825-1 and its amendments • compliance with any additional national laws and ordinances. -
Page 7: Instructions On Use Of The Laser Protective Goggles
(labeled on the goggles). These instructions apply particularly when using goggles supplied from an outside source that are not included in the scope of delivery of the SIROLaser. Wireless phone interference CAUTION... -
Page 8: Disposal
1 Warning and safety information Disposal If you plan to discontinue the use of your SIROLaser and intend to dispose of the unit, make sure to observe the applicable legal provisions. Please contact your local dental distributor or authorized service center for the disposal of the SIROLaser. -
Page 9: Glossary, Symbols And Abbreviations
Specification of laser output power and wavelength of IR and aiming beam (see also chapter "Technical data") States the compliance of the SIROLaser with IEC 60825-1, edition 1.2 Warns of potential laser radiation hazards when opening the laser unit 60 90 570 D 3485... -
Page 10: Glossary
2 Glossary, symbols and abbreviations Warns of class 4 laser radiation hazards when using the laser unit. “LASER STOP” button: Press this button in case of an emergency. Laser STOP Operate the laser unit exclusively with the Sinpro MPU50-105 power sup- ply. -
Page 11: Abbreviations
2 Glossary, symbols and abbreviations Abbreviations Square centimeter Hertz Seconds Watt Milliwatt (one thousandth of a Watt) Joule Nanometer Volt Infrared diode NOHD Nominal Ocular Hazard Distance according to IEC 60825-1: 1993 + A1:1997 + A2:2001 60 90 570 D 3485 D 3485.201.04.09.02 09.2007... -
Page 12: Introduction
3 Introduction Introduction Classification According to the applicable standards, the SIROLaser is classified as follows: Class I Type B according to EN IEC 60601-1:1990 + A1:1993 + A2:1 1995 Class IIb according to Council Directive 93/42/EEC Class IV laser product according to IEC 60825-1: 1993 + A1:1997 +... -
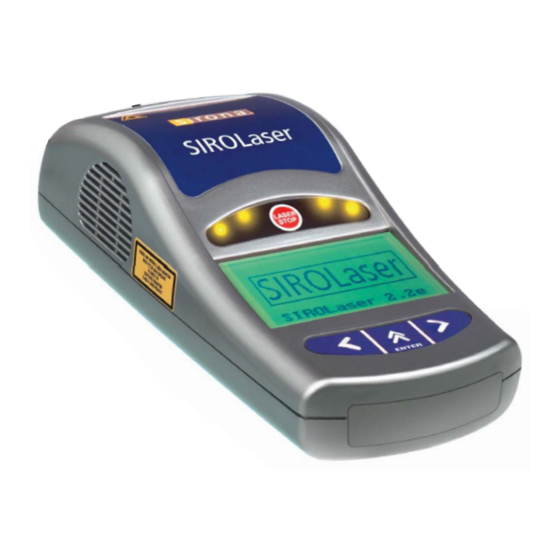
Page 13: Figure 1: "Laser Stop" Button
3 Introduction Figure 1: “LASER STOP” button Observe all labels on the laser unit. WARNING Operation of this laser unit by unauthorized persons must be prohibited in or- der to prevent incorrect or improper use. WARNING Never direct the laser beam or the aiming beam toward the eyes or the thyroid gland of a person. -
Page 14: Transport And Storage
Transport and storage 3.3.1 Transport and storage The SIROLaser is supplied in a case that ensures proper and easy transport. However, please observe the following: CAUTION Do not leave the laser unit in a car parked in the sun. The temperature inside the car can reach levels that may damage its components. -
Page 15: Precautions
This can be achieved for example by switching off the laser unit after use, so that the electronic access key must be entered prior to further operation. Set up the SIROLaser laser unit properly and completely before putting it into operation (see chapter 4). - Page 16 3 Introduction CAUTION Never allow dust or dirt to enter the optical fiber socket and the optical system. Otherwise, the unit may be permanently damaged CAUTION Always protect the optical fiber socket as well as the optical fiber itself with the special protection caps.
-
Page 17: Installation
4 Installation Installation If national or local legal regulations require that the installation of the SIROLaser be performed by specialized personnel, these regulations must be complied with. WARNING The handpieces and the tips are supplied non-sterile, you must clean, disin- fect and sterilize these products prior to first use and prior to each subsequent use. -
Page 18: Spare Parts
Spanish 60 85 703 Italian 60 85 729 4.2.1 Accessories Upon request, the SIROLaser can be delivered with the following accesso- ries: Laser protective goggles for wearers of 60 56 514 glasses (nontransparent) Take-up reel incl. 400 µm optic fiber... -
Page 19: Interlock
The installation must be performed by a qualified electrician who is also re- sponsible for the installation and maintenance of the electrical system to which the SIROLaser is connected. Please request the technical data sheet with wiring diagram for installation of the interlock device. -
Page 20: Installation Of An Interlock Jumper (Without Door Switch)
The degree of protection of the foot switch is IPX5. Therefore, this foot switch may not be used in hospital operating rooms. Please contact Sirona Dental Systems LLC or your local dental distributor if you want to use the laser unit to- gether with the foot switch in a hospital OR operation theatre. -
Page 21: Connection Of The Finger Switch
4 Installation Connection of the finger switch Unscrew the distal part of the handpiece. Figure 7: Distal part of the handpiece Mount the finger switch. Figure 8: Distal part with finger switch Screw the distal part of the handpiece back onto the rest of the handpiece. -
Page 22: Connecting The Optical Fiber
The SIROLaser optical fibers have a standard SMA-905 connection and can be used only with the SIROLaser in the spectral range of 970nm ± 15 nm. If optical fibers from other manufacturers are used, physical properties such as tensile strength and transmission behavior may vary. -
Page 23: Figure 12: Take-Up Device
Tapered part with slot Cylindrical part NOTICE The SIROLaser detects that the optical fiber is also properly connected only if it is connected to the connector. If the connector or the optical fiber is missing, an error message is output. -
Page 24: Preparation For Clinical Use
If the aiming beam signal produces an evenly illuminated, circular beam pattern, remove the attached distal seal by cutting it off with a pair of scissors. This results in the expiration of Sirona Dental Systems GmbH's liability for any mechanical damage to the optical fiber. - Page 25 If you cannot detect any damage on the optical fiber and the signal of the aiming laser is not visible with the new optical fiber either, turn off the laser and contact Sirona Dental Systems GmbH, your local dental distributor or your authorized service center.
-
Page 26: Figure 18: Inserting The Optical Fiber Into The Handpiece
4 Installation Insert the optical fiber in to the handpiece. Figure 18: Inserting the optical fiber into the handpiece Insert the desired curved tip by applying pressure and twisting it. CAUTION Do not use the 320 µm fiber or one larger in combination with the 60° tip! CAUTION Check the tip for damage before inserting it. -
Page 27: Adjusting The Sheath
Power supply connection CAUTION The SIROLaser may only be operated with the Sinpro MPU50-105 power sup- ply. Operation with other power supplies may result in failure or destruction of the laser unit. Using power supplies other than the recommended one results in invalidation of the approval of the entire unit and loss of the warranty granted by Sirona Dental Systems GmbH. -
Page 28: Operating Instructions
The temperature of the laser diode is < 5 °C or > 90 °C; or the temperature sensor is defective. Adapt the SIROLaser to room temperature over a period of 2 hours. If this message nevertheless still appears, contact your dealer or an authorized Customer Service Department. - Page 29 This message indicates an error of the laser current output power. The SIROLaser output is out of the ± 20 % tolerance. Switch the laser unit off and switch it on again. If the error message is displayed again contact your local dealer or your authorized service center.
-
Page 30: Switching The Laser Unit On And Off
Once you have completed the installation procedure, press the “ENTER” key to switch on the laser unit. After 2 minutes of inactivity, the SIROLaser enters the standby mode. You can leave the unit in standby mode with the power cord connected. -
Page 31: Setting Up The Software Interface Language
5 Operating Instructions Setting up the software interface language Press the "RIGHT ARROW" key to select the treatment area. Press the “LEFT ARROW” key twice. The following screen appears on the display: Press the “ENTER” key. A new screen appears on the display. Press the “ENTER”... -
Page 32: Surgery
5 Operating Instructions Press the “RIGHT ARROW” key to select the treatment area. Press the “ENTER” key to access the surgery area (SURGERY AREA). In this area you will find a number of surgical submenus with preset treatment parameters. Press the “ENTER” key to access the periodontics area (PERIODONTICS AREA). -
Page 33: Figure 24: Example Of A Treatment Submenu
5 Operating Instructions Operculectomy Frenulectomy Hemostasis Gingival incisions Aphthae Herpes PERIODONTICS AREAPERIODONTICS Periodont. lesions Periodont. pockets Peri-implantitis ENDODONTICS AREA Endodont. germ reduction Gangrene germ reduction After you have selected the desired indication with the “ENTER” key, the fol- lowing happens: You are prompted to connect the specified fiber (200 µm/320 µm)! Confirm with "ENTER"... -
Page 34: Manual Setting Area" Submenu
5 Operating Instructions Pulse duration in milliseconds: in single pulse or auto-repeat mode. If set to any time, laser radiation will stop after this time, even if you continue to press the foot switch or finger switch. If set to zero, “------” appears on the display, and the laser remains activated as long you press the foot switch or finger switch. -
Page 35: Figure 25: "Manual Setting Area" Submenu
5 Operating Instructions Here you can select from 10 programs with the arrow keys. Pressing the "ENTER" key takes you to the selected program (PP1 for program 1, PP2 for program 2,..) Confirm the fiber you would like to have for your personal setting (200µm or 320 µm) with "ENTER"... -
Page 36: Setup Area" Submenu
If no activation time has been preset, the energy will not be calculated. WARNING As soon as you have selected the program, the SIROLaser is in standby mode. As soon as you press the foot switch or finger switch, the laser unit is activated. - Page 37 5 Operating Instructions A function is activated when it is highlighted. To save the changes made, press the “ENTER” key. Pressing the “ENTER” key again highlights the next function. To quit the “SETUP AREA”, press the “LEFT ARROW” key while no functions are highlighted.
-
Page 38: Indications, Contraindications And Medical Precautions38
At the end of this section, you will find an overview where some possible treat- ments with the SIROLaser as well as the power values to be used are listed. List of indications... -
Page 39: Contraindications
Contraindications At present, no contraindications are known for the use of therapeutic lasers in dentistry with devices of the same power and wavelength as the SIROLaser. Precautions WARNING Never direct the laser beam or the aiming beam toward the eyes or the thyroid gland of a person. -
Page 40: Cleaning And Sterilization
7 Cleaning and sterilization Cleaning and sterilization After finishing treatment, switch off the laser and disconnect the power cord from the power supply. WARNING The handpieces and the tips are supplied non-sterile, you must sterilize these products prior to first use and prior to each subsequent use. WARNING Disinfect the finger switch and the fiber prior to the first use and prior to each subsequent use. -
Page 41: Disinfection
7 Cleaning and sterilization Handpiece Remove the tip from the handpiece. Disassemble the handpiece by unscrewing the two threaded joints. Clean the handpiece and tip by scrubbing them with a suitable brush under running water. Clean the distal end of the optical fiber using a soft, damp cloth. -
Page 42: Cleaning Of The Laser Unit And Finger Switch
SIRONA DAC PROFESSIONAL. Cleaning of the laser unit and finger switch Use a dry, soft cloth to remove dust from the SIROLaser. More stubborn spots can be removed with a damp cloth. For disinfection, you can treat the SIROLaser with all products commonly used for medical electrical equipment, such as MinutenSpray classic, ®... -
Page 43: Maintenance And Service
We recommend performing this check at least once a week. To ensure precise control of the efficiency and perfect functioning of your SIROLaser unit, we recommend you to perform a calibration at three different power levels: The SIROLaser performs a self-calibration, during which the system will check whether the parameters responsible for laser emission are correct. -
Page 44: Calibration-Check With Use Of An External Power Meter
Switch on the SIROLaser and go to the “SETUP AREA”. Select “SERVICE”. Check to see that the fiber is neatly cut, and that the laser beam projects a red circle. -
Page 45: Error Message And Incorrect Parameter Values
10 W (upper end of scale) of up to 10 W at 970 nm and wavelength of ± 15 nm. 970 nm +/– 15 nm. Sirona Dental Does the error Systems LLC, persist when repeating Dental distributor the measurement? -
Page 46: Safety Checks
0.5 W and 7 W Maintenance The SIROLaser does not require special maintenance. In case of malfunc- tioning, see chapter Technical support, repair and testing. However, Sirona Dental Systems GmbH recommends the following actions to be taken at reg-... -
Page 47: Technical Support, Repair And Testing
Technical support, repair and testing Technical information concerning parts to be repaired may be supplied by Sirona only to authorized agents and after providing a training course to the technical personnel. Please contact your local dental distributor or authorized service center for technical support. -
Page 48: Technical Data
87 × 54 × 190 mm (3.43" × 2.1" × 7.48") Weight 0.45 kg (1 lb.) Power supply The SIROLaser may only be operated with the Sinpro MPU50-105 power supply provided NOHD (Nominal Ocular Hazard approx. 1.5 m for 10 s radiation exposure of the unprotected eye Distance) (numerical aperture of the optical fiber NA = 0.22) -
Page 49: Manufacturer's Declaration Regarding Electromagnetic Compatibility
Compliance Electromagnetic environment – guidance RF emissions Group 1 The SIROLaser UNIT uses HF energy only for its internal function. The HF emission is therefore very low, and it is CISPR 11 improbable that nearby electronic devices might be dis- turbed. - Page 50 10 Manufacturer’s declaration regarding electromagnetic compatibility Interference immunity The SIROLaser is intended for use in the electromagnetic environment specified below. The end user should ensure that it is used in such an environment. Immunity test EN 60601-1-2 Compliance Electromagnetic environment –...
- Page 51 10 Manufacturer’s declaration regarding electromagnetic compatibility RF immunity The SIROLaser is intended for use in the electromagnetic environment specified below. The end user should ensure that it is used in such an environment. Immunity test EN 60601-1-2 Compliance Electromagnetic environment –...
- Page 52 Recommended separation distances between portable and mobile RF communications equipment and the SIROLaser The SIROLaser model is intended for use in an electromagnetic environment in which radiated RF disturbances are con- trolled. The customer or user can help prevent electromagnetic interference by maintaining a minimum distance between portable and mobile RF communications equipment (transmitters) and the SIROLaser as recommended below, according to the maximum output power of the communications equipment.
-
Page 53: Appendix
The unit is manufactured in compliance with the provisions of Council Directive 93/42/EEC concerning medical devices. 11.2 Appendix B – Label positions The following figures show the positions of the labels on the SIROLaser. Label 1a Label 1 Label 4... -
Page 54: Figure 28: Label Positions, Bottom View
11 Appendix Label 2 Label 6 Label 3 Label 8 Label 7 Figure 28: Label positions, bottom view 60 90 570 D 3485 D 3485.201.04.09.02 09.2007... - Page 55 11 Appendix B2 – Label list The following labels are attached to the SIROLaser: Label 1a Label 1 Label 2 Label 3 Label 4 60 90 570 D 3485 D 3485.201.04.09.02 09.2007...
- Page 56 11 Appendix Label 5 Label 6 Software extention (CU, NU, SA) Label 7 CU, NU, SA Software extention (CU, NU, SA) Label 8 60 90 570 D 3485 D 3485.201.04.09.02 09.2007...
- Page 58 tÉ=êÉëÉêîÉ=íÜÉ=êáÖÜí=íç=ã~âÉ=~åó=~äíÉê~íáçåë=ïÜáÅÜ=ã~ó=ÄÉ=êÉèìáêÉÇ=ÇìÉ=íç=íÉÅÜåáÅ~ä=áãéêçîÉãÉåíëK «=páêçå~=aÉåí~ä=póëíÉãë=dãÄe=OMMRJOMMT péê~ÅÜÉW= ÉåÖäáëÅÜ= mêáåíÉÇ=áå=dÉêã~åó a=PQURKOMNKMQKMVKMO===MVKOMMT ûKJkêKW= NMT=UMQ fãéêáã¨=Éå=^ääÉã~ÖåÉ páêçå~=aÉåí~ä=póëíÉãë=dãÄe áå=íÜÉ=rp^W SM=VM=RTM=a=PQUR c~Äêáâëíê~≈É=PN páêçå~=aÉåí~ä=póëíÉãë=ii` lêÇÉê=kç SQSOR=_ÉåëÜÉáã QUPR=páêçå~=aêáîÉI=pìáíÉ=NMM dÉêã~åó `Ü~êäçííÉI=k`=OUOTP ïïïKëáêçå~KÅçã...
Need help?
Do you have a question about the SIROlaser and is the answer not in the manual?
Questions and answers