Table of Contents
Advertisement
Quick Links
MOUNTING AND
OPERATING INSTRUCTIONS
EB 31a-23
Original instruction
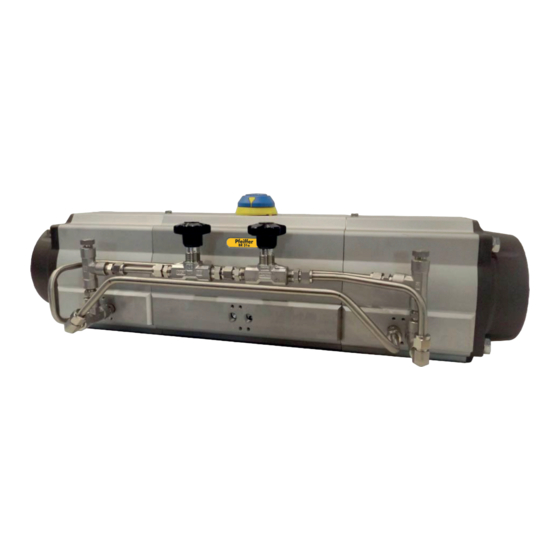
Quarter-turn actuator with adjustable hydraulic damping
Version HCD DAP / HCD SRP
Edition November 2021
PFEIFFER Chemie-Armaturenbau GmbH · Hooghe Weg 41 · 47906 Kempen · Germany
Telefon: +49 2152 2005-0 · Telefax: +49 2152 1580
vertrieb@pfeiffer-armaturen.com · www.pfeiffer-armaturen.com
Advertisement
Table of Contents

Related Manuals for Samson EB 31a-23


Summary of Contents for Samson EB 31a-23
- Page 1 MOUNTING AND OPERATING INSTRUCTIONS EB 31a-23 Original instruction Quarter-turn actuator with adjustable hydraulic damping Version HCD DAP / HCD SRP Edition November 2021 PFEIFFER Chemie-Armaturenbau GmbH · Hooghe Weg 41 · 47906 Kempen · Germany Telefon: +49 2152 2005-0 · Telefax: +49 2152 1580...
- Page 2 Note on these mounting and operating instructions These mounting and operating instructions assist you in mounting and operating the device safely. The instructions are binding for handling PFEIFFER devices. The images shown in these instructions are for illustration purposes only. The actual product may vary. For the safe and proper use of these instructions, read them carefully and keep them for later reference If you have any questions about these instructions, contact...
-
Page 3: Table Of Contents
Contents Inhalt Safety instructions and measures Notes on possible severe personal injury Notes on possible personal injury Notes on possible property damage Markings on the device Actuator name plate HCD hydraulic circuit extra labelling Design and principle of operation HCD actuator Direction of action and fail position HCD actuator with hydraulic circuit 3.3.1... - Page 4 Contents Service Preparation for servicing Part lists 9.2.1 Part list for Quarter-turn actuator in standard version 9.2.2 Part list for Quarter-turn actuator in HCD version 9.2.3 HCD with hydraulic circuit part list Disassembly 9.3.1 Position indicator removal 9.3.2 Hydraulic fl uid removal 9.3.3 Stop cap screws removal 9.3.4...
-
Page 5: Safety Instructions And Measures
Safety instructions and measures Revisions and other modifi cations Safety instructions and measures Revisions, conversions or other modifi cations of the product are not authorized by PFEIFFER. They are performed at the users Intended use own risk and may lead to safety hazards, for ex- ample. Further- The PFEIFFER HCD actuators are designed for the automation more, the product may no longer meet the requirements for its in- and operation of quarter-turn valves such as butterfl... -
Page 6: Notes On Possible Severe Personal Injury
Safety instructions and measures Therefore, the actuator cannot to be put into service until the WARNING machinery and/or the fi nal system, where the actuator is in- corporated, will be declared in compliance with the require- Crush hazard arising from moving parts! ments of the Directive. - Page 7 Safety instructions and measures NOTICE Risk of actuator damage due to the use of inappropriate tools! Certain tools are required to work on the actuator. Do not use damaged tools. Refer to section “15.1.3 Tools”. Risk of actuator damage due to excessively high or low tight- ening torques! Observe the specifi...
- Page 8 Safety instructions and measures EB 31a-23_EN Edition: November 2021 Specifi cations subject to change...
-
Page 9: Markings On The Device
Markings on the device Markings on the device 2.1 Actuator name plate The actuator type, size, operating pressure, output torque, direction of rotation, fail-safe action, operating temperature, and type of at- tachment are determined by the actuator designation. Keep the nameplate to ensure that the actuator can be identifi ed at all times. Rack-and-pinion actuators have nameplates, which show the following information: Fig. -
Page 10: Hcd Hydraulic Circuit Extra Labelling
Marking on the device Table 2-1: Marking on the nameplate of the drive Information Item Comment Unique identifi cation (variable) Order number Position number in the order Serial number (automatically assigned Connection for accessories (fi xed, depending on AA1 to AA5 (VDE/VDI actuator size 1 to 4) actuator size) Connection for accessories (fi... -
Page 11: Design And Principle Of Operation
Design and principle of operation The actuators can be controlled by different options: Design and principle of operation − direct mounting of control devices (for example a solenoid valve or a manifold) with NAMUR interface, 3.1 HCD actuator − threaded connections (to pressurize port “2“ and “4“) with The HCD actuator is typically used to obtain a decelerated strok- air lines from separate electro-pneumatic control system. -
Page 12: Hcd Hydraulic Circuit Operating Function
Design and principle of operation Open or close the speed control valve until the desired stroke 3.3.1 HCD hydraulic circuit operating func- time rotation is achieved tion Make rotation test to verify the correct stroke time in closing For adjust the stroking time there are two speed control valves: rotation. -
Page 13: Technical Data
Design and principle of operation 3.4 Technical data The nameplate provides information on the actuator confi gura- tion. Refer to section “2.1 Actuator name plate”. − More information’s are available in the actuator model tech- nical data sheet available from PFEIFFER. Power operating media Use dry or lubricated air or inert gas. - Page 14 Design and principle of operation EB 31a-23_EN Edition: November 2021 Specifi cations subject to change...
-
Page 15: Shipment And On-Site Transport
Shipment and on-site transport Do not attach load-bearing slings to the travel stop or to ac- Shipment and on-site transport cessories. The work described in this section is only to be performed by ful- Do not use damaged or defective slings. ly trained and qualifi... -
Page 16: Storing The Actuator
Shipment and on-site transport Use appropriate tackles and slings to lift the actuator. Storage instructions Refer to technical data sheet for the actuator weight. Store the actuator in a clean and dry place. Temperature limits are defi ned by the rubber components ma- Lifting instructions terial. -
Page 17: Mounting And Assembly
Mounting and assembly Mounting and assembly 5.3 Mounting the actuator over the valve The work described in this section is only to be performed by ful- DANGER ly trained and qualifi ed personnel. Risk of bursting in the actuator! Pneumatic actuators are pressure equipment that may burst when 5.1 Preparation for installation handled incorrectly. - Page 18 Mounting and assembly Before mounting the actuator over the valve, make sure the fol- − When fi tting accessories over the actuators, assemble them in lowing conditions are met: such a way that the emergency controls are easily accessible for emergency manual operation. −...
- Page 19 Mounting and assembly WARNING Risk of damage due to incorrect alignment! Support the actuator with the lifting equipment until the con- nection bolts are completely tightened. Make sure to align correctly the dowel pins or the spigot, if any. Align the valve stem/coupling to the actuator’s bore. Carefully lower the actuator and engage the valve stem/ cou- pling into the actuator’s bore without forcing and driving the actuator into the position only with the weight of the actuator...
- Page 20 Mounting and assembly EB 31a-23_EN Edition: November 2021 Specifi cations subject to change...
-
Page 21: Start-Up
Start-up Start-up The work described in this section is only to be performed by ful- ly trained and qualifi ed personnel. WARNING Risk of personal injury during actuator air exhaust! In case of pneumatic version the actuator is operated with air. As a result, air is exhausted during operation. - Page 22 Start-up EB 31a-23_EN Edition: November 2021 Specifi cations subject to change...
-
Page 23: Operation
Operation Operation The work described in this section is only to be performed by ful- ly trained and qualifi ed personnel. WARNING Risk of personal injury during actuator air exhaust! In case of pneumatic version the actuator is operated with air. As a result, air is exhausted during operation. - Page 24 Operation EB 31a-23_EN Edition: November 2021 Specifi cations subject to change...
-
Page 25: Malfunctions
Malfunctions Malfunctions The work described in this section is only to be performed by fully trained and qualifi ed personnel. 8.1 Troubleshooting Malfunction Possible reasons Recommended action Inadequate supply Check the supply system and make sure that the supply pressure is correct. Disassemble the actuator, lubricate all the sliding parts and reassemble the ac- Missing lubricant tuator. - Page 26 Malfunctions EB 31a-23_EN Edition: November 2021 Specifi cations subject to change...
-
Page 27: Service
Service With the information given below, PFEIFFER provides the end us- Service er with all the required information necessary for service. The work described in this section is only to be performed by ful- Under normal conditions, the actuator requires only periodic ly trained and qualifi... -
Page 28: Part Lists
Service 9.2 Part lists 9.2.1 Part list for Quarter-turn actuator in standard version Fig. 9-1: Explosion view of BR 31a Quarter-turn actuator in standard version EB 31a-23_EN Edition: November 2021 Specifi cations subject to change... - Page 29 Service Table 9-2: Part list of Type BR 31a Quarter-turn actuator in standard version Item Unit Qty. Note Description Octi-cam (Stop arrangement) Stop cap screw Washer for models with extra travel stop adjustment Washer Nut (Stop screw) for models with extra travel stop adjustment Nut (Extra travel stop adjustment screw) Bearing (Piston back) Bearing (Pinion top)
-
Page 30: Part List For Quarter-Turn Actuator In Hcd Version
Service 9.2.2 Part list for Quarter-turn actuator in HCD version in HCD version Fig. 9-2: Sectional diagram through a BR 31a Quarter-turn actuator Table 9-3: Part list for the BR 31a Quarter-turn actuator in HCD version Item Unit Qty. Note Description End cap 43MH... -
Page 31: Hcd With Hydraulic Circuit Part List
Service Item Unit Qty. Note Description Not applicable for Type HCD 3000 and HCD 4000 O-Ring (Stop screw fl ange) Not applicable for Type HCD 3000 and HCD 4000 Washer (Stop screw fl ange) O-ring (Internal fl ange) HCD Stem Sphere plug (HCD Body) 331A only for Type HCD 3000 and HCD 4000... -
Page 32: Hydraulic Fl Uid Removal
Service Fig. 9-4: Position indicator and graduated ring removal Fig. 9-6: Remove the hydraulic circuit 9.3.2 Hydraulic fl uid removal 9.3.3 Stop cap screws removal Refer to Fig. 9-2, Fig. 9-5 and Fig. 9-6 Refer to Fig. 9-1 and Fig. 9-7 Before proceeding to the end caps disassembly is necessary to empty the HCD bodies (301H and 302H) from the liquid. -
Page 33: End Caps Disassembly
Service 9.3.4 End caps disassembly Refer to Fig. 9-1, Fig. 9-2, Fig. 9-8, Fig. 9-9, Fig. 9-10 and Fig. 9-11 Disassemble one end cap at a time. WARNING Risk of personal injury due to compressed springs! End caps are under tension due to compressed springs. Before starting any work on the actuator disconnect all pneu- matic / hydraulic / electrical supplies from the actuator and exhaust the pressure from the power module. -
Page 34: Hcd Components Disassembly
Service Double acting actuators Remove the following soft components and discard, if repla- cing, all soft components: Unscrew and remove the plug (339), see Fig. 9-10 – Bushing fl ange (307) Unscrew completely the end cap bolts (318) as per the se- quence shown in the Fig. -
Page 35: Drive Shaft Disassembly
Service Remove the thrust washer (10) and the external thrust bea- ring (08). Apply downward force to the top of the drive shaft (60/60.1), until it is partially out of the bottom of the body. Remove the internal thrust bearing (08) and the octi-cam (01). -
Page 36: Drive Shaft Reassembly
Service 9.5.1 Drive shaft reassembly Refer to Fig. 9-1, Fig. 9-16, Fig. 9-17 and Fig. 9-18. Place the drive shaft top bearing (06) and bottom bearing (07). Lubricate and place the drive shaft top o-ring (21) and bot- tom o-ring (20). Lubricate the external surface of the bearings and o-rings placed onto the drive shaft (60/60.1) as per the Fig. -
Page 37: Hcd Components Reassembly
Service With pistons completely closed (0° position) as per Fig. 9-22, referring to the axis of the body, the rotation obtained must – about over 0° up to 5° With pistons completely closed (0° position) as per Fig. 9-22 the dimension “A“ must be the same on both sides. Fig. -
Page 38: End Cap Reassembly
Service Insert the spring clip (310). Put the body HCD (301H) on the body (50), by verifying that the o-ring (311) remains in its groove. Insert the o-ring (311) and (329) in the grooves of the inter- nal fl ange and lubricate the o-ring (329). Lubricate internally the body. -
Page 39: Hcd Chamber Fi Lling
Service NOTICE Risk of components damage due to incorrect assembly! During reassembling the end caps can be damaged due to une- ven force generated by compressed springs. Assemble the end caps as shown in Fig. 9-29 keeping a con- stant distance (A = B) between the actuator body and the end cap interface. - Page 40 Service WARNING Risk of personal injury due to hydraulic fl uid! The tubes used to fi ll the chambers can be opened at the end. The liquid can be come out with high fl ow without control. Before starting to pressurize the actuator, make sure that the tubes do not come out of the container during the fi...
-
Page 41: Position Indicator Reassembly
Service Insert onto both stop screws (02), the nut (04), the washer 9.5.6 Position indicator reassembly (03) and the o-ring (11). Refer to Fig. 9-1, Fig. 9-36 and Fig. 9-37. Place the stop cap screws (02) into the body (50). Fix the graduated ring (19.0) into the body, if any. - Page 42 Service EB 31a-23_EN 9-16 Edition: November 2021 Specifi cations subject to change...
-
Page 43: Decomissioning
Decomissioning To decommission the actuator for service work or before remov- 10 Decomissioning ing it from the valve, proceed as follows: The work described in this section is only to be performed by ful- Put the valve and its accessories out of operation in a safe ly trained and qualifi... - Page 44 Decomissioning EB 31a-23_EN 10-2 Edition: November 2021 Specifi cations subject to change...
-
Page 45: Removal
Removal 11 Removal WARNING The work described in this section is only to be performed by ful- Risk of personal injury due to preloaded and compressed ly trained and qualifi ed personnel only. springs! Before removing from the valve, make sure the actuator is put out End caps are under tension due to compressed springs. - Page 46 Removal Proceed as follows to remove the actuator from the valve refer- ring to Fig. 11-1, making sure to not expose the plant to any risk: Disconnect any electrical/pneumatic/hydraulic power supply from the actuators and make sure the actuator itself is depres- surized.
-
Page 47: Repairs
Repairs 12 Repairs If the actuator does not function properly according to how it was originally sized or does not function at all, it is defective and must be repaired or replaced. NOTICE Risk of actuator damage due to incorrect repair work! Do not perform any repair work on your own. - Page 48 Repairs EB 31a-23_EN 12-2 Edition: November 2021 Specifi cations subject to change...
-
Page 49: Disposal
Disposal 13 Disposal At the end of their life cycle PFEIFFER actuators can be complete- ly disassembled and disposed sorting the components by the dif- ferent materials. Observe local, national and international refuse regulations All materials have been selected in order to ensure minimal envi- ronmental impact, health and safety of personnel during their in- stallation and maintenance, provided that, during use, they are not contaminated by hazardous substances. - Page 50 Disposal EB 31a-23_EN 13-2 Edition: November 2021 Specifi cations subject to change...
-
Page 51: Certifi Cates
Certifi cate 14 Certifi cates The following certifi cates and documents are available from PFEIFFER: − Declaration of conformity in acc. to EC Machinery directive 2006/42/EC,. refer page 14-2 − Declaration of conformity in acc. to EU ATEX directive 2014/34/EU,. refer page 14-2 −... - Page 52 Certifi cate EB 31a-23_EN 14-2 Edition: November 2021 Specifi cations subject to change...
- Page 53 Certifi cate EB 31a-23_EN 14-3 Edition: November 2021 Specifi cations subject to change...
- Page 54 Certifi cate EB 31a-23_EN 14-4 Edition: November 2021 Specifi cations subject to change...
-
Page 55: Annex
Annex Table 15-3: Stop screws nuts (04) 15 Annex Actuator Type Tightening torque Thread DAP HCD / SRP HCD in Nm 15.1 Tightening torques, lubricants and tools 8 ... 9 15.1.1 Tightening torques 18 ... 20 34 ... 36 Note 60 ... -
Page 56: Tools
Annex Table 15-6: Tools dimensions 15.1.3 Tools Actuator Type HCD DAP / HCD SRP Tools list 1200 2000 3000 4000 15.2 Spare parts The recommended spare parts are listed in the following sections „15.2.1 Spare parts for the Quarter-turn actuator with hydraulic speed control“... -
Page 57: Spare Parts For The Quarter-Turn Actuator With Hydraulic Speed Control
Annex 15.2.1 Spare parts for the Quarter-turn actuator with hydraulic speed control Fig. 15-3: Sectional drawing of the quarter-turn actuator DAP HCD / SRP HCD Table 15-7: Recommended spare parts for the quarter turn actuator DAP HCD / SRP HCD Item Unit Qty. -
Page 58: Part List For Br 31A Edition 2010 Quarter-Turn Actuator In Standard Version
Annex 15.2.2 Part list for BR 31a Edition 2010 Quarter-turn actuator in standard version Fig. 15-4: Explosion view of Quarter-turn actuator in standard version EB 31a-23_EN 15-4 Edition: November 2021 Specifi cations subject to change... - Page 59 Annex Table 15-8: Part list of Quarter-turn actuator in standard version Item Unit Qty. Note Description Octi-cam (Stop arrangement) Stop cap screw Washer For models with extra travel stop adjustment Washer Nut (Stop screw) For models with extra travel stop adjustment Nut (Extra travel stop adjustment screw) Bearing (Piston back) Bearing (Drive shaft top)
-
Page 60: After-Sales Service
Annex 15.3 After-sales service Contact PFEIFFER after-sales service for support concerning ser- vice or repair work or when malfunctions or defects arise. E-mail address You can reach our after-sales service at „vertrieb@pfeiffer-armaturen.com“ Necessary information For request and for troubleshooting, please provide the following information: −... - Page 61 EB 31a-23_EN Edition: November 2021 Specifi cations subject to change...
- Page 62 EB 31a-23_EN Edition: November 2021 Specifi cations subject to change...
- Page 63 EB 31a-23_EN Edition: November 2021 Specifi cations subject to change...
- Page 64 PFEIFFER Chemie-Armaturenbau GmbH Hooghe Weg 41 · 47906 Kempen · Germany Phone: +49 2152 2005-0 · Fax: +49 2152 1580 E-Mail: vertrieb@pfeiffer-armaturen.com · Internet: www.pfeiffer-armaturen.com EB 31a-23_EN Edition: November 2021 Specifi cations subject to change...
Need help?
Do you have a question about the EB 31a-23 and is the answer not in the manual?
Questions and answers