Table of Contents
Advertisement
Quick Links
Advertisement
Table of Contents

Related Manuals for BenQ ST4302S


Summary of Contents for BenQ ST4302S
- Page 1 ST4302S / ST5502S Digital Signage User Manual...
- Page 2 Disclaimer BenQ Corporation makes no representations or warranties, either expressed or implied, with respect to the contents of this document. BenQ Corporation reserves the right to revise this publication and to make changes from time to time in the contents thereof without obligation to notify any person of such revision or changes.
-
Page 3: Product Support
Please visit the website for the latest version of this document and other product information. Available files vary by model. 1. Make sure your computer is connected to the Internet. 2. Visit the local website from www.BenQ.com. The website layout and content may vary by region/country. - User manual and related document: www.BenQ.com... -
Page 4: Table Of Contents
Notes on the LCD panel of this display ........7 Safety notice for remote control ..........8 Battery safety notice ..............8 BenQ ecoFACTS................9 Package contents ............... 10 Setting up the display ............11 Mounting the display ..............11 Parts of the display and their functions ...... - Page 5 Table of Contents Screen....................29 Audio ....................30 Configuration 1 ................31 Configuration 2 ................32 Advanced option................33 System interface..............36 Main screen ..................36 APPS....................38 Product information............53 Specifications.................. 53 Dimensions..................55 Supported input signal resolution ..........57 Troubleshooting ..............
-
Page 6: Safety Warnings And Precautions
Safety warnings and precautions Safety warnings and precautions THIS EQUIPMENT MUST BE GROUNDED To ensure safe operation, the three-pin plug must be inserted only into a standard three-pin power outlet which is effectively grounded through normal household wiring. Extension cords The lightning flash with arrowhead used with the equipment must have symbol, within an equilateral triangle, is... -
Page 7: Important Safety Instructions
Important safety instructions Important safety instructions 1. Read these instructions. 2. Keep these instructions. 3. Heed all warnings. 4. Follow all instructions. 5. Do not use this apparatus near water. 6. Clean only with dry cloth. 7. Do not block any ventilation openings. Install in accordance with the manufacturer's instructions. -
Page 8: Safety Notice For Remote Control
Important safety instructions • LCD screens, like plasma (PDP) and conventional CRT (Cathode Ray Tube) screens, are also susceptible to 'screen burn-in' or 'image retention' which can be found on the screen as visible fixed lines and shades. To avoid such damage to the screen, avoid displaying still images (like On-Screen Display menus, fixed/inactive text or icons) for more than 30 minutes. -
Page 9: Benq Ecofacts
Important safety instructions BenQ ecoFACTS BenQ has been dedicated to the design and development of greener product as part of its aspiration to realize the ideal of the “Bringing Enjoyment 'N Quality to Life” corporate vision with the ultimate goal to achieve a low-carbon society. Besides meeting... -
Page 10: Package Contents
Package contents Package contents Open the sales package and check the contents. If any item is missing or damaged, please contact your dealer immediately. LCD display Remote control Power cord (By region) AAA battery x 2 HDMI cable x 1 RS232 cable x 1 Quick start guide •... -
Page 11: Setting Up The Display
Installing the display on a wall VESA Standard: ST4302S: 200 x 200 (4 - M6 x 15L) ST5502S: 400 x 400 (4 - M6 x 15L) 1. Place a clean, dry and lint-free cloth on a flat, horizontal and object-free surface. - Page 12 Setting up the display 5. Install the wall mounting bracket on Thickness the display and attach the display to of the wall the wall according to the mounting mounting bracket’s instructions. The length of the screw should exceed the thickness bracket display of the wall mounting bracket, please...
-
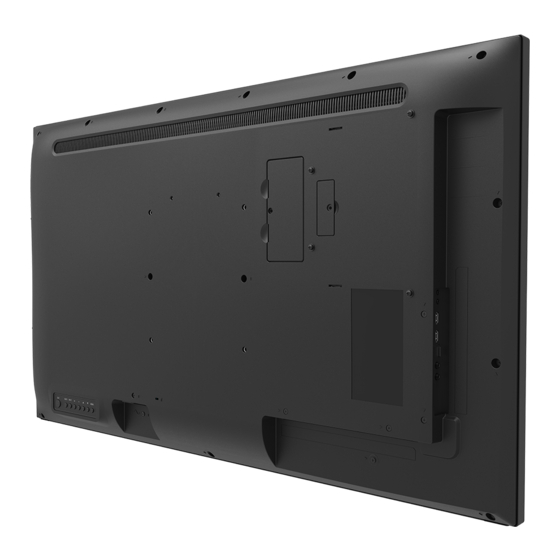
Page 13: Parts Of The Display And Their Functions
Parts of the display and their functions Parts of the display and their functions Rear pane 4 5 6 Name Description Turns the display on/off. Disables the audio. MUTE Opens the input source menu. INPUT • Increases the volume. • Opens the selected item or confirms a selection in the OSD or input source menu. -
Page 14: Input/Output Terminals
Parts of the display and their functions Input/output terminals Bottom side AUDIO OUT HDMI1 IN HDMI2 IN PC LINE IN DVI(DVI-D) IN VGA IN RJ45 Name Description Connects to a power outlet through the supplied power cord. AC IN Port Power Switch Turns on/off the power supplied from the AC IN port. -
Page 15: Power Status Indicator
Parts of the display and their functions Left Side RS232 RS232 USB2.0 USB2.0 IR-OUT IR-IN Name Description Connects with the serial I/O input connector of a device to RS232 OUT transfer data. Connects with the serial I/O output connector of a device to RS232 IN receive data. -
Page 16: Remote Control
Parts of the display and their functions Remote control ADJUST No function. Disables the audio. • The red, green, and yellow buttons have no function. • The blue button turns on/off the backlight of the display. NORMAL Returns to normal operation after setting display ID. -
Page 17: Using The Remote Control
Parts of the display and their functions Using the remote control Installing remote control batteries 1. Press and flip open the battery compartment cover. 2. Insert two AAA batteries into the battery compartment ensuring that the (+) and (-) signs on the batteries match the (+) and (-) indications on the battery compartment. -
Page 18: Connection
Connection Connection Connecting audio/video signals Pay attention to the following notes when you connect cables: • Please turn off all devices. • Familiarize yourself with the audio/video ports on the display and the devices you want to use. Be aware that incorrect connections may adversely affect picture quality. •... - Page 19 Connection Connecting the analog input 1. Connect the VGA IN jack on the display to the VGA output jack on a computer using a D-Sub (15-pin) cable. 2. Connect the computer’s audio output jack to the PC LINE IN jack on the display using a suitable audio cable.
-
Page 20: Connecting Power
Connection Connecting the multimedia inputs To play multimedia files stored on the USB flash drive, insert the USB flash drive into the USB2.0 port. USB flash drive USB 2.0 standard spec is 0.5A and USB 3.0 standard spec is 0.9A. Connecting power Plug one end of the power cord into the power jack on the display and the other end into an appropriate power outlet (if the outlet is switched, turn on the switch). -
Page 21: Basic Operations
Basic operations Basic operations Turning the display on or off 1. Be sure to follow the instruction in Connecting power on page 2. Before turning on the display, make sure the power switch is set to ON. The system will enter standby mode. Power Switch The display’s standby mode still consumes power. -
Page 22: Operations In The Osd Menu
Basic operations Operations in the OSD menu Using the control panel buttons Using the remote control 1. Press MENU to open the OSD menu. 1. Press to open the OSD menu. 2. In the OSD menu, press 2. Press to scroll up or down. scroll up or down. -
Page 23: Initial Setup
Follow the on-screen instructions or the steps below to start up your display and complete the initial setup. 1. Turn on the display. Wait for the display to boot up with the BenQ screen. This may take a moment. -
Page 24: Setting Up The Internet Connection
Basic operations Setting up the Internet connection Your display must be connected to a network to conduct OTA updates or surf the Internet. To find the MAC address in operating system of the display, please go to Settings > System > About >... - Page 25 Basic operations Wireless connection You need to install a wireless adapter in order to connect the display to the Internet wirelessly. Please contact your local dealer for more information about the wireless adapter. 1. Install a wireless adapter to the display. 2.
-
Page 26: Updating Software
To manually update the software: On the main screen, go to Settings > System > About > BenQ System Updates. • Update system: The device will search for the update file while connecting to the Internet. -
Page 27: Osd Menu Operations
OSD menu operations OSD menu operations Picture Picture Brightness Screen Contrast Audio Sharpness Configuration 1 Black level Configuration 2 Tint Advanced option Color Noise reduction Medium Gamma selection Native Color temperature Native Color control Action Smart power Overscan Menu Description Brightness Adjusts the brightness of the display (0 to 100). - Page 28 OSD menu operations Menu Description Color control Adjusts individual red, green, and blue color balance. • R (0 to 255) • G (0 to 255) • B (0 to 255) Adjusts the power consumption based on the brightness of the Smart power display automatically.
-
Page 29: Screen
OSD menu operations Screen Picture H position Screen V position Audio Clock Configuration 1 Clock phase Configuration 2 Zoom mode Full Advanced option Auto adjust Action Screen reset Action Menu Description Adjusts the horizontal position of the video from the VGA IN input H position source (0 to 100). -
Page 30: Audio
OSD menu operations Audio Picture Balance Screen Treble Audio Bass Configuration 1 Volume Configuration 2 Audio Out (Line Out) Advanced option Maximum Volume Minimum Volume Mute Audio source Digital Audio reset Action Audio Out Sync Speaker Setting Menu Description Adjusts the sound balance of the audio output (0 to100). Balance Treble Adjusts the treble of the audio output (0 to 100). -
Page 31: Configuration 1
OSD menu operations Configuration 1 Picture Switch on state Force on Screen Panel saving Action Audio RS232 routing RS232 Configuration 1 Boot on source Action Configuration 2 Advanced option Configuration1 reset Action Factory reset Action Menu Description Sets the power-on status of the display (Power off / Forced Switch on state on / Last status). -
Page 32: Configuration 2
OSD menu operations Configuration 2 Picture OSD turn off Screen OSD H position Audio OSD V position Configuration 1 Rotation Landscape Configuration 2 Information OSD Advanced option Logo Monitor ID Action Heat status 24.21°C 75.57°F Monitor information Action HDMI Version Configuration2 reset Action Menu... -
Page 33: Advanced Option
OSD menu operations Advanced option Picture IR control Unlock Screen Power LED Light Audio Keyboard control Unlock Configuration 1 Tiling Action Configuration 2 Off Timer Advanced option Date and time Action Schedule Action HDMI with One Wire Auto signal detection Language English OSD transparency... - Page 34 OSD menu operations Menu Description Locks/Unlocks the buttons on the rear panel of the display. Keyboard control • Unlock: Unlocks the buttons. • Lock All: Locks the buttons. • Lock All but Volume: Only allows you to adjust the volume of the display. •...
- Page 35 OSD menu operations Menu Description Allows the display to automatically turn on/off at a pre- Schedule configured time. • Schedule list: Allows users to create up to 7 schedules (1 to 7). • Enable: Check to enable the schedule. • Start time: Sets the time to turn on the display. •...
-
Page 36: System Interface
Main screen Main screen of the display allows you to use BenQ’s various proprietary applications to create, manage, play captivating digital signage content to instantaneously engage your customers, as well as adjust display settings. - Page 37 System interface Application Name Description Allows you to download recommended apps. Refer to BenQ Suggests on page 41 for more BenQ Suggests ( information. Serves as a wireless broadcast system that allows immediate message delivery as well as X-Sign Broadcast ( group notification.
-
Page 38: Apps
Designer on their PCs or laptops and then import the file to the display through the USB flash drive. The content will be played automatically. X-Sign Designer can be downloaded from BenQ website. Please refer to the postcard in the accessory pack for the download instructions. - Page 39 System interface InstaShare InstaShare allows you to mirror the display's screen on your mobile device for hands- on annotation and mirror the screen of your mobile device on the display. Before launching InstaShare, make sure your display is properly connected to lnternet. To use InstaShare: 1.
- Page 40 System interface You can also select Setting ( ) in the lower right corner of the display to modify the settings for InstaShare, such as the InstaShare ID name, connect code, or mirroring confirmation message.
- Page 41 BenQ Suggests allows you to view and download recommended apps. After BenQ Suggests is launched, you can select the category on the left panel to browse the suggested apps. Select an app from the selected category to view the basic description of the app.
- Page 42 System interface WPS Office WPS Office allows you to read PDF files or edit files that are supported in Microsoft Office, PowerPoint, and Excel. To edit a file with WPS Office: Function Description Allows you to browse and open a file. Open Share Allows you to share your files through email or other sharing...
- Page 43 System interface Function Description File Allows you to open, save, share, print, and manage your presentations. View Allows you to change or edit the presentation views. Allows you to start or set up a slideshow. Play Allows you to edit the content or format of the slides. Edit Allows you to insert tables, pictures, charts, comments, video, or Insert...
- Page 44 System interface Supported Office versions and file formats Supported Office versions: 97 / 2000 / XP/ 2003 / 2007 / 2010 Supported Office software formats: Office Software Supported File Formats Word wps / wpt / doc / docx / dot / dotx / txt / log / irc / c / cpp / h / asm / s / java / asp / bat / bas / prg / cmd et / ett / xls / xlsx / xlt / xltx / csv / xlsm / xltm Excel...
- Page 45 System interface Media Player Media Player allows you to view your photos or play audio or video files. Media Player also allows you to create and play playlists of your media files. After Media Player is launched, you will see the main Media Player screen with the following options: Menu Description...
- Page 46 System interface Browse When selecting Browse on the main Media Player screen, a message will appear allowing you to select where your files are located. Once a file is selected from the location, it will begin playing. Menu Description Searches for files from the internal storage of the display. Internal Searches for files from a USB flash drive connected to the display through the USB2.0 port at the left side of the...
- Page 47 System interface Play When selecting Play on the main Media Player screen, the PlayList menu will appear. You can select a playlist to play. • You are allowed to create up to 7 playlists for your media files. Refer to Compose on page 48 for more information.
- Page 48 System interface Compose When selecting Compose on the Media Player screen, the PlayList menu will appear. You can select an empty field and start creating a playlist for your media files or edit an existing playlist. Creating/Editing a Playlist • If you select an empty field, a message requesting you select where your files are located will appear.
- Page 49 System interface When the Compose screen appear, you can start creating a playlist or editing an existing playlist. You can use the remote control to create or edit a playlist. • To confirm the selected item, press OK. • To play the file, press •...
- Page 50 System interface Menu Description Deletes all files in the playlist. Delete all Adds a file into the playlist or removes a file from the Add/Remove playlist. Prioritizes the play sequence of the files in the playlist. Sort Save/Abort Saves or aborts the playlist. Closes the toolbar.
- Page 51 System interface Settings You can set the audio/video effects for the playback of your media files. Menu Description Sets the repeat mode of the playlists. • Repeat once: Repeats the selected playlist. Repeat Mode • Repeat all: Repeats all playlists. Sets the transition effects for the slideshow of your Slideshow Effect photos (Right to left / Fold / Corner / None).
- Page 52 System interface Supported media formats Video Video Codec Resolution Bit Rate MPEG 1/2 1080P @ 30 fps 40 Mbps MPEG 4 1080P @ 30 fps 40 Mbps H.263 1080P @ 30 fps 40 Mbps H.264 4k2k @ 60 fps 135 Mbps H.265 4k2k @ 60 fps 100 Mbps...
-
Page 53: Product Information
Specifcations Item ST4302S / ST5502S Backlight D-LED ST4302S: 43" Panel size ST5502S: 55" ST4302S: 0.245 x 0.245 Pixel pitch (mm) ST5502S: 0.315 x 0.315 Frame Rate 60 Hz Native resolution (pixels) UHD 3840 x 2160 ST4302S: 941.2 x 529.4 Active Area (mm) LCD panel ST5502S: 1209.6 x 680.4... - Page 54 Product information ST4302S: 10.7/14.3 Weight (without packing / with packing) (kg) ST5502S: 16.6/22.0 ST4302S: 973.0 x 561.2 x 63.5 Dimensions (W x H x D) Mechanical (mm) ST5502S: 1241.8 x 712.6 x 63.5 Bezel Dimension - T/B/L/R 13.9/13.9/13.9/13.9 (mm) Image setting...
-
Page 55: Dimensions
Product information Dimensions ST4302S Unit: mm... - Page 56 Product information ST5502S Unit: mm...
-
Page 57: Supported Input Signal Resolution
Product information Supported input signal resolution Input source Resolution PC Timing (PC device) HDMI 1.4/2.0 VGA/DVI 640 x 480 @ 60Hz 640 x 480 @ 75Hz 720 x 400 @ 70Hz 800 x 600 @ 60Hz 832 x 624 @ 75Hz 1024 x 768 @ 60Hz 1280 ×... - Page 58 Product information Resolution Input source Video Timing (non-PC device) (HDMI 1.4 / 2.0) 1920 x 1080 P 59.94 @ 60Hz 16:9 1920 x 1080 I 59.94 @ 60Hz 16:9 1920 x 1080 P @ 50Hz 16:9 1920 x 1080 I @ 50Hz 16:9 1920 x 1080 @ 60Hz (HDMI 2.0 only) 3840 x 2160 P 59.94 @ 60Hz...
-
Page 59: Troubleshooting
Troubleshooting Troubleshooting Problem Solution • Is the display turned on? Check the power status indicator of the display. • Is the signal source device turned on? Turn on the device and try again. No video / image • Are there any loose cable connections? Make sure that all cables are connected firmly.
Need help?
Do you have a question about the ST4302S and is the answer not in the manual?
Questions and answers