
Related Manuals for LELY JUNO 150


Summary of Contents for LELY JUNO 150
- Page 1 LELY JUNO 150 Feed Pusher Installation and Operator Manual D-I012.1109EN English Original www.lely.com innovators in agriculture Lely Industries N.V.
- Page 2 innovators in agriculture INTENTIONALLY BLANK...
- Page 3 Viseo, Voyager, Walkway and Welger are registered trademarks of the Lely Group. The right of exclusive use belongs to the companies of the Lely Group. All rights reserved. The information given in this publication is provided for information purposes only and does not constitute an offer for sale.
- Page 4 innovators in agriculture INTENTIONALLY BLANK...
- Page 5 LIST OF INCLUDED AMENDMENTS Issue Date Chapter(s) Remarks (yy/mm) 11/09 Product name changed to "JUNO 150" 4, 6 Feed groups added 4, 6 Push power for feed groups added 10/07 Full revision of the manual - Software changes are incorporated...
- Page 6 innovators in agriculture INTENTIONALLY BLANK...
- Page 7 • Multiboard pcb: JUN1.04R.bx • E-Link: 1.07 Standard Torque Loading of Parts All the nuts, bolts and screws used on the JUNO 150 Feed Pusher are torque tightened to standard torque loadings applicable to the construction materials used. If a part has a non-standard torque loading, it is specified in the...
- Page 8 JUNO 150 when you contact your local Lely service provider or order spare parts. Type and Serial Number Plate We suggest you complete the table below with the type and serial numbers of your JUNO 150. This makes sure you can easily find the information. Type number 5.4301.0000.1...
- Page 9 When the training program is completed successfully, Lely issues a certificate and a service pass to the technician. The service pass contains the following information: • The name of the technician • A photograph of the technician •...
- Page 10 innovators in agriculture INTENTIONALLY BLANK...
-
Page 11: Table Of Contents
innovators in agriculture Table of Contents 1. Introduction 2. Safety Introduction Signal Words Safety Instructions 2.3.1 Electrical Safety 2.3.2 Installation Safety 2.3.3 Operating Safety 2.3.4 Maintenance Safety Safety Decals 2.4.1 Safety Decal Messages 2.4.2 Installation of Safety Decals 2.4.3 Maintenance of Safety Decals Safety Devices 2.5.1 Emergency Stop Button... - Page 12 Open or Close the Lid Operate the E-Link Manual Controller Switch ON or OFF the JUNO 150 Manually Drive the JUNO 150 Drive the JUNO 150 to the Charging Station Prepare for Programming 6.6.1 Requirements for a Good Route Program the JUNO 150 6.7.1...
- Page 13 Preventive Maintenance Schedule Preparation 7.3.1 Break or close the Power Circuit 7.3.2 Remove or Install the Cover 7.3.3 Switch OFF or ON the JUNO 150 Maintenance Procedures 7.4.1 Clean the Charging Strips and the Charging Electrodes 7.4.2 Replace the Rubber Skirt 7.4.3 Tighten a Chain 8.
- Page 14 Recovery Procedures 9-14 9.4.1 Reset the System 9-14 9.4.2 Calibrate the Gyroscope 9-14 9.4.3 Charge the JUNO 150 9-14 10. Diagrams 10-1 Glossary of Terms Index...
-
Page 15: Introduction
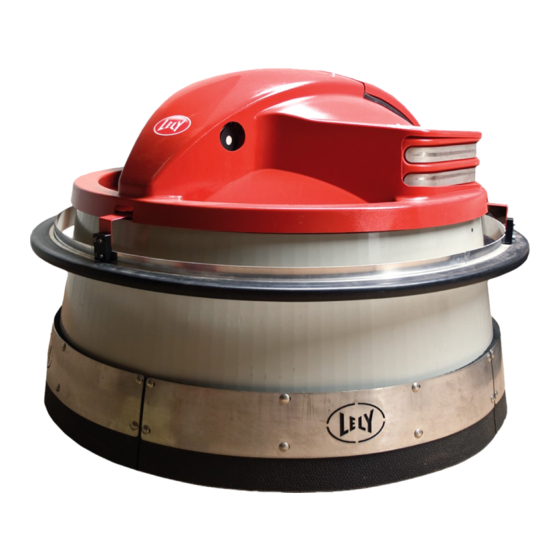
This gives the cows better access to more fresh food through the day. The rotating lower part of the side of the JUNO 150 pushes the forage against the feed fence while the vehicle drives along the feeding alley. - Page 16 innovators in agriculture INTENTIONALLY BLANK Introduction...
-
Page 17: Safety
The safety alert symbol identifies important safety messages on your JUNO 150 Feed Pusher and in the manual. When you see this symbol, be alert to the possibility of personal injury or death. Follow the instruction of the safety message. -
Page 18: Safety Instructions
• Hoist the JUNO 150 Feed Pusher with a rope attached to the hoisting eye. (page 5-12) • The JUNO 150 is not stable until it is correctly installed. Make sure it is correctly supported at all times during movement and installation •... -
Page 19: Operating Safety
JUNO 150 • Only trained persons are permitted to operate the JUNO 150 • Make sure all covers are installed before you operate the JUNO 150 • Make sure the safety bracket is installed on the front side before you operate the JUNO 150 •... -
Page 20: Maintenance Safety
• Disconnect and isolate the electrical power supply before you do work on the JUNO 150 • Do NOT spout water on the body of the JUNO 150. Use a wet brush to clean the JUNO 150 • Make sure all covers are installed when maintenance work is complete. -
Page 21: Safety Decals
High Voltage - Electric Shock Caution Figure 4. Electric Shock - High Voltage Symbol Electric shock. CAUTION Keep away from the collision detector during operation of the JUNO 150. 2.4.1.3 No Admittance for Unauthorized Persons Figure 5. No Admittance for Unauthorized Persons Symbol... - Page 22 innovators in agriculture 2.4.1.4 Danger - Do not Sit on Vehicle / Keep Safe Distance Figure 6. 'Do not sit on the vehicle' and 'Keep safe distance' decal (Canada and USA) Figure 7. 'Do not sit on the vehicle' and 'Keep safe distance' decal (except Canada and USA) Do not sit on the vehicle.
-
Page 23: Installation Of Safety Decals
2.4.3 Maintenance of Safety Decals Safety decals on the JUNO 150 Feed Pusher display important and useful information that will help you safely operate and maintain the JUNO 150. Obey the instructions below to make sure all the decals stay in the correct position and condition. -
Page 24: Safety Devices
60 cm above floor level. The reaction of the JUNO 150 depends on the object type. • If the vehicle hits a solid object (for instance a tractor), the JUNO 150 drives back until there is no contact with the obstacle. After 2 seconds the vehicle tries to continue its route. -
Page 25: Software Controlled Charging System
2.5.7 Software Controlled Charging System The operational software of the JUNO 150 controls the charge system. This allows to keep the vehicle connected to the charging station when it is not moving, even if the battery is fully charged. The software prevents overcharging the battery and keeps it fully charged until the next operation. -
Page 26: Battery Stop
innovators in agriculture 2.5.11 Battery Stop The battery stop (3) is used to disconnect the battery. It is installed on the battery. Figure 10. Position of the safety devices KEY: 1. Protection ring - 2. Safety bracket - 3. Acoustic warning device (E-Link) - 4. Emergency stop button - 5. -
Page 27: Specifications
innovators in agriculture 3. SPECIFICATIONS Feed Pusher 3.1.1 Dimensions and Weight • Diameter: 156 cm (61.4 in) • Height: 106 cm (41.7 in) • Weight: 575 kg (1268 lbs) • Rotating part height: 60 cm (23.6 in) • Maximum width of feed: 200 cm (78.7 in) •... -
Page 28: Charging Station
innovators in agriculture Charging Station 3.2.1 Dimensions and Weight Charging station • Width: 37 cm (14.6 in) • Depth: 25 cm (9.8 in) • Height: 62.5 cm (24.6 in) • Weight excluding floor column: 40 kg (88.2 lbs) • Weight including floor column: 84 kg (185.2 lbs). Floor column •... -
Page 29: Description And Operation
4. DESCRIPTION AND OPERATION Introduction This chapter describes the parts of the JUNO 150 Feed Pusher. It also explains how the parts work together to push the feed to the feed fence. Figure 11. Main components KEY: 1. -
Page 30: Component Description
• Skirt • Concrete block • Driving mechanism • Power system, to store and distribute power • Control system, to control the JUNO 150 using the programmed route and sensors • Shock system. Figure 12. Main components JUNO 150 Feed Pusher KEY: 1. - Page 31 The front wheel is a support wheel. The frame is attached to a concrete contra weight. The contra weight weighs 335 kg (739 ft.) which makes sure the JUNO 150 has sufficient mass to push the forage. On top of the concrete contra weight a hoisting eye is installed.
- Page 32 innovators in agriculture 4.2.1.3 Driving Mechanism The drive motors, that are attached to plates on the contra weight, drive the two wheels on the side via chains and gear sets. The vehicle has no steering-wheel. Its direction is controlled by letting one of the motors run faster than the other.
- Page 33 • Charging strips • Multiboard pcb. The multiboard pcb has a ON and a OFF button to switch ON or OFF the JUNO 150 (page 7-3, page 6-3). Figure 14. Power system (cover and contra weight removed) KEY: 1. Charging strip - 2. PCB-box with multiboard PCB and ON and OFF buttons - 3. Battery stop - 4.
- Page 34 4.2.1.5 Shock System The shock system makes sure the cows do not block the JUNO 150. The power energizer (2) generates the pulse in the protection ring (3). The pulse is only on when the vehicle drives a route.
- Page 35 • Ultrasonic sensor • Gyroscope (embedded on the multiboard pcb) • Inductive sensor. All the parts work together to keep the JUNO 150 on the correct route. Multiboard PCB The multiboard pcb hosts the management software and controls driving mechanism, the power system, and the shock system. It has a gyroscope installed on it.
- Page 36 The encoders send outputs to the multiboard PCB. Ultrasonic Sensor The ultrasonic sensor (1, fig. 17, page 4-9) makes sure the JUNO 150 follows the wall or fence at a pre-determined distance. A foam ring (3) is attached to on the sensor to minimize reflections and to focus the ray beam.
- Page 37 The gyroscope is installed on the multiboard PCB. Inductive Sensor The JUNO 150 has an inductive sensor device with two sensors to detect pre-installed metal strips along the feeding alley. This ensures accuracy of the programmed routes. The device is installed in the middle lower part of the vehicle.
- Page 38 The E-link Manual Controller has an LCD display and nine buttons that enable the user to give commands and change values in the JUNO 150. The LCD display also shows reports and alarms. The connector of the E-Link Manual Controller is connected to the multiboard PCB box.
-
Page 39: Charging Station
Charging Station The charging station is the start and finishing point for all routes. The JUNO 150 can be left permanently connected to the charging station. This keeps the battery in good condition. The multiboard PCB continuously examines the voltage of the battery. It is not possible to overcharge the battery. -
Page 40: E-Link User Interface
• [ESC] to go to the previous menu. 4.3.1 Work The menu 'Work' is used for daily operation of the JUNO 150. You can operate the JUNO 150 in automatic mode using a time path and in manual mode. The menu 'Work' has the following submenu's: •... - Page 41 innovators in agriculture The button [ ] must be used to open next menu, [ESC] to open the previous menu. A black dot on the right side of the screen indicates the level. The highest level (ON/OFF ) has for example a dot on the upper side, the lowest level (MANUAL CHARGER) a dot on the lower side.
- Page 42 innovators in agriculture - Route: route number - Action: action description (visible during route) - Act.nr: sequence number for the action in this route - Runnr: run number - Battery: battery voltage. Buttons: • [START/STOP] to start or stop timed actions •...
-
Page 43: Routes
innovators in agriculture Buttons: • [START/STOP] to start or stop the action • [ ] to go to the next menu • [ESC] to go to the previous menu • Soft button [L] to turn right • Soft button [R] to turn left •... - Page 44 innovators in agriculture New Route A new route is built from the following actions: • Strip follow • Straight • Turn R --> • Turn L <-- • Feed push L • Ultrasound L • Charger strip • Waiting time. A route has a maximum of 125 actions.
- Page 45 innovators in agriculture Turn --> or <-- Turn Turn right or left. You can choose from 9 standard turns to both right and left. The chosen turn can be adjusted according to the specific situation. The standard curves are: • Turn right 90 degrees, smoothly •...
- Page 46 innovators in agriculture After selecting an option, the variables of the turn can be adjusted. The display shows the following information: Display Description • Actionr: sequence number for the action in this route • Angle of the turn, positive value (+) = turn right, negative value (-) = turn left •...
- Page 47 • Soft button [MAN] to adjust the position of the vehicle. Charger strip Drive the vehicle back to the charging station. The JUNO 150 follows the metal strip on the floor and finds the charging station independently (default = on the left) (page 4-1). The vehicles nose must be placed within 1 m (39.4 in) before the strip into the direction of the charging...
- Page 48 innovators in agriculture Waiting time Wait an adjustable time before continuing with the next action in a route (page 6-9). This action can be used in route that moves the vehicle out of the feeding alley, keeps the vehicle waiting, and returns the vehicle to the charging station when the work is done (for example bringing new forage into the feeding alley).
- Page 49 It is useful to combine routes into a 'Time path'. If the time path is switched ON the JUNO 150 drives the set routes automatically at the set times each day (page 6-12). A time path lasts maximum 24 hours. A time path has 48 time/route combinations maximum, made up of 16 different routes maximum.
- Page 50 innovators in agriculture 4.3.2.3 Blockage Route The menu 'Blockage route' is used to temporally block one or more routes. If you do not want the vehicle to drive within a particular distance from the feed fence, block the routes that have that distance. Blocked routes will be ignored by the time path.
- Page 51 innovators in agriculture Display text Explanation Bend in action Very unreliable route due to a combination of factors (B-J) Start-Resetp. angle Angle of more than 20 degrees between the start and the reset point. This could be due to an angled start point Resetp.-End angle Angle of more than 15 degrees between the reset point and the end point.
-
Page 52: Settings
The menu Gyroscope is used to recalibrate the gyroscope. The JUNO 150 must not be moved during the calibration. Feed push power The menu Feed push power is used to modify the force of the JUNO 150. There are three settings: • High •... -
Page 53: Alarms
Set the wheel diameter. The default value is 250 mm (9.8 in). 4.3.4 Alarms The JUNO 150 monitors itself continuously and informs you about the situation. The JUNO 150 generates alarms and reports. Alarm List The Alarm List gives a summary of the alarms received. This list stores up to 250 alarms (page 9-1). -
Page 54: Service
(only used by a service technician) • Version to display the software version • Installation 1 to install and test the JUNO 150 (only used by a service technician) • Installation 2 to install and test the JUNO 150 (for development purposes only) •... -
Page 55: Control System
• measure and correct the direction (α). Two sensors on the bottom detect the metal striping on the floor. The information is used to keep the JUNO 150 on the correct route. The built-in ultrasonic sensor makes sure that the JUNO 150 follows a wall or feed fence at a pre-determined distance. - Page 56 Obstacles The JUNO 150 has a rubber ring with a collision detector (3, fig. 10, page 2-10) that stops the vehicle immediately when the vehicle hits an object that is at least 60 cm above floor level. The reaction of the JUNO 150 depends on the object type.
-
Page 57: Installation
Preparation by the Owner Before the actual installation can start, a number of tasks should be done by the owner of the JUNO 150 with support from the Lely service provider. These tasks are most of the construction tasks for the farm and the purchase of equipment necessary to use the JUNO 150: •... - Page 58 innovators in agriculture • 1× Electrode assembly (5) • 2× Brackets (4) • 8× M8 bolts and lock nuts (9), (10) • 1× Battery charger with power supply cable and 12V battery cable (packed separately) (2) • 2× M6 bolts •...
-
Page 59: Plan The Location Of The Charging Station
(fig. 24, page 5-3). • Make sure there is minimum cow interference with the charging station. The JUNO 150 approaches the charging station from the left side. Note: Figure 24. Necessary room for installation of the charge unit... -
Page 60: Install The Charging Station
innovators in agriculture Install the Charging Station Make sure there is 3 m (9.8 ft) clear space on the left side of the charging CAUTION station and 1.5 m (4.9 ft) clear space on the right side. The charging station can be installed •... -
Page 61: Install The Electrode Assembly On The Mounting Plate
innovators in agriculture 5.4.2 Install the Electrode Assembly on the Mounting Plate Parts • 1× Electrode assembly • 2× Brackets • 8× M8 bolts, washers and lock nuts. Installation Install the two brackets (2, fig. 26, page 5-5) on the mounting plate (1) with four M8 bolts, washers and lock nuts (4, 5). -
Page 62: Install The Mounting Plate
innovators in agriculture 5.4.3 Install the Mounting Plate Parts • 1× Mounting plate with electrode assembly • 4× Suitable stainless steel bolts and washers, plugs (not supplied). Installation Installation on the wall Make sure the distance between the bottom side of the mounting plate and the floor (fig. -
Page 63: Install The Battery Charger
innovators in agriculture Figure 27. Install the mounting plate 5.4.4 Install the Battery Charger Parts • 1× Battery charger 12 V - 20 A with a power supply cable • 1× Battery charger mounting plate • 2× M6 bolts. Installation Install the battery charger mounting plate (1, fig. -
Page 64: Install The Earthing
innovators in agriculture Connect the 12 V cable (6) to the electrode assembly with the two M6 bolts: Connect the lead of the brown (or red) cable to the (+) terminal (5). Connect the blue (or black) cable to the (-) terminal. Make sure the cable is minimum of 2 cm (0.8 in.) from the side. -
Page 65: Install The Cover
innovators in agriculture Connect the ground wire (1, fig. 29, page 5-9) to the electrode assembly (2) with the M6 bolt, shake-proof washer (A6.4) and nut. Install the self-adhesive cable ties (3) on the mounting plate, at least 35 mm (1.4 in.) from the left edge of the plates, to prevent the cover from damaging the wire. -
Page 66: Install The Inductive Metal Guiding Strips
innovators in agriculture Make sure the battery charger mounting plate is correctly installed (page 5-7). Make sure no wiring is pinched off. Lower the cover until the stop. Figure 30. Install the cover 5.4.7 Install the Inductive Metal Guiding Strips Parts •... - Page 67 innovators in agriculture Figure 31. Install the inductive metal guiding strips Installation 5-11...
-
Page 68: Install The Juno 150
Make sure you use equipment suitable for hoisting 575 kg (1268 lb). WARNING Attach the hoisting rope to the hoisting eye (1, fig. 32, page 5-12). Hoist the JUNO 150 and transport it to the appropriate location. Remove the hoisting rope. Install the cover. -
Page 69: Install The Safety Bar
1. Default safety bar position (right side) - 2. Optional safety bar position (left side) 5.5.3 Put the JUNO 150 in Operation Before you supply power to the JUNO 150 or operate, maintain or WARNING adjust the machine, read and understand the safety instructions carefully (page 2-2). -
Page 70: Setup The Juno 150
Setup the JUNO 150 5.6.1 Adjust the Skirt Height Preparation Manually drive the JUNO 150 to a clean and quiet location (page 6-4). Remove the cover (page 7-2). Switch OFF the JUNO 150 (page 7-3, page 6-3). Break the power circuit (page 7-2). -
Page 71: Modify The Feed Push Power
innovators in agriculture Figure 34. Set the skirt height (without cover) KEY: 1. Handle - 2. Feed fence side of the skirt - 3. Knob - 4. Front side of the skirt 5.6.2 Modify the Feed Push Power Get the E-Link Manual Controller (page 6-2). Push [ESC] or [ ] to wake up the E-Link. - Page 72 Select 'Inductor height'. Remove the cover (page 7-2). Move to the test position If the inductive sensor of the JUNO 150 is not exactly above the strip: Push soft button [MAN]. Drive the vehicle to a position exactly above the strip (page 6-4).
-
Page 73: Make Different Routes Per Distance To The Feed Fence
innovators in agriculture If the indicator on the E-Link is below the middle position on the scale, raise the inductive sensor until the indicator is in the middle of the scale. Tighten the bolts that secure the clamp (1). Install the cover (page 7-2). Push button [ESC] to go up one level. - Page 74 Make sure the safety bar is installed on the front right side (fig. 33, page 5-13) of the JUNO 150. If the feed fence is on the right side of the JUNO 150, install the safety bar on the front left side.
-
Page 75: Operating Instructions
DANGER Only persons who have read and understood all applicable safety WARNING instructions are permitted to enter the area. Only operate the JUNO 150 with the safety bar installed on the front. WARNING Electric shock. CAUTION Keep away from the collision detector during operation of the JUNO 150. -
Page 76: Open Or Close The Lid
Open or Close the Lid The JUNO 150 stops immediately when the lid is opened. Note: Open or close the lid (fig. 37, page 6-2). Figure 37. Open the lid Operate the E-Link Manual Controller Danger of being entangled by rotating parts. -
Page 77: Switch On Or Off The Juno
Note: not used for 10 minutes. Figure 38. Operate the E-Link Manual Controller Switch ON or OFF the JUNO 150 The JUNO 150 does not need to be switched OFF during normal operation. Note: To switch ON Open the lid. -
Page 78: Manually Drive The Juno 150
Drive the JUNO 150 to the Charging Station Stop all timed actions (page 6-13). Manually drive the JUNO 150 to 0.5 m (2 ft.) or less from the strip (page 6-4). Make sure the front of the vehicle points in the direction of the charging station. -
Page 79: Prepare For Programming
Make it possible for the JUNO 150 to correct itself • Remove feed and obstacles from the feed alley when programming a route. This enables the JUNO 150 to return to the 'ideal' route when it is forced to deviate from the route when pushing feed. - Page 80 If the the vehicle is not connected to the charging station, you can push soft Note: button [CHARGR] to drive the JUNO 150 to the charging station (page 6-4). Push soft button [START]. Read the messages on the display and push [ Program the first action (Strip follow).
- Page 81 'Straight' option as little as possible. If it really is necessary, for example to pass the JUNO 150 across the feed alley, make the distance travelled as short as possible. Continue with ' Ultrasound L'. This improves the accuracy of the route that is travelled.
- Page 82 innovators in agriculture 6.7.1.4 Feed Push L Do not program Feed push L when the fence is more than 2.5 meter (8.2 ft) Note: away. Select the menu Feed push L and push [ Read the actual distance to the fence (UltraDst) from the display. Push [ ] or [ ] to select the required distance to the fence...
-
Page 83: Copy A Route
Push [START/STOP] to start. The JUNO 150 approaches the charging station and stops by itself. Note: 6.7.1.7 Waiting Time Select the menu Waiting time. Push [ ] or [ ] to select the waiting time. Push soft button [Save]. -
Page 84: Reset A Modified Route To The Previous Version
innovators in agriculture Select the property you want to modify with soft button [<]. Modify the value of the property with [ ] or [ 13. Push [ESC] to confirm and go one level up. 14. Push soft button [Yes] to confirm. 6.7.4 Reset a modified Route to the previous Version Get the E-Link Manual Controller (page 6-2). -
Page 85: Define Feed Groups
innovators in agriculture Push [ ] or [ ] to select the route number. Repeat step 6 and 7 to select the next route in the series (if applicable). Push soft button [>] twice. Push [Save] to save the series of manual routes. Delete a Manual Route Push [ ] or [... -
Page 86: Define The Push Power For A Feed Group
Select time path and push [ Refer to the time path description. The JUNO 150 must not drive more than 40% of the total time in a time path. Note: It must spend minimum 60% of the total time charging at the charging station. -
Page 87: Make Or Restore A Backup
Select Backup route and push [ Push soft button [Bckup]. Push soft button [Yes]. Wait until the process ends with a beep. A backup can be restored by a Lely certified technician. Note: Start or Stop Timed Actions Get the E-Link Manual Controller (page 6-2). -
Page 88: Start, Stop Or Pause A Manual Route
innovators in agriculture Start, Stop or Pause a Manual Route To start a manual route: Stop all timed actions (page 6-13). In the main menu of the E-Link, select Work and push [ Push [ ] to select the menu Manual route. Push [ ] to select the series of routes (A, B, C or D). -
Page 89: Block A Route
innovators in agriculture 6.10 Block a Route Stop all timed actions (page 6-13). In the main menu of the E-Link, select Routes and push [ Select Blockage route and push [ Push [ ] to select the route that you want to block and push [ Push [ ] to block the route (value 1) and push [ESC] to confirm and go one level up. - Page 90 innovators in agriculture INTENTIONALLY BLANK 6-16 Operating Instructions...
-
Page 91: Maintenance
7. MAINTENANCE Introduction This chapter contains the preventive maintenance schedule and the applicable preventive maintenance procedures for the JUNO 150. It also contains some basic corrective maintenance procedures. Preventive Maintenance Schedule The following table shows the preventive maintenance schedule for the JUNO 150. -
Page 92: Preparation
innovators in agriculture Preparation 7.3.1 Break or close the Power Circuit To break the power circuit Loosen the knob on the battery stop (1, fig. 43, page 7-2). To close the power circuit Fasten the knob on the battery stop. Figure 43. -
Page 93: Switch Off Or On The Juno 150
The JUNO 150 does not need to be switched OFF during normal operation. Note: To switch OFF Open the lid. On the PCB-box, push the button [OFF] to take the JUNO 150 out of operation. Close the lid. To switch ON Open the lid. -
Page 94: Maintenance Procedures
Clean the Charging Strips and the Charging Electrodes Preparation Disconnect the main power supply to the charging station. Manually drive the JUNO 150 to a clean and quiet location (page 6-4). Clean Thoroughly clean the charging strips (1, fig. 45, page 7-4) of the JUNO 150 with sand paper. -
Page 95: Replace The Rubber Skirt
7.4.2 Replace the Rubber Skirt Preparation Manually drive the JUNO 150 to a clean and quiet location (page 6-4). Remove the cover (page 7-2). Switch OFF the JUNO 150 (page 7-3, page 6-3). Break the power circuit (page 7-2). -
Page 96: Tighten A Chain
Figure 46. Replace the rubber skirt 7.4.3 Tighten a Chain Preparation Manually drive the JUNO 150 to a clean and quiet location (page 6-4). Remove the cover (page 7-2). Switch OFF the JUNO 150 (page 7-3, page 6-3). Break the power circuit (page 7-2). - Page 97 Put the JUNO 150 in operation (page 7-3, page 6-3). Install the cover (page 7-2). Get the E-Link manual controller (page 6-2). During the calibration process you must not move the JUNO 150. Note: Push soft button [Yes] to start the gyroscope calibration process.
- Page 98 innovators in agriculture Figure 47. Tighten a chain Maintenance...
-
Page 99: Test And Adjustment
innovators in agriculture 8. TEST AND ADJUSTMENT Introduction This chapter contains the test- and adjustment procedures for the JUNO 150 Feed Pusher. Several options shown on the E-Link displays are not relevant for standard test Note: and adjustment procedures, but may be useful for troubleshooting by your service provider. -
Page 100: Modify The Beep Length
innovators in agriculture Select Beepfreq route and push [ Select the route you want to modify and push [ Push [ ] or [ ] to modify the number of beeps per second. The standard value 0.5 equals one beep per two seconds. Note: Push [ESC] to confirm and go one level up. -
Page 101: Test A Route
Figure 48. Battery voltage 8.3.4 Make sure the Battery is Charging Make sure the JUNO 150 is connected to the charging station. Stop all timed actions (page 6-13). In the main menu of the E-Link, select Work and push [ ]. -
Page 102: Test The Ultrasonic Sensor
(page 7-4). 10. If the JUNO 150 is still not charging, make sure all power connections are connected properly. 11. If the JUNO 150 is still not charging, call the local service provider. Figure 49. Battery charging current 8.3.5... - Page 103 Close-up Manually drive the JUNO 150 to the charging station (page 6-4). Start the timed actions (page 6-13). Figure 50. Test the ultrasonic sensor Test and Adjustment...
- Page 104 innovators in agriculture INTENTIONALLY BLANK Test and Adjustment...
-
Page 105: Troubleshooting
• A critical alarm message: a beep sounds and the JUNO 150 stops functioning. The E-Link displays the message "ALARM" with a description (page 9-1). The error requires an error recovery procedure. -
Page 106: Alarm List
Make sure there are no obstacles. BLOCKAGE_JUN Juno blocked!! Try to run the route again. If the JUNO 150 is blocked by the forage, make routes with smaller intervals. If the JUNO 150 is blocked at a different place, calibrate the gyroscope (page 9-14). - Page 107 Clean the charging strips and the LOADING No charging current! Check charging electrodes (page 7-4). charge strips for dirt Manually drive the JUNO 150 to the charging station (page 6-4). Make sure the battery is charging (page 8-3). If the problem remains, call your local Lely service provider.
- Page 108 If the problem remains, call your local Lely service provider. HEAVY DRIVE Juno drives hard!! The JUNO 150 has difficulty in driving the route. If the alarm is repeated more that 5 times per week: Make sure there are no obstacles.
- Page 109 Call your local Lely service provider. SHORT-CIR. 1L Short-circuit motor 1 Left wheel Call your local Lely service provider. SHORT-CIR. 2R Short-circuit motor 2 Right wheel Make sure the E-Link is connected BACKUP ERROR Error backup: Try again! properly.
- Page 110 Calibrate voltage PCB not provider. good -> deviation too high! BATTERY_STOP Juno battery runs down. The JUNO 150 stops and beep for 1 Switch off or charge Juno hour. Clean the charging strips and the charging electrodes (page 7-4). Manually drive the JUNO 150 to the charging station (page 6-4).
- Page 111 Make sure there are no obstacles. COLL_DET_STOP Collision detector activated! If the problem remains, call your local Lely service provider. JUNO 150 lost the guide strip!! 1. Make sure the JUNO 150 is above NO STRIP the strip. If the problem remains, call your local Lely service provider.
-
Page 112: Read A Report
Report Description/Procedure code Timepath contains x % drive time The JUNO 150 must not drive more than 40% of the total time in a time path. It must spend minimum 60% of the total time charging at the charge station. - Page 113 Clean the charging strips and the charging Battery power too low to start route! Drive electrodes (page 7-4). JUNO 150 to charger or clean charge strips! Charge the JUNO 150. Call your local Lely service provider. JUNO 150 is not finished with test route.
-
Page 114: Information Report List
125 is reached. ERROR: timepath contains % of The JUNO 150 must not drive more than 40% of the total time in the drive time. Max 40% a time path. It must spend minimum 60% of the total time charging at the charging station. -
Page 115: Troubleshooting Tables
The vehicle does not move JUNO 150 is switched OFF Start the timed actions (page 6-13) Remove the blockage The route is blocked Drive the JUNO 150 to the The battery is low charging station (page 6-4) Charge for one hour Replace the fuse... - Page 116 There was to much feed in front program a new route (page of the feed fence during 6-5). programming the routes Adjust the skirt height (page The skirt of the JUNO 150 does 5-14) not rotate smoothly Call your local Lely service Other provider.
-
Page 117: Troubleshooting Table Juno 150 Charging Station
E-Link start up screen when you reset the E-Link). If the version is not correct: Call your local Lely service provider. 9.3.2 Troubleshooting Table JUNO 150 Charging Station Symptom Possible cause Action Green and Yellow LED Battery loader defect Call your local Lely service provider. - Page 118 Recovery Procedures 9.4.1 Reset the System Open the cover of the PCB-box. Switch the JUNO 150 OFF and then ON (page 7-3, page 6-3). Close the cover of the PCB-box. 9.4.2 Calibrate the Gyroscope Get the E-Link Manual Controller (page 6-2).
- Page 119 innovators in agriculture 10. DIAGRAMS Diagrams 10-1...
- Page 120 innovators in agriculture INTENTIONALLY BLANK 10-2 Diagrams...
- Page 121 PCB: printed circuit board with electrical components. report: message on the E-Link display that informs you about the status of the JUNO 150 or actions to be taken route: route through a (part of a) barn route analysis: built-in function to analyse the...
- Page 122 innovators in agriculture INTENTIONALLY BLANK Glossary of Terms...
- Page 123 innovators in agriculture INDEX note ............2-1 preventive maintenance alarms schedule ..........7-1 recover alarms ........9-1 route battery ............3-1 blockage route........6-15 loading ..........8-3 manual route ........6-14 battery loader new route ........4-16, 6-5 20 Amp ..........4-11 test ............8-3 caution ............2-1 safety chain............7-6 electrical safety ........2-2 emergency stop button ......2-8 charging station ........4-11...
- Page 124 innovators in agriculture INTENTIONALLY BLANK Index...
- Page 125 innovators in agriculture INTENTIONALLY BLANK...
- Page 126 LELY INDUSTRIES NV Weverskade 110 NL-3147 PA Maassluis Tel +31 (0)10 - 59 96 333 Fax +31 (0)10 - 59 96 444 www.lely.com Live Life Lely...
Need help?
Do you have a question about the JUNO 150 and is the answer not in the manual?
Questions and answers