Table of Contents
Advertisement
Quick Links
Repair and Parts
SoloTech™ Peristaltic
SoloTech™
SoloTech™
Electric- - - powered
powered hose
hose pump
Electric
Electric
powered
hose
only.
only. Not
only.
Not
Not approved
approved for
approved
for use
for
the model
model approvals
approvals section.
section.
the
the
model
approvals
section.
Important Safety
Important
Important
Safety Instructions
Safety
Read all warnings and instructions in this manual and in your
Installation and Operation Manual before using this equipment. Save
all instructions.
125 psi (0.9 MPa, 9 bar) Maximum Fluid
Working Pressure
See page 6 for model information.
Peristaltic Pumps
Pumps
Peristaltic
Pumps
pump for
for use
use in in in fluid
fluid transfer
pump
for
use
fluid
use in in in explosive
use
explosive atmospheres
explosive
atmospheres or or or hazardous
atmospheres
Instructions
Instructions
PROVEN QUALITY. LEADING TECHNOLOGY.
transfer and
and metering
metering applications.
transfer
and
metering
hazardous locations
hazardous
applications. For
For professional
professional use
applications.
For
professional
locations unless
locations
unless otherwise
unless
otherwise stated
otherwise
3A3367L
EN
use
use
stated in in in
stated
Advertisement
Table of Contents

Related Manuals for Graco SoloTech i6


Summary of Contents for Graco SoloTech i6
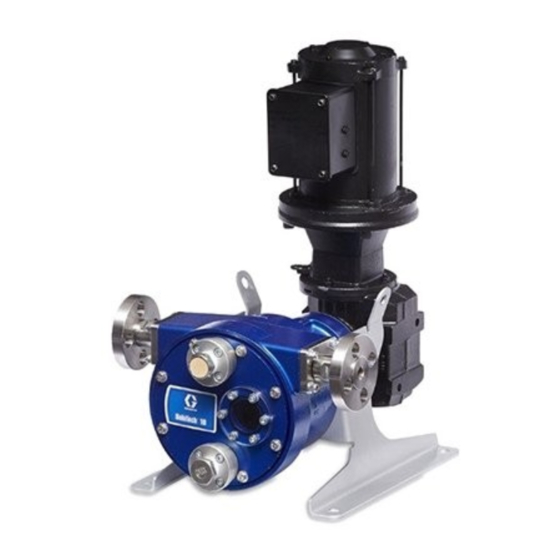
- Page 1 Repair and Parts 3A3367L SoloTech™ Peristaltic Peristaltic Pumps Pumps SoloTech™ SoloTech™ Peristaltic Pumps Electric- - - powered powered hose hose pump pump for for use use in in in fluid fluid transfer transfer and and metering metering applications. applications. For For professional professional use Electric...
-
Page 2: Table Of Contents
Contents Contents Contents Related Manuals ..........2 Parts..............19 Warnings ............3 Kits and Accessories........... 28 Hose Kits............. 28 Configuration Number Matrix ....... 6 Barb Kits ............. 28 Troubleshooting..........8 Hose Clamp Kits .......... 29 Repair..............10 Hose Lubricant Kits ........29 Pressure Relief Procedure...... -
Page 3: Warnings
• All electrical wiring must be done by a qualified electrician and comply with all local codes and regulations. • Wait five minutes for capacitor discharge before opening equipment. • Always use the recommended amount of genuine Graco hose lubricant to minimize build-up of static electricity. 3A3367L... - Page 4 Warnings WARNING WARNING WARNING PRESSURIZED PRESSURIZED PRESSURIZED EQUIPMENT EQUIPMENT EQUIPMENT HAZARD HAZARD HAZARD Fluid from the equipment, leaks, or ruptured components can splash in the eyes or on skin and cause serious injury. Pressure Relief Relief Procedure Procedure when you stop spraying/dispensing and before •...
- Page 5 Warnings WARNING WARNING WARNING MOVING MOVING MOVING PARTS PARTS PARTS HAZARD HAZARD HAZARD Moving parts can pinch, cut or amputate fingers and other body parts. • Keep clear of moving parts. • Do not operate equipment with protective guards or covers removed. •...
-
Page 6: Configuration Number Matrix
Configuration Number Matrix Configuration Number Number Matrix Matrix Configuration Configuration Number Matrix Check the identification plate (ID) for the Configuration Number of your pump. Use the following matrix to define the components of your pump. Some combinations are not possible. Check with your local supplier. i23 MAC MAC NR NR SS... - Page 7 Configuration Number Matrix Approvals Approvals Approvals ✦ These models are certified: II 2 G Ex h IIB T4 Gb † These models are certified: ‡ These models comply with: EC 1935/2004 ■ Food Grade fluid contact parts: These materials are FDA-compliant and meet the United States Code of Federal Regulations (CFR) Title 21.
-
Page 8: Troubleshooting
NOTE: NOTE: NOTE: • Follow the Pressure Relief Procedure, page • Check all possible remedies before disassembling the pump. See the Operation Manual (334859) for troubleshooting or error information on the Graco Motor Control. Problem Problem Problem Cause Cause Cause... - Page 9 Try to locate the pump as near to the fluid source as possible. Oversize the inlet piping when possible. Viscosity or specific gravity of Consult your Graco distributor for pumped fluid is too high. suitable operating conditions for your pump. Replace with a new hose and Low flow.
-
Page 10: Repair
Repair Repair Repair Repair Pressure Relief Relief Procedure Procedure Drain the the Lubricant Lubricant Pressure Pressure Relief Procedure Drain Drain Lubricant Follow the Pressure Relief 1. Hold a pail under the drain plug (29) and unscrew Procedure whenever you see this the plug to drain the lubricant. -
Page 11: Replace The Hose
Repair Replace the the Hose Hose Replace Replace Hose Remove Remove Remove the the Hose Hose Hose 4. Use a wrench to remove the four nuts (35) from the hose barb assembly on one port. Pull the hose so it extends about 2–3 in. (51–76 mm) out of the pump. - Page 12 Repair Install Install Install the the Hose Hose Hose 1. Install a gasket (25) onto each hose barb (28) so 8. Repeat steps 3–6. that it mates with the plate (26). 9. The roller must be moved to install the hose. 2.
-
Page 13: Replace The Roller
Repair Replace the the Roller Roller Replace Replace Roller Install Install the Install the Roller Roller Roller 1. Lubricate the eccentric shaft (9) with hose The bearings in the roller are sealed and lubricant. Slide the roller (11) onto the shaft. non-serviceable. -
Page 14: Complete Pump Repair
Repair Complete Pump Pump Repair Repair Complete Complete Pump Repair Disassembly Disassembly Disassembly Remove Remove the Remove the Motor Motor Motor Output Output Output Shaft Shaft Shaft Complete pump disassembly is necessary only to See Figure 4 on page 15. replace the main shaft assembly, for example in the 1. - Page 15 NOTICE NOTICE rotate freely and are seated against the shoulder of the shaft (6). Use only genuine Graco replacement parts. Non-standard parts will void your warranty and 2. Install the eccentric shaft key (56). may damage your equipment. 3. Coat the outer races of the shaft bearings and the inner diameter of the housing with lithium-based •...
- Page 16 Repair Install Install Install the the Seals Seals Seals 3. Press a new seal (5) onto the pump end of the shaft (6) and a new seal (8) into the bore at the front of the pump housing (1).The lips of the 1.
- Page 17 Repair Install Install Install the the Motor Motor Motor and and Gearbox Gearbox Gearbox Install Install the Install the Eccentric Eccentric Shaft Eccentric Shaft Shaft 1. Use an anti-seize compound to lubricate the 1. Verify that the eccentric shaft key (56) is installed. motor output shaft (6) and the keyway.
- Page 18 Do not use glycerin hose — — — 24Y920 Half Gallon (1.89 l) lubricant if pumping strong oxidizer or acids. 24K693 24K686 Gallon (3.79 l) • Keep the pump properly filled with genuine Graco hose lubricant. 24M435 24M434 55 Gallons (208 l) 3A3367L...
-
Page 19: Parts
Parts Parts Parts Parts 3A3367L... - Page 20 Parts i6, i/h10, i/h10, i/h16 i/h16 Parts Parts i6, i6, i/h10, i/h16 Parts i6, i/h10, i/h10, i/h16 i/h16 Parts Parts i6, i/h10, i/h10, i/h16 i/h16 Parts Parts i6, i6, i/h10, i/h16 Parts i6, i6, i/h10, i/h16 Parts Part Description Part Description Part Part...
- Page 21 Stainless steel 17G170 SCREW, flange head, 24Y814 PVDF M6–1 x 20 mm 24Y815 Hastelloy 24Y445 GRACO MOTOR CONTROL; used on 19D236 BARB, kit, for h10; includes (BLDC) pumps o-ring (ref. 44) 15Y051 CABLE, M12, 8 pin, m/f, BARB, kit, for i16; includes 3.0 m (9.8 ft);...
- Page 22 24Y801 Natural Rubber, black 17G170 SCREW, flange head, 24Y802 CSM, orange ,M6–1 x 20 mm 24Y803 EPDM, blue 24Y445 GRACO MOTOR 24Y804 Nitrile, yellow CONTROL; used on (BLDC) pumps 19C745 HOSE, 25 mm, Food 15Y051 CABLE, M12, 8 pin, m/f, Grade, for 3.0 m (9.8 ft);...
- Page 23 Parts Notes for Parts: Notes Notes Parts: Parts: Replacement Danger and Warning labels, tags, and cards are available at no cost. ▲ — — — Not sold separately. Parts included in Front Cover Kit, Ref. 16. Parts included in Gasket Kit 24Y834. †...
- Page 24 WASHER, lock, spring 24Y807 EPDM, blue 111003 WASHER, flat 24Y808 Nitrile, yellow 24Y445 GRACO MOTOR CONTROL; used on 19C714 HOSE, 26 mm, Food (BLDC) pumps Grade, sanitary, for 15*† — — — GASKET, front cover 15Y051 CABLE, M12, 8 pin, m/f, 3.0 m (9.8 ft);...
- Page 25 Parts Notes for i/h26 Parts: Parts included in Gasket Kit 24Y835. Notes Notes i/h26 i/h26 Parts: Parts: † Replacement Danger and Warning labels, tags, Parts included in Main Shaft Kit 24Y843. ▲ ‡ and cards are available at no cost. ∆...
- Page 26 Grade, for 16K729 SCREW, flange head, 15*† — — — GASKET, front cover M8-1.25 x 25mm 16K738 WASHER, lock, spring FRONT COVER, kit 112914 WASHER, flat 24Y832 24Y445 GRACO MOTOR 19D482 CONTROL; used on 19C914 (BLDC) pumps 121110 O-RING 3A3367L...
- Page 27 Parts i30, i30, i30, i/h32 i/h32 i/h32 Parts Parts Parts i30, i30, i/h32 i30, i/h32 Parts i/h32 Parts Parts Part Part Part Description Description Description Part Part Part Description Description Description 15Y051 CABLE, M12, 8 pin, m/f, 24Z041 GEARBOX, BLDC 3.0 m (9.8 ft);...
-
Page 28: Kits And Accessories
Kits and Accessories Kits and and Accessories Accessories Kits Kits Accessories Hose Kits Kits Hose Hose Kits Industrial Hose Hose Kits Kits Industrial Industrial Hose Kits Hose Hose Material Hose Material Material i6 i6 i6 24Y798 24Y802 24Y806 24Y810 CSM (CS) 19C739 19C743 19C748... -
Page 29: Hose Clamp Kits
Kits and Accessories Hose Clamp Clamp Kits Kits Hose Hose Clamp Kits Food Grade Grade Cover Cover Kits Kits Food Food Grade Cover Kits h10, h10, h10, h16 i/h10, i/h10, i/h10, i/h16 i/h23 i/h26 i/h30 i/h16 i/h16 i/h23 i/h23 i/h26 i/h26 i/h30 i/h30... -
Page 30: Gearbox Cover Kits
Kits and Accessories Gearbox Cover Cover Kits Kits Gearbox Gearbox Cover Kits Diameter Diameter Diameter of of of Bolt Bolt Bolt Pump Pump Pump Nord Nord Nord Gearbox Gearbox Gearbox Circle Circle Circle 25F093 i/h6, 75 mm i/h10, i/h16 – – – i/h23, i/h25 –... -
Page 31: Motor Kits
17H103 17H103 selections. For systems with BLDC motors that use a Upgrade kit includes software token and instructions. Graco Motor Control, order an extension cable from NOTE: NOTE: NOTE: Also purchase Programming Cable Kit the first section. For systems with AC motors that 24Y788. -
Page 32: Technical Data
Maximum Fluid Working Pressure 125 psi 0.9 MPa, 9 bar Motor Horsepower/Gear Ratio See the identification tag on your gear motor. Maximum Pump Speed, using a Graco BLDC motor 90 RPM Environmental Temperature Range 14°F to 104°F –10°C to 40°C (Do not allow material to freeze in the pump.) - Page 33 Technical Data SoloTech Peristaltic Peristaltic Pumps Pumps SoloTech SoloTech Peristaltic Pumps U.S. U.S. U.S. Metric Metric Metric Hose Hose Hose Inner Inner Inner Diameter Diameter Diameter i/h6 0.24 in. 6 mm i/h10 0.39 in. 10 mm i/h16 0.63 in. 16 mm i/h23 0.91 in.
- Page 34 Technical Data Graco Motor Motor Control Control for for SoloTech SoloTech Peristaltic Peristaltic Pumps Pumps Graco Graco Motor Control SoloTech Peristaltic Pumps (All installations and wiring must comply with NEC and local electrical codes.) DC Power Supply Class 2 Power Supply only...
- Page 35 Electric Electric Electric Motor Motor Motor for for SoloTech SoloTech SoloTech Peristaltic Peristaltic Peristaltic Pumps Pumps Pumps Motor Motor Motor Config- Config- Pump Pump Pump Gear Pump Pump Pump Gearmotor Maxi- Maxi- Maxi- Power Power Power Output Maximum Maximum Maximum Voltage Voltage Voltage and...
- Page 36 Electric Motor Motor for for SoloTech SoloTech Peristaltic Peristaltic Pumps Pumps Electric Electric Motor SoloTech Peristaltic Pumps Motor Motor Motor Config- Config- Config- Pump Pump Pump Gear Gear Gear Pump Pump Pump Gearmotor Gearmotor Gearmotor Maxi- Maxi- Maxi- Power Power Power Output Output...
-
Page 37: California Proposition 65
California Proposition 65 Optional Optional Leak Optional Leak Leak Sensor Sensor Sensor Contact Ratings: State Normally open Voltage 200 VAC/VDC max. Current 1.25 A DC or peak AC Power 10 W max Ambient Temperature –5°C to 80°C (23°F to 176°F) Ex Ratings: Classification “simple apparatus”... - Page 38 Graco to be defective. This warranty applies only when the equipment is installed, operated and maintained in accordance with Graco’s written recommendations. This warranty does not cover, and Graco shall not be liable for general wear and tear, or any malfunction, damage or wear caused by faulty installation, misapplication, abrasion, corrosion, inadequate or improper maintenance, negligence, accident, tampering, or substitution of non-Graco component parts.
Need help?
Do you have a question about the SoloTech i6 and is the answer not in the manual?
Questions and answers