Table of Contents
Advertisement
Quick Links
Advertisement
Table of Contents

Related Manuals for ViTiny UM5-CAM


Summary of Contents for ViTiny UM5-CAM
- Page 1 UM5-CAM User’s Guide USB MICROSCOPE Version 1.4A...
-
Page 3: Table Of Contents
Contents 1. Product Introduction 1. Product Introduction .......... 1 1.1 Packing Content 1.1 Packing Content ......... 1 Object Quantity Object Quantity 1.2 USB Microscope Functions Introduction: .. 1 USB Digital User’s Guide Microscope 1.3 USB Microscope Operation: ...... 2 Installation CD Supporter 1.4 USB Cable .......... -
Page 4: Usb Microscope Operation
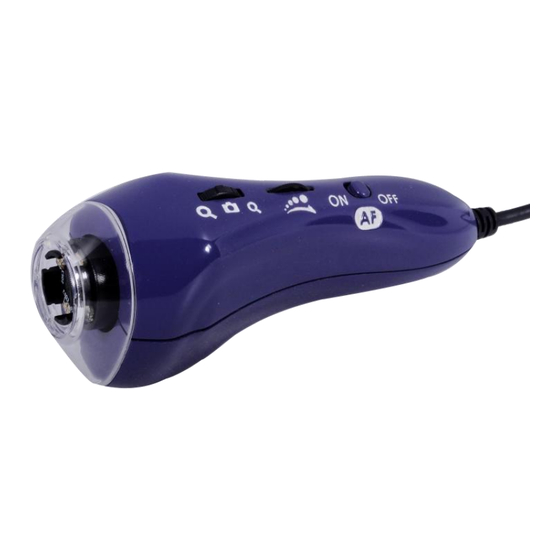
(a-1) Turn the switch forward to a-1 position is for quick (High Mag.) Zoom in direction focusing (zooming in). (a-2) Slightly tuning the switch forward to a-2 position for slow focusing. Five-Section Switch (a-3) Press down the switch for photography. (a-4) Slightly tuning backward the switch to a-4 position for slowly zooming out the image. -
Page 5: Usb Cable
(2) Manual Focus: Push AF button to “OFF” position. Then Focus can down manually. Slightly turn forward for higher Long-Shot magnification; slightly turn backward for lower magnification. Please refer to [Section 1.2 item(1)]. b. Photography for contacted-observation: Horizontally put the lens onto the observed object. -
Page 6: Insert Installation Cd (Step 1)
CD-ROM. The CD will be run by computer automatically, and the installation window will pop out as below: If the Installation CD provided together with the product is missing or unknown damaged, please visit http://www.vitiny.com to download installation files. 2.2 Install Application Program Please click “Install Application Program”button. -
Page 7: Main Menu
The window is applied to display shot images, edit and process (3) Window:you can adjust sizes of video information windows images. and switch to the single window model. (4) Tool:open saved file location, default file path, time lapse, convert video to image, convert image to video..etc functions…. -
Page 8: Files List
3.6 Special Functional Modules :Pressing delete Icon will delete image. (5) Delete Image Start and connect Application Program, the toolbars of Special :to record or stop (6) Video Record / Stop Record Function Modules will show below the Video Preview Window; which includes: comparison, aming mode, image control, recording video. - Page 9 (real-time image) or static (loaded images or frozen image) images, as well as providing various measuring tools. Please refer to the following image for tools of Measurement Model. :This mode is to control the device (5) Device control mode from AP directly without operate function button on the device. From the AP control, users allow to photography, zoom in/out image, and brightness control…etc.
- Page 11 © MicroLinks Technology Corp. All rights reserved. HTTP://WWW.VITINY.COM...
Need help?
Do you have a question about the UM5-CAM and is the answer not in the manual?
Questions and answers