Rehau RAUTOOL A-LIGHT2 Product Instructions
Hide thumbs
Also See for RAUTOOL A-LIGHT2:
- Operating instructions / technical information (20 pages) ,
- Operating instructions and technical information (68 pages) ,
- Product instructions (12 pages)

Related Manuals for Rehau RAUTOOL A-LIGHT2


Summary of Contents for Rehau RAUTOOL A-LIGHT2
- Page 1 RAUTOOL A-LIGHT2 ™ PRODUCT INSTRUCTIONS www.rehau.com Construction Automotive Industry...
-
Page 2: Table Of Contents
RAUTOOL A-LIGHT2 TABLE OF CONTENTS Safety Information . . . . . . . . . . . . . . . . . . . . . . . . . . . . . . . . . . . . . . . 3 Items Supplied . -
Page 3: Safety Information
General Use and Care – As a result of improper use, liquid can leak from the bat- – The tool is intended to be used with REHAU SDR11 compression- tery. Avoid contact with this liquid. In the event of inadvertent sleeve fittings in the size range 25 to 40 mm. -
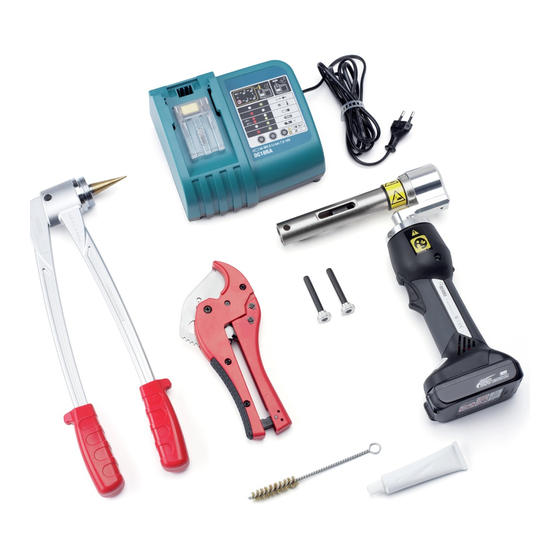
Page 4: Items Supplied
RAUTOOL A-LIGHT2 ITEMS SUPPLIED RAUTOOL A-light2 - Li-ion battery (Art. 203619-001) - Battery charger 120 V DC18RA (Art. 212754-001) - Ratchet pipe cutter (Art. 138062) - RO pipe expander (Art. 139592) - Expander bit RO 25/32 mm (Art. 247504-001) - Expansion head RO 25 x 2.3 mm (Art. 139662-001) - Expansion head RO 32 x 2.9 mm (Art. -
Page 5: Replacement Parts And Accessories
RAUTOOL A-LIGHT2 REPLACEMENT PARTS AND ACCESSORIES Expander Heads RO Expander Bit RO Art. No. 139622-001 Art. No. 247504-001 25 x 2.3 mm 25/32 mm Art. No. 137193-001 32 x 2.9 mm Clamping Jaws Li-ion Battery 18V/1 .5Ah Art. No. 257259-002 Art. -
Page 6: Technical Data, Description And Operation
RAUTOOL A-LIGHT2 TECHNICAL DATA, DESCRIPTION AND OPERATION Technical data Max. working pressure: 6,256 psi (450 bar) Max. shear force: 4,046 lb/ft (18 kN [linear]) Mains voltage battery charger: 120V / 60Hz Battery voltage: 18 V Battery capacity: 1.5 Ah Battery technology:... -
Page 7: Tool Preparation
RAUTOOL A-LIGHT2 TOOL PREPARATION Charging the Battery To charge the battery, connect the charger to the electric power mains and push the battery securely into the charger. Charging takes about 22 min. The battery charge level is indicated by the LEDs on the charger. -
Page 8: Description Of The Led Display On The Tool
Description of the LED Display on the Tool The light-emitting diode together with the electronic control system serves to provide information about the battery charge levels and functionality of the tool. Self-test! When the battery is inserted, the light-emitting diode flashes a few times. The elec- tronic control is performing its self-test satisfactorily. -
Page 9: Expanding Tool
Damaged tools must no clamping action of the bit in the jaws is correct (to avoid falling out). longer be used and should immediately be sent to a REHAU If necessary, increase the clamping action through short activation of representative for repair. -
Page 10: Using The Tool
RAUTOOL A-LIGHT2 USING THE TOOL 1. When changing the compres- 2. Fix the compression jaws with sion jaws, always first push the pins. the long compression jaw and then the short one onto the tool Ensure the identical alignment cylinder. -
Page 11: Assembly Procedure
RAUTOOL A-LIGHT2 ASSEMBLY PROCEDURE 1. Using pipe cutters, cut pipe to required length at right angles and without leaving burrs. Note: Keep your hand at a safe distance from the tool. Do not use saws, or similar. 2. Slide compression-sleeve onto pipe. With metal compression sleeves, the inside taper must point toward the joint. - Page 12 4. Insert fitting into pipe up to the stop. After a brief period, the fitting will sit tightly in the pipe (memory effect). Note: All sealing ribs must be covered. Until the memory effect has set in completely, the fitting can fall out of the pipe. Make sure to seat the fitting in level position.
-
Page 13: Important Notes
ZGT_07707 - muss im Layoutprogramm durchgestrichen werden! age the pipe. Replacements are supplied with the tool. To avoid available from your local REHAU excess grease entering the pipe, representative. do not grease the taper to much. -
Page 14: Maintenance
Note: Do not perform any repairs on the tool yourself. Return the tool cleaning and inspection. to your local REHAU representative. – Always keep jaw sets, expanding tools and cylinders clean. When Storage soiled, clean them with a brush and oil them. Then store the tool in Never store the tool if wet. -
Page 15: Troubleshooting
- Charger/battery contacts damaged Send charger/battery to your local REHAU representative - Battery not locked correctly into the charger Reinsert battery, paying close attention to locking mechanism If the defects cannot be remedied, send the tool to your local REHAU representative . - Page 16 For updates to this publication, visit na .rehau .com/resourcecenter The information contained herein is believed to be reliable, but no representations, guarantees or warranties of any kind are made as to its accuracy, suitability for particular applications or the results to be obtained therefrom. Before using, the user will determine suitability of the information for user’s intended use and shall assume all risk and liability in connection therewith.
Need help?
Do you have a question about the RAUTOOL A-LIGHT2 and is the answer not in the manual?
Questions and answers