
Related Manuals for ESX VN1061-MA-4G


Summary of Contents for ESX VN1061-MA-4G
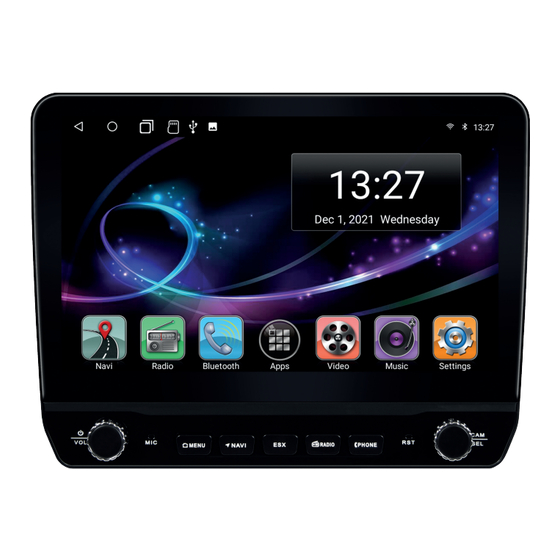
- Page 1 VN1061-MA-4G SMART NAVICEIVER MOBILE INTERNET READY V I S I O N A N D R O I D S E R I E S ™...
-
Page 2: Table Of Contents
INDEX Always follow the instructions in this manual before using the device. Please keep this manual easily accessible in the vehicle for future reference. Important Notes ............................3 Safety Information ..........................5 1. Operation............................6 SD card slot for navigation software ..................6 Reset button ......................... -
Page 3: Important Notes
ATTENTION: Your ESX device has an internal memory with a limited capacity. By downloading apps, pictures and music you fill up this memory. When the memory is full, there is a possibility that apps may stop working or be of limited use. - Page 4 IMPORTANT NOTES LEGAL NOTICE • ESX or Audio Design GmbH are in no way affiliated with the car manufacturer or any of its subsidiar- ies or affiliated companies connected to, or is acting on its behalf or with its authorization.
-
Page 5: Safety Information
SAFETY INFORMATION • Note any time the traffic regulations of the country in which the device is operated. • Please ensure, that with the engine turned off the vehicle‘s battery does not discharge fully. The de- vice is another electrical consumer which must be operated with the engine running, other-wise the vehicle‘s battery will be discharged and the vehicle can not be started. -
Page 6: Operation
1. OPERATION 1.1 SD CARD SLOT FOR NAVIGATION SOFTWARE Here you can insert the MicroSD card of the navigation software. Please only use the upper MicroSD card slot. The lower MicroSD card slot is only suitable for media. 1.2 RESET BUTTON If the device no longer reacts to inputs, the system is overloaded or has crashed. -
Page 7: Function Keys
The ESX button can be assigned to any function. Simply hold the but- ton down until the symbols of the compatible functions / apps appear on the left. Then tap on the desired symbol to assign the ESX key. Radio FM/AM Press here to start the radio application. -
Page 8: Status Bar
® The ESX device has GPS connection. The ESX device is connected to mobile internet via 4G/LTE. WiFi/WLAN The ESX device is connected via WiFi/WLAN or to the hotspot of a smartphone or via a network. Time Current time display. -
Page 9: Touchscreen
1. OPERATION 1.5 TOUCHSCREEN You can operate the touchscreen of the ESX device with the following gestures: Touch the screen Touch the screen Hold and swipe briefly longer The “Apps” control panel at the bottom takes you The ESX device has two freely assignable main... -
Page 10: Main Menus
1. OPERATION 1.6 MAIN MENUS The ESX device has two main menus in which In the first main menu you will find the widget the seven basic apps with the most important “Time” in the upper control field on the right. You functions which are located below. - Page 11 1. OPERATION 1.6 MAIN MENUS You can also swap the positions of the two To remove an app or a widget from the main widgets. menu, simply move it to the trash can that appears above. The second main menu is initially empty in the You can also equip this with apps and widgets as upper control panel.
-
Page 12: Split Screen
1. OPERATION 1.7 SPLIT SCREEN At the top of the status bar, tap on All currently used or recently used apps can be Hold the desired app briefly until the gray fields seen in this view. appear on the side. Then slide the app window all the way to the left until it clicks into place. -
Page 13: Camera View
1. OPERATION 1.8 CAMERA VIEW When you engage reverse gear, you can see the If you want to change the camera settings, tap reversing camera with guide lines, which was on the screen and then on the gear symbol that connected to “R-CAM”. -
Page 14: Settings
2.1 INTERNET CONNECTION VIA WiFi / HOTSPOT In order to be able to fully use the Android operating system of the ESX device, e.g. Google Maps, it is necessary to connect the device to the Internet via WLAN. To do this, you need a smartphone with a mobile internet connection and the so-called hotspot function. -
Page 15: Internet Connection Via 4G/Lte
2. SETTINGS 2.2 INTERNET CONNECTION VIA 4G / LTE To connect the device to the Internet via an optionally connected 4G/LTE dongle, please proceed as follows: > Turn off the device and have your PIN code ready to unlock your SIM card >... -
Page 16: Date & Time
2. SETTINGS 2.3 DATE & TIME This ESX device has the function of automatically determining the date and time via active GPS reception or the Internet. You can also set the date, time zone and format manually. App menu > Settings >... -
Page 17: Google Account
Tap on “Add account” to connect the ESX device Your Google account has now been set up and to your Google account. Then enter your login linked to the ESX device. You can also add other details. accounts. Tap your account name to open the account menu. -
Page 18: Screen Brightness
2. SETTINGS 2.6 SCREEN BRIGHTNESS In one of the menus, drag the status bar down. Here you can change the brightness of the screen. The status menu opens. Then keep swiping down. 2.7 WALLPAPER Here you can change the background image of the menus. Press and hold on an empty space in the main Tap “Overview”... -
Page 19: Steering Wheel Remote Control
Important note: If the ESX device does not receive any signals from the steering wheel remote control, check whether it is correctly connected to the device. Some vehicles are not compatible. The ESX device is CAN bus compatible, but for this you need a corresponding vehicle-specific CAN bus adapter or CAN bus module. -
Page 20: Sound Settings
2. SETTINGS 2.9 SOUND SETTINGS In the app menu, tap on „DSP“ to make sound settings. Under „EQ“ you will find a 16-band equalizer Under “Surround Sound” you can set the with 8 different presets. Tap on one of the presets acoustic center of the stage. -
Page 21: Navigation
Important note: The iGO Navigation is optional and, depending on the equipment, already installed on your ESX device. In this case, please refer to the enclosed separate owner‘s manual. 2.11 KEY ILLUMINATION Under „General“ you can switch on the key illumination of the device permanently. Otherwise, it will only turn on when the vehicle‘s headlights are on. -
Page 22: More Settings
2. SETTINGS 2.12 MORE SETTINGS In the app menu, tap on “Settings”. In this menu you will find various submenus in Under “Display” you can make optical settings which you can make further settings such as e.g. for menu and the user interface. under “Network”. -
Page 23: Microphone Selection
2. SETTINGS 2.13 MICROPHONE SELECTION If you use an optionally available external microphone such as VNA-MIC-AND from ESX instead of the internal microphone on the front panel, you must activate this in the device. In the app menu tap on „SwitchMIC“. -
Page 24: Basic Functions
With the controller below you can choose between the station presets directly The PTY function is a classification of radio stations in different categories. Every program on a radio station is categorized. After you have selected a category, the ESX device automatically searches for suitable radio stations. -
Page 25: Digital Radio (Dab+)
3. BASIC FUNCTIONS 3.1 RADIO (FM/AM) Important note: If only a few or no stations are displayed, deactivate the AF function or set PTY to “None” in order to be able to receive more stations. 3.2 DIGITAL RADIO (DAB+) In the app menu, tap on “DAB-Z” to start the digital radio. When using the device for the first time, you must first start the station search as requested. -
Page 26: Phone
Then tap on “Bluetooth” in the main menu or push the “PHONE” button on the device to open the phone menu. In the delivery state, the Bluetooth function is already activated on the ESX device. ® Pairing the devices Tap on , to start pairing the devices. - Page 27 3. BASIC FUNCTIONS Phone book Tap on , to open the phone book. The phone book is initially empty. Tap on , to load or synchronize your contacts. Symbol Function Tap here to search for contacts from your smartphone. Tap here to search for contacts from your SIM card. Tap here to import all phone books.
- Page 28 3. BASIC FUNCTIONS Numeric keypad Tap on , to open the numeric keypad. Symbol Function Tap here to delete the last entry. Tap here to start the call after entering the number. Tap here to end a call. Tap here to forward the current call to the mobile phone. Important note: The function keys in the lower area are not available during the call.
- Page 29 3. BASIC FUNCTIONS Audio streaming Tap on , to open the audio streaming menu. Use the play / pause and skip buttons to play audio files from your mobile phone through the device. Important note: Some cell phones require their music player to be started in order to use this function.
-
Page 30: Audio Player
3. BASIC FUNCTIONS 3.4 AUDIO PLAYER In the main menu tap on „Music“ to start the audio player. Compatible formats: MP3 / AAC / FLAC / WAV / AMR / M4A / OGG The audio player accesses all files that can be found either on the internal device memory (iNand) or on optionally connected storage media (USB or SD card). -
Page 31: Video Player
3. BASIC FUNCTIONS 3.5 VIDEO PLAYER In the main menu tap on „Video“ to start the audio player. Compatible formats: MP4 / AVI / WMV / 3GP / FLV / SAF / MOV / MKV / MPG The video player accesses all files that can be found either on the internal device memory (iNand) or on optionally connected storage media (USB or SD card). -
Page 32: Media Connect Ios
3.6 MEDIA CONNECT iOS (WIRELESS) If you have an iOS smartphone, you can connect it wirelessly to the ESX device. In the settings of the iOS smartphone you have to grant the necessary approvals under CarPlay. In the app menu tap on „TLINK“. -
Page 33: Media Connect Android
3.7 MEDIA CONNECT ANDROID (ONLY WITH CHARGING CABLE) If you have an Android smartphone, you can connect it to the ESX device with its charging cable via USB port. You may have to first download the Android Auto app from the Play Store to your smartphone and grant the required approvals in its settings under Android Auto. -
Page 34: File Manager
3. BASIC FUNCTIONS 3.8 FILE MANAGER In the app menu tap on „File Manager“. Here you can see which files have been saved in In the file manager, files can then be copied, which location. moved or deleted as required on another storage medium. -
Page 35: Updates
4. UPDATES 4.1 MCU UPDATE After you have decompressed the downloaded MCU update, copy the files to your SD card or USB stick. Insert the SD card or USB stick into the device. Apps > Settings > System > MCU upgrade Mark the circle symbol and then confirm the entry. - Page 36 ESX Car Media Systems · Audio Design GmbH Am Breilingsweg 3 · D-76709 Kronau/Germany Tel. +49 7253 - 9465-0 · Fax +49 7253 - 946510 www.esxnavi.de - www.audiodesign.de © All rights reserved, technical changes and errors reserved...
Need help?
Do you have a question about the VN1061-MA-4G and is the answer not in the manual?
Questions and answers