Table of Contents
Advertisement
Quick Links
MODEL G0716
10" DRUM SANDER
OWNER'S MANUAL
Copyright © NoVEMBEr, 2010 By grizzly iNdustrial, iNC., rEVisEd JuNE, 2011 (ts)
WARNiNG: NO pORtiON Of thiS MANUAL MAy bE REpRODUcED iN ANy ShApE
OR fORM WithOUt thE WRittEN AppROvAL Of GRizzLy iNDUStRiAL, iNc.
(For ModEls MaNuFaCturEd siNCE 2/11) #ts13385 priNtEd iN ChiNa
Advertisement
Table of Contents

Related Manuals for Grizzly G0716


Summary of Contents for Grizzly G0716
- Page 1 MODEL G0716 10" DRUM SANDER OWNER'S MANUAL Copyright © NoVEMBEr, 2010 By grizzly iNdustrial, iNC., rEVisEd JuNE, 2011 (ts) WARNiNG: NO pORtiON Of thiS MANUAL MAy bE REpRODUcED iN ANy ShApE OR fORM WithOUt thE WRittEN AppROvAL Of GRizzLy iNDUStRiAL, iNc.
- Page 2 This manual provides critical safety instructions on the proper setup, operation, maintenance, and service of this machine/tool. Save this document, refer to it often, and use it to instruct other operators. Failure to read, understand and follow the instructions in this manual may result in fire or serious personal injury—including amputation, electrocution, or death.
-
Page 3: Table Of Contents
... 36 adjusting Elevation stop ... 37 Conveyor Belt replacement ... 38 SEctiON 8: WiRiNG ... 39 Wiring safety instructions ... 39 g0716 Wiring diagram ... 40 SEctiON 9: pARtS ... 41 stand ... 41 Conveyor ... 42 Main ... 44 Machine labels ... -
Page 4: Introduction
Bellingham, WA 98227-2069 Email: manuals@grizzly.com Machine Description the Model g0716 drum sander features a vari- able speed conveyor belt that feeds the workpiece into the rotating sanding drum. the amount of material removal (depth of cut) is controlled by the elevation handwheel with the aid of the elevation pointer and scale. -
Page 5: Identification
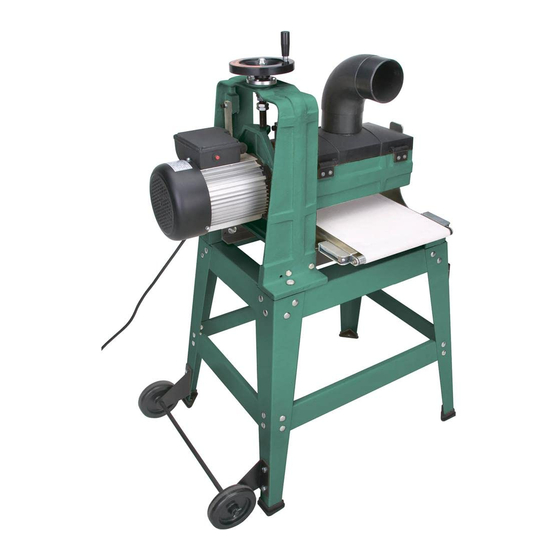
Collection hood Elevation lock Knob sanding drum housing lifting handle Model g0716 (Mfg. since 2/11) identification Elevation handwheel Conveyor Belt stand figure 1. Model g0716 identification. to reduce the risk of serious injury when using this machine, read and... -
Page 6: Machine Data Sheet
Machine Data Sheet Customer Service #: (570) 546-9663 · To Order Call: (800) 523-4777 · Fax #: (800) 438-5901 MODEL G0716 10" DRUM SANDER Product Dimensions: Weight... 159 lbs. Width (side-to-side) x Depth (front-to-back) x Height... 28-3/8 x 23-1/4 x 47-1/4 in. - Page 7 The information contained herein is deemed accurate as of 6/22/2011 and represents our most recent product specifications. Due to our ongoing improvement efforts, this information may not accurately describe items previously purchased. Model g0716 (Mfg. since 2/11) PAGE 2 OF 2...
-
Page 8: Section 1: Safety
Extended exposure to this noise without hearing protection can cause permanent hearing loss. MENTAL ALERTNESS. Be mentally alert when running machinery. Never operate under the influence of drugs or alcohol, when tired, or when distracted. Model g0716 (Mfg. since 2/11) - Page 9 FEED DIRECTION.Unlessotherwisenoted,feed work against the rotation of blades or cutters. Feedinginthesamedirectionofrotationmaypull yourhandintothecut. Model g0716 (Mfg. since 2/11) FORCING MACHINERY.Donotforcemachine. It will do the job safer and better at the rate for whichitwasdesigned. GUARDS & COVERS. Guards and covers can...
-
Page 10: Additional Safety For Drum Sanders
Use this and other machinery with caution and respect. failure to do so could result in serious per- sonal injury, damage to equipment, or poor work results. Model g0716 (Mfg. since 2/11) ⁄ " or narrower... -
Page 11: Section 2: Power Supply
Model g0716 (Mfg. since 2/11) circuit Requirements This machine is prewired to operate on a 110V... -
Page 12: Grounding & Plug Requirements
Any extension cord used with this machine must contain a ground wire, match the required plug and receptacle, and meet the following require- ments: Minimum Gauge Size ...14 AWG Maximum Length (Shorter is better)...50 ft. Model g0716 (Mfg. since 2/11) -
Page 13: Section 3: Setup
Get lifting help or use power lifting equipment such as a forklift to move heavy items. Model g0716 (Mfg. since 2/11) Needed for Setup the following are needed to complete the setup process, but are not included with your machine. -
Page 14: Inventory
If you cannot find an item on this list, check the mounting location on the machine or the packaging materials. Sometimes parts are pre-installed for shipping, or they become hidden by packaging materials. ⁄ " ... 2 NOTICE Model g0716 (Mfg. since 2/11) -
Page 15: Hardware Recognition Chart
Recognition chart -13- Model g0716 (Mfg. since 2/11) -
Page 16: Site Considerations
Lighting around the machine must be adequate enough that operations can be performed safely. Shadows, glare, or strobe effects that may distract or impede the operator must be eliminated. 30" 23" figure 4. Minimum working clearances. Power Connection Infeed Clearance Model g0716 (Mfg. since 2/11) -
Page 17: Assembly
Step 4. Step 1 Step 2 figure 6. layout and orientation of the stand legs and braces. Model g0716 (Mfg. since 2/11) figure 5. legs attached to the top braces. REAR Mounting Holes for Wheel Brackets... - Page 18 (4) M6-1 x 10 flat head screws and M6-1 lock nuts, as shown in figure 10. Foot figure 10. lifting handle assemblies attached. Cotter pin Model g0716 (Mfg. since 2/11)
- Page 19 11. sander assembly secured to the stand. thread the handle into the elevation handwheel, as shown in figure 12. Model g0716 (Mfg. since 2/11) figure 12. handle installed onto the elevation handwheel. 10. install the dust collection elbow into the dust collection hood, as shown in figure 13.
-
Page 20: Dust Collection
Dust collection DO NOt operate the Model G0716 without an adequate dust collection system. this sand- er creates substantial amounts of wood dust while operating. failure to use a dust collec- tion system can result in short and long-term respiratory illness. -
Page 21: Test Run
OFF. remove the switch disabling key, as shown in figure 15. Model g0716 (Mfg. since 2/11) figure 15. removing switch key from paddle switch. try to turn the start the machine with the paddle switch. -
Page 22: Section 4: Operations
OMMEND that you read books, review industry trade magazines, or get formal training before beginning any projects. Regardless of the content in this section, Grizzly industrial will not be held liable for accidents caused by lack of training. -20- basic controls... -
Page 23: Workpiece Inspection
Model g0716 (Mfg. since 2/11) Sandpaper Selection sanding a workpiece smooth requires making progressively smaller scratches in the wood until they become too small to feel or be seen. -
Page 24: Replacement
Replacement replacement sandpaper for the Model g0716 is available in 3" bulk rolls (see page 28 for options from grizzly). When fabricating a replacement sandpaper strip from bulk rolls, either use the existing strip as a template or refer to the dimensioning information in figure 17. - Page 25 Model g0716 (Mfg. since 2/11) While keeping reasonable tension on the strip with one hand, roll the drum away from you with the other hand to wrap the strip onto the drum (see figure 20).
- Page 26 14. Close and secure the dust collection hood with the cap screw before connecting the sander to power. removing Maintaining pressure on Clamp ⁄ " apart, and they are not over- Model g0716 (Mfg. since 2/11)
-
Page 27: Depth Of Cut
Depth of cut the correct depth of cut when surface sanding with the Model g0716 depends on many vari- ables, such as the hardness of the wood, the width of the workpiece, and the feed rate. generally, a ⁄ turn of the elevation handwheel ⁄... -
Page 28: Feed Rate
• When sanding workpieces with a bow or crown, place the high point up (prevents the workpiece from rocking) and take very light passes. ⁄ " or ⁄ turn of the elevation Model g0716 (Mfg. since 2/11) -
Page 29: Sanding Operation
Model g0716 (Mfg. since 2/11) When the sanding drum has complete con- trol of the workpiece, step to the rear of the... -
Page 30: Section 5: Accessories
Grizzly. NOTICE Refer to the newest copy of the Grizzly catalog for other accessories available for this machine. G1512—pro-Stik® Sandpaper cleaner pad this crepe-rubber sandpaper Cleaner quickly removes gum and grit from sandpaper strips without damage. -
Page 31: Section 6: Maintenance
(see page 28 for an option from grizzly). Model g0716 (Mfg. since 2/11) Lubrication the bearings on the Model g0716 have been lubricated and sealed at the factory. No other care of these bearings is necessary unless they need replacement. -
Page 32: Section 7: Service
5. test by rotating shaft by hand; rotational grinding or loose shaft requires bearing replacement. 6. replace bearings. 1. store sandpaper away from extreme dry/moist environment or hot temperatures. 2. store sandpaper rolled, not folded or bent. Model g0716 (Mfg. since 2/11) - Page 33 2. sandpaper strip not cut to the correct dimensions. 3. slack in sanding strip. 4. torn or damaged sandpaper strip. Model g0716 (Mfg. since 2/11) possible solution 1. reduce depth of cut or increase feed rate; use coarser grit sandpaper.
- Page 34 2. Make sure the elevation lock knob is tight. 1. Evenly adjust pressure roller tension (see page 36). 2. use roller stands or tables on the infeed and outfeed ends of the conveyor to keep the workpiece from bending. Model g0716 (Mfg. since 2/11)
-
Page 35: Conveyor Belt Tension & Tracking
30. Conveyor belt tensioners. Model g0716 (Mfg. since 2/11) as a starting point, make sure that the ends of both tensioning screws extend evenly approximately shown in figure 31. -
Page 36: Gib Adjustment
Note: Tighten the cap screws to increase gib pressure. repeat Step 3 until you are satisfied with the sanding head movement, then re-tighten both lock nuts. (1 of 2) Model g0716 (Mfg. since 2/11) -
Page 37: Conveyor Belt To Drum Alignment
Make sure the gibs are properly adjusted. plane the board so that the thickness on each side of it is equal. Model g0716 (Mfg. since 2/11) take several light cuts through the sander without rotating or flipping the board. Make measurements at "a" and "B" as indi- cated in figure 34. -
Page 38: Pressure Roller Adjustment
— if the workpiece slips on the conveyor belt, increase the pressure by rotating the screws clockwise one turn, then perform the test again. Model g0716 (Mfg. since 2/11) -
Page 39: Adjusting Elevation Stop
Needed Wrench 10mm ... 1 phillips screwdriver #2 ... 1 Model g0716 (Mfg. since 2/11) to adjust the elevation stop screw: Make sure the conveyor belt is properly tensioned (refer to conveyor belt tension & tracking on page 33 for detailed instruc- tions). -
Page 40: Conveyor Belt Replacement
Replacement if the conveyor belt becomes excessively worn or damaged, it can easily be replaced. Contact grizzly Customer support at 1-800-523-4777 to obtain a replacement belt (part No. p0706101). items Needed phillips screwdriver #2 ... 1 open-End Wrench 10mm ... 1 Wrench or socket 13mm ... -
Page 41: Section 8: Wiring
You can view these pages in color at www.grizzly.com. Model g0716 (Mfg. since 2/11) WIRE/COMPONENT DAMAGE. Damaged wires or components increase the risk of serious per- sonal injury, fire, or machine damage. If you notice... -
Page 42: G0716 Wiring Diagram
80Mfd 300VAC figure 42. switch wiring. Ground ON/OFF Bridge Switch Rectifier Conveyor Neutral Motor Conveyor Transformer Circuit Omron Board DB-B838 HF-7A 120V/60Hz 24V/1.4A 5-15 Plug 110VAC (As Recommended) READ ELECTRICAL SAFETY -40- Model g0716 (Mfg. since 2/11) ON PAGE 39! -
Page 43: Section 9: Parts
RIGHT FRONT STAND LEG PLN03M LOCK NUT M6-1 P0716012 SHORT BOTTOM BRACE P0716013 FRONT SHORT TOP BRACE P0716014 LEFT LONG TOP BRACE P0716015 LONG BOTTOM BRACE Model g0716 (Mfg. since 2/11) Stand REF PART # P0716016 PLN04M P0716018 PCB11M P0716020 P0716021 PB03M P0716023... -
Page 44: Conveyor
-42- Model g0716 (Mfg. since 2/11) -
Page 45: Conveyor Parts List
P0716119 INFEED ROLLER PS06M PHLP HD SCR M5-.8 X 20 P0716124 SWITCH COVER G8988 GRIZZLY SAFETY ON/OFF SWITCH Model g0716 (Mfg. since 2/11) REF PART # DESCRIPTION PS02M PHLP HD SCR M4-.7 X 12 P0716131 SWITCH HOUSING BRACKET P0716132 TERMINAL BLOCK 4P... -
Page 46: Main
Main -44- Model g0716 (Mfg. since 2/11) -
Page 47: Main Parts List
RIGHT BRACKET SUPPORT P0716245 LEFT BRACKET SUPPORT PLN01M LOCK NUT M4-.7 P0716247 PRESSURE ROLLER BUSHING P0716248 PRESSURE ROLLER PN26M ACORN NUT M12-1.75 Model g0716 (Mfg. since 2/11) Main parts List PART # PW06M P0716251 P0716252 P0716253 PK08M PB148M P0716256 P0716257... -
Page 48: Machine Labels
MUSt maintain the original location and readability of the labels on the machine. if any label is removed or becomes unreadable, REpLAcE that label before using the machine again. contact Grizzly at (800) 523-4777 or www.grizzly.com to order new labels. -46-... -
Page 49: Warranty Card
Do you think your machine represents a good value? Would you recommend Grizzly Industrial to a friend? Would you allow us to use your name as a reference for Grizzly customers in your area? Note: We never use names more than 3 times. - Page 50 FOLD ALONG DOTTED LINE FOLD ALONG DOTTED LINE Send a Grizzly Catalog to a friend: Name_______________________________ Street_______________________________ City______________State______Zip______ GRIZZLY INDUSTRIAL, INC. P.O. BOX 2069 BELLINGHAM, WA 98227-2069 TAPE ALONG EDGES--PLEASE DO NOT STAPLE Place Stamp Here...
-
Page 51: Warranty And Returns
WARRANTY AND RETURNS Grizzly Industrial, Inc. warrants every product it sells for a period of 1 year to the original purchaser from the date of purchase. This warranty does not apply to defects due directly or indirectly to misuse, abuse, negligence, accidents, repairs or alterations or lack of maintenance. - Page 52 Buy Direct and Save with Grizzly – Trusted, Proven and a Great Value! ® ~Since 1983~ Visit Our Website Today For Current Specials! ORDER 24 HOURS A DAY! 1-800-523-4777...
Need help?
Do you have a question about the G0716 and is the answer not in the manual?
Questions and answers