Table of Contents
Advertisement
Quick Links
Advertisement
Table of Contents

Subscribe to Our Youtube Channel
Related Manuals for Grizzly G0719


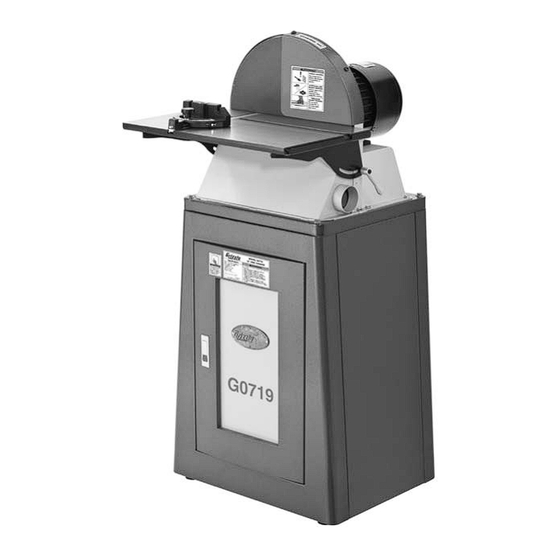
Summary of Contents for Grizzly G0719
- Page 1 OWnEr's ManuaL Copyright © JANUAry, 2011 By grizzly iNdUstriAl, iNC. WarninG: nO pOrtiOn Of this ManuaL May BE rEprODuCED in any shapE Or fOrM WithOut thE WrittEn apprOvaL Of GrizzLy inDustriaL, inC. For models mANUFACtUred siNCe 10/10 #JB13694 priNted iN tAiWAN...
- Page 2 This manual provides critical safety instructions on the proper setup, operation, maintenance, and service of this machine/tool. Save this document, refer to it often, and use it to instruct other operators. Failure to read, understand and follow the instructions in this manual may result in fire or serious personal injury—including amputation, electrocution, or death.
-
Page 3: Table Of Contents
intrODuCtiOn ... 2 manual Accuracy ... 2 Contact info... 2 machine description ... 2 identification ... 3 machine data sheet ... 4 sECtiOn 1: safEty ... 6 safety instructions for machinery ... 6 Additional safety for disc sanders ... 8 sECtiOn 2: pOWEr suppLy ... -
Page 4: Introduction
Your Machine For your convenience, we post all available man- uals and manual updates for free on our website at www.grizzly.com. Any updates to your model of machine will be reflected in these documents as soon as they are complete. -
Page 5: Identification
Cabinet lock handle (one of two) tilt scale door figure 1. identification. to reduce the risk of serious injury when using this machine, read and understand this entire manual before beginning any operations. model g0719 (mfg. since 10/10) -
Page 6: Machine Data Sheet
Machine Data sheet © Grizzly Industrial, Inc. • Customer Service: (800) 523-4777 • Website: www.grizzly.com 15" disc sander Product Dimensions: Weight ... 201 lbs. Length/Width/Height ...20-1/2 x 26 x 46 in. Foot Print (Length/Width) ...20-1/2 x 26 in. Shipping Dimensions: Carton 1 Type ...Carboard... - Page 7 Features: Automatic internal motor braking system Table tilt range +15° to -45° Accepts 15" PSA discs Large tilting precision-ground cast iron table X and Y-axis miter slots Steel base Model G0719 model g0719 (mfg. since 10/10) Page 2 of 2...
-
Page 8: Section 1: Safety
Extended exposure to this noise without hearing protection can cause permanent hearing loss. MENTAL ALERTNESS. Be mentally alert when running machinery. Never operate under the influence of drugs or alcohol, when tired, or when distracted. model g0719 (mfg. since 10/10) - Page 9 FEED DIRECTION.Unlessotherwisenoted,feed work against the rotation of blades or cutters. Feedinginthesamedirectionofrotationmaypull yourhandintothecut. model g0719 (mfg. since 10/10) FORCING MACHINERY.Donotforcemachine. It will do the job safer and better at the rate for whichitwasdesigned. GUARDS & COVERS. Guards and covers can...
-
Page 10: Additional Safety For Disc Sanders
(mfg. since 10/10) -
Page 11: Section 2: Power Supply
(mfg. since 10/10) Circuit information A power supply circuit includes all electrical equipment between the breaker box or fuse panel in the building and the machine. -
Page 12: Grounding Requirements
Any extension cord used with this machine must contain a ground wire, match the required plug and receptacle, and meet the following require- ments: Minimum Gauge size ...14 aWG Maximum Length (shorter is Better)...50 ft. model g0719 (mfg. since 10/10) -
Page 13: Section 3: Setup
Get lifting help or use power lifting equipment such as a forklift to move heavy items. model g0719 (mfg. since 10/10) needed for setup the following are needed to complete the setup process, but are not included with your machine. -
Page 14: Inventory
Discard immediately. NOTICE If you cannot find an item on this list, check the mounting location on the machine or the packaging materials. Sometimes parts are pre-installed for shipping, or they become hidden by packaging materials. model g0719 (mfg. since 10/10) -
Page 15: Cleanup
Repeat Steps 2–3 as necessary until clean, then coat all unpainted surfaces with a quality metal protectant to prevent rust. model g0719 (mfg. since 10/10) Gasoline or products with low flash points can explode or cause fire if used to clean machin- ery. -
Page 16: Site Considerations
Lighting around the machine must be adequate enough that operations can be performed safely. Shadows, glare, or strobe effects that may distract or impede the operator must be eliminated. 33.5" 26" Dust Port Wall figure 5. minimum working clearances. 20" model g0719 (mfg. since 10/10) -
Page 17: Assembly
Fasten the upper and lower shelves, as shown in figure 7, using (8) m6-1 x 12 flange bolts. figure 7. shelf installation. model g0719 (mfg. since 10/10) Fasten the panel and door assembly to the left and right panels, as shown in figure 8, using (4) ⁄... -
Page 18: Power Connection
Connecting power 1. Turn the machine power switch OFF. 2. Insert the power cord plug into a matching power supply receptacle. The machine is now connected to the power source. figure 12. Connecting power. Disconnecting power 1. Turn the machine power switch OFF. 2. Grasp the molded plug and pull it completely out of the receptacle. Do not pull by the cord as this may damage the wires inside. figure 13. Disconnecting power. model g0719 (mfg. since 10/10) -
Page 19: Test Run
Always disconnect the machine from power when investigating or correcting potential problems. model g0719 (mfg. since 10/10) turn the machine OFF. remove the switch disabling key, as shown in figure 14. figure 14. removing switch key from paddle switch. -
Page 20: Section 4: Operations
Grizzly industrial will not be held liable for accidents caused by lack of training. -18- to complete a typical sanding operation, the... -
Page 21: Attaching Sandpaper
(mfg. since 10/10) Disc sanding the model g0719 uses dual-axis miter slot design for increased versatility of workpiece control. always keep the guard in place and the workpiece on the side of the wheel that is rotating down. - Page 22 To prevent burning the workpiece and over- loading the sanding disc, move the workpiece slowly back and forth from the left side of the sanding disc to the center. figure 18. Angle sanding. -20- model g0719 (mfg. since 10/10)
-
Page 23: Section 5: Accessories
ACCessories sECtiOn 5: aCCEssOriEs replacement sanding Discs for Model G0719 MODEL and typE t23357 15" psA ... 60 t23358 15" psA ... 80 t23359 15" psA ... 100 t23360 15" psA ...120 t23361 15" psA ...150 t23362 15" psA ...180 t23363 15"... -
Page 24: Section 6: Maintenance
-22- Cleaning Cleaning the model g0719 is relatively easy. Vacuum excess wood chips and sawdust, and wipe off the remaining dust with a dry cloth. if any resin has built up, use a resin dissolving cleaner to remove it. -
Page 25: Section 7: Service
1. pointer or scale not calibrated correctly. incorrect or out of miter gauge or table not correctly aligned. square. model g0719 (mfg. since 10/10) troubleshooting possible solution 1. re-install switch disabling key. 2. trace/replace broken or corroded wires, fix loose connections, correct wiring. - Page 26 4. Use different stock. or, accept the characteristics of the stock and plan on cleaning/replacing sandpapers frequently. 5. replace sandpaper. 6. reduce sanding depth or install coarser sandpaper. 1. replace; store sandpaper away from extremely dry, hot, or damp conditions. model g0719 (mfg. since 10/10)
-
Page 27: Table Gap & Parallelism
— if the if the sandpaper touches the table at any point, re-adjust the table parallelism. model g0719 (mfg. since 10/10) Calibrating Miter At 90˚, the miter gauge should be perpendicular ⁄... -
Page 28: Table Tilt Calibration
0˚, then retighten the screw. recheck the scale accuracy with the square. model g0719 (mfg. since 10/10) -
Page 29: Section 8: Wiring
You can view these pages in color at www.grizzly.com. model g0719 (mfg. since 10/10) WIRE/COMPONENT DAMAGE. Damaged wires or components increase the risk of serious per- sonal injury, fire, or machine damage. If you notice... - Page 30 27. g0719 wiring component locations. 1-1/2 HP 220V Motor Internal Wires Safety Brake CB-04-CS DC 90V 220 VAC 6-15 Plug Ground READ ELECTRICAL SAFETY -28- ON PAGE 27! start Capacitor regulator Regulator CS-021 Red In: AC 220V Black Out: DC 9-10.5V...
-
Page 31: Section 9: Parts
HEX BOLT 5/16-18 X 1 PB06M HEX BOLT M8-1.25 x 12 PB118M HEX BOLT M8-1.25 x 45 PW07 FLAT WASHER 5/16 PB02M HEX BOLT M6-1 X 12 model g0719 (mfg. since 10/10) 32 33 28 29 REF PART # PB03M P0719022 P0719023 P0719024 P0719025... -
Page 32: Machine Labels
Must maintain the original location and readability of the labels on the machine. if any label is removed or becomes unreadable, rEpLaCE that label before using the machine again. Contact Grizzly at (800) 523-4777 or www.grizzly.com to order new labels. -30-... - Page 33 Do you think your machine represents a good value? Would you recommend Grizzly Industrial to a friend? Would you allow us to use your name as a reference for Grizzly customers in your area? Note: We never use names more than 3 times.
- Page 34 FOLD ALONG DOTTED LINE FOLD ALONG DOTTED LINE Send a Grizzly Catalog to a friend: Name_______________________________ Street_______________________________ City______________State______Zip______ GRIZZLY INDUSTRIAL, INC. P.O. BOX 2069 BELLINGHAM, WA 98227-2069 TAPE ALONG EDGES--PLEASE DO NOT STAPLE Place Stamp Here...
-
Page 35: Warranty And Returns
WARRANTY AND RETURNS Grizzly Industrial, Inc. warrants every product it sells for a period of 1 year to the original purchaser from the date of purchase. This warranty does not apply to defects due directly or indirectly to misuse, abuse, negligence, accidents, repairs or alterations or lack of maintenance. - Page 36 Buy Direct and Save with Grizzly – Trusted, Proven and a Great Value! ® ~Since 1983~ Visit Our Website Today For Current Specials! ORDER 24 HOURS A DAY! 1-800-523-4777...
Need help?
Do you have a question about the G0719 and is the answer not in the manual?
Questions and answers