Table of Contents

Related Manuals for UEi DL579


Summary of Contents for UEi DL579
- Page 1 DL579 Digital HVAC Clamp Meter w/ CATIII 600V INSTRUCTION MANUAL ENGLISH RANGE MAX/MIN AUTO µ True RMS 300V SELECT INRUSH DISCONNECT TEST LEADS CAT IV TEMP CATIV 300V CATIII 600V 600V CAT III 1-800-547-5740 www.ueitest.com • email: info@ueitest.com...
-
Page 2: Table Of Contents
Table Of Contents FUNCTIONS ....................3 FEATURES .....................3 GENERAL SPECIFICATIONS .............3 IMPORTANT SAFETY WARNINGS ..........4 SYMBOLS .....................5 CATEGORY DEFINITIONS ..............5 OVERVIEW ..................6 - 7 OPERATING INSTRUCTIONS Low Z (Low Impedance) ............7 AC Amps: <600A – Jaw ............8 Non-Contact Voltage .............. -
Page 3: Functions
Functions • True RMS • Diode test • 750V AC/1000V DC • Audible continuity • 600A AC • NCV • AC/DC microamps: 2000µA • LRA Inrush • Capacitance: 6000µF • Temperature range: -328˚ to 2462˚F • Frequency: 99.99kHz • Resistance: 60MΩ •... -
Page 4: Important Safety Warnings
Important Safety Warnings WARNING Read entire Safety Notes section regarding potential hazards and proper instructions before using this meter. In this manual the word “WARNING” is used to indicate conditions or actions that may pose physical hazards to the user. The word “CAUTION” is used to indicate conditions or actions that may damage this instrument. -
Page 5: Symbols
Symbols AC (Alternating current) DC (Direct current) Negative AC/DC Voltage or Current Auto-ranging Overload: Range Exceeded Auto power off Active Non-Contact Voltage Low Battery Hold/Capture Value Minimum measured Maximum measured value displayed value displayed Duty Cycle Hertz/Frequency Voltage Inrush Amperage Ohms/Resistance Diode Capacitance... -
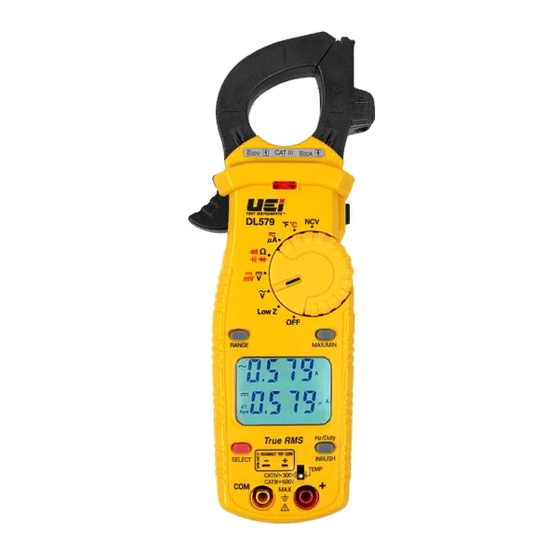
Page 6: Overview
Overview RANGE MAX/MIN AUTO µ True RMS SELECT INRUSH DISCONNECT TEST LEADS TEMP CATIV 300V CATIII 600V A. Clamp: Measure inductive AC current. Opens to 1.25” (32.0mm). B. Conductor Alignment Marks: Use to aid the visual alignment of a conductor when measuring inductive amperage. Greatest accuracy is achieved when the conductor inside the clamp is centered at the intersection of these marks. -
Page 7: Low Z (Low Impedance)
Overview (Cont.) P. Min/Max Button: • Press to enter MIN/MAX mode. • Step through maximum(MAX), minimum(MIN) and present values. • Press and hold return to Live readings Q. Display: • High contrast dual display with backlit. • AC Amps reading will always display on upper display. R. -
Page 8: Ac Amps <600A Jaw
AC Amps <600A Jaw Single Conductor Only • Rotary selector dial = RANGE RANGE MAX/MIN MAX/MIN any position Low Z AUTO AUTO µ µ • Reading show on upper display True RMS True RMS SELECT SELECT INRUSH INRUSH DISCONNECT TEST LEADS DISCONNECT TEST LEADS TEMP TEMP... -
Page 9: Non-Contact Voltage
Non-Contact Voltage NCV Sensor in the tip. RANGE MAX/MIN AUTO AUTO µ True RMS SELECT INRUSH DISCONNECT TEST LEADS TEMP CATIV 300V CATIII 600V • Rotate Rotary Selector Dial to NCV position move the tip of the clamp meter near voltage source. •... -
Page 10: Ac/Dc Microamps: <2000Μa
AC/DC Microamps: <2000µA • Default = • Press SELECT = • Readings show on lower display RANGE MAX/MIN AUTO AUTO µ µ True RMS SELECT DISCONNECT TEST LEADS INRUSH TEMP CATIV 300V CATIII 600V WARNING • Do not attempt to measure more than 2000µA. Features: SELECT DC Microamps Measurement -Test lead input... -
Page 11: Temperature F˚/C
Temperature °F/°C Temp • Press SELECT = ˚F or ˚C RANGE MAX/MIN • Readings show on lower display AUTO AUTO µ °F True RMS SELECT INRUSH DISCONNECT TEST LEADS TEMP CATIV 300V TEMP CATIII 600V • Disconnect test lead probes from voltage source and meter. •... -
Page 12: Continuity
Continuity • Default = • Press SELECT x1 = RANGE MAX/MIN AUTO AUTO µ Ω True RMS SELECT INRUSH DISCONNECT TEST LEADS TEMP CATIV 300V CATIII 600V • Buzzer sounds at less than < 40Ω. WARNING • Do not measure resistance on a live circuit. Features: SELECT Open circuit voltage <... -
Page 13: Capacitance
Capacitance • Default = Ω • Press SELECT x3 = RANGE MAX/MIN • Press RANGE to select resolution AUTO AUTO µ µ True RMS SELECT INRUSH DISCONNECT TEST LEADS TEMP CATIV 300V CATIII 600V Features: SELECT Range Resolution Accuracy Overload Protection 60.00nF 0.01nF 600.0nF... -
Page 14: Diode
Diode GOOD DIODE Reverse Bias Displays "OL" • Default = Ω • Press SELECT x2 = RANGE MAX/MIN AUTO µ Forward Bias True RMS Displays approx. SELECT INRUSH DISCONNECT TEST LEADS TEMP CATIV 300V voltage drop CATIII 600V BAD DIODE Open Diode Displays "OL"... -
Page 15: Ac Voltage: 750V Ac
Voltage 750V AC High • Default = • Press RANGE to select resolution Voltage RANGE MAX/MIN Alert AUTO µ True RMS SELECT INRUSH DISCONNECT TEST LEADS TEMP CATIV 300V CATIII 600V WARNING • Use CATIII rated test leads or higher. •... -
Page 16: Dc Voltage: 1000V Dc
Voltage 1000V DC High • Default = • Press SELECT= m Voltage RANGE MAX/MIN • Press RANGE to select resolution Alert AUTO AUTO µ True RMS SELECT INRUSH DISCONNECT TEST LEADS TEMP CATIV 300V CATIII 600V WARNING • Use CATIII rated test leads or higher. •... -
Page 17: Frequency/Hz/Duty Cycle(%)
Frequency (Hz)/Duty Cycle (%) • Default = Volts AC • Press and hold Hz/Duty/INRUSH = • Press and hold Hz/Duty/INRUSH x2= RANGE MAX/MIN AUTO AUTO µ True RMS SELECT INRUSH DISCONNECT TEST LEADS TEMP CATIV 300V CATIII 600V Use CAT III rated leads or higher. Rotate Rotary selector Dial to position select AC voltage, press and hold the button for Frequency and Duty Cycle modes. -
Page 18: Lra Inrush
TEMP CATIV 300V CATIII 600V The UEi LRA Inrush is programmed to properly capture the starting current forInrush current can be measured in any position of the rotary selector Dial. compressor motors. • Select the range capable of capturing the maximum value. -
Page 19: Test Lead Notes
Test Lead Notes Cat IV and CAT II Measurement Locations • Ensure the test lead shield is pressed firmly in place. Failure to use the CAT IV shield increases arc-flash risk. CAT II Measurement Locations 18mm 18mm • CAT IV shields may be removed for CAT II locations. This will allow testing on recessed conductors such as standard wall outlets. -
Page 20: Warranty
Any implied warranties, including but not limited to implied warranties of merchantability and fitness for a particular purpose, are limited to the express warranty. UEi shall not be liable for loss of use of the instrument or other incidental or consequential damages, expenses, or economic loss, or for any claim or claims for such damage, expenses or economic loss.
Need help?
Do you have a question about the DL579 and is the answer not in the manual?
Questions and answers
I can't get a reading on the amperage setting. Is it possible batteries or user error. Sending a picture. Maybe wrong setting. Ty
The UEi DL579 may not be providing a reading on the amperage setting due to one of the following reasons:
1. Incorrect Connection – Ensure the test leads are properly connected to the correct input terminals for measuring current.
2. Blown Fuse – The internal fuse may be blown, preventing current measurement.
3. Single Conductor Requirement – When using the clamp for AC amperage, only a single conductor should be inside the jaws.
4. Battery Issues – Weak or dead batteries could affect the meter’s functionality; replace them if necessary.
5. Selector Dial Position – Ensure the rotary selector dial is set to the correct amperage measurement mode.
If these steps do not resolve the issue, further inspection or repair may be needed.
This answer is automatically generated