
Subscribe to Our Youtube Channel
Related Manuals for ROVE R3


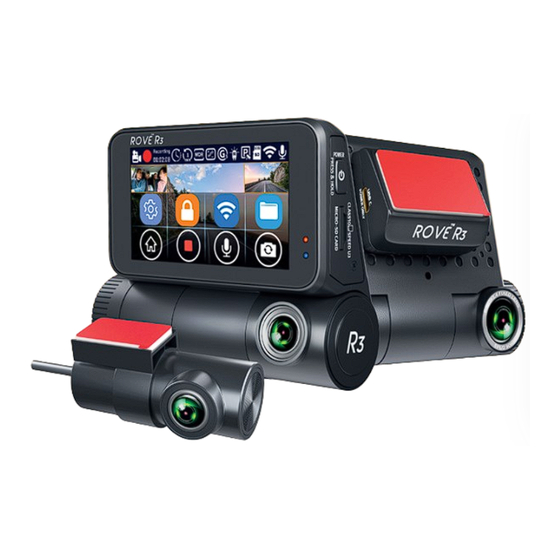
Summary of Contents for ROVE R3
- Page 1 3 - Channel Touch Screen Dash Cam www.rovedashcam.com Copyright (C) 2021, All rights reserved...
- Page 2 EMAIL US help@rovedashcam.com For faster response text us TEXT US 1 (401) 484-ROVE(7683) Scan the QR Code to Email US Scan the QR Code to Text US Just Scan the QR Code with your iPhone or Android’s Camera to get in touch with us.
- Page 3 WATCH HOW TO VIDEOS Visit our website www.rovedashcam.com/pages/videos Understanding ROVE R3 Understanding ROVE R3 Watch HOW-TO VIDEOS to learn & understand all the features so you can get the maximum benefit out of it.
-
Page 4: Table Of Contents
Inserting/ Removing A Micro SD Card ..............Formatting Memory Card ....................Time-Zone Setting ......................Using WiFi Feature ......................Connecting ROVE R3 Dash Cam With Smart Phone ........Understanding 2 – Camera Modes ................. Playback Your Recorded Videos ................Understanding Camera Settings ................ -
Page 5: Introduction
Dash Cam (Front 1440P + Cabin 1080P + Rear 1080P). This product provides high-quality image capture and irrefutable evidence for what goes on from your dashboard’s perspective. Rove R3 Dash Cam is a Smart, High-End, very elegant, convenient, and durable multi-vehicle driving recorder. PRODUCT OVERVIEW This product is an Ultra HD Digital Vehicle Black Box Recorder. -
Page 6: Features
(Class 10, U3 Speed Only-Not Included) WDR - Wide Dynamic Range Distortion Correction Custom Designed Beautiful Software Beautiful ROVE APP for iOS & Android Devices H.265 & H.264 Video Compression 150° Front, 140° Cabin & Rear Cam Wide Angle Super Night Vision... -
Page 7: User Agreement
USER AGREEMENT By purchasing ROVE Dash cam, it is assumed that by default you agree with precautions, user warnings and all the terms & conditions of warranty. If for any reason you do not agree with any of the terms mentioned in this manual, then you may return the product in its original packaging unused within its return window for a full refund. - Page 8 USER MANUAL Do not place the camera loose on top of the dashboard or in-front of the air bags. Do not mount the camera where it can be a distraction if it became loose and fall off the windshield while driving. Do not expose this device to an excessive heat, dust or use any chemical substance or cleaning solvent to clean this device.
-
Page 9: Getting Started
Make sure to always keep the camera plugged into the power during its operation as ROVE R3 uses Supercapacitor (NOT an internal battery) You can plug the camera into your home’s 110V outlet during set up. For the power you can use your cellphone’s USB charger and included USB Type-C... - Page 10 Page 27) ROVE R3 Car dash cam is programmed to turn ON and START RECORDING automatically when it receives power, and STOPS RECORDING and turns OFF automatically when power gets disconnected within 1-2 seconds.
- Page 11 APP for iOS/Android. (See Page 29) RESET: There is no reset button for ROVE R3. If your dash cam ever get stuck on any screen or does not respond for any reason, then simply un-plug & re-plug the power cable to reset the dash cam.
-
Page 12: Camera Specifications
USER MANUAL CAMERA SPECIFICATIONS Chipset / Sensor HiSilicon Hi3559V200 / OmniVision IS05A10 5M CMOS Sensor (front camera) and SONY iMX307 Starvis 2M CMOS Sensor (cabin and rear camera) LCD Screen 3" IPS Touchscreen LCD Screen 640x360 Lens 150° front, 140° cabin, and rear. Front + Cabin + Rear Video Resolution 1440P + 1080P + 1080P 30FPS (Default) - Page 13 Memory Card TF Card Class 10, U3 Speed, Max Support 256 GB G-Sensor Built-in 3-Axis Impact Accelerometer Gravitational Sensor to lock & protect current video. Anti Flicker 60 Hz, 50 Hz Voice Guidance Support Distortion Correction Support Digital Image Stabilization Built-In Loop Recording Support –...
-
Page 14: Package Contents
USER MANUAL PACKAGE CONTENTS ROVE R3 Primary Dash Cam (Front & Cabin) 12 FT Type-C USB Power Cable Windshield 3M Sticky Mount 4.8 AMP Dual USB FAST Car Charger (For Primary Dash Cam) ROVE R3 Rear Dash Cam 6M Type-C USB Rear camera Cable... -
Page 15: Unit Structure Appearance & Buttons
UNIT STRUCTURE APPEARANCE & BUTTON Light Sensor for IR LEDs Serial Number Sticky Mount Label Rear Cam Power/Data Touchscreen WiFi on/off LED Power/Recording Status LED 4-Hidden IR Leds Cabin Camera Lens Multifunction Power On/Off Button USB C Power Only Micro-SD Card Slot (Class 10 U3 Speed Only, Max 256 GB) Speaker Front Camera... -
Page 16: Installation
Make sure to format the memory card before first time use. First, turn OFF the car's engine. Place the sticky mount on your car's windshield. Most people installed their ROVE R3 next to the rearview mirror and opposite side from the driver. NOTE We strongly suggest that you use the included electrostatic film... - Page 17 Connect the 12FT USB Type-C Power Cable for front camera into the sticky windshield mount. Use the included wire trim tool and run the cable along the edge of the windshield, tucking it away in the seams and extend it to the USB port of the car chager.
- Page 18 USER MANUAL Plug in the included ROVE's USB car charger into your car's cigarette lighter socket. 12FT Charging Cable Car Cigarette ROVE R3 Car Cigarette Lighter Socket Lighter Plug Dash Cam Wiring at a glance Install the rear camera at the rear window.
- Page 19 Plug the rear camera's cable into the front camera's rear connecting port. Adjust the lens angle of the front, cabin, and rear cameras accordingly. Start the car’s engine and check if the dash cams are working correctly. CAUTION Make sure to remove the Plastic Lens Screen Protector from the lens before recording videos.
-
Page 20: Turning On/Off Your Camera
TURNING ON/OFF YOUR CAMERA Auto Power ON/OFF Auto Power ON: ROVE R3 Dash Cam is designed to • turn ON and start recording automatically when it receives power. i.e., when the car engine is started. - Page 21 To Remedy this situation, you can do one of the two option. Hardwire your dash cam to your car’s fuse box with ROVE’S 3-Lead Auto Trigger Hardwire Kit. Visit “www.rovedashcam.com” to purchase one separately.
-
Page 22: About Supercapacitor
Li-ion batteries (i.e., ROVE R2-4K) or built-in Supercapacitor (i.e., ROVE R1 & R3 model) to save that last video file safely before shutting off the dash cam, in case if the power gets disconnected due to accident and also during daily turning off your vehicle. - Page 23 • about 2 seconds. WHY SUPERCAPACITOR? ROVE R3 dash cam uses a supercapacitor, making it a unique, reliable dash cam on power consumption and safety. Moreover, it is more resistant to heat, unlike batteries, and it extends the overall product life span of...
-
Page 24: Home Screen
USER MANUAL HOME SCREEN Exposure Gsensor IR LED Parking Mode Loop Recording Video Time lapse Video Memory Card Recording Started WiFi Recording Status Record Audio Video Mode Cabin Camera View Rear Camera View Settings Playback Folder Emergency Lock Video WiFi on/off Button Back To Home Screen WiFi Status LED Recording Status LED... -
Page 25: Led Status Light Indicator
LED STATUS LIGHT INDICATOR SOLID RED LED - WiFi is turned ON NO RED LED - WiFi is OFF SOLID Blue LED - Camera is ON but NOT Recording Blinking Blue LED - Camera is ON and Recording DIFFERENT SCENARIOS When Camera Is Plugged Into The POWER Camera is ON, (Video NOT recording) Solid... -
Page 26: Inserting/ Removing A Micro Sd Card
Recording after few seconds. Then It is the issue of the MEMORY CARD. (NOT THE CAMERA ISSUE) - Please Contact US. ROVE R3 Dash Camera is High Bit-Rate UHD Video recording device. Which requires High Speed Rating SPECIFIC Micro-SD Cards. -
Page 27: Formatting Memory Card
FORMATTING MEMORY CARD Press anywhere on the LCD screen of the camera to access the Menu Settings Select the gear icon on the Menu. Now, you will see the Back, Video Settings, and System Settings menu on the left side of the screen. Please select the System Settings (gear icon) to go to the camera's System Settings. -
Page 28: Time-Zone Setting
USER MANUAL TIME-ZONE SETTING: To set the date & time, choose one of the following options below: You can choose date and time of your choice manually, go to System Settings > Date/Time and select the date and time of your choice. -
Page 29: Using Wifi Feature
It is NOT a cloud or an IP camera and it is NOT meant to do that. You can get live video and footage on ROVE R3’s APP as long as you stay within the 10M range from the dash cam. - Page 30 PLEASE NOTE ROVE R3's WiFi Connection paring does NOT broadcast the internet. The WiFi Connection to ROVE R3 is meant to transfer the data between your phone and the ROVE R3 dash cam.
- Page 31 - You will only need to do this once. You should stay logged in your ROVE account mostly, unless you get logged out. If you ever need to sign back in to ROVE account again, then you will need to be connected with the internet first, then login to your account...
-
Page 32: Connecting Rove R3 Dash Cam With Smart Phone
You will see a solid Red LED Light on the camera indicating that the WiFi is ON. CONNECT WiFi: Now Simply join the ROVE R3 WiFi by going into your iPhone or Android phone’s Settings > WiFi > ROVE R3 WiFi. Then Enter the default password: 12345678. Then JOIN the network. - Page 33 For Android phones: There is one extra step you will have to take for the first time. Once you connect to ROVE R3 WiFi, it will say “No Internet”. Which is fine. Wait about 10-15 seconds until you see the below pop up or notification.
-
Page 34: Understanding 2 - Camera Modes
USER MANUAL UNDERSTANDING 2 – CAMERA MODES ROVE R3 has 2 different camera modes: VIDEO MODE PLAYBACK MODE 1. Video Mode (Default Mode) Video mode lets you record live videos and store them on the installed Micro SD card. While in the Video Mode: Touch the screen anywhere to access the on-screen Menu (Touch •... - Page 35 While in the Playback Mode: On top you will see two main menus. • Videos - this is where normal videos are stored. Events - this is where locked videos are stored. Under Videos, you will see 3 separate folders for the front, cabin, •...
-
Page 36: Playback Your Recorded Videos
USER MANUAL Playback Your Recorded Videos There are 3 different ways you can access your videos. A. Directly on the CAMERA by going to the Playback Mode Touch the screen anywhere to access the on-screen Menu. And then press the to go to the Playback Mode On top you will see two main menus. - Page 37 PC if you have a memory slot. 256 GB SD Card Micro-SD Card Adaptor Then find the added memory card drive “ROVE R3” on your computer and then simply double click on the video to play them.
- Page 38 USER MANUAL If default video player does not open VLC player by double clicking, then you can right click on each video file and then select OPEN WITH > VLC Media Player. (Make sure to download first. See pg. 39 You will also see a folder named "Protect"...
- Page 39 C. On Smart Phone To play on Smart Phone, simply turn on WiFi first from the camera, then connect the ROVE R3 WiFi by entering the default password “12 3 4 5 6 78 ” Once connected, simply open the correct ROVE APP for your...
- Page 40 USER MANUAL VIDEO SETTINGS Resolution Audio Recording Back Back Loop Recording Parking Mode Video Setting IR LED Video Setting Exposure G-Sensor System Setting System Setting License Plate Speed Unit Back Back Video Stamps Distortion Correction Video Setting Time Lapse Video Video Setting Live Speed &...
-
Page 41: Understanding Camera Settings
UNDERSTANDING CAMERA SETTINGS VIDEO SETTINGS VIDEO RESOLUTION Here you can set your preferred video resolution. Higher the video resolution, improved the video quality and larger the file sizes, hence it takes more storage space. LOOP RECORDING Loop recording feature will split video files into selected video length. - Page 42 USER MANUAL G-SENSOR G-Sensor is a 3-axis impact gravitational accelerometer which is designed to detect physical and gravitational forces on the camera. This allows the camera to LOCK the videos automatically when such impact is detected over the selected setting. While Video is Being Recorded: In the event when G-Sensor is triggered due to physical or gravitational impact force on the camera, the current loop cycle length of video file will be locked so...
- Page 43 PARKING MODE ROVE R3 Hardwire Kit installation is required for this feature. Purchase the HWK separately by visiting www.rovedashcam.com ROVE R3 dash cam does NOT have internal battery. Therefore for parking mode feature to work, the dash cam needs power when you are parked and away from your car.
- Page 44 USER MANUAL START recording for 1-min then lock that video file safely so it does NOT get deleted by loop cycle function & turns itself OFF automatically. NEW Feature: Now when you turn ON your car the next time, the camera will give you voice alert stating “Parking mode got activated while you were away”.
- Page 45 Driving Speed • • License Plate ROVE Logo NOTE By turning OFF Speed stamps the camera will NOT attach the speed embedded data with the video. So when you play your video on GPS Player, you will NOT see any speed associated with the video.
- Page 46 USER MANUAL CAUTION In the event of accident please make sure you retrieve your footage before using your camera again to prevent the loss of important video file due to the loop cycle function, in case the force was minor which did NOT trigger G-Sensor to lock video file automatically.
- Page 47 It is widely known as the fish-eye lens effect. ROVE R3’s advanced distortion correction algorithm is designed to reduce the “fish-eye” or “barrel” effect from the edges of the video.
-
Page 48: System Settings
WIFI WiFi will allow you to turn ON the WiFi broadcast from the dash cam so you can connect your dash cam with your smartphone using the ROVE APP to access videos, photos, and settings. • OFF (Default) ON - Once •... - Page 49 WIFI MODE WiFi Mode allows you to choose the wifi band. The 2.4 GHz band provides coverage at longer range but transmit data at a slower speed. The 5.0 GHz band provides less coverage but transmit data at a faster speeds. We suggest to use 5.0 GHz band unless your iOS/Android device is older version and can only support 2.4 GHz, which is very rare currently.
- Page 50 USER MANUAL DATE Here you can choose the date of your choice manually, along with date format menu settings. DATE SETTING Year Month Date 2020 2021 2022 Cancel Confirm DATE FORMAT This feature allows you to set the date format as per your choice that will be applied across the dash cam.
- Page 51 SCREEN BRIGHTNESS This menu will allow you to set the screen brightness. • High (Default) Medium • Low (Recommended to Prevent Heating) • NOTE We recommend that you set your brightness to either medium or low. Due to the touch screen, high brightness will make your camera HOT. If the temperature will go beyond limit, then the brightness will be automat- ically set to LOW and even turn OFF LCD until the device will cool down.
- Page 52 OFF. CAUTION ROVE R3 has an important failsafe voice feedback if camera is not recording the video when it is turned ON and sitting idle. Therefore the camera will remind you every 30 seconds that it is NOT recording the video. If you hear this feedback, then you should check and investigate to see why your camera is NOT recording the video.
- Page 53 GPS INFO This setting allows you to turn ON/OFF the built-in GPS of the dash cam. • ON (Default) • NOTE NO GPS related data will be used across the device. (I.e. Live Speed, Speed Stamp, GPS Coordinates) STORAGE SPACE It shows you the information about the memory card inserted into the camera.
- Page 54 For faster response text us TEXT US 1 (401) 484-ROVE(7683) LEGAL Copyright 2021, All rights are reserved by ROVE. FCC ID : 2A2OE-R3 This device complies with part 15 of the FCC rules. Operation is subject to the following two conditions.
-
Page 55: Gps Player Installation
GPS player Software Installation (PC/MAC Only) (Only suitable for the units with GPS function) To download FREE GPS Player, visit www.rovedashcam.com Why GPS Player? What are the features? Check G-Sensor Data Play back your recorded videos To see the Exact GPS route with the video on google maps Check Driving Speed Check Driving Direction (i.e. - Page 56 USER MANUAL Date & Time Shows Date & Time of video was recorded Past Viewed Files These are you previously viewed files. Click on to view them again. Driving Speed This is where your driving speed will be displayed. Playback Controls •...
-
Page 57: One Year Limited Warranty
ONE YEAR LIMITED WARRANTY We at would like to provide One (1) full year of limited warranty for your product from the date of purchase to be free from defects in materials and craftsmanship. IMPORTANT: Please save your warranty/serial number card as an evidence. - Page 58 USER MANUAL The replacement unit will be either new or refurbished based on the availability. We reserve the right to even upgrade you to the newest version be it similar or not if we have discontinued the current model. LIMITATIONS / DISCLAIMER OF WARRANTY / LIABILITY Company shall not be liable/responsible directly or indirectly for any claim for compensations, damages, any losses etc.
-
Page 59: Safety & Legal Aspects
Dash Cam must be placed at proper location so it does not obstruct your view while driving. • Do not use or manipulate any functions or any accessories of ROVE Dash Cam while driving. Distraction is a leading cause of accidents. -
Page 60: Troubleshooting Your Rove R3
Please trust us. We have sold thousands of ROVE Dash Camera’s and they do NOT lag, we stand by our prduct and we do extensive testing. - Page 61 My oldest video files are missing Your ROVE Dash Cam has Loop Cycle Recording. When it is set to either 1, 3, 5 or 10-mins, it will delete oldest files and record newer files over and over when the memory card is full.
- Page 62 USER MANUAL Camera showing "Memory Error" or "Please Insert Micro SD Card" even though memory card is already installed into the camera. Please make sure memory card is at least Class 10, U3 and purchased from trusted vendor such as Walmart, target, best buy, Ship & Sold by Amazon" etc. (there are many fake cards out there Online, remember if it's cheap, its fake.) Now go to camera's system settings and FORMAT your memory card.
-
Page 63: A Big Thank You
A BIG THANK YOU!! Thank you for purchasing your new Dash Cam. We hope you find your new dash cam useful and fun to use. If you are having difficulties setting it up, please email us at help@rovedashcam.com. 99% of all setup problems can easily be resolved and should be able to get you up and running in no time. - Page 64 1-401-484-7683 FCC ID: 2A2OE-R3 This device complies with part 15 of the FCC Rules. Operation is subject to the following two conditions. (1) This device may not cause harmful interference, and (2) this device must accept any interference received, including interference that may cause undesired operation.
Need help?
Do you have a question about the R3 and is the answer not in the manual?
Questions and answers
How do you set up compass?