Advertisement
Quick Links
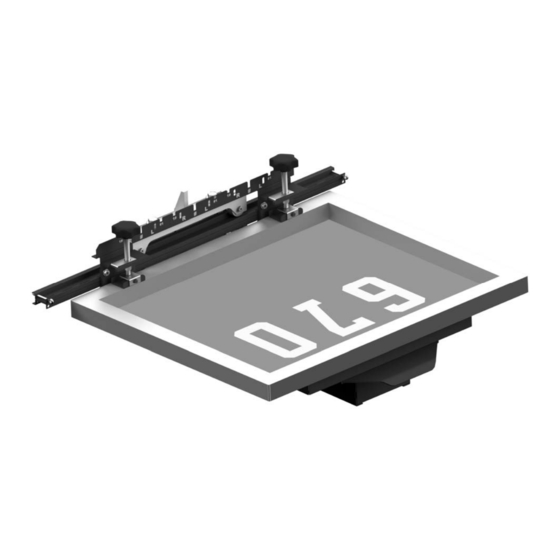
DIGIT-JR Numbering System
Contents
Models: DJR-8-U / DJR-8
Assembly and Operating Manual
Page#
2
2
Vastex E-mail assistance
3-6
Purchasing & Product Info:
sales@vastex.com
7
Electrical Support:
stech@vastex.com
Tech Support, Mechanical Setup, and Operation
techsupport@vastex.com
10
Screen Printing Issues & Support:
11
printech@vastex.com
12
Vastex International, Inc.
7 Emery Street
Bethlehem, Pa. 18015 USA
Phone# 610 625-2702 Fax# 610 625-2775
Web Site www.vastex.com
Doc # 01-19-001
Advertisement

Related Manuals for VASTEX DJR-8-U


Summary of Contents for VASTEX DJR-8-U
-
Page 1: Table Of Contents
Doc # 01-19-001 DIGIT-JR Numbering System Models: DJR-8-U / DJR-8 Assembly and Operating Manual Contents Page# Introduction Component ID Vastex E-mail assistance Attachment Assembly/Installation Purchasing & Product Info: sales@vastex.com Site & Detent Rail Installation Electrical Support: stech@vastex.com... -
Page 2: Introduction
11 lbs each. It must also be strong enough to hold the screen level when slid to the end printing positions. Additional springs or shocks may be required for your press to hold this attachment. Vastex is not responsible for damages incurred while trying to retrofit our DIGIT-JR to your press. -
Page 3: Attachment Assembly/Installation
1. Use Upper Square cutouts. Flag is pointing up for reference. -Tighten Well using 1/2” or 12mm wrench Roller Assembly -For Vastex V-100 Press Manufactured Before 10/1/2018 Thumb Screw Optional Pitch adjustment (standard after Slide Bracket 10/1/2018) should be used on V-100 presses. - Page 4 Attachment Installation (V-1000) 1) Remove Stop bar and allow printhead to raise vertical. 2) Remove springs and slide printhead pin out of slot. 3) Set Printhead to the side, springs and stop bar will be used for Digit-JR installation. Remove Spring Remove Stop Bar Remove Spring 4) Install V1-EX-100 arm with the springs and stop bar removed in...
- Page 5 Attachment Installation (Clamp In) 1) Universal Clamp Assembly must be attached to each Roller Assembly 2) Attach Bottom Channel to roller assembly using (3)10-32 button head bolts and (3)10-32 square nuts. Tighten well with 1/8” Allen wrench. Note orientation below. 3) Attach Top Channel to Roller Assembly using (3)10-32 button head bolts and (3) 10-32 Serrated Nuts.
- Page 6 Clamping Assembly Installation 1) Attach Screen Clamps and Clamp Carriers to Clamping Rail using (5) 10-32 x 1/2” button head bolts and (5) 10-32 Serrated nuts for each Screen Clamp -Tighten well with 1/8” allen wrench and 3/8” open end. Take note of the hardware orientation.
-
Page 7: Site & Detent Rail Installation
Site Rail Installation The Site Rail is a visual aid for selecting the desired print location of the numbers. Note 1) Loosen the two phillips head screws circled in the picture below. The Site and Detent Rails can be installed 2) Slide the Site Rail into the slots above the clamps while the numbering attachment is on the Be sure to install the correct Site and Detent Rails to match the... -
Page 8: Site Rail And Number Alignment Overview
Site Rail and Number Alignment Overview Your Digit-JR attachments are made up of 4 individual attachments and screens. 1 and 0 are present twice in the system. This enables the user to switch screens less in production. All site and detent rails of each size are the same. - Page 9 Alignment Instructions & Tips To align your DiGiT Numbering System, please photocopy the Alignment Guide (AG) which is the back page of this manual. This page will aid you in aligning your screens. 1) Photocopy (full size) back 2) Position and attach the page of DiGiT Manual.
-
Page 10: Operating Instructions
When the screen is in the print screen locks fully into the Detent Rail. position, the detent will engage into the roller 5) Install (optional) Vastex Squeegee Rest onto bearing. A properly set off contact is required for screen. -
Page 11: Adjustments
Adjustments Assembly is too tight or too loose when sliding left to right? -Tighten or Loosen Vertical Adjustment bolt and nut. Loosen if slide is too tight, Tighten if slide is too loose. Screen tilted down too much in print position? -Washer(s) must be added behind the UPPER wheel.
Need help?
Do you have a question about the DJR-8-U and is the answer not in the manual?
Questions and answers