VASTEX V-1000 Assembly And Operation Manual
Hide thumbs
Also See for V-1000:
- Installation and operating insctructions (2 pages) ,
- Assembly and operation manual (20 pages)
Advertisement
Table of Contents
- 1 Table of Contents
- 2 Introduction / Safety / Features
- 3 Tools Required
- 4 Contents of Boxes
- 5 Printer Overall View
- 6 Component Identification / Print Head
- 7 Assembly Instructions
- 8 Wheel Lock Housing Checking Level
- 9 Pallet Assembly
- 10 Pallet Leveling
- 11 Print Head Leveling
- 12 Lubrication / Maintenance
- 13 Warranty / Terms & Conditions
- Download this manual
20____
Year of Manufacture:
This manual contains the following documents:
Serial Num-
VTX
(Please log your machine's serial number and date of purchase for future reference.)
V-1000 Printer
Assembly and Operations Manual
Floor and Tabletop Models
Date:____
Vastex International, Inc.
1032 N. Irving St.
Allentown, Pa. 18109 USA
Phone# 610 434-6004 Fax# 610 434-6607
Pg. 2-3
Web Site www.vastex.com
Pg. 4
Authorized Representative in Europe:
Certification Experts BV
Pg. 5
Nieuwstad 100 1381 CE Weesp,
The Netherlands
Pg. 6
Tel : + 31 (0) 294 - 48 33 55
Fax : + 31 (0) 294 - 41 46 87
Pg. 7-11
Vastex E-mail assistance
Pg. 9
Purchasing & Product Info:
Pg. 12-13
sales@vastex.com
Electrical Support:
Pg. 14
stech@vastex.com
Tech Support, Mechanical Setup, and Operation:
Pg. 15
techsupport@vastex.com
Pg. 16
Screen Printing Issues & Support:
printech@vastex.com
Pg. 17
/
/
____
Doc # 01-08-042E
Original Instructions
Tabletop Press shown on
Utility Cart, sold separately
Advertisement
Table of Contents

Subscribe to Our Youtube Channel
Related Manuals for VASTEX V-1000


Summary of Contents for VASTEX V-1000
-
Page 1: Table Of Contents
20____ Doc # 01-08-042E Year of Manufacture: Original Instructions V-1000 Printer Assembly and Operations Manual Floor and Tabletop Models Tabletop Press shown on Utility Cart, sold separately Vastex International, Inc. This manual contains the following documents: 1032 N. Irving St. -
Page 2: Introduction / Safety / Features
Thank you for purchasing your printing equipment form Vastex International Inc. Vastex has been designing and building printing equipment since 1960. We have knowledge and experience, and are proud to supply the printing industry with quality equipment at an affordable price. - Page 3 In the unlikely event that a part of your press breaks, or if your press does not seem to be operating normally and the instructions in this manual do not correct the issue, do not continue using your press. Contact Vastex for assistance in repairing your press.
-
Page 4: Contents Of Boxes
Contents of Boxes Your Printer has been packaged in several pre marked boxes. The printer you ordered may consist of several combinations of the following boxes. Center Hub Rotor Detent Assembly Tabletop Printer Assembly Hardware (2) Platen Arms (2) Knobs (2) Pallets (4) Bolts (4) Legs... -
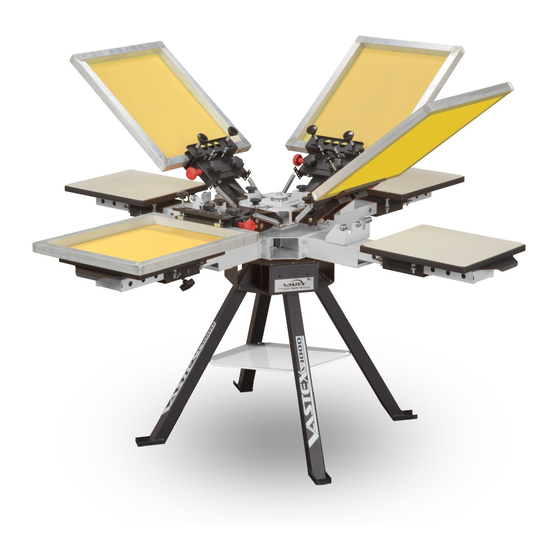
Page 5: Printer Overall View
Printer Overall View V-1000 4 Station 6 Color Press Model#: V1-46 Print Head Color-Hub V1-PH 4 color: V1C-HUB4 Wheel Lock Housing 6 color: V1C-HUB6 14-03-010-0 15” x 17” Pallet Bearings w/ Pallet arm (5)04-04-019 V1P-1517 Rotor arm Detent Rail Rotor-Hub... -
Page 6: Component Identification / Print Head
Component Identification / Print Head Print Head Overview: The V-1000 Printers utilize floating print heads. When the print heads are lowered they lock into a Wheel Lock Housing. This effectively disengages the print head from the “C” hub and precisely aligns it to the pallet. -
Page 7: Assembly Instructions
Assembly Tabletop models skip to page 8. Leg (1of4) 1) Place box marked Center Hub Assembly in an open area of your shop floor. Remove top of box. Center Hub assembly can remain in the box while installing legs and optional service pan. - Page 8 Assembly cont’d 5) Install the Rotor Detent Assembly using three 1/4” x 3/4” bolts and serrated nuts. Tighten well using a 7/16” wrench. Install the assembly on any one of the four sides of the Base Hub. Once you have Rotor Arms installed, as described later in the manual, adjust the detent roller by loosening the lock nut with a 9/16”...
-
Page 9: Wheel Lock Housing Checking Level
Wheel Lock Housing Level Check Doc #:01-08-046 The following instructions will help determine if shimming the Wheel Lock Housings (WLH) is needed. A slight variation in level between housings is acceptable. See FIG A for allowable limits. IMPORTANT Checking Level Between Wheel Lock Housings (WLH) 1) Rotate the Rotor Arm until it is engaged in the detent roller. - Page 10 Assembly cont’d Next step is the installation of the Hinge, Extension Arm, and Print Head. There are two available Print Heads for the V-1000. Both are installed in the same manor, only differing in number of springs and a Kickstand. ...
- Page 11 Assembly cont’d Step 10 &11 for HD Print Head Only 10) If installing the springs for the DiGit Number System or side clamps with roller frames, use the upper and mid- dle spring mounting holes. Always hook springs from the outside in (pictured). Remove the upper spring from each side when using wood or aluminum screens.
-
Page 12: Pallet Assembly
1/4” wrench. Be careful not to over tighten or cross thread the screws! Note: neck guide is needed if using Vastex Jacket Quick Stretch. Pallet Neck Guide 14) Place one washer onto each 3/8 x 2-1/2”lg. flanged hex bolt. - Page 13 Assembly cont’d Corner Tab Corner Nut 16) Install Corner Tab and Corner Nut as shown on right. Then, install Clip, Hairpin to secure Corner Tab Clip, Hairpin in place. Pallet Knob 17) Install Pallet Knob. Leave loose. 18) Install Pallet and Arm onto Rotor Arm. Re- peat these steps for each Pallet needing to be assembled.
-
Page 14: Pallet Leveling
Pallet Leveling Note: Level only one pallet with the following procedure and mark this pallet as #1. Then level all print heads to this pallet. See Print Head Leveling for instructions. 1) First, tighten the pallet arm locking knob. Take a reading from a level placed on the bottom of the pallet arm. -
Page 15: Print Head Leveling
21 and 22, and flush with the edge of this screen. Maintain a consistent gap between screen and pallets. Align side of screen with side of pallet Your Vastex Printer is now ready for printing shirts. Pg.15... -
Page 16: Lubrication / Maintenance
Lubrication / Maintenance **V-1000 Press comes with a small bottle of oil, and a tube of grease to maintain your press properly. Please follow all lubrication instructions to prevent premature wear ** Lubrication Main center column bearings can be lubricated with a light oil. Apply oil at the edge of the bearing plate, located at the top center of the printer. -
Page 17: Warranty / Terms & Conditions
The defective part or parts will be repaired or replaced at the discretion of Vastex Internation- al, Inc. If the equipment in question is less than one (1) year old, it will be shipped to the customer at no charge, with an RGA issued by Vastex for the defective part. The defec- tive part must be shipped back to Vastex freight prepaid within 30 days or the account will be billed.
Need help?
Do you have a question about the V-1000 and is the answer not in the manual?
Questions and answers