
Related Manuals for BK Precision 313C


Summary of Contents for BK Precision 313C
- Page 1 BK PRECISION 313C 600A TRMS AC / DC INCE 600A TRMS AC / DC CLAMP METER M BK313C F00...
-
Page 2: Table Of Contents
BK313C SOMMAIRE 1. Prescriptions de sécurité............. 2 Conditions d’utilisation ............2 Symboles utilisés..............2 2. Spécifications générales ............. 2 3. Spécifications électriques ........... 3 3-1 Tensions continues ............3 3-2 Tensions continues (Mode Peak-hold) ......3 3-3 Tensions alternatives ............ 3 3-4 Tensions alternatives (Mode Peak-hold) ...... -
Page 3: Prescriptions De Sécurité
BK313C Prescriptions de sécurité Ne pas utiliser votre appareil si celui-ci semble endommagé ou si les cordons sont en mauvais état. Bien vérifier la position du commutateur avant d’effectuer une mesure. Ne jamais effectuer des mesures de résistance ou continuité sur des dispositifs sous tension. -
Page 4: Spécifications Électriques
BK313C Dimensions: 210 x 62 x 36 mm Masse: 270g (avec piles) Livré avec: housse, piles, 1 jeu de cordons de sécurité, manuel. 3. Spécifications électriques La précision est donnée en ± [% de la lecture + nombre de digits (dgts)] dans le domaine de référence (23°C ±... -
Page 5: Courants Continus
BK313C 3-5 Courants continus Gamme Résolution Précision 60 A 0.01 A 2% + 5dgts 600 A 0.1 A Protection : 600A 3-6 Courants continus (Mode Peak-hold) Gamme Résolution Précision 600 A 0.1 A 2.5% + 8dgts Protection : 600A 3-7 Courants alternatifs Gamme Résolution Précision... -
Page 6: Description De L'appareil
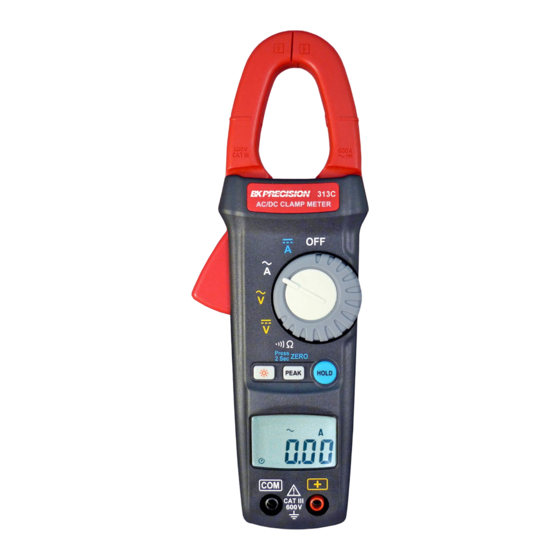
BK313C 4. Description de l’appareil 4-1 Afficheur Indication d’arrêt automatique Polarité (signe moins) Indication piles faibles Tension/courant alternatif Tension/courant continu Mesure de courant Mesure de tension Fonction Hold Fonction Peak-Hold Test de continuité sonore Mesure de résistance Fonction Zéro (courant DC) -
Page 7: Panneau Avant Et Arriere
BK313C 4-2 Panneau avant et arrière ○, Mâchoires (système de mesure de courant) ○, Gâchette ○, Commutateur rotatif ○, Touche Peak ○, Touche du rétroéclairage ○, Touche fonction Hold ○, Afficheur LCD ○, Borne COM (point froid) ○, Borne + (point chaud) ○, Compartiment piles... -
Page 8: Utilisation Des Fonctions
BK313C 5. Utilisation des fonctions 5-1 Fonction HOLD Un appui sur la touche "HOLD" permet de figer l’affichage. Un nouvel appui permet de quitter la fonction. 5-2 Fonction PEAK-HOLD En appuyant sur la touche "PEAK", le symbole "PEAK" est affiché. La valeur crête des mesures restera affichée jusqu’à... -
Page 9: Mesures De Tension Dc
BK313C 6-2 Mesures de tension DC: Positionner le commutateur sur Brancher les cordons sur les bornes “+” et “COM”. AC/DC CLAMP METER Pour mesurer, connecter toucher les conducteurs à l’aide des pointes de touche. Lire la valeur sur le LCD. CAT I I 600V 6-3 Mesures de courant AC:... -
Page 10: Mesures De Courant Dc
BK313C 6-4 Mesures de courant DC : Positionner le commutateur sur Utilisez la fonction " " pour annuler un offset éventuel. Enserrer le conducteur à mesurer dans les mâchoires de la pince. Fermer les mâchoires et lire la valeur sur le LCD. Note:... -
Page 11: Mesure De Resistance
BK313C 6-5 Mesure de résistance Positionner le commutateur sur Brancher les cordons sur les bornes “+” et “COM”. AC/DC CLAMP METER Toucher la résistance à mesurer avec les pointes de touche Lire la valeur sur le LCD. Note: Assurez-vous de toujours mesurer des composants hors tension et de décharger les capacités éventuelles. -
Page 12: Remplacement Des Piles
BK313C 7. Remplacement des piles Lorsque le symbole indiquant des piles faible s’affiche, il faut remplacer les piles. Arrêter votre pince en mettant le commutateur sur “OFF” et débranchez les cordons de mesure. Retournez et ouvrez le compartiment piles avec un tournevis adapté. Remplacez les 2 piles par des piles 1.5V (AAA / LR03) en respectant la polarité. -
Page 13: Maintenance
BK313C 8. Maintenance DANGER! Ne jamais tenter de faire des mesures si le capot du compartiment piles est ouvert. Toujours débrancher les cordons avant d’ouvrir le compartiment. ATTENTION! Ne jamais tenter de toucher les circuits internes de votre appareil. Vous risquez endommager avec... - Page 14 BK313C TABLE OF CONTENTS SAFETY INFORMATION ............1 2. GENERAL SPECIFICATION ............1 3. ELECTRICAL SPECIFICATION ........... 2 3-1 D ............... 2 IRECT OLTAGE 3-3 A .............. 2 LTERNATING OLTAGE 3-4 A ) ........2 LTERNATING OLTAGE 3-5 D ............... 3 IRECT URRENT 3-6 D...
-
Page 15: Safety Information
BK313C SAFETY INFORMATION Do not operate the tester if the body of meter or the test lead look broken. Check the main function dial and make sure it is at the correct position before each measurement. Do not perform resistance and continuity test on a live power system. Do not apply voltage between the test terminals and test terminal to ground that exceed the maximum limit record in this manual. -
Page 16: Electrical Specification
BK313C Power Source: 1.5V size AAA battery X 2 Typical battery Life: 50 hours (without buzzer, backlight function) Auto Power Off: If there is no key or dial operation for 30 minutes, the meter will power itself off to save battery consumption. This function can be disabled by press and hold the “... -
Page 17: Direct Current
BK313C 3-5 Direct Current Range Resolution Accuracy 60 A 0.01 A 2% + 5dgts 600 A 0.1 A 3-6 Direct Current ( Peak Model ) Range Resolution Accuracy 600 A 0.1 A 2.5% + 8dgts 3-7 Alternating Current Range Resolution Accuracy 2.0% ±... -
Page 18: Description Of The Instrument
BK313C DESCRIPTION OF THE INSTRUMENT Description Of The Display Auto power off indication Polarity indication Low battery indication Alternative source indication Direct source indication Current measurement indication Voltage measurement indication Data hold indication Peak data indication Continuity test indication Resistance measurement indication Zero measurement indication... -
Page 19: Description Of Front And Rear
BK313C Description Of Front And Rear ○, Current Sensing Clamp ○, Clamp opening handle ○, Function select dial ○, Peak button ○, Backlight button ○, Data hold button ○, LCD display ○, COM input terminal ○, Positive input termina ○, Battery cabinet... -
Page 20: Button Instruction
BK313C BUTTON INSTRUCTION 5-1 HOLD Function It is possible to freeze the value displayed by pressing on the "HOLD" button. To deactivate this function, press the "HOLD" button a second time. 5-2 PEAK Function If you press on the "PEAK" button , the display will show "PEAK" symbol. -
Page 21: Dc Voltage Measurement
BK313C DC Voltage Measurement: Switch the main function selector range. Connect red test lead to “ + ” terminal and black one to the AC/DC CLAMP METER “COM”terminal. Measure the voltage by touch the test lead tips to the test circuit where the value of voltage is needed. -
Page 22: Dc Current Measurement
BK313C 6-4 DC Current Measurement: Switch the main function selector to range. Open the clamp by pressing the jaw-opening handle and insert the cable to be measured into the jaw. Close the clamp and get the reading from the LCD panel. Note:... -
Page 23: Resistance Measurement
BK313C 6-5 Resistance Measurement Switch the main function to range. Connect red test lead to “+”terminal and black one to the "COM”terminal. AC/DC CLAMP METER Connect tip of the test leads to the points where the value of the resistance is needed. -
Page 24: Battery Changing
BK313C BATTERY CHANGING When the battery voltage drop below proper operation range the symbol will appear on the LCD display and the battery needs to be changed. Before changing the battery, switch the main dial to “OFF ”and disconnect test leads. Open the back cover by a screwdriver. -
Page 25: Maintenance
BK313C MAINTENANCE WARNING! Before open the meter, disconnect both test lead and never uses the meter before the cover is closed. CAUTION! To avoid contamination or static damage, do not touch the circuit board without proper static protection. 8-1 REMARK: ... - Page 26 BK313C SEFRAM 32, rue Edouard MARTEL BP 55 F42100 SAINT ETIENNE France Tél : 04.77.59.01.01 Fax : 04.77.57.23.23 Web : www.sefram.fr E-mail : sales@sefram.fr...
Need help?
Do you have a question about the 313C and is the answer not in the manual?
Questions and answers