Advertisement
Quick Links
IMPORTANT INSTRUCTIONS...
Important Instructions
When using electrical appliances, basic precautions should always be
followed to reduce the risk of fire, electric shock, and injury to persons,
including the following:
1.
Read all instructions before installing or using this appliance.
2.
This appliance is hot when in use; to avoid burns, do not let
bare skin touch hot surfaces; keep combustible materials
such as papers, clothes, bedding, etc. and curtains at least
1m from the heater.
3.
Extreme caution is necessary when the unit is used by or
near children or invalids and whenever it is left operating and
unattended.
4.
Do not use outdoors.
5.
Do not operate any heater after it malfunctions; disconnect at
service panel. Call a competent electrical technician to
investigate.
6.
Do not insert or allow foreign objects to enter the return or
discharge grilles as this may cause an electrical shock, fire or
damage to the appliance.
7.
To prevent possible fire, do not block return and discharge air
grilles in any manner.
8.
Do not use where flammable vapors or liquids are store.
9.
Use this appliance only as described in this manual. Any
other use not recommended by the manufacturer may cause
fire, electric shock or injury to persons and property.
WARNING... Risk of fire. Do not use as a
household or residential heater
Electrical
Model
Input (W)
JET 6
4965
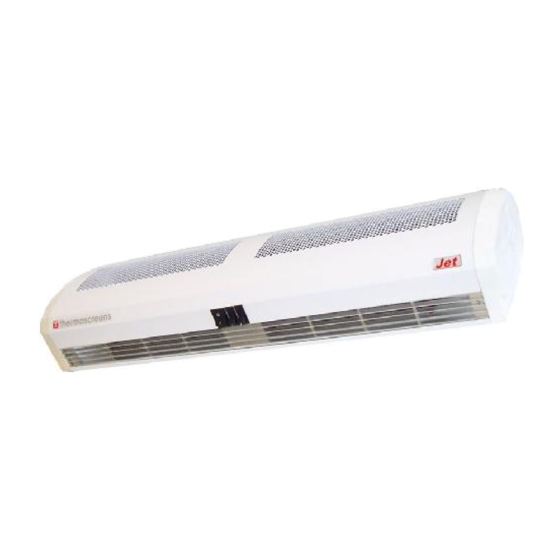
Figure 1: Jet 6 General Assembly Drawing
CONTENTS
Remove from carton and check contents include:
Thermoscreens Jet 6 Drive-Thru Air Curtain [DTAC] unit
Mounting bracket [MB] c/w fixing hardware
Cable gland
For warranty purposes please retain your receipt as proof of purchase.
4001360-2
Read all instructions before installing or using
... SAVE THESE INSTRUCTIONS
this heater
Heat
Weight
Output
(kg)
(kW)
5.5
6.0/3.0
Installation, Operation and
Maintenance Instructions
INSTALLATION
The DTAC is designed for surface mounting horizontally at a discharge
height level to the sliding window header. Multiple DTACs mounted
side by side may be used for wider openings. The DTAC must be
mounted directly to the MB. The DTAC must not be located
immediately below a socket outlet. DO NOT INSTALL BOTTOM OF
HEATER LESS THAN 550mm ABOVE PLATFORM.
Figure 2: Window Header Mounting Guide
Before fitting DTAC, locate mounting hardware as necessary taking into
account the window header design and unit weight (see Table 1). Using
the MB as a template, determine an optimum location for the DTAC,
place the MB on the target location, mark position of the fixing holes to
be drilled. Using suitable fixing hardware, install the MB as required into
position. Some internal header components may have to be moved
before any drilling is conducted; it may be necessary to drill up from the
header due to design configuration of the window clearance.
Figure 3: Mounting Bracket Alignment
Align and position mounting bracket into the two slots on the rear plate
of the DTAC (refer to Figure 3). Ensure the serrated washer, at each
end of the DTAC, is positioned between the mounting bracket and the
internal hanging bracket (see Figure 4). Tilt and point DTAC into the
preferred direction and firmly tighten both fixing screws. Using a
Philips No. 2 screwdriver the fixing screws are tightened via access
hole in each end cap.
Figure 4: Cross Sectional View of Mounting Bracket
ELECTRICAL CONNECTION
All electrical wiring and connections must be carried out by a competent
qualified electrician in accordance with the latest wiring and/or local
statutory regulations.
1
JET 6 DTAC
208V ~ 60Hz 25A
Advertisement

Subscribe to Our Youtube Channel
Related Manuals for Thermoscreens JET 6 DTAC


Summary of Contents for Thermoscreens JET 6 DTAC
- Page 1 Figure 1: Jet 6 General Assembly Drawing CONTENTS Remove from carton and check contents include: Thermoscreens Jet 6 Drive-Thru Air Curtain [DTAC] unit Figure 4: Cross Sectional View of Mounting Bracket Mounting bracket [MB] c/w fixing hardware ...
- Page 2 Live brown cable to terminal marked L or L1 electrician or Thermoscreens appointed technician. To ensure the Neutral blue cable to terminal marked N or L2 DTAC operates efficiently, the air inlet and outlet grilles, fan impellers, housings and motors must be kept free of dust and debris.
Need help?
Do you have a question about the JET 6 DTAC and is the answer not in the manual?
Questions and answers