Table of Contents
Advertisement
Quick Links
Advertisement
Table of Contents

Related Manuals for Ozone BV1


Summary of Contents for Ozone BV1
- Page 1 Pilots Manual EN...
-
Page 2: Table Of Contents
CONTENTS Thank You Warning Your BV1 Anatomy of the BV1 Inflatable Protection Speed System Reserve parachute installation Connection to the wing Fitting / Adjustments Features Use and Maintenance Materials Technical Specifications Ozone Quality Guarantee EN v1.0 August 2021... -
Page 3: Thank You
This is a great asset in the development of the Ozone range. We know that quality and value for money are essential considerations when choosing equipment, so to keep costs low and quality high we build all our wings and harnesses in our own production facility. During production all Ozone products undergo numerous rigorous quality control checks. This way we can guarantee that our equipment meets the same high standards that we expect ourselves. -
Page 4: Warning
WARNING • Paragliding is a potentially dangerous sport that can cause serious injury including bodily harm, paralysis and death. Flying an Ozone harness is undertaken with the full knowledge that paragliding involves such risks • As the owner of an Ozone harness you take exclusive responsibility for all risks associated with its use. Inappropriate use and or abuse of your equipment will increase these risks • Any liability claims resulting from use of this product towards the manufacturer, distributor or dealers are excluded • Be ready to continue your learning by attending advanced courses to follow the evolution of our sport, as techniques and materials keep improving • Use only certified paragliders, harnesses with protector and reserve parachutes that are free from modification, and use them only within their certified weight ranges. Please remember that flying outside of certified configurations may jeopardise any insurance (e.g. liability, life etc) you have. It is your responsibility as the pilot to verify your insurance cover • Make sure you complete a thorough daily and pre-flight inspection of all of your equipment. Never attempt flying with unsuitable or damaged equipment • Always wear a helmet, gloves and boots • All pilots should have the appropriate level of license for their respective country and third party insurance. • Make sure that you are physically and mentally healthy before flying • Choose the correct wing, harness and conditions for your level of experience • Pay special attention to the terrain you will be flying and the weather conditions before you launch. If you are unsure do not fly, and always add a large safety margin to all your decisions • NEVER fly in rain, snow, strong wind, turbulent weather conditions or clouds • Respect the environment and look after your flying sites • If you need to dispose the harness, do so in an environmentally responsible manner. Do not dispose of it with the normal household waste... -
Page 5: Your Bv1
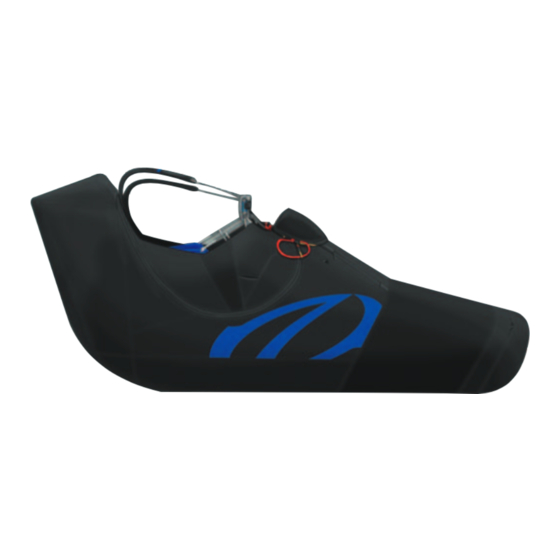
YOUR BV1 The BV1 is a lightweight solo pod harness, designed specifically for vol biv missions but is equally suited for everyday flying. It features an incredible balance of comfort, storage space and weight, made possible by highly evolved construction techniques and modern materials. Nitinol rods assist with the ergonomic back support, and an algorithmically calculated Dyneema thread load- bearing seam pattern carries the pilot load. Well-proven lightweight fabrics are used throughout the interior/exterior surfaces and the storage compartments. Ozone Team Pilot and vol-biv record holder, Antoine Girard, was heavily involved in the planning and design of this harness, which he tested in unforgiving conditions during development. Durability was a key concern and the BV1 is a strong and reliable tool which lacks nothing you’ll need for deep vol-biv excursions. With excellent back and lumbar support, and judiciously reinforced areas of wear, the BV1 is as comfortable as it is tough. In flight, it is stable and reassuring in active air, with handling and precision tuned for piloting advanced wings. The BV1 features an under-seat compartment, back pocket with two access zips for storage and hydration systems, large side pocket (big enough for camera and pole extension), top pod-pocket and under-reserve pocket. The ample storage and solid design... -
Page 6: Anatomy Of The Bv1
ANATOMY OF THE BV1 Shoulder Velcro Shoulder straps adjustments Main riser hang points Leg/chest strap Reserve handle Solar panel attachment loops Reserve bridles Speed system... - Page 7 ANATOMY OF THE BV1 Hydration system Reserve parachute container Lumber adjustment Top pod pocket Rear storage pocket Side pocket Underseat protection/ Lower storage pocket...
-
Page 8: Inflatable Protection
INFLATABLE PROTECTION... - Page 9 UNdEr-sEat PrOtECtION rEMOval/INstallatION The BV1 features a certified EN/LTF/CE inflatable under seat protector. Cleverly designed, it offers excellent impact absorption properties despite the low weight and volume. The protection is in place upon delivery, but requires inflating before use. Should you need to remove it or replace it please follow the instructions. The protection is located in the pocket found under the seat, to remove the protection from the harness first you need to remove the stopper from the inflation pipe found in the main rear pocket. Unlock the stopper and slide it off the pipe. Open the pocket found under the seat and with the protection deflated, remove it whilst feeding the pipe through the hole from the rear compartment.
- Page 10 UNdEr-sEat PrOtECtION INFlatION The protection is inflated by hand using trapped air inside the supplied special stuff sack. To inflate the protection open the rear pocket to access the inflation pipe. Make sure the stopper is in the open position and attach the inflation pipe to the outlet found on the stuff sack.
- Page 11 Close off the top of the stuff sac by rolling it tightly in the hands to trap the air inside and push/ squeeze so the air is transferred into the protection. The process may need to be repeated until the protection is fully inflated. Once the protection is fully inflated - to the point at which you cannot easily add any more air using the stuff sack - close the inflation pipe stopper fully. Ensure the underseat pocket that contains the protection is fully and completely closed with the zip located neatly in the red retainer. This is an essential part of the safety and impact absorption of the harness. Failure to do so will make the protection less effective. IMPORTANT: Ensure the inflation pipe stopper and the underseat zip are fully closed. Failure to do so will result in the protection not functioning correctly.
-
Page 12: Speed System
SPEED SYSTEM... - Page 13 sPEEd systEM A lightweight integrated speed-line is included as standard. The speed system is already installed by the factory but if you ever need to replace it, ensure it is routed as follows. Route the free end of one of the lines down through the small reinforced slit found on the side panel of the harness. Pass the line through the Ronstan pulley and then the ring ensuring the pulley is not twisted. Ensure that the lines run cleanly through the pulleys and pass on the inside of all structural webbing straps. Double-check the lines have not inadvertently wrapped around any of the structural webbing straps before attaching them to the bar. The bar can then be joined with the bungees attached to the footplate Once in the air, and when it is safe to do so, check that you can place your foot on the bar easily and that the system operates smoothly all the way to full speed. IMPORTANT: The speed bar lines must be of equal length, ensure they are not too short as this will inadvertently activate the speed system when under tension in the air.
-
Page 14: Reserve Parachute Installation
RESERVE PARACHUTE INSTALLATION... - Page 15 Please note, the parachute handle is on the right hand side of the container and should be thrown with the right hand. The BV1 does not have a dedicated reserve parachute deployment bag, use the one supplied with your parachute. The parachute should be packed in such a way that it matches the shape and dimension of the front container. Attach the deployment handle...
- Page 16 Ensure the harness bridle is correctly routed into the reserve compartment as shown. Please note, the BV1 is only suitable for reserve parachutes with a short bridle. Attach the harness bridles to the parachute’s bridle using a suitable connector and secure the ends with elastics (not supplied). Alternatively, the parachute bridle can be attached directly to the harness bridles with a Larks foot to save weight. Ensure the parachute container zip is positioned fully to the right hand side - where the bridle enters the container. Feed the handle through the gap and place the deployment bag neatly within the container. The parachute lines...
- Page 17 Now the 3 yellow pins need to be threaded through their respective loops. Start with the pin that feeds towards the rear of the harness. Each pin must go through the loops in the correct order, with the red loop first. Once the red loop and 3 smaller black loops have been threaded, place the pin in the end retainer loop. Use the same procedure for the pin that faces towards the front of the harness. Once the first couple of loops are done, close the zip slightly to make it easier to thread through the remaining loops.
- Page 18 The third pin follows the direction of the harness bridles. After the first couple of loops are in place pull the zip so that the remaining loops can be threaded. Before placing the pin in the end pocket, position the handle under the pin to keep it neatly in place. Finally the pin can be placed in the end pocket. The parachute container and bridle compartment zips can now be closed fully. Make sure the zips are fully closed and located in their respective end compartments. Failure to do so will result in inadvertent un-zipping.
-
Page 19: Connection To The Wing
CONNECTION TO THE WING Connect the BV1 to the risers of the wing using the integrated Link Lite connectors at the main hang points as follows: Loop B Tab B Loop A Rubber bands IMPORTANT: There Elastic band are no other suitable attachment points to Place risers on Link Lite Pass loop A through loop B attach the risers to the harness. Pass Tab through loop A Secure Tab B with rubber bands Secure Tab B with elastic band... -
Page 20: Fitting / Adjustments
FITTING / ADJUSTMENTS Before your first flight, we recommend to suspend the harness from a suitably strong point to check that it fits you correctly and to become familiar with the features and adjustments. You can set the shoulder adjustment-straps to find the best fit, and adjust the lumber support so that they leave you in a comfortably reclined position. To put the harness on first place the shoulder straps over your shoulders. The leg straps fasten with the T lock buckles, coloured coded for each side. Slip the T lock completely through the loop and secure in place with the elastic loop. IMPORTANT: Ensure the elastic loop is correctly in place. Failure to do so could result in the leg straps coming undone. - Page 21 The shoulder retainer strap can be done up by passing the T lock through the loop. The pod closing system should now be connected. First attach the female buckle of the right hand side to the male buckle located on the pod of the left hand side (blue). Pass the red loop found on the side of the parachute container through the metal ring of the left hand side and secure with the anti forget T lock buckle (red). The anti forget line should be routed over the top of the pod / structire as shown.
- Page 22 shOUldEr straPs The length of the Shoulder straps can be modified using the splice adjustments. Adjust the shoulders whilst standing up with the harness on so that they are comfortably snug. Whilst suspended in the seated position ensure the straps are comfortable and supportive. To tighten the shoulder straps pull the grey cord from the knot towards the front of the harness. To loosen, pull the loop in the same...
- Page 23 lEg sUPPOrt aNglE / FINE tUNINg OF thE POd Minor adjustments to the angle and overall length of the pod can be made using the splice adjustments. The angle of the foot plate can also be changed by moving the relative positions of the splices.
-
Page 24: Features
FEATURES MassIvE stOragE sPaCE The BV1 features an under-seat compartment, back pocket with two access zips for storage and hydration systems, large side pocket (big enough for camera and pole extension), pod-pocket and under-reserve pocket. - Page 25 The BV1 includes a hydration access system with an integrated pocket in the main rear pocket, an opening on the left hand side and shoulder anchor points for your hydration tube.
- Page 26 PaNEl lOOPs The BV1 features loops to attach a solar panel (not included). vElCrO shOUldEr MOUNt The right shoulder strap has a Velcro mounting point for a small vario, tracking device or a radio.
-
Page 27: Use And Maintenance
It is recommended to immediately undo all straps and swim away from the harness taking care to not become entangled within the lines. tOWINg The BV1 is not suitable for towing. ExtErNal ParaChUtE CONtaINEr An additional parachute container cannot be added to the BV1. - Page 28 UNdEr-sEat PrOtECtION rEMOval/INstallatION ParaChUtE dEPlOyMENt If you are in the unfortunate situation of needing to throw your reserve, do so with conviction: Look; Reach; Pull; Throw • Look at the handle, grab it and pull so the retaining pins are released. The parachute can only be thrown with the right hand • Pull out the deployment bag, it is best to pull towards the outside so that the parachute extracts sideways from the pocket, pulling the handle upwards may not allow the parachute to release properly. Know your equipment and adapt your technique accordingly • Throw the parachute away from you as hard as you can into clear space, not towards your wing. It is important at this stage to remember to LET GO of the handle. Aim to throw with the direction of airflow to aid a fast opening and against the direction of rotation • If after throwing the parachute does not deploy (possible in low energy emergencies e.g. parachutal stall), grab the reserve bridle and give it a strong pull. This will help encourage the parachute to open faster • As the parachute deploys, the next stage is to concentrate on disabling the paraglider. There are several ways to do this – B line stall; rear riser stall; gathering the canopy by working up the A lines until you have the material in your hands or using the brakes to stall the wing. The best technique depends entirely on the situation. The most important thing to remember is to completely disable the wing so that it does not act against the parachute and cause a down-plane. Whichever method you choose do so symmetrically, you do not want the paraglider to start rotating, this could cause the paraglider to fly into and effectively disable the parachute • Due to the position of the reserve bridle hang points on most harness, deploying the reserve parachute tends to automatically put you in to the PLF position (legs down), if you are not, do everything you can to get yourself into this position so you can absorb the landing impact with your legs • Always use a PLF when landing under emergency situations or under a rescue parachute...
- Page 29 CarE The harness will last you many flights and many years if looked after correctly. To keep your harness clean and airworthy, please note the following: • Avoid excessive exposure to UV, heat and humidity • Pack the harness dry and store in a cool dry place • Never drag your harness, especially when landing • Keep you harness clean of dirt and away from any oils or other corrosive substance • Use water and a cloth to clean INsPECtION For safety, routine inspection of all of your equipment is vitally important. Ozone recommends a service interval of 12 months in addition to the usual pre flight checks. For inspection, visually check the stitching, webbing and all structurally important areas. Pay particular attention to the webbing around the hang point area under the carabiner, as this is where abrasion is most likely. If you find any damage or if you are in any doubt make sure the harness checked by a professional. If using a reserve parachute, the system should be checked every 6 months and the parachute repacked according to the manufacturer’s recommendation. dIsPOsal When the harness comes to the end of its useful life, remove all the metal parts and dispose the rest in an environmentally friendly manner.
-
Page 30: Materials
MATERIALS MatErIals harness Outer fabric Dominico 145D, 70D, Lycra Main webbing Technisangle 7 / Torus Line Dyneema reserve parachute bridles Dyneema 6mm buckles T Lock toggles Carabiners Link Lites... -
Page 31: Technical Specifications
TECHNICAL SPECIFICATIONS Weight (kg) Recommended pilot height (cm) 155 - 170 170 -180 175 -185 185 -195 Weight includes : Back protection, Link Lite carabiners and rescue bridles. CErtIFICatION The BV1 is certified EN 1651:2017 and LTF with a maximum load of 120kgs. In addition, the inflatable under seat protection is certified to the CE standard by CRITT (France). -
Page 32: Ozone Quality Guarantee
OZONE QUALITY GUARANTEE At Ozone we take the quality of our products very seriously. Our harnesses are made to the highest standards in our own manufacturing facility. Every harness manufactured goes through a stringent series of quality control procedures and all the components used are traceable. We always welcome customer feedback and are committed to customer service. Ozone guarantees all of its products against manufacturer’s defects or faults. Ozone will repair or replace any defective product free of charge. Ozone and its distributors provide the highest quality service and repair, any damage to products due to wear and tear will be repaired at a reasonable charge. If you are unable to contact your dealer then you can contact us directly at info@flyozone.com. summary Safety is paramount in our sport. To be safe, we must be trained, practised and alert to the dangers around us. To achieve this we must fly as regularly as we can and progress our piloting skills, ground handle as much as possible and take a continuous interest in the weather. If you are lacking in any of these areas you will be exposing yourself to more danger than is necessary. Respect the environment and look after your flying sites. Finally, RESPECT the weather, it has more power than you can ever imagine. Understand what conditions are right for your level of flying and stay within that window. Happy flying & enjoy your BV1. team Ozone... - Page 33 1258 Route de Grasse Le Bar sur Loup 06620 France...
Need help?
Do you have a question about the BV1 and is the answer not in the manual?
Questions and answers