Advertisement
Installation & Assembly
Flat Panel Screens
Two instruction sheets are included with your product. Begin with this sheet.
Read instruction sheet before you start assembly and installation.
Maximum Load Capacity: 90 lb (40.9 kg)
• It is the responsibility of the installer to verify that the supporting surface will safely support the combined load of
all attached hardware and components.
• Use an assistant or mechanical lifting equipment to safely lift and position the plasma screen.
• Do not attach directly to a metal stud wall. Use of a triple stud WSP wall plate is required for attachment to metal
studs (contact customer care).
Installations:
To Wood Stud Walls .......................................................................................................... page 2
To Solid Concrete, Concrete Block, or Brick Walls ............................................................. page 3
Visit the Peerless Web Site at www.peerlessmounts.com
-
™
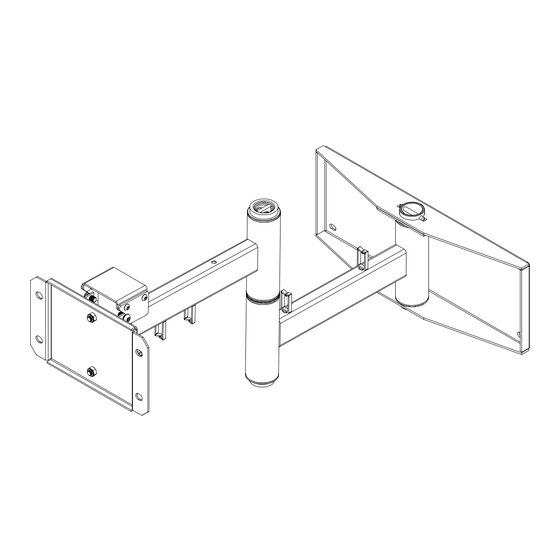
Solid•Point
Articulating Swivel Arm for Large
WARNING
1 of 6
ISSUED: 07-23-03 SHEET #: 201-9073-4 07-14-05
For customer care call 1-800-729-0307 or 708-865-8870.
Models:
PLA 2,
PLA 2S
Advertisement
Table of Contents

Subscribe to Our Youtube Channel
Related Manuals for PEERLESS Mounts Solid-Point PLA 2


Summary of Contents for PEERLESS Mounts Solid-Point PLA 2
- Page 1 Installation & Assembly Models: ™ Solid•Point Articulating Swivel Arm for Large PLA 2, Flat Panel Screens PLA 2S Two instruction sheets are included with your product. Begin with this sheet. Read instruction sheet before you start assembly and installation. Maximum Load Capacity: 90 lb (40.9 kg) WARNING •...
- Page 2 Before you start make sure all parts Parts List listed are included with your product. PART # PART # QTY. DESCRIPTION PLA 2 PLA 2S A 200-1413 200-4413 wall bracket B 200-1418 200-4418 swivel weldment C 200-1052 200-1052 wall support arm axle D 200-1483 200-4483 swivel bracket...
- Page 3 WARNING • When installing Peerless wall mounts on cinder block, verify that you have a minimum of 1 5/8" of actual concrete surface in the 1/4" diameter hole to be used for the concrete anchors. Do not drill into mortar joints! Be sure to mount in a solid part of the block, generally 1"...
- Page 4 Insert holding pin (H) into wall support arm axle (C). Insert axle (C) through wall bracket (A) and lower swing arm (E). Lock axle (C) in place with holding pin (H). IMPORTANT: Be sure swing arm is in correct position shown below with plastic cap at top.
- Page 5 Attach roll pitch assembly (F) to adapter plate/plasma screen assembly (not included) using four M10 x 15 mm penta-pin screws (O). ADAPTER PLATE ADAPTER PLATE AND SCREEN MAY APPEAR DIFFERENT THAN ILLUSTRATED Insert two M8 screws (L) into roll pitch assembly (F). Leave approx.
- Page 6 Snap four cable clips (G) in to swing arm assembly (E) as shown. 6 of 6 ISSUED: 07-23-03 SHEET #: 201-9073-4 07-14-05 Visit the Peerless Web Site at www.peerlessmounts.com For customer care call 1-800-729-0307 or 708-865-8870. ©2005 Peerless Industries, Inc. All rights reserved. Peerless is a registered trademark of Peerless Industries, Inc.
Need help?
Do you have a question about the Solid-Point PLA 2 and is the answer not in the manual?
Questions and answers