
Related Manuals for Vaisala GM70


Summary of Contents for Vaisala GM70
- Page 1 All manuals and user guides at all-guides.com Hand-held Carbon Dioxide Meter GM70 UIDE M010139en-B February 2003...
- Page 2 Finland Visit our Internet pages at http://www.vaisala.com/ © Vaisala 2003 No part of this manual may be reproduced in any form or by any means, electronic or mechanical (including photocopying), nor may its contents be communicated to a third party without prior written permission of the copyright holder.
-
Page 3: Table Of Contents
CHAPTER 1 GENERAL INFORMATION ................4 Safety ..................4 Warranty ..................5 CHAPTER 2 PRODUCT DESCRIPTION................6 Vaisala's Hand-held CO meter GM70 ........6 Parts description ..............7 Probes..................8 CHAPTER 3 PREPARATIONS BEFORE USE ..............9 Recharging the batteries............9 Turning on and setting language, date and time ....10 CHAPTER 4 MEASURING CARBON DIOXIDE..............11... - Page 4 Transferring recorded data to PC......... 30 Real time monitoring with PC ..........30 CHAPTER 9 FIELD CHECKING OF FIXED TRANSMITTERS ........31 Field checking of the Vaisala's GMD/W20 series transmitters ................31 Field checking of the GMT220 (without a display) ..... 32 CHAPTER 10 CALIBRATING AND ADJUSTING THE PROBES........
- Page 5 All manuals and user guides at all-guides.com _________________________________________________________________________________ Cleaning...................42 Changing the battery pack.............42 Vaisala Service Centres ............43 CHAPTER 13 TECHNICAL SPECIFICATIONS ..............44 GM70 Hand-held Carbon Dioxide Meter .......44 GMP221/222 probes combined with GMH70 handle ...44 MI70 Indicator................45 Accessories................46 Dimensions in mm (inch) ............47 VAISALA _________________________________________________________________________ 3...
-
Page 6: Chapter 1 General Information
All manuals and user guides at all-guides.com User's Guide _______________________________________________________________________ CHAPTER 1 GENERAL INFORMATION Safety Throughout the manual, important safety considerations are highlighted as follows: WARNING Warning alerts you to a potential hazard. If you do not read and follow instructions very carefully at this point, there is a risk of injury or even death. -
Page 7: Warranty
The allegedly defective Product or part shall, liability shall under no circumstances exceed the should Vaisala so require, be sent to the works of invoice price of any Product for which a warranty Vaisala or to such other place as Vaisala may... -
Page 8: Chapter 2 Product Description
Tool for adjustments For adjusting the GMT220 series transmitters, GM70 needs only the probes. GM70 adjusts and stores the adjusting information to the non- volatile memory of the probes. This enables the true interchangeability of the probes. -
Page 9: Parts Description
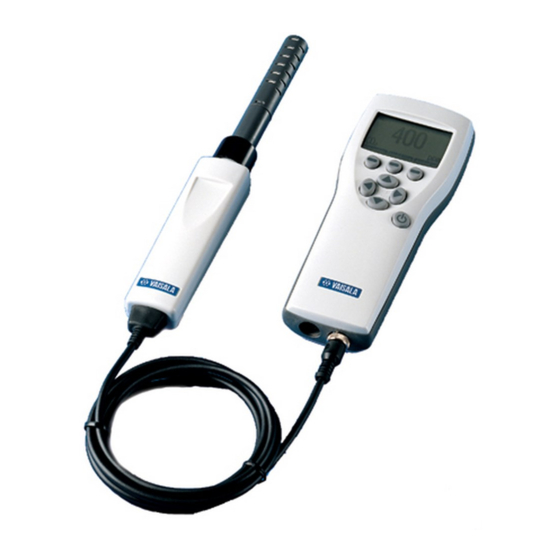
9 10 GM70PUMP (for pump aspirated sampling) 8 Gas inlet 9 Gas outlet 10 ON/OFF switch 11 Measuring chamber 12 Probe GMP221 or GMP222 13 Probe connector 14 Connector to MI70 indicator Figure 1. Hand-held Carbon Dioxide Meter GM70. VAISALA_________________________________________________________________________ 7... -
Page 10: Probes
All manuals and user guides at all-guides.com User's Guide _______________________________________________________________________ Probes Probes GMP221 and GMP222 can be used with GM70. The following measuring ranges can be selected for the probes: GMP221 0...2 %, 0...3 %, 0...5 %, 0...10 %, 0...20 % CO GMP222 0...2000 ppm, 0...3000 ppm, 0...5000 ppm, 0...7000 ppm,... -
Page 11: Preparations Before Use
Recharging the batteries If using alkalines, unscrew the back plate of the indicator and insert the alkalines. If GM70 is ordered with a rechargeable battery pack, the battery pack is already in place as shipped from the factory. Recharge the battery pack as follows: Plug in recharger to the recharger connector of the indicator and connect the recharger to wall socket. -
Page 12: Turning On And Setting Language, Date And Time
EXIT. . Otherwise select basic display appears. To ensure the best possible accuracy, give the actual pressure and temperature values to GM70 as follows: - select the pressure setting (P:1013 hPa, default), press UNIT select unit (hPa or bar), press... -
Page 13: Measuring Carbon Dioxide
Give the correct settings as instructed on page 16. Taking measurements (diffusion sampling) See Chapter 2 Preparations before use if you start the GM70 first time, otherwise follow instructions below. Connect the probe cable to MI70 indicator's connector port. - Page 14 All manuals and user guides at all-guides.com User's Guide _______________________________________________________________________ Taking measurements (pump aspirated sampling) See Chapter 2 Preparations before use if you start the GM70 first time, otherwise follow instructions below. Connect one end of the sampling tube to the gas inlet (marked with IN), in case of using a tube.
-
Page 15: Buttons, Displays And Menus
All manuals and user guides at all-guides.com Chapter 5 __________________________________________________ Buttons, displays and menus CHAPTER 5 BUTTONS, DISPLAYS AND MENUS Buttons and navigation To open a menu view 1. Press an arrow button 2. Press this shortcut button 2 Shortcut buttons 3 Arrow buttons 1 Power ON/OFF Press down the... -
Page 16: Basic Display
Recording/Viewing State of battery. 6. Pressure and temperature setting. 7. Symbol which indicates that GM70 is communicating with PC. If the PC cable is not connected, this symbol is not shown. -functions above the shortcut buttons are set in Graphic, Hold/Sa Record the factory. -
Page 17: Menus
All manuals and user guides at all-guides.com Chapter 5 __________________________________________________ Buttons, displays and menus Menus In the menus you can change settings and select the functions. Open the main menu by pressing any of the buttons. Press within 5 seconds. The basic display returns if you do OPEN not open the shortly. -
Page 18: Chapter 6 Settings
EXIT Setting actual temperature value and unit For achieving the most accurate measurements, the actual temperature value shall be set to GM70. The acceptable temperature range is -20...60 °C. Follow the instructions below: Open the press MENU;... -
Page 19: Display Settings
All manuals and user guides at all-guides.com Chapter 6 ___________________________________________________________________Settings Select with press ENVIRONMENT Select temperature value, press SET. Set the temperature value by using buttons Press save the value. to change the temperature unit. Default unit is °C. Press UNIT Press to return to the basic display. -
Page 20: Rounding
All manuals and user guides at all-guides.com User's Guide _______________________________________________________________________ Rounding When using % units, you can select two or three decimal display by using function. The default setting is rounding off (= three decimal Rounding display). 1. Open the press MENU: OPEN... -
Page 21: Graphic History
All manuals and user guides at all-guides.com Chapter 6 ___________________________________________________________________Settings Graphic history Graphic history shows you the data curve from the time turning on the device. 1. Open the press MENU: OPEN 2. Select , press Display 3. Select press to have a graphical history display. -
Page 22: Automatic Power Off
(middle). Automatic power OFF As shipped from factory, GM70 has default setting which turns the power off automatically after 15 minutes of inactivity. This is to save battery. In case you want to change the inactivity time setting to 60 minutes or turn off the automatic power off function, follow the instructions. -
Page 23: Key Click And Backlight On Key Press
All manuals and user guides at all-guides.com Chapter 6 ___________________________________________________________________Settings Press the shortcut key you want to change, for example: Hold/Save. If you want to replace with pressure setting function, select Hold/Save by using arrow buttons, , press pressure setting Environment→... -
Page 24: Setting Date And Time
Software version of Software version of the probe the MI70 indicator Location or device of Serial number of the the last adjustment MI70 indicator (Alternatives: Vaisala, GM70 or GMK220) Indicator information Probe information 22 ___________________________________________________________________ M010139en-B... -
Page 25: Reverting Factory Settings
2. For example, if you want to set ON the alarm when concentration exceeds 1000 ppm, set the first level as 0 ppm and the second level as 1000 ppm. When alarming is ON, GM70 starts to beep and display backlight starts to blink. - Page 26 All manuals and user guides at all-guides.com User's Guide _______________________________________________________________________ Select the first limit, press (if the alarm function is ON, take it OFF). Set the alarm level by using arrow buttons Press to save the setting. If needed, select the second limit, and then follow instructions from item 6.
-
Page 27: Analog Output Connection
All manuals and user guides at all-guides.com Chapter 7 _____________________________________________________Analog output connection CHAPTER 7 ANALOG OUTPUT CONNECTION Selecting and scaling the analog output → → To get analog measurement data, you need an analog output signal cable, see list of accessories on page 46. One scalable voltage signal channel 0...1.0V is available. - Page 28 All manuals and user guides at all-guides.com User's Guide _______________________________________________________________________ Select to set the value for the 1.0V output signal, press 1.0V Set the high value by using arrow buttons Press button to choose the sign of the value. Press to make the setting.
-
Page 29: Chapter 8 Recording Data
All manuals and user guides at all-guides.com Chapter 8 _____________________________________________________________ Recording data CHAPTER 8 RECORDING DATA Recording → You can record measurement data and view the recorded data on the display. Press the shortcut alternatively open the select Record, ( MENU, Recording/Viewing) Select... -
Page 30: Stopping Recording
It is recommended to have power on during recording to get the most accurate measurements. In long lasting recordings, power GM70 via the charging adapter. Ensure that the automatic power off function is deactivated. In battery use, you can switch off power during recording to save battery, however, and then the accuracy is not necessarily within accuracy specifications. -
Page 31: Viewing Recorded Data
All manuals and user guides at all-guides.com Chapter 8 _____________________________________________________________ Recording data Viewing recorded data Open the press MENU: OPEN Select , press Recording/Viewing Select press View recorded data, Select the file you want to view, press . The files are identified according to the starting date and time of recording. -
Page 32: Transferring Recorded Data To Pc
Microsoft Excel) to be modified Real time monitoring with PC You can monitor GM70 readings directly with a PC by using MI70 Link program. MI70 Link program can be ordered from Vaisala, see list of accessories on page 46. 30 ___________________________________________________________________ M010139en-B... -
Page 33: Field Checking Of Fixed Transmitters
Field checking of the Vaisala GMD/W20 series transmitters (diffusion sampling) Check the reading of a fixed transmitter by using GM70 as a reference. The both readings can be seen on GM70's display simultaneously when using a connecting cable GMA70 (see the list of accessories). -
Page 34: Field Checking Of The Gmt220 (Without A Display)
The pump aspirated system feeds the same gas sample both to the reference probe and to the transmitter to be checked. The both readings can be seen on GM70's display simultaneously when using a connecting cable GMA70 (see the list of accessories). - Page 35 Detach the GM220 probe from the transmitter base (open the cover, loosen the tightening screw and pull out the probe). Insert the GM220 probe to GM70 handle as deep as possible. Turn the probe inside the handle until you feel that a step in the probe connector snaps into the groove of the probe handle connector and locks the probe.
-
Page 36: Calibrating And Adjusting The Probes
Factory calibration and adjustment It is recommended to send the GM70 probe to Vaisala SSD Service Centres for calibration and adjustment, see contact information, page 43. Calibration and adjustment by the user GM70 can be calibrated and adjusted by following the instructions given in this chapter. -
Page 37: Adjustments With Reference Gases
For the adjustment procedure with gases, you need the probe to be adjusted, accurate reference gas(es), a pressure regulator, a flow meter, the field check adapter (can be ordered from Vaisala) and flexible tubing with 3 mm (1/8") inner diameter. - Page 38 All manuals and user guides at all-guides.com User's Guide _______________________________________________________________________ If adjustment is done by using one reference gas (one-point adjustment), concentration of the gas shall be near to the concentration values in which the device is used. NOTE It must be noted that when adjustment is done only in one point, this results high accuracy only near to the adjustment point, not necessarily over the whole measurement range.
-
Page 39: Two-Point Adjustment Procedure
Let the low end reference gas flow with flow rate of about 0.6 l/min for about 5 minutes. Take out the screw from the GM70 probe handle to expose the adjustment button (see Figure 2, page 35). Press the button with a small screwdriver. -
Page 40: One-Point Adjustment Procedure
Let the reference gas flow with flow rate of 0.6 l/min for about 5 minutes. Take out the screw from the GM70 probe handle to expose the adjustment button (Figure 2, page 35). Press the button with a small screwdriver. When pressing the button, indicator turns to adjusting mode. -
Page 41: Adjustment With Two Probes
Connect the probes to the connectors I and II in the bottom of the indicator. Turn on GM70. Take the probe you want to adjust. Unscrew the probe handle screw to expose the adjustment button (Figure 2, page 35). Press the button with a small screwdriver. -
Page 42: Chapter 11 Error Messages
Tighten the probe fastener. Switch on power. Adapter error Switch off power and check that the probe is connected properly, see the instructions of Probe error. In case of continuous error, contact Vaisala or send the probe to Vaisala Service, see page 43. 40 ___________________________________________________________________ M010139en-B... -
Page 43: Chapter 12 Maintenance
CHAPTER 12 MAINTENANCE Changing the probe Turn off GM70. Detach the probe as follows (see Figure 3): loosen the plastic probe fastener by unscrewing it about 5 turns take a firm hold from the base of the probe and pull strongly until the probe comes loose. -
Page 44: Changing The Filter
All manuals and user guides at all-guides.com User's Guide _______________________________________________________________________ Changing the filter of the probe Spare filters for the probe can be ordered from Vaisala, see list of accessories on page 46. 1. Remove the plastic grid by pulling it out. -
Page 45: Vaisala Service Centres
Figure 4. Installing the battery pack. Vaisala Service Centres NORTH AMERICAN SERVICE CENTER Vaisala Inc., 100 Commerce Way, Woburn, MA 01801-1068, USA. Phone: +1 781 933 4500, Fax +1 781 933 8029 Email: us-customersupport@vaisala.com EUROPEAN SERVICE CENTER Vaisala SSD Service, Vanha Nurmijärventie 21 FIN-01670 Vantaa, FINLAND. -
Page 46: Technical Specifications
All manuals and user guides at all-guides.com User's Guide _______________________________________________________________________ CHAPTER 13 TECHNICAL SPECIFICATIONS GM70 Hand-held Carbon Dioxide Meter General Storage temperature -40 ...+70 °C Storage humidity range 0...100 % non condensing Electromagnetic compatibility Complies with the following standard: EN 61326-1:1997 +Am1:1998, Electrical equipment for measurement, control and laboratory use - EMC requirements;... -
Page 47: Mi70 Indicator
Warm-up time 30 seconds 15 min full specification -20...+ 60 ° C Operation temperature Operation pressure 700...1300 hPa Probe material GMH70 Handle, GM70 Pump GMH70 Handle GMH70 handle material ABS/PC-blend Probe fastener Aluminium GM70 Pump Pump housing Anodized aluminium / IP54 Pump 0...18 mbar differential pressure... -
Page 48: Accessories
All manuals and user guides at all-guides.com User's Guide _______________________________________________________________________ Data logging capacity 900...2700 real time data points, Logging interval 1 s to 12 h Logging duration 1 min ... memory full Alarm Audible alarm function Housing classification IP54 Weight 400 g Housing material ABS/PC-blend... -
Page 49: Dimensions In Mm (Inch)
All manuals and user guides at all-guides.com Chapter 13 _____________________________________________________Technical Specifications Dimensions in mm (inch) VAISALA________________________________________________________________________ 47...
Need help?
Do you have a question about the GM70 and is the answer not in the manual?
Questions and answers