Table of Contents
Advertisement
Quick Links
Instruction Manual
®
VWR
LED Digital Rotary Evaporator
European Catalogue Number(s):
LED Rotary Evaporator, set V17, bath
LED Rotary Evaporator, set V17C, bath
LED Rotary Evaporator, set D17, bath
LED Rotary Evaporator, set V12, bath
Main Unit
Heating Bath Glassware
531-1369
531-1371
531-1369
531-1371
531-1369
531-1371
531-1369
531-1371
531-1375(
Vertical, 1700cm²
531-1376(
Vertical,1700cm² ,Coated
531-1378(
Diagonal, 1700cm²
531-1380(
Vertical, 1200cm²
Version01
Issue 05/25/2020
)
)
)
)
Advertisement
Table of Contents

Related Manuals for VWR avantor LED Digital Rotary Evaporator V17


Summary of Contents for VWR avantor LED Digital Rotary Evaporator V17
- Page 1 Instruction Manual ® LED Digital Rotary Evaporator European Catalogue Number(s): Main Unit Heating Bath Glassware LED Rotary Evaporator, set V17, bath 531-1369 531-1371 531-1375( Vertical, 1700cm² LED Rotary Evaporator, set V17C, bath 531-1369 531-1371 531-1376( Vertical,1700cm² ,Coated LED Rotary Evaporator, set D17, bath 531-1369 531-1371 531-1378(...
- Page 2 Legal Address of Manufacturer Europe VWR International bv ResearchparkHaasrode 2020 Geldenaaksebaan 464 B-3001 Leuven + 32 16 385011 http://be.vwr.com UK Importer VWR International Ltd Hunter Boulevard, Magna Park Lutterworth, Leicestershire, LE17 4XN http://uk.vwr.com Country of origin P. R. CHINA 2 / 22...
-
Page 3: Table Of Contents
Table of Contents Warning ............................ 4 Safety Information ........................4 Package Contents ........................7 Unpacking ..........................7 Installation ..........................8 Intended use ..........................11 Symbols and conventions ......................11 Product Specifications ......................12 Overview ..........................13 Description of Buttons and Switches ..................14 Operation .......................... -
Page 4: Warning
Warning Please carefully read the Instructions, and use the product safely under the direction of the Instructions. • Our products are under the patent protection of the origin country and other countries and regions (including obtained patents and patents being applied for). •... - Page 5 • Place the instrument on a stable, clean, antiskid, dry and fireproof table surface. • Make sure there is sufficient space above the instrument and the glass assembly might exceed the height of the instrument. • Before use, please carefully examine the instrument and accessories especially the glass assembly for any damage.
- Page 6 • The glass evaporating flask may not be heated on one side. The rotating evaporating flask must rotate at the heating phase. The glass assembly’ design pressure tolerance is 10mbar. The venting valve (see the part of • “Testing”) must be opened before heating and once again after cooling. When performing vacuum distillation, the steam must be condensed before release or released safely.
-
Page 7: Package Contents
Package Contents Product Description Quantity Main unit Instruction manual Quick Guide Wrench Fuse6.3A Main unit Fuse1A Vapor Tube Fastening Frame Loop Fastener Power Cable(Euro/UK/CH Plug) Heating bath Heating bath Power Cable(Euro/UK/CH Plug) 531-1375(Vertical condenser, 1700cm² ) 531-1376(Vertical condenser,1700cm² ,Coated) 531-1378(Diagonal condenser, 1700cm² ) 531-1380(Vertical condenser, 1200cm²... -
Page 8: Installation
Installation Fig. 1 • Place the main unit on a flat tabletop and squeeze the handle switch (a) to lift it to the highest position. Fig. 2 • Tighten the screw (b) by hand, adjust the angle of the motor head and tighten the rotating head locking nut (c) to prevent accidental rotation. - Page 9 Fig. 3 • Rotate the locking device (d) (Fig. 3) by 60° counterclockwise to mount the evaporating tube in place, and rotate the locking device (d) clockwise for locking • Mount the seal ring (Fig. 4 and Fig. 5) Fig. 4 Fig.
- Page 10 Fig. 6 Fig. 7 • Mount the fixing device for the vertical condensation glass assembly (Fig. 8) Fig. 8 • Piping connection (Fig. 9) 10 / 22...
-
Page 11: Intended Use
Vacuum tube interface Condensate outlet Condensate inlet Fig. 9 Note: To ensure good sealing performance, each glass ground joint may be coated with a layer of sealing grease. Intended use This instrument is designed for such application environments as schools, labs and factories, in conjunction with the optional accessories recommended by the manufacturer, which may be used for: •... -
Page 12: Product Specifications
Product Specifications Item Main unit Heating bath Voltage [VAC] 100-240 200-240/100-120 Frequency [Hz] 50/60 50/60 Power [W] 1010 Motor DC brushless Speed range [rpm] 20-200 Display Temperature range [° C] Room temperature -180 Temperature control accuracy [° C] ± 1(oil ± 3) Lifting method Manual Lifting travel [mm]... -
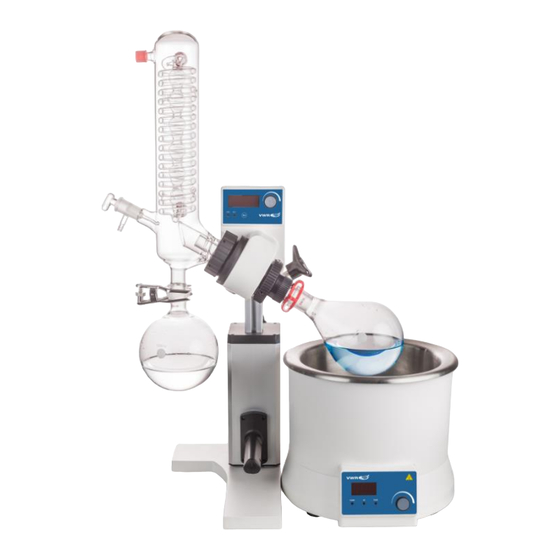
Page 13: Overview
Overview Welcome to use the Instruction Manual of Rotary Evaporator. Users are advised to read carefully this manual before using this instrument, operate the instrument according to the instructions contained herein and be aware of all precautions Rotary head control panel Condenser Motor Evaporating flask... - Page 14 Heating bath power switch Fig. 12 Adjustment knob display Forward Reverse Forward and reverse indicator indicator rotation interval setting button Fig. 13 Temperature adjustment knob Heating Water mode Oil mode indicator indicator indicator Fig. 14 14 / 22...
- Page 15 Name Description LED display Indicates the current working status and parameter setting. The indicator is on when the instrument is in the state of forward rotation Forward indicator only The indicator is on when the instrument is rotating forwardly and reversely in Reverse indicator turn Forward and reverse...
-
Page 16: Operation
After setting, by pressing the “INT” key, the interface changes to the real-time speed display. When the heating bath is turned on, water mode is the default mode, the water mode indicator is on and the interface is on, indicating the real-time temperature: Fig. -
Page 17: Troubleshooting
• Squeeze the handle switch to place the evaporating flask into the heating bath • Press the adjustment knob to start rotation Normal work of the product during the operations above means the product can be put into normal service. If abnormal work occurs, which means the product may be damaged during transport, please contact the after-sales service center of local supplier or manufacturer. -
Page 18: User Replaceable Accessories And Spare Parts
User replaceable accessories and spare parts Description Quantity Cat. No. Glassware set V17 531-1375 Glassware set V17C 531-1376 Glassware set D17 531-1378 Glassware set V12 531-1380 Evaporating flask 50ml 531-1384 Evaporating flask 100ml 531-1385 Evaporating flask 250ml 531-1386 Evaporating flask 500ml 531-1387 Evaporating flask 1000ml 531-1388... - Page 19 19 / 22...
-
Page 20: Technical Service
(2) years from date of delivery. If a defect is present, VWR will, at its option and cost, repair, replace, or refund the purchase price of this product to the customer, provided it is returned during the warranty period. - Page 21 Equipment disposal This equipment is marked with the crossed out wheeled bin symbol to indicate that this equipment must not be disposed of with unsorted waste. Instead it's your responsibility to correctly dispose of your equipment at lifecycle -end by handling it over to an authorized facility for separate collection and recycling.
- Page 22 Local VWR offices in Europe and Asia Pacific Austria Poland Hungary VWR International GmbH VWR International Sp. z o.o. Graumanngasse 7 VWR International Kft. Limbowa 5 1150 Vienna Simon Lá szló u. 4. 80-175 Gdansk Tel.: +43 1 97 002 0 4034 Debrecen Tel.: +48 058 32 38 210...
Need help?
Do you have a question about the avantor LED Digital Rotary Evaporator V17 and is the answer not in the manual?
Questions and answers