Advertisement
Quick Links
™
Table of Contents
Section Code
Section
1
1
1
1
1
1
1
Mechanical Procedures
2
Nautilus, Inc., www.NautilusInc.com, 5415 Centerpoint Parkway, Groveport, OH 43125 U.S.A. - Customer Service: North America (800) 605-3369, csnls@nautilus.com | outside U.S.
ORIGINAL DOCUMENT - ENGLISH VERSION ONLY
8027899.091520.A
C7 Bike Service Manual
™
Page Number
3
5
6
6
7
9
12
15
1
Service Manual
8027898.091520.A
Advertisement

Related Manuals for Nautilus Bowflex C7


Summary of Contents for Nautilus Bowflex C7
-
Page 1: Table Of Contents
Emergency Stop Console Adjustments Demonstration Mode Mechanical Procedures Adjust the Belt Tension Nautilus, Inc., www.NautilusInc.com, 5415 Centerpoint Parkway, Groveport, OH 43125 U.S.A. - Customer Service: North America (800) 605-3369, csnls@nautilus.com | outside U.S. ORIGINAL DOCUMENT - ENGLISH VERSION ONLY 8027899.091520.A... - Page 2 This icon means a potentially hazardous situation which, if not avoided, could result in death or serious injury. Read and understand all Warnings on this machine. Nautilus, Inc., www.NautilusInc.com, 5415 Centerpoint Parkway, Groveport, OH 43125 U.S.A. - Customer Service: North America (800) 605-3369, csnls@nautilus.com | outside U.S. www.nautilusinternational.com | Printed and other countries. | The Bluetooth ®...
-
Page 3: Fcc Compliance
SAFETY WARNING LABELS AND SERIAL NUMBER Console WARNING! machine. FCC Compliance authority to operate the equipment. - Page 4 SPECIFICATIONS Machine Weight without Dumbbells: Weight of Dumbbells (supplied in U.S./Canada): Total Surface Area (footprint) of equipment: 6599 cm (1025 in 146 cm (57.5”) Power Requirements (Power Adapter): Input Voltage: Output Voltage: (Arm Band - supplied in U.S./Canada): 122.2 cm 54 cm (48.1”) (21.3”)
-
Page 5: Maintenance
MAINTENANCE Read all maintenance instructions fully before you start any repair work. In some conditions, an assistant is required to do the necessary tasks. in US/Canada, contact Customer Service for replacement labels. If purchased outside US/Canada, contact your local distributor for them. Daily: Before each use, examine the exercise machine for loose, broken, damaged, or worn parts. -
Page 6: Moving/Storing The Machine
ADJUSTMENTS / OPERATIONS Remove the power cord. Remove the dumbbells, any media devices, or water bottles from the bike before moving it. To lock the Flywheel, turn the Emergency Brake/Resistance Adjustment Knob clockwise until it encounters an increase in resistance. Then rotate the Emergency Brake/Resistance Adjustment Knob another 1/2 turn clockwise. To move the bike, carefully pull the Handlebars toward you while pushing the front of the bike downward. -
Page 7: Console
Console Console Display Speaker Speaker experience – see for details. The Status LED shows if the Console is activated and starting up/operating correctly (LED is on), or if the Console is experiencing an error (LED blinks 3 times). To reset the Console during an error, disconnect the power to the machine for 30 seconds and reconnect it. - Page 8 ® ® instructions provided with your Bluetooth HR monitor. ® ® ® heart rate monitor. Be sure to remove the protective cover (if provided) from the Heart Rate Sensor before use. ® Heart Rate Armband. When the ® Bluetooth Heart Rate Armband is connected, the Console will display the Bluetooth ®...
-
Page 9: Adjustments
Seat Adjustment risk of injury. When you adjust the seat, use the shoes that you plan to wear for riding. 1. Standing next to the bike, raise/lower the Seat so that it is level with the top of your hip bone. 2. - Page 10 2. Push the cleat down and forward to engage the Pedal. 3. Repeat for the other foot. 4. Practice engaging and disengaging from the Pedals before starting your workout. To disengage (release) the cleats from the pedals, push the heels outward and lift. engagement/release mechanism in the Pedals.
- Page 11 Troubleshooting Condition/Problem Things to Check Solution No display/partial display/unit Check electrical (wall) outlet will not turn on connections/orientation connector should line up and snap into place. damage Console Display Console. Speed displayed is not accurate Check Speed Sensor Magnet position Speed displayed is always “0”/ stuck in Pause mode Speed Sensor...
-
Page 12: Demonstration Mode
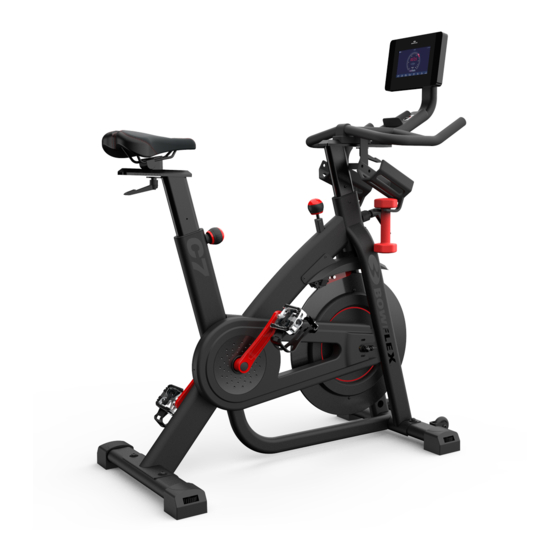
Condition/Problem Things to Check Solution Check Speed Sensor outside US/Canada). Unit rocks/does not sit level Check level adjustment Move machine to level area. Check pedal to crank pedal/ Pedals seem to skip or connection cross-threaded. slip with a sudden increase in connection Clicking sound when pedaling Check pedal to crank... - Page 13 Adjustment Handle Cover, Drive Belt Inside Seat Slider Drive Pulley Seat Fender Cover, Drive Belt Seat Post Crank Arm Flywheel Crank Cap Power Inlet Console Speed Sensor Drive Belt Speed Sensor Magnet...
- Page 14 REPLACEMENT PROCEDURE SKILL LEVEL Level I : Low - very little mechanical knowledge or exposure. Level II : Intermediate - some experience with mechanical procedures Level III : Advanced - knowledgeable about mechanical procedures • Console • Front Stabilizer • Handlebar •...
-
Page 15: Adjust The Belt Tension
This icon means a potentially hazardous situation which, if not avoided, could result in death or serious injury. Read and understand all Warnings on this machine. Nautilus, Inc., www.NautilusInc.com, 5415 Centerpoint Parkway, Groveport, OH 43125 U.S.A. - Customer Service: North America (800) 605-3369, csnls@nautilus.com | outside U.S. www.nautilusinternational.com | Printed other countries. | ORIGINAL DOCUMENT - ENGLISH VERSION ONLY This icon means a potentially hazardous situation which, if not avoided, could result in death or serious injury. - Page 16 Note: in and cause injury. move normally with no skipping (slip), the tension is correct. right Crank Arm. Crank Arm Using a 16mm socket and wrench, remove the Flange Nut under the threaded Cap. Flange Nut Puller is in the correct position, only 1-2 threads on the outer portion Note:...
- Page 17 Note: “A” indicates the two machine screws with washers. Drive Belt Cover 19mm socket and wrench. Flywheel Axle Nut Flywheel Axle Nut Check the tension: Tensioner Eyebolt and measure the distance. The Drive Belt should have only 0.25” (0.64 Drive Belt Drive Belt turn only 90 degrees (1/4 turn, to vertical).
- Page 18 one. Crank Shaft NOTICE: Make sure the Flywheel is aligned with the Frame. Be inside. Cover, Crank Arm and Pedal. 14. Final Inspection Inspect your machine to ensure that all hardware is tight and components Do not use until the machine has been fully assembled and inspected for correct performance in accordance with the...
- Page 19 This icon means a potentially hazardous situation which, if not avoided, could result in death or serious injury. Read and understand all Warnings on this machine. Nautilus, Inc., www.NautilusInc.com, 5415 Centerpoint Parkway, Groveport, OH 43125 U.S.A. - Customer Service: North America (800) 605-3369, csnls@nautilus.com | outside U.S. www.nautilusinternational.com | Printed other countries. | ORIGINAL DOCUMENT - ENGLISH VERSION ONLY This icon means a potentially hazardous situation which, if not avoided, could result in death or serious injury.
- Page 20 Note: Using a #2 Phillips screwdriver, loosen and remove the hardware that attaches the Fender to the Main Frame. Set the Fender and hardware Resistance Knob NOTICE: Fender Note: Brake Pad Brake Assembly...
- Page 21 Emergency Brake Front of bike NOTICE: Note: Back of bike NOTICE: Final Inspection Inspect your machine to ensure that all hardware is tight and components Do not use until the machine has been fully assembled and inspected for correct performance in accordance with the...
- Page 22 This icon means a potentially hazardous situation which, if not avoided, could result in death or serious injury. Read and understand all Warnings on this machine. Nautilus, Inc., www.NautilusInc.com, 5415 Centerpoint Parkway, Groveport, OH 43125 U.S.A. - Customer Service: North America (800) 605-3369, csnls@nautilus.com | outside U.S. www.nautilusinternational.com | Printed countries. | ORIGINAL DOCUMENT - ENGLISH VERSION ONLY This icon means a potentially hazardous situation which, if not avoided, could result in death or serious injury.
- Page 23 Note: cause injury. 2. Using a #2 Phillips screwdriver, loosen and remove the hardware that Resistance NOTICE: Knob Fender Roll Pin Resistance Adjust- NOTICE: ment Shaft pin so that it does not get lost. Collar Resistance Nut...
- Page 24 Resistance Knob down. Resistance Ad- justment Shaft Top Spacer Spring Square Spacer Note: NOTICE: Final Inspection Inspect your machine to ensure that all hardware is tight and Do not use until the machine has been fully assembled and inspected for correct performance in accordance with the...
- Page 25 This icon means a potentially hazardous situation which, if not avoided, could result in death or serious injury. Read and understand all Warnings on this machine. Nautilus, Inc., www.NautilusInc.com, 5415 Centerpoint Parkway, Groveport, OH 43125 U.S.A. - Customer Service: North America (800) 605-3369, csnls@nautilus.com | outside U.S. www.nautilusinternational.com | Printed ORIGINAL DOCUMENT - ENGLISH VERSION ONLY This icon means a potentially hazardous situation which, if not avoided, could result in death or serious injury.
- Page 26 Note: Note: The Left Pedal is reverse-threaded. 15mm Crank Arm. Right Crank Arm Right Crank Arm...
- Page 27 Using a 16mm socket and wrench, remove the Crank Nut under the threaded Cap. Flange Nut Puller is in the correct position, only 1-2 threads on the outer portion (CP2) Note: old parts. ® ® Crank Shaft Crank Nut...
- Page 28 10. To reinstall a Pedal, s and the Pedal does not turn smoothly into the Crank Arm, make sure that the threads are aligned correctly. Be sure that the Pedal is going opening, remove the Pedal and start again. Note: The Left Pedal is reverse-threaded. 15mm Note: or reverse, pedal.
- Page 29 This icon means a potentially hazardous situation which, if not avoided, could result in death or serious injury. Read and understand all Warnings on this machine. Nautilus, Inc., www.NautilusInc.com, 5415 Centerpoint Parkway, Groveport, OH 43125 U.S.A. - Customer Service: North America (800) 605-3369, csnls@nautilus.com | outside U.S. www.nautilusinternational.com | Printed other countries. | ORIGINAL DOCUMENT - ENGLISH VERSION ONLY This icon means a potentially hazardous situation which, if not avoided, could result in death or serious injury.
- Page 30 NOTICE: Note: cause injury. Crank Arm Using a 16mm socket and wrench, remove the Flange Nut under the threaded Cap. Flange Nut Puller is in the correct position, only 1-2 threads on the outer portion (CP2) Note:...
- Page 31 6. Using a #2 Phillips screwdriver, loosen and remove the hardware that Resistance NOTICE: Knob Fender Brake NOTICE: Magnet Flywheel Brake Assembly Brake Assembly Resistance Sensor segments are oriented up and downward. This will assist with re- Resistance Sensor Magnet...
- Page 32 Torsion Spring NOTICE: Resistance Nut Note: “A” indicates the two machine screws with washers. Drive Belt Cover...
- Page 33 14. To loosen the Flywheel hardware, use a 19mm crescent wrench to Tensioner Eyebolt Tensioner Eyebolt Flywheel Bracket Flywheel Bracket Tensioner Tensioner Support Support Flywheel Flywheel Bracket Bracket Axle Nut Axle Nut 15. Using a 10mm wrench, loosen and remove the outer Flywheel Thin Nut Tensioner Eyebolt Outer...
- Page 34 you turn the Drive Pulley and Flywheel. Drive Belt new Drive Belt in position on the Flywheel Pulley. Flywheel NOTICE: Pulley NOTICE: Drive Belt Make sure the Drive Belt is aligned on the Flywheel Pulley and Drive Pulley. Drive Pulley you turn the Drive Pulley and Flywheel.
- Page 35 This icon means a potentially hazardous situation which, if not avoided, could result in death or serious injury. Read and understand all Warnings on this machine. Nautilus, Inc., www.NautilusInc.com, 5415 Centerpoint Parkway, Groveport, OH 43125 U.S.A. - Customer Service: North America (800) 605-3369, csnls@nautilus.com | outside U.S. www.nautilusinternational.com | Printed other countries. | ORIGINAL DOCUMENT - ENGLISH VERSION ONLY This icon means a potentially hazardous situation which, if not avoided, could result in death or serious injury.
- Page 36 Note: Fender Fender NOTICE: NOTICE: Final Inspection Resistance Cable Inspect your machine to ensure that all hardware is tight and components Fender Do not use until the machine has been fully assembled and inspected for correct performance in accordance with the...
- Page 37 This icon means a potentially hazardous situation which, if not avoided, could result in death or serious injury. Read and understand all Warnings on this machine. Nautilus, Inc., www.NautilusInc.com, 5415 Centerpoint Parkway, Groveport, OH 43125 U.S.A. - Customer Service: North America (800) 605-3369, csnls@nautilus.com | outside U.S. www.nautilusinternational.com | Printed other countries. | ORIGINAL DOCUMENT - ENGLISH VERSION ONLY This icon means a potentially hazardous situation which, if not avoided, could result in death or serious injury.
- Page 38 NOTICE: Note: Resistance Knob place. right Crank Arm. Crank Arm Using a 16mm socket and wrench, remove the Flange Nut under the threaded Cap. Flange Nut Puller is in the correct position, only 1-2 threads on the outer portion Note:...
- Page 39 7. Using a #2 Phillips screwdriver, loosen and remove the hardware Resistance NOTICE: Knob Fender area. Brake NOTICE: Magnet Flywheel Brake Assembly Resistance Sensor segments are oriented up and downward. This will assist with re- Resistance Sensor Magnet...
- Page 40 Torsion Spring NOTICE: Resistance Nut Note: “A” indicates the two machine screws with washers. Drive Belt Cover...
- Page 41 Tensioner Eyebolt Tensioner Eyebolt 16. To loosen the Flywheel hardware, use a 19mm crescent wrench to Flywheel Bracket Flywheel Bracket Tensioner Tensioner Support Support Flywheel Flywheel Bracket Bracket Axle Nut Axle Nut 17. Using a 10mm wrench, loosen and remove the outer Flywheel Thin Nut Tensioner Eyebolt Outer...
- Page 42 Speed Sensor Speed Sensor NOTICE: Thin Nut Thin Nut NOTICE: Spacer Spacer NOTICE: Drive Belt Flywheel Pulley Thin Nut Thin Nut NOTICE: Drive Belt NOTICE: Drive Pulley sure the Drive Belt is aligned on the Flywheel Pulley and Drive Pulley. turn the Drive Pulley and Flywheel.
- Page 43 NOTICE: at the position that you recorded in step 15. Make sure Sensor and Speed Sensor Magnet on the Flywheel do not touch. Speed Sensor Speed Sensor Magnet Resistance Cable Fender the Belt Tension” procedure. 29. Final Inspection Inspect your machine to ensure that all hardware is tight and components Do not use until the machine has been fully assembled and inspected for correct performance in accordance with the...
- Page 44 This icon means a potentially hazardous situation which, if not avoided, could result in death or serious injury. Read and understand all Warnings on this machine. Nautilus, Inc., www.NautilusInc.com, 5415 Centerpoint Parkway, Groveport, OH 43125 U.S.A. - Customer Service: North America (800) 605-3369, csnls@nautilus.com | outside U.S. www.nautilusinternational.com | Printed other countries. | ORIGINAL DOCUMENT - ENGLISH VERSION ONLY This icon means a potentially hazardous situation which, if not avoided, could result in death or serious injury.
- Page 45 Note: Note: The Left Pedal is reverse-threaded. 15mm...
- Page 46 smoothly into the Crank Arm, make sure that the threads are aligned correctly. Be with the opening, remove the Pedal and start again. Note: Be sure to check the Pedals weekly to Since this machine operates with a pedal. Doing so may loosen the Pedals, which could result in damage to the machine and/or injury to the user.
- Page 47 This icon means a potentially hazardous situation which, if not avoided, could result in death or serious injury. Read and understand all Warnings on this machine. Nautilus, Inc., www.NautilusInc.com, 5415 Centerpoint Parkway, Groveport, OH 43125 U.S.A. - Customer Service: North America (800) 605-3369, csnls@nautilus.com | outside U.S. www.nautilusinternational.com | Printed other countries. | ORIGINAL DOCUMENT - ENGLISH VERSION ONLY This icon means a potentially hazardous situation which, if not avoided, could result in death or serious injury.
- Page 48 NOTICE: Note: Resistance Knob place. right Crank Arm. Crank Arm Using a 16mm socket and wrench, remove the Flange Nut under the threaded Cap. Flange Nut Puller is in the correct position, only 1-2 threads on the outer portion Note:...
- Page 49 7. Using a #2 Phillips screwdriver, loosen and remove the hardware Resistance NOTICE: Knob Fender area. Brake NOTICE: Magnet Flywheel Brake Assembly Resistance Sensor segments are oriented up and downward. This will assist with re- Resistance Sensor Magnet...
- Page 50 Torsion Spring NOTICE: Resistance Nut Note: “A” indicates the two machine screws with washers. Drive Belt Cover...
- Page 51 Tensioner Eyebolt Tensioner Eyebolt 16. To loosen the Flywheel hardware, use a 19mm crescent wrench to Flywheel Bracket Flywheel Bracket Tensioner Tensioner Support Support Flywheel Flywheel Bracket Bracket Axle Nut Axle Nut 17. Using a 10mm wrench, loosen and remove the outer Flywheel Thin Nut Tensioner Eyebolt Outer...
- Page 52 Speed Sensor Speed Sensor NOTICE: NOTICE: Thin Nut Thin Nut Spacer Spacer NOTICE: 23. Place the Flywheel near the Flywheel Brackets, and put the Drive NOTICE: Drive Belt Flywheel Pulley Make sure the Drive Belt is aligned on the Flywheel Pulley and Drive Drive Belt Pulley.
- Page 53 Lower Rubber Lower Rubber Grommet Grommet Speed Sensor Speed Sensor Cable Cable NOTICE: Speed Sensor Speed Sensor Left Frame Upright Left Frame Upright NOTICE: at the position that you recorded in step 15. Make sure Sensor and Speed Sensor Magnet on the Flywheel do not touch.
- Page 54 Resistance Cable Fender the Belt Tension” procedure. 29. Final Inspection Inspect your machine to ensure that all hardware is tight and components Do not use until the machine has been fully assembled and inspected for correct performance in accordance with the...
Need help?
Do you have a question about the Bowflex C7 and is the answer not in the manual?
Questions and answers