
Related Manuals for SeaLevel HUB7M


Summary of Contents for SeaLevel HUB7M
- Page 1 High Speed 7-Port USB 2.0 Hub With SeaLATCH USB Ports User Manual | HUB7M © Sealevel Systems, Inc. HUB7M Manual | SL9184 10/2021...
-
Page 2: Table Of Contents
APPENDIX A – TROUBLESHOOTING ......................................14 APPENDIX B – HOW TO GET ASSISTANCE ....................................15 APPENDIX C – SILK SCREEN – HUB7M PCB ..................................... 16 APPENDIX D – HUB7M BOARD MOUNTING OUTLINE ................................17 APPENDIX E– COMPLIANCE NOTICES ......................................18 WARRANTY ................................................ -
Page 3: Safety Instructions
Keep work area free of non-conductive materials such as ordinary plastic assembly aids and Styrofoam. • Use field service tools such as cutters, screwdrivers, and vacuum cleaners which are conductive. • Always place drives and boards PCB-assembly-side down on the foam. © Sealevel Systems, Inc. HUB7M Manual | SL9184 10/2021... -
Page 4: Introduction
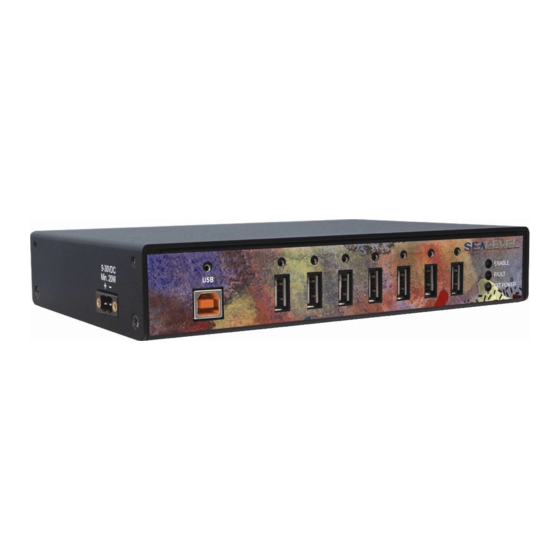
Introduction The HUB7M is a high speed 7-port USB 2.0 hub that is ideal for adding USB ports to a SeaI/O data acquisition “stack” or a Relio R1000 embedded solid-state industrial computer. The HUB7M includes an industrial grade wall- mount power supply that outputs 12VDC @ 2.5A, providing a full 500mA to each attached USB peripheral. -
Page 5: Before You Get Started
Before You Get Started What’s Included The HUB7M is shipped with the following items. If any of these items is missing or damaged, please contact Sealevel for replacement. HUB7M – High Speed 7-Port USB 2.0 Hub with SeaLATCH USB Ports •... - Page 6 Depending upon your application, you are likely to find one or more of the following cable items useful with the HUB7M. Additional items can be found in the Mounting Options section of this manual. All items can be purchased from our www.sealevel.com...
-
Page 7: Installation
2. Simply connect the included wall-mount power supply to the HUB7M and connect to an AC outlet. When the unit is successfully powered, the green LED will light. 3. Using the included SeaLATCH USB device cable, plug the HUB7M into an available USB port on your host system. -
Page 8: Hardware Description
Hardware Description USB Ports The HUB7M integrates SeaLATCH USB ports, which are fully compatible with standard USB cables. When used with the included USB cable with a SeaLATCH type B USB connector, the metal thumbscrew provides a secure metal-to-metal connection to the hub and prevents accidental cable disconnection. - Page 9 HARDWARE DESCRIPTION, CONTINUED Status LEDs Status LEDs are also included on the front of the HUB7M module to indicate the following information: ENABLE (Yellow) – Lights when the USB hub is enumerated by the host system. • FAULT (Red) – Lights when there is a problem with a downstream USB port. Disconnect the •...
-
Page 10: Sealatch® Usb
SeaLATCH® USB The HUB7M integrates SeaLATCH USB ports, which are fully compatible with standard USB cables. When used with the included USB cable (Item# CA356) with a SeaLATCH USB type B connector, the metal thumbscrew provides a secure metal-to-metal connection to the hub and prevents accidental cable disconnection. - Page 11 Sealevel products with a SeaLATCH type B port and legacy USB type A ports. The CA356 is included with Sealevel devices with a SeaLATCH type B port. SeaLATCH USB Type A to SeaLATCH USB Type B Device Cable, 72 in Length (Item# CA332) The CA332 is a 72”...
-
Page 12: Mounting Options
(Item# KT123) is extremely versatile and can be used to mount the HUB7M from the top, bottom, or back edge. The hub alone or with a stack of SeaI/O modules can be mounted flat to a tabletop, underneath a counter, or inside an enclosure. The kit can be used to mount the hub flat to a wall, or along the back edge, similar to DIN-rail mounting options. -
Page 13: Technical Specifications
Non-Condensing Non-Condensing Manufacturing All Sealevel Systems Printed Circuit boards are built to UL 94V0 rating and are 100% electrically tested. These printed circuit boards are solder mask over bare copper or solder mask over tin nickel. © Sealevel Systems, Inc. -
Page 14: Appendix A - Troubleshooting
Appendix A – Troubleshooting The HUB7M is a generic USB hub and should provide years of trouble-free service. Should the device appear to not be functioning correctly, the following tips can eliminate most common problems without the need to call Technical Support. -
Page 15: Appendix B - How To Get Assistance
When calling for technical assistance, please have your user manual and current adapter settings. If possible, please have the adapter installed in a computer ready to run diagnostics. Sealevel Systems provides an FAQ section on its web site. Please refer to this to answer many common questions. This section can be found at http://www.sealevel.com/faq.asp. -
Page 16: Appendix C - Silk Screen - Hub7M Pcb
Appendix C – Silk Screen – HUB7M PCB © Sealevel Systems, Inc. HUB7M Manual | SL9184 10/2021... -
Page 17: Appendix D - Hub7M Board Mounting Outline
Appendix D – HUB7M Board Mounting Outline © Sealevel Systems, Inc. HUB7M Manual | SL9184 10/2021... -
Page 18: Appendix E- Compliance Notices
Always use cabling provided with this product if possible. If no cable is provided or if an alternate cable is required, use high quality shielded cabling to maintain compliance with FCC/EMC directives. © Sealevel Systems, Inc. HUB7M Manual | SL9184 10/2021... -
Page 19: Warranty
In the event of failure, Sealevel will repair or replace the product at Sealevel's sole discretion. Failures resulting from misapplication or misuse of the Product, failure to adhere to any specifications or instructions, or failure resulting from neglect, abuse, accidents, or acts of nature are not covered under this warranty.
Need help?
Do you have a question about the HUB7M and is the answer not in the manual?
Questions and answers