
Related Manuals for iWeld TIG 2400 AC/DC PFC


Summary of Contents for iWeld TIG 2400 AC/DC PFC
- Page 1 CUTTING EDGE WELDING HASZNÁLATI ÚTMUTATÓ TIG/MIG/MMA multifunkciós IGBT technológiás AC/DC hegesztő inverter MULTIG 2400 AC/DC PFC...
- Page 2 Bevezető Köszönjük, hogy egy IWELD hegesztő vagy plazmavágó gépet választott és használ! Célunk, hogy a legkorszerűbb és legmegbízhatóbb eszközökkel támogassuk az Ön munkáját, legyen az otthoni barkácsolás, kisipari vagy ipari feladat. Eszközeinket, gé- peinket ennek szellemében fejlesztjük és gyártjuk. Minden hegesztőgépünk alapja a fejlett inverter technológia melynek előnye, hogy nagymértékben csökken a fő...
- Page 3 FIGYELEM! A hegesztés és vágás veszélyes üzem! Ha nem körültekintően dolgoznak könnyen bal- esetet, sérülést okozhat a kezelőnek illetve a környezetében tartózkodóknak. Ezért a műveleteket csakis a biztonsági intézkedések szigorú betartásával végezzék! Olvassa el fi gyelmesen jelen útmutatót a gép beüzemelése és működtetése előtt! •...
- Page 4 AZ ELEKTROMÁGNESES KOMPATIBILITÁSRA VONATKOZÓ ÓVINTÉZKEDÉSEK 1 Általános megállapítások A hegesztés elektromágneses interferenciát okozhat. Az ívhegesztő berendezések interferencia-kibocsátása a megfelelő telepítési módszerekkel és helyes használattal minimalizálható. Az ívhegesztő gépekre az A osztály határértékei vonatkoznak (minden alkalomra érvényesek, kivéve a nyilvános kisfeszültségű elektromos hálózatok által működtetett lakóterületeket). Figyelmeztetés: Az A osztályú...
- Page 5 2. Fő pareméterek QUICKSILVER MULTIG 2400 AC/DC PFC 800MLTG2400PFC Art. Nr. Inverter type IGBT Vízhűtés HF/ LT Ívgyújtás módja Programhelyek száma Vezeték nélküli távvezérlés Távvezérlés hegesztőpisztolyról AC AWI AC PULSE AWI DC AWI DC PULSE AWI ...
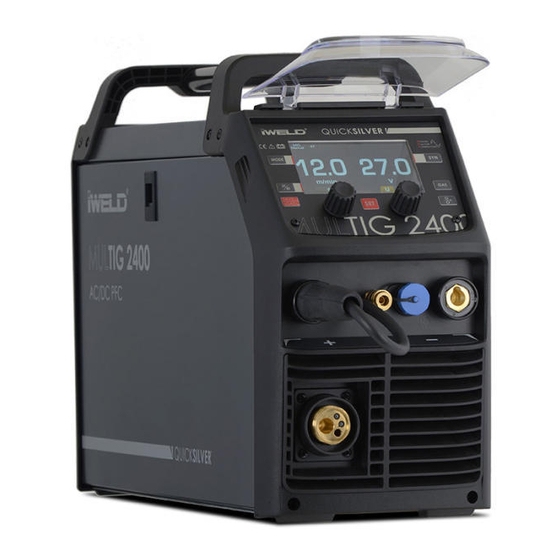
- Page 6 panel funkciói és leírása 3.1 A gép elrendezésének leírása 1) TIG 4) 12 6) MIG...
- Page 7 elemei 3.2.1 1. Hegesztési mód kiválasztó t a DC MMA / AC MMA/ HF AWI / TIG / MIG ási mód 3. PROGRAM 4. SYN 6. Kézi huzal 8. Bal...
- Page 8 3.2.2 MMA AC/DC 1. Hegesztési mód kiválasztó DC MMA az AC MMA 2. Bal 3. Jobb á ásá á t tá tá á ásá á ását s seg t az ásá á á tá á Az MMA hegeszt á ást á á...
- Page 9 3.2.3 TIG HF/Lift 1. Hegesztési mód kiválasztó há „0”...
- Page 10 AC Frekvencia Funkciók 2. Imp 11. Lefutás 12. Kráterfe 13. Utóáramlás...
- Page 11 Ez a -2 sec) a hegeszt hegeszt -10 sec) -10 sec) Az e...
- Page 12 -2 sec) -10 sec) -10 sec) a hegeszt hegeszt hegeszt -10 sec) -10 sec) Impulzus kitöltés...
- Page 13 Funkciók Gáz utóáramlás i mód Ponthegesztés Kapcsoló Gázáramlás Huzaltolás Kimeneti feszültség Hegeszt...
- Page 14 3.2.4 MIG kézi Funkciók...
- Page 15 Visszaégés hegeszt Ezt a Ez a 3.2.5 MIG á á shez s a g á á á á á gá á á á á t s t ága, a á á á get, á á á á á á tá á...
- Page 17 Funkciók...
- Page 18 3.2.6 szám 4. Bal...
- Page 19 4 Telepítés és 4.1.1 Telepítés á shez á á ást á á ás á á á „ ” „-” É...
- Page 20 ” MMA / Pálca elektróda feladata...
- Page 21 4.1.3 MMA Elektróda kiválasztása Maximális vastagsága Hege Elektródaméret Áram ø mm 60-95 át 100-130 130-165 165-260...
- Page 22 át Elektróda szöge hegesztett …...
- Page 23 4.2 Telepítés 4.2.1 á á a hegeszt á á ztassa az AWI hegeszt á t a g á t a g 12-PIN- á á t a gá gáz gá á á ás! á á á , a háts á á ás! á...
- Page 24 4.2.2 DC A DC a TIG- z AWI át a gáz z AWI...
- Page 25 „LIFT” ÍVGYÚJTÁS a TIG hegesztéshez a volfrám érinti a gázáramlás munkadarabot stabil AWI ív szikra távolság a volfrám hegyénél Helyezze a fúvókát a Húzza oldalra a Húzza vissza a h.pisztolyt Az ív fenntartásához munkadarabra úgy, hogy a hegesz úgy, hogy a emelje fel a volfrám ne érjen hozzá...
- Page 26 TIG hegesztés h 4.2.4 TIG-...
- Page 27 DC áram AC áram AC áram hullám Tórium Cirkónium Cirkónium 15-80 15-80 20-60 70-150 70-150 60-120 150-250 140-235 100-180 250-400 225-325 160-250 400-500 300-400 200-320 4.2.5...
- Page 28 tárcsával ikusan kell csúcsszöggel lással...
- Page 29 csúcsszög csúcsszög Impulzus Elektróda Csúcsszög hegesz 05 - 30 05 - 60 0 00 08 - 50 05 - 100 10 - 70 10 - 140 12 - 90 12 - 180 15 - 150 15 - 250 20 - 200 20 - 300 25 - 250 25 - 350...
- Page 30 4.3 Telepítés és - MIG hegesztés 4.3.1 Telepítés a MIG hegesztéshez...
- Page 31 nyomja át a huzalt kb. 150 mm...
- Page 32 á á seg ts g 4.3.2 , ezt...
- Page 33 4.3.3 A MIG hegeszt...
- Page 35 4.3.4 MIG MIG huzalveze hegesz hegeszt...
- Page 36 Stee 0.6mm-0.8mm 0.9mm - 1.2mm 1.6mm 2.0mm - 2.4mm Teflon 0.6mm-0.8mm 0.9mm - 1.2mm 1.6mm 1.0mm-1.6mm Réz - Réz - Sárgaréz...
- Page 38 tagság...
- Page 39 4.7 Üzemeltetési értesítések...
- Page 40 Kód Leírás Fáz Hege...
- Page 41 Óvintézkedések Munkaterület 1. A hegesztőkészüléket pormentes, korróziót okozó gáz, gyúlékony anyagoktól mentes, maxi- mum 90% nedvességtartalmú helyiségben használja! 2. A szabadban kerülje a hegesztést, hacsak nem védett a napfénytől, esőtől, hótól. A munkaterület hőmérséklete -10°C és +40°C között legyen! 3. Faltól a készüléket legalább 30 cm-re helyezze el! 4.
- Page 42 CUTTING EDGE WELDING CE MEGFELELŐSÉGI NYILATKOZAT MINŐSÉGI TANÚSÍTVÁNY Forgalmazó: IWELD Kft. 2314 Halásztelek II. Rákóczi Ferenc út 90/B Tel: +36 24 532-625 info@iweld.hu www.iweld.hu MULTIG 2400 AC/DC PFC Termék: AWI/MIG/MMA multifunkciós, IGBT technológiás AC/DC hegesztő inverterek Alkalmazott szabályok (1): EN 60204-1:2005...
-
Page 43: Manual De Utilizare
CUTTING EDGE WELDING MANUAL DE UTILIZARE Tehnologia IGBT, controlat de mi- croprocesor Aparate de sudura AC/DC TIG/MIG/MMA MULTIG 2400 AC/DC PFC... - Page 44 Introducere Vă mulţumim că aţi ales şi utilizaţi aparatul de sudare şi de tăiere iWELD! Scopul nos- tru este acela de a sprijini munca d-voastră prin cele mai moderne şi fi abile mijloace, fi e că este vorba de lucrări casnice de bricolaj, de sarcini industriale mici sau mari.
- Page 45 ATENTIE! Pentru siguranţa dumneavoastră şi a celor din jur, vă rugăm să citiţi acest manual înainte de instalarea şi utilizarea echipamentului. Vă rugăm să folosiţi echipament de protecţie în timpul sudării sau tăierii. Pentru mai multe detalii, consultaţi instrucţiunile de utilizare. •...
- Page 46 PRECAUŢII CU PRIVIRE LA COMPATIBILITATEA ELECTROMAGNETICĂ 1. Informaţii generale Sudura poate cauza interferenţă electromagnetică. Emisiile de interferenţă ale echipamentului de sudură cu arc electric pot fi reduse prin adoptarea unei metode adecvate de instalare şi a unei metode corecte de utilizare. Produsele descrise în cadrul prezentului manual aparţin limitei echipamentelor de clasă...
- Page 47 2. Primele parametrii QUICKSILVER MULTIG 2400 AC/DC PFC 800MLTG2400PFC Numar articol IGBT Tip invertor Racitor de apa HF/ LT Aprindere arc Numărul de program Comandă la distanţă fără fi r Comandă la distanţă din pistolul AC AWI ...
- Page 48 Func iile panoului de co i descrieri Descrierea configura iei aparatului Configura ia panoului fa i spate al 1) Duz pistolet TIG. 4) Muf 12 pini pentru TIG. Euro pistolet MIG. Alimentatorul aparatului de 10) S sâ ârm pentru 15) Muf 9 pini pentru...
- Page 49 Configura ia panoului de c 3.2.1 Panoul de co în Stick DC/ Stick AC/ TIG Buton mod declan are: între Buton JOB: i timp de 1 secund în num rul JOB. Butonul de sistem SYN: tipul ârmei de sudu Buton verificare aer: este neobstruc Butonul func ie: iei.
- Page 50 3.2.2 Introducere privind afi ajul electronic MMA în c.a./c.c. Buton parametru L: Se rote Buton parametru R: între Hot Arc Force i roti Hot start (Curentul de amorsare) Func rezisten m sur 0~10. Arc force (Stabilitatea arcului) pentru î cu diferite tipuri de electrod i de condi ii de sud î...
- Page 51 3.2.3 Introducere privind afi ajul pentru sudura TIG cu înalt frecven (HF)/Ridicare (Lift) între modurile de sudur TIG HF TIG Lift. Buton mod declan are î Butonul func ie iei. Buton parametru L: Roti curentul de sud . Atunci când sunte i î func re i timpul Post Flow (timpul de post-...
- Page 52 AC Frequency (Frecven a în curent alternativ) Disponi ei în curent ului. O f lent Interfa a func iei Forma undei de ie ire: Modul puls: ON OFF. Mod declan are: 2T/ 4T/ Spot weld. (Modul S în puncte – Spot weld - este disponibil Pre Flow (Timp pre-curgere gaz): 0~2s.
- Page 53 Modul 2T (3) procesul procesul ie f r /sud /sud lor sub iri Introducere (1) 0: i butonul pistoletului i men ine i. (2) 0 t1: Timpul pre- (0.1~2.0s) t1 t2: ire cre te pân (I w I b ) minim .
- Page 54 Introducere i butonul pistoletului i men ine . Începe s (2) 0 t1: Timpul pre- (0.1~2.0S); t1 t2: i butonul pistoletului; curentul de ie ire cre t2 t3: Curentul de ie ire cre te pân (I w I b ). (Upslope Time) t3 t4: .
- Page 55 Spot weld Post Flow (timp post-curgere gaz): 0.1~2s. Welding current (curent de sudare): 10~200A. Timp T on : 0.2~1s. Timp T off : 0~10s. Post Flow (timp post-curgere gaz): 0.1~10s. Modul de declan are a sud rii în puncte Sudare în puncte Tensiune ie ire Curent ie ire...
- Page 56 3.2.4 Buton mod MIG. Butonul modului de declan are: Butonul func ie: iei. Buton parametru L: . În Flow. Buton parametru R: indu Buton verificare aer. Buton Interfa a func iei...
- Page 57 Modul declan are: 2T Burnback (Durata post-ardere): 0~10. Pre Flow (Timp pre-curgere gaz): 0.1~10s. Post Flow (Timp post-curgere gaz): 0.1~10s. Slow Feed (Timp alimentare mic): 0~10. Spool Gun (pistolet): off/ on. Burnback (Durata post-ardere) ârmei de sudur â ârmei de sudur „post- ”...
- Page 58 Buton mod sudare: MIG. Buton mod declan are: Buton sistem SYN: SYN. Select i ârmei Buton func ie: iei. Buton parametru L: Roti ârmei de sudur . Când sunte i î Post Flow. Buton parametru R: Î i butonul Buton verificare aer.
- Page 59 Interfa a func iei Trigger mode: 2T or 4T. Burnback: 0~10. Pre Flow: 0.1~10s. Post Flow: 0.1~10s. Slow Feed: 0~10.
- Page 60 3.2.6 Butonul JOB: JOB i timp de 1 secund Afi area parametrilor: i to î Afi ajului num rului JOB. Buton parametru L: Roti i pent Buton parametru R: : Roti rul JOB i ine...
- Page 61 Instalare i operare 4.1 Instruc iuni de instalare i utilizare pentru sudura de tip MMA cu electrozi 4.1.1 Instalarea configura iei A/cle telui port-electrod . Electrozii te optime ie deosebit ii – iile produc DCEP: Ele (+). DCEN: (-). MMA (DC): DCEN DCEP în func ie de tipul de electrod.
- Page 62 4.1.2 MA/ cu electrozi înveli i electric electrod electric sc drept tec ie â . Miezul electrodului în sine umplere peste Electrod MMA / Electrod învelit din î protec prin z ile sudurii sub strat de flux Produ de protec peste sudur î...
- Page 63 4.1.3 Alegerea electrodului ând propriet i i furnizorul Greutatea medie a Diametru maxim materialului recomandat pentru iunii ât sec electrod ât 1.0-2.0 mm 2.5 mm 2.0-5.0 mm 3.2 mm i pentru di 5.0-8.0 mm 4.0 mm >8.0 mm 5.0 mm Dimensiune Intervalul de curent electrod...
- Page 64 Lungimea arcului u or pe se produce produce stropi electrodului Unghiul electrodului în pozi î între 5 de spre direc Viteza de deplasare Electrodul trebuie dep iei îmbin î î fuziune î i propriet i a îmbin rii i s nu con in unde îmbin Î...
- Page 65 4.2 Instruc iuni de instalare i operare privind sudura de tip TIG 4.2.1 Configura ia pentru sudarea TIG (1) Introduce i fi i roti i-o i tor i roti i-o (3) Co r ei î (4) Con ei TIG (5) Co (6) Co (7) Con (8) Deschide...
- Page 66 4.2.2 Sudarea DCTIG continuu folose (curent continuu) î într- direc (-) c (+). În circuitul electric în curent ii conform c într-un circuit î ldur ) este î . Acest lucru este import born ii de sudur . Câ înc mbându- î...
- Page 67 AMORSAREA PRIN ATINGERE pentru sudarea de tip TIG î i se produc scâ în microsecunde) cre scâ într- î (HF) âriere. Tungsten n Flux gaz contact cu piesa Arc TIG stabilit amorsare Tungsten ridicat de pe pies Pune Roti i î...
- Page 68 În mu i o sârm î pentru înt este inut în pozi ie pân câ dur ; i tor ° i-o u or i uniform de- rodus pe este de obicei men inut ° î încet i uniform î în timpul sud rii s p în interiorul sârmei 4.2.4...
- Page 69 primesc Valorile nominale ale curentului de sudare pentru electrozii din tungsten Diametr Amperi c.c. Amperi c.a. negativ dezec tun gste 0.8% zirconat 2% toriat 1.0mm 15-80 15-80 20-60 1.6mm 70-150 70-150 60-120 2.4mm 150-250 140-235 100-180 3.2mm 250-400 225-325 160-250 4.0mm 400-500 300-400...
- Page 70 â â â înc îmbun t i te dur . Î us cre ârfului. Unghiul inclus al electrodului/Conicitate – Sudarea în curent continuu ului ului i diferite de...
- Page 71 Electrozii mai toci i, cu un unghi inclus mai larg, ofer urm toarele avantaje pot sus Electrozii mai ascu i i, cu un unghi inclus mai mic, ofer urm toarele avantaje in sudur Diam. Diam. l Unghi constant Interval Interval tungste - mm inclus - Grade...
- Page 72 4.3 Instruc iuni de instalare i operare privind sudura de tip MIG 4.3.1. Instalarea de configurare pentru sudura de tip MIG (1) Introduce (-) i roti â i pistoletul MIG î ei MIG de pe i strâ (3) In i fi i strâ...
- Page 73 Introduce i sâ în tubul re de ie ire i sâ Închide i suportul rolei ul de presiune î â (10) Deschide ie robinetul buteliei (11) oletului MIG. (12) i i ine ârmei pistoletului ân când iese sâ âtul pistoletului. (13) i introduce i sâ...
- Page 74 4.3.1 în timpul este în ele pentru ii de i este denumit „rol ”: cum este În func ie de tipul de cât i ce tip de rol este a tare - o rol conduc în form de „V” optim .
- Page 75 4.3.2 i ghid de instalare ârmei î esen i consistent . U iunile ârmei în i piuli (2) N iune...
- Page 76 tiftul â s nu se î . Pune deruleze sâ loc piuli i strâ sâ i sâ re de ie tensiunii.
- Page 77 4.3.3 Tipuri de liner pentru pistoletul MIG i informa ii Linerele pentru pistoletul MIG Linerul este unul i pân Linerele din o el linerelor pentru pistolet sub numele de elii o i fle i îi permite s în timpul utiliz rii. Linerele din o el de o el bun folosind un liner din i în...
- Page 78 Linere din o el -0.6mm-0.8m Ro u - 0.9mm - 1.2mm Linere din o el - 1.6mm Verde - 2.0mm - 2.4mm Linerele din teflon i (PA) precum sâ î pentru sârm de tipuri de sârm â din o tul sârmei de sudur î i pot con i uzur .
- Page 79 4.4 Instruc iuni privind instalarea 4.4.1 Instalarea de configurare a pistoletului i fi în polul (-) roti â Inse i fi i strâ i pistoletul î strâ i pistoletul, str nge i complet i bine piuli a adaptorului. i conectorul aparatului, fapt care poate d una grav at t conexiunii pistoletului, c t i conexiunii aparatului de sudur .
- Page 80 Parametrii de sudare Referin proces pentru sudarea cap la cap cu CO2 el cu con inut mic de carbon Tensiune Grosime Deschid Curent Debit (MM) rostului (MM) (CM/MIN) (L/MIN) G(MM) 50-60 16-16.5 60-70 50-60 17-17.5 75-85 50-60 10-15 17 18 0-0.5 1.0/1.2 110-120...
- Page 81 Mediul de func ionare rii 1000 M. 14 ~ 104°F (-10 ~ +40°C). 90%. încâ nu dep 15°. Prot î ie în timpul sudurii. de cel pu in 1-1/2” (38cm) i perete. ionarea Citi ie Sec î începe s tul. : 50/60Hz.
- Page 82 Lista codurilor de eroare Tip de eroare Descriere (primul releu termic) Releu termic Nu s Subtensiune Alte defec Accesoriu...
-
Page 83: Măsuri De Precauţie
Măsuri de precauţie Spaţiul de lucru 1. Aparatul de sudare se va utiliza într-o încăpere fără praf, fără gaze corozive, fără materiale infl amabile, cu conţinut de umiditate de maxim 90%. 2. Se va evita sudarea în aer liber, cu excepţia cazurilor în care operaţiunea este efectuată ferit de razele solare, de ploaie, de căldură;... - Page 84 CUTTING EDGE WELDING CERTIFICAT DE CONFORMITATE CERTIFICAT DE CALITATE Furnizorul: IWELD Ltd. 2314 Halásztelek Strada II. Rákóczi Ferenc nr. 90/B Tel: +36 24 532-625 info@iweld.hu www.iweld.ro MULTIG 2400 AC/DC PFC Produsul: Tehnologia IGBT, controlat de microprocesor Aparate de sudura AC/DC TIG/MIG/MMA...
- Page 85 CUTTING EDGE WELDING USER’S MANUAL TIG/MMA dual function IGBT inverter technology AC/DC welding power source TIG 2400 AC/DC PFC...
- Page 86 Introduction First of all, thank you for choosing an IWELD welding or cutting machine! Our mission is to support your work with the most up-to-date and reliable tools both for DIY and industrial application. We develop and manufacture our tools and machines in this spirit.
- Page 87 WARNING! Welding is a dangerous process! The operator and other persons in the working area must follow the safety instructions and are obliged to wear proper Personal Protection Items. Always follow the local safety regulations! Please read and understand this instruction manual carefully before the installation and operation! •...
- Page 88 PRECAUTIONS TO ELECTROMAGNETIC COMPATIBILITY 1 General Welding may cause electromagnetic interference. The interference emission of arc welding equipment can be minimized by adopting proper installa- tion method and correct use method. The products described in this manual belong to the limit of class A equipment (applies to all occa- sions except the residential areas powered by public low-voltage power system).
- Page 89 2. The Main Parameters QUICKSILVER MULTIG 2400 AC/DC PFC 800MLTG2400PFC Art. Nr. IGBT Inverter type Water Cooling Unit HF/ LT Arc Ignition Number of programs Wireless Remote Control Remote Control from TIG Torch AC AWI AC PULSE AWI ...
- Page 90 3 Panel Functions & Descriptions 3.1 Machine Layout Description Front and rear panel layout of welding machine TIG torch gas connector. Polarity change power connection. Positive (+) welding power output connection socket. 12 core air socket for TIG. Negative (-) welding power output connection socket.
- Page 91 3.2 Layout for Control panel 3.2.1 Control panel Welding mode button: Press it to select Stick DC/ Stick AC/ TIG HF/ TIG Lift/ MIG Manual/ MIG Synergic welding mode. Trigger mode button: Press it to select 2T or 4T trigger mode. JOB button: Press it for 3s to open JOB program and press it for 1s to save parameters into JOB number.
- Page 92 3.2.2 MMA AC/DC display introduction Welding mode button: Press it to select Stick DC or Stick AC welding mode. L parameter knob: Turn it to welding current. R parameter knob: Press it to select Hot Start or Arc Force and turn it to adjust values. Hot start Hot start provides extra power when the weld starts to counteract the high resistance of the electrode and workpiece as the arc is started.
- Page 93 3.2.3 TIG HF/Lift display introduction Welding mode button: Press it to enter TIG HF or TIG Lift welding mode. Trigger mode button: Press it to select 2T or 4T trigger mode. Function button: Press it to enter the function interface. L parameter knob: Turn it to adjust welding current.
- Page 94 AC Frequency Only be available in AC welding mode. Increasing AC frequency will focus the shape of the arc, resulting in a tighter, more controlled arc causing increased penetration and less heated affected area for the same current setting. Slower frequency will result in a wider, softer arc shape.
- Page 95 Further Controls Explained 2T Mode (3) The trigger is pulled and held on to activate the welding circuit, when the trigger is released, the welding circuit stops. This function without the adjustment of start current and crater current is suitable for the Re-tack welding transient welding thin plate welding and so on.
- Page 96 Introduction: 0: Press and hold the gun switch, Electromagnetic gas valve is turned on. The shielding gas stars to flow; 0 t1: Pre-gas time (0.1~2.0S); t1 t2: Arc is ignited at t1 and then output the setting value of start current; t2: Loosen the gun switch, the output current slopes up from the start current;...
- Page 97 Function interface of Spot weld: Post Flow: 0.1~2s. Welding current: 10~200A. time: 0.2~1s. time: 0~10s. Post Flow: 0.1~10s. Spot Weld trigger mode: Spot weld Gun Switch Gas Supply Wire Feed Output Voltage Output Current Spot Weld Time...
- Page 98 3.2.4 MIG Manual display introduction Welding mode button: Press it to select MIG Manual welding mode. Trigger mode button: Press it to select 2T or 4T trigger mode. Function button: Press it to enter the function interface. L parameter knob: Turn it to adjust wire feeding speed. In function interface, turn it to select parameters, such as Pre Flow, Post Flow.
- Page 99 Trigger mode: 2T or 4T. Burnback: 0~10. Pre Flow: 0.1~10s. Post Flow: 0.1~10s. Slow Feed: 0~10. Spool Gun: off/ on. Burnback Short-circuit between welding wire and molten pool leads to the increase of current, which leads to the melting speed of welding wire too fast, and the wire feeding speed cannot keep up with, which makes the welding wire and workpiece disconnected.
- Page 100 Welding mode button: Press it to select MIG Manual welding mode. Trigger mode button: Press it to select 2T or 4T trigger mode. SYN system button: Press it to enter SYN item. Select wire material/ wire diameter and shield gas by using R parameter knob. Function button: Press it to enter the function interface.
- Page 101 Function interface: Trigger mode: 2T or 4T. Burnback: 0~10. Pre Flow: 0.1~10s. Post Flow: 0.1~10s. Slow Feed: 0~10.
- Page 102 3.2.6 JOB display introduction JOB button: Press it for 3s to enter JOB programs and press it for 1s to save parameters. Parameters display: Here are all the selected parameter that you settings. JOB number display. L parameter knob: Turn it to turn the page and press it to delete the parameters. R parameter knob: Turn it to select JOB program number and press it to load the selected JOB program number.
- Page 103 4 Installation & Operation 4.1 Installation & Operation for MMA Electrode Welding 4.1.1 Set-Up Installation Two sockets are available on this welding machine, One Positive (+) and one Negative (-) polarity, to connect MMA/Electrode holder cable and earth clamp cable. Various electrodes require different polarity for optimum results and careful attention should be paid to the polarity, refer to the electrode manufacturers information for the correct polarity.
- Page 104 4.1.2 MMA/Stick Electrode Welding One of the most common types of arc welding is manual metal arc welding (MMA) or stick welding. An electric current is used to strike an arc between the base material and a consumable electrode rod or ‘stick’. The electrode rod is made of a material that is compatible with the base material being welded and is covered with a flux that releases a gaseous vapor that serve as a shielding gas and providing a layer of slag, both of which protect the weld area from atmospheric contamination.
- Page 105 additional functions are provided mainly by the various coverings on the electrode. 4.1.3 MMA Welding Fundamentals Electrode Selection As a general rule, the selection of an electrode is straight forward, in that it is only a matter of selecting an electrode of similar composition to the parent metal. However, for some metals there is a choice of several electrodes, each of which has particular properties to suit specific classes of work.
- Page 106 Arc Length To strike the arc, the electrode should be gently scraped on the work until the arc is established. There is a simple rule for the proper arc length; it should be the shortest arc that gives a good surface to the weld.
- Page 107 4.2 Installation & Operation for TIG Welding 4.2.1 Set-Up for TIG Welding (1) Insert the earth cable plug into the positive socket on the front of the machine and twist to lock in place. (2) Plug the welding torch into the negative socket on the front panel and twist to lock. (3) Connect the control cable of torch switch to 12-pin socket on the front of the machine.
- Page 108 4.2.2 DCTIG Welding The DC power source uses what is known as DC (direct current) in which the main electrical component, known as electrons, flow in only one direction from the negative terminal (-) to the positive terminal (+). In the DC electrical circuit there is an electrical principle at work which provides that, in a DC circuit, 70% of the energy (heat) is always on the positive side.
- Page 109 and contamination of the weld or electrode). When the machine detects that the tungsten has left the surface and a spark is present, it immediately (within microseconds) increases power, converting the spark to a full arc. It is a simple, safe lower cost alternative arc ignition process to HF (high frequency) and a superior arc start process to scratch start.
- Page 110 TIG Welding with Filler Wire Technique It is necessary in many situations with TIG welding to add a filler wire into the weld pool to build up weld reinforcement and create a strong weld. Once the arc is started the torch tungsten is held in place until a weld pool is created, a circular movement of the tungsten will assist is creating a weld pool of the desired size.
- Page 111 Tungsten Electrodes Rating for Welding Currents Tungsten DC Current Amps AC Current Amps AC Current Amps Diameter Torch Negative Un-Balanced Wave Balanced Wave 2% Thoriated 0.8% Zirconiated 0.8% Zirconiated 1.0mm 15-80 15-80 20-60 1.6mm 70-150 70-150 60-120 2.4mm 150-250 140-235 100-180 3.2mm 250-400...
- Page 112 increasing the flat to the maximum level that still allows arc start and eliminates arc wonder will improve the weld penetration and increase the electrode life. The included angle determines weld bead shape and size. Generally, as the included angle increases, penetration increases and bead width decreases.
- Page 113 Blunter electrodes with larger included angle provide: Last Longer Have better weld penetration Have a narrower arc shape Can handle more amperage without eroding. Sharper electrodes with smaller included angle provide: Offer less arc weld Have a wider arc Have a more consistent arc Tungsten Diameter at the Constant Included...
- Page 114 4.3 Installation & Operation for MIG Welding 4.3.1 Set up installation for MIG Welding (1) Insert the earth cable plug into the Negative (-) socket and twist to tighten. (2) Plug the MIG welding gun into MIG torch euro-connector on the front panel and tighten locking nut securely.
- Page 115 (8) Feed wire over drive roller into outlet guide wire tube, push wire through approximately 150mm. (9) Close down the top roller bracket and clip the pressure arm into place with a medium amount of pressure applied. (10) Carefully open the valve of the gas cylinder, set the required gas flow rate.
- Page 116 4.3.2 Wire Feed Roller Selection The importance of smooth consistent wire feeding during MIG welding cannot be emphasized enough. Simply put the smoother the wire feed then the better the weld. Feed rollers or drive rollers are used to feed the wire mechanically through the length of the welding gun cable.
- Page 117 positive feed of flux core wire without any deformation of the wire shape. 4.3.3 Wire Installation and Set-Up Guide Again the importance of smooth consistent wire feeding during MIG welding cannot be emphasized enough. The correct installation of the wire spool and the wire into the wire feed unit is critical to achieving an even and consistent wire feed.
- Page 118 (3) Fit the wire spool onto the spool holder (4) Snip the wire carefully, be sure to hold fitting the locating pin into the location hole the wire to prevent the spool uncoiling. on the spool. Replace the spool retaining Carefully feed the wire into the inlet guide nut tightly.
- Page 119 4.3.4 MIG Torch Liner Types and Information MIG Torch Liners The liner is both one of the simplest and most important components of a MIG gun. Its sole purpose is to guide the welding wire from the wire feeder, through the gun cable and up to the contact tip.
- Page 120 Steel Liners Blue-0.6mm-0.8m Red - 0.9mm - 1.2mm Yellow - 1.6mm Green - 2.0mm - 2.4mm Teflon and Polyamide (PA) Liners Teflon liners are well suited for feeding soft wires with poor column strength like aluminum wires. The interiors of these liners are smooth and provide stable feeding, especially on small diameter welding wire Teflon can be good for higher heat applications that utilize water-cooled torches and brass neck liners.
- Page 121 4.4 Installation & Operation for Spool Gun 4.4.1 Set up installation for Spool Gun 1) Insert the earth cable plug into the negative (-) socket on the front of the machine and twist to tighten. 2) Insert the polarity switch cable plug into the positive socket on the front of the machine and tighten it.
-
Page 122: Welding Parameters
4.5 Welding Parameters Process reference for CO butt welding of low carbon steel solid welding wire Process reference for CO corner welding of low carbon steel solid welding wire... -
Page 123: Operation Environment
4.6 Operation Environment temperature range 14 ~ 104°F (-10 ~ +40°C). Air relative humidity is below 90%. not exceed 15°. and against direct sunshine. ast 1-1/2” (38cm) free distance between the machine and wall. 4.7 Operation Notices 1 carefully before starting to use this equipment. ure that the input is 110V/230V AC, single-phase: 50/60Hz. -
Page 124: List Of Error Codes
5 List of Error Codes Error Type Code Description Over-heating (1st thermal relay) Over-heating (2nd thermal relay) Thermal relay Over-heating (3rd thermal relay) Over-heating (4th thermal relay) Over-heating (Program default) Phase loss No gas Welding machine Under voltage Over voltage Over current Wire feeder over load Button fault on operating panel when switch on the machine... -
Page 125: Safety Requirements
Precautions Workspace 1. Welding equipment free of dust, corrosive gas, non-fl ammable materials, up to 90% humidity for use! 2. Avoid welding outdoors unless protected from direct sunlight, rain, snow, work area tempera- ture must be between -10 °C and +40°C. 3. - Page 126 CUTTING EDGE WELDING CERTIFICATE OF EUROPEAN STANDARD Manufacturer: IWELD Ltd. 2314 Halásztelek II. Rákóczi Ferenc street 90/B Tel: +36 24 532-625 info@iweld.hu www.iweld.hu MULTIG 2400 AC/DC PFC Item: TIG/MIG/MMA dual function IGBT inverter technology AC/DC welding power source Applied Rules (1):...
- Page 127 ÁLTALÁNOS GARANCIÁLIS FELTÉTELEK A JÓTÁLLÁSI ÉS SZAVATOSSÁGI IGÉNYEK ESETÉN minden GORILLA ®...
-
Page 128: Jótállási Jegy
Forgalmazó: JÓTÁLLÁSI JEGY IWELD KFT. 2314 Halásztelek II. Rákóczi Ferenc út 90/B Szerviz: Tel: +36 24 532 706 mobil: +36 70 335 5300 Sorszám: ........típusú............gyári számú ..................termékre a vásárlástól számított 12 hónapig kötelező jótállást vállalunk a jogszabály szerint. A jótállás lejárta után 3 évig bizto- sítjuk az alkatrész utánpótlást. -
Page 129: Certifi Cat De Garanţie
Distribuitor: Certifi cat de garanţie IWELD KFT. 2314 Halásztelek Str. II.Rákóczi Ferenc 90/B Ungaria Service: Tel: +36 24 532 706 mobil: +36 70 335 5300 Număr: ........tipul............număr de serie ..................necesare sunt garantate timp de 12 luni de la data de produse de cumpărare, în conformitate cu legea. La trei ani după... -
Page 130: Záručný List
Distribútor: ZÁRUČNÝ LIST IWELD KFT. 2314 Halásztelek II. Rákóczi Ferenc út 90/B Service: Tel: +36 24 532 706 mobil: +36 70 335 5300 Poradové číslo: Výrobok: ..........Typ: ............. Výrobné číslo: .......... Na tento výrobok platí záruka 12 mesiacov od kúpy podľa platnej legislatívy. Na uplatnenie záruky je nutné predložiť originál- ny nákupný... - Page 131 www.iweld.hu...
Need help?
Do you have a question about the TIG 2400 AC/DC PFC and is the answer not in the manual?
Questions and answers