Kramer VP-734 Quick Start Manual
Hide thumbs
Also See for VP-734:
- User manual (83 pages) ,
- Quick start manual (2 pages) ,
- Quick start manual (2 pages)
Table of Contents
Advertisement
Quick Links
Scan for full manual
Step 1: Check what's in the box
VP-734 Presentation Switcher/Scaler
Remote control transmitter with batteries
2 C-GM/3RVF-1 cables
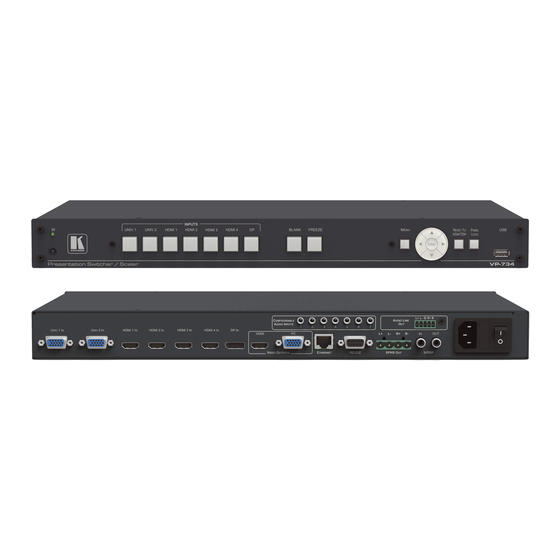
Step 2: Get to know your VP-734
#
Feature
1
IR Sensor
IR LED
2
UNIV. 1
INPUT Selector
Buttons
(illuminate green
3
HDMI™ 1
when selected)
4
DP
5
Program BLANK Button
6
Program FREEZE Button
7
MENU Button
8
ENTER Button
Button
Button
Button
Button
9
RESET TO XGA/720p Button
10
PANEL LOCK Button
11
USB Connector
The terms HDMI, HDMI High-Definition Multimedia Interface, and the HDMI Logo are trademarks or registered trademarks of HDMI Licensing Administrator, Inc.
VP-734 Quick Start
VP-734 Quick Start Guide
This guide helps you install and use your VP-734 for the first time.
Go to
www.kramerav.com/downloads/VP-734
upgrades are available.
Function
Receives signals from the remote control transmitter.
Lights red when the unit accepts IR remote commands.
Press to select the analog video (VGA / component / composite / s-Video) source
(configured via the OSD menu), and the appropriate audio source (from 1 to 2).
Press to select the HDMI source (from 1 to 4).
Press to select the DP source.
Press to toggle between a blank screen (blue or black) and the program display.
The BLANK button can be programmed to mute the audio signal at the same time.
Press to freeze/unfreeze the program output video image. The FREEZE button can be
programmed to mute the audio signal at the same time.
Press to display the OSD menu screen. Press again to return to normal operation.
Press to move to the next level in the OSD screen or to accept a new parameter.
Decreases the range by one step in the OSD screen or moves to the previous level in
the OSD screen.
Decreases the volume level, when not in the OSD menu.
Moves up one step (in the same level) in the OSD screen or moves to the previous slide
when running a slideshow.
Increases the range by one step in the OSD screen.
Increases the volume level, when not in the OSD menu.
Moves down one step (in the same level) in the OSD screen or moves to the next slide
when running a slideshow.
Press and hold to reset to the default resolution (toggles between RESET TO XGA and
720p).
Press to lock/unlock the front panel to prevent unintentional operation
Connects to a USB drive to download a Logo and save settings.
to download the latest user manual and check if firmware
1 Set of rack ears
1 Power cord
P/N:
2900- 301068QS
4 Rubber feet
1 Quick start guide
Rev:
6
Advertisement
Table of Contents

Related Manuals for Kramer VP-734


Summary of Contents for Kramer VP-734
- Page 1 VP-734 Quick Start Guide This guide helps you install and use your VP-734 for the first time. Go to www.kramerav.com/downloads/VP-734 to download the latest user manual and check if firmware Scan for full manual upgrades are available. Step 1: Check what’s in the box...
- Page 2 Step 4: Connect the inputs and outputs Always switch OFF the power on each device before connecting it to your VP-734. For best results, we recommend that you always use Kramer high-performance cables to connect AV equipment to the VP-734.
- Page 3 EDID_SCL Note that PINs 5, 6, 7, 8 and 10 are GND Step 5: Connect the power Connect the power cord to VP-734 and plug it into the mains electricity. Safety Instructions Caution: There are no operator serviceable parts inside the unit.
- Page 4 Technical Specifications Inputs 2 Universal (VGA, Composite, s-Video On 15-pin HD connectors and Component) 4 HDMI On female HDMI connectors 1 DP On a female DisplayPort connector 1 S/PDIF On an RCA connector 7 Unbalanced Stereo Audio On 3.5mm mini jack connectors Outputs 1 HDMI On a female HDMI connector...
Need help?
Do you have a question about the VP-734 and is the answer not in the manual?
Questions and answers