Advertisement
Quick Links
0
BASIC SETUP
nsert the memory card.
• put in batteries + SD
When inserting the memory card, make sure the front side of the
card
card is facing up and insert the card slowly. If the card is
forcibly inserted incorrectly, the R-09HR or the memory card
ing the R-09HR
may be damaged. Please exercise caution.
Carefully insert the memory card all the way in—until it is firmly
ower-onoff-e.eps_80
in place.
• Power up recorder
0
5.
Turn power on.
Press and hold down the [POWER switch] to turn on the
lose the [Bottom Cover].
power.
• press MENU
use the REC button controls
When using a memory card with the R-09HR for the first time, the memory card must be formatted.
to select and set most important
Please format the memory card following the procedure in "Formatting" (p. 27).
"SD Unformatted" is shown when an unformatted memory card is inserted into the R-09HR.
menu items
Removing
• 1. Recorder Setup
1.
Turn off power to the R-09HR.
• sample rate: 44.1 kHz
• rec mode: WAV 24 bit
2.
Open the [Bottom Cover].
• File Name : Date ( this
3.
Lightly push the memory card inward, then release it.
will make it easier to
Remove the memory card after it pops out toward you.
identify files )
Never insert or remove a memory card while this unit's power is on. Doing so may corrupt the data on the
memory card.
• 4. Power Manage
• set battery types
• set auto power off
• 5.Input Setup
• Rec Monitor SW = ON
• 7.Date / Time - set
6
• 8.SD card - format
Press Menu twice to quit
Be careful when you put batteries in. Slide the
backs of the pack on rather than snapping it on.
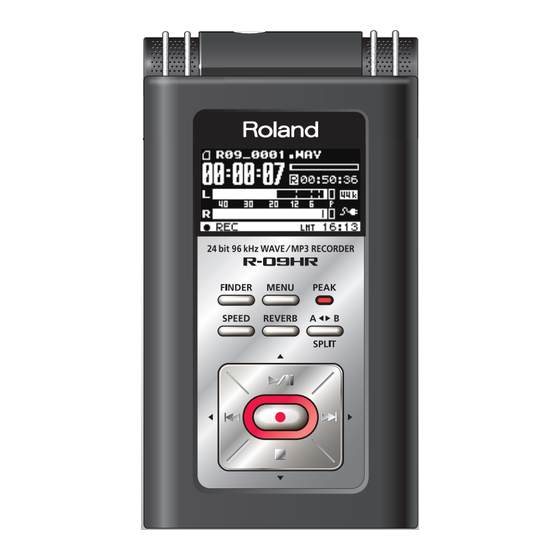
ROLAND R-09HR SMART GUIDE
Front side
24
Hold down
25
28
26
27
25
29
30
Battery compartment
Batteries are inserted here when operating
on battery power.
There is no need to insert batteries when
using the AC adaptor.
§ "Using batteries" (p. 21)
Be sure to turn the R-09HR off before unplugging
the AC adapter.
Preview Monitor
This is an internal speaker used as a monitor.
* No sound is output from the preview monitor
when headphones are connected. Also, no
sound is output from the preview monitor during
recording or recording standby to prevent
feedback.
HOLD switch
Set the HOLD switch to the ON position so
only the following buttons can be used and
to help prevent accidental operations.
Buttons remaining operable when the HOLD
switch is set to ON:
• [LIMITER/AGC Switch
]
• [PLUG-IN POWER Switch
]
• [LOW CUT Switch
]
• [MICROPHONE GAIN Switch
]
LIMITER/AGC (Automatic Gain Control): Keep Off The limiter limits/controls how
loud the highest point of your signal will get. Not really needed for voice recording.
This limiter has a 10:1 ratio: the original signal has to hit 10dB before the
compression allows a 1dB increase.
PLUG-IN POWER:
keep off : it doesn"t work with the mics that we use.
Names of things and what they do
LIMITER/AGC (Auto Gain Control)
switch
This switch turns the LIMITER or AUTO GAIN
CONTROL on or off. Ordinarily, it can be
set to off.
Switching between LIMITER and AUTO
GAIN CONTROL is performed on the
<Menu Screen> (p. 102).
Turns the LIMITER or AUTO GAIN
ON
CONTROL ON.
Records input sounds without chang-
OFF
ing them.
PLUG-IN POWER switch
Slide this switch to the appropriate setting
when you've connected a plug-in powered
microphone to the [MIC Input Jack
].
ON
Plug-in powered microphone is used.
Plug-in powered microphone is not used.
OFF
* When set to use plug-in powered microphones,
using a dynamic microphone or a battery-
powered microphone may cause damage.
LOW CUT switch
This switch turns LOW CUT on or off.
It is usually set to off.
Records while cutting the lower range
portion of the input signal. Turn on
when breath noise (the sound of
ON
breathing while recording a voice) or
wind noise (when recording outside)
may be a problem.
OFF
Records without cutting the lower range.
MIC GAIN switch
This switch changes the sensitivity with
respect to the input from the microphone.
Application
Lowers the microphone sensitivity.
L
Set to L when inputting loud sounds
(LOW)
such as band performances.
Increases the microphone sensitivity.
H
Set to H when inputting softer
(HIGH)
sounds such as meetings.
LOW CUT: Keep Off when recording voice. Generally
used for a very very loud environment.
MIC GAIN: Most times keep at High for voice.
13
R-09HR screens and basic operations
The R-09HR screen
The <Main Screen> is shown when power to the R-09HR is turned on.
The <Finder Screen> and <Menu Screen> can be opened from the <Main Screen>.
fig.mode-e.eps_78
<Main Screen>
This startup screen is shown after
power is turned on.
Songs can be recorded or played.
Hold down
USB connection
RECORDING ( wear headphones )
•Set MIC GAIN switch to High
•Press the REC button to go into pause
•adjust the input levels while the red light flashes
•ideal levels are between 12dB and -6dB
1
Techniques for re
•press REC to start recording
16
speci c instrumen
RECORDING VOICE
•Hold the Roland or microphone 2 to 3 inches below the chin.
•This will reduce popping and ssss sounds.
•Have your subject speak in a normal voice.
•Adjust the Input Level
Record
from
the front
Acoustic Guitar
<Finder Screen>
This screen shows a song list and
allows names to be edited and
songs to be deleted or copied.
<Menu Screen>
You can do things such as set the
date and time, adjust the recording
sound quality, adjust the brightness
of the display, and perform
initializations.
<USB Screen>
This screen is displayed when a PC
is connected via USB. Songs can
be copied (moved) between
the R-09HR and PC.
Vocals
Ideally, recordin
space that exclu
in a room, choo
mental noise (s
echo much.
The mic should
Avoid recording breaths
However, you ca
(when breathing is loud)
to reduce the so
rounded sound,
recorded, depen
To prevent this e
make the sound
Advertisement

Related Manuals for Roland R-09HR


Summary of Contents for Roland R-09HR
- Page 1 Songs can be recorded or played. Records input sounds without chang- <Menu Screen> When using a memory card with the R-09HR for the first time, the memory card must be formatted. to select and set most important ing them. Please format the memory card following the procedure in “Formatting” (p. 27).
- Page 2 • Start recording and say the date and “Roland recorder exercise” and teacher’s name • ( ie: Friday Sept 12th, Roland recorder exercises, Emily Pelstring’s/ Frank Sanna’s sound 1 class. “ • before each interview, identify ( by recording ) who is the interviewer and who is being interviewed •...
Need help?
Do you have a question about the R-09HR and is the answer not in the manual?
Questions and answers