Table of Contents
Advertisement
Quick Links
Advertisement
Table of Contents

Related Manuals for AT&T Velocity 3


Summary of Contents for AT&T Velocity 3
- Page 1 AT&T Velocity ® User Guide DOC20210105...
-
Page 2: Table Of Contents
Contents Introduction . . . . . . . . . . . . . . . . . . . . . . . . . . . . . . . . . . . . . . . . . . . . . . . . . . . . . . . . . . . 5 Getting started . - Page 3 Device settings . . . . . . . . . . . . . . . . . . . . . . . . . . . . . . . . . . . . . . . . . . . . . . . . . . . . . . . . 25 Navigating the user interface .
- Page 4 Troubleshooting . . . . . . . . . . . . . . . . . . . . . . . . . . . . . . . . . . . . . . . . . . . . . . . . . . . . . . . 51 Specifications .
-
Page 5: Introduction
Introduction The following topics describe the basics of using this guide and your new mobile hotspot . About the user guide Thank you for purchasing your new AT&T Velocity 3 mobile hotspot . The ® following topics explain how best to use this guide to get the most out of your mobile hotspot . -
Page 6: Getting Started
Getting started Getting to know your mobile hotspot Back removal notch LCD home screen Power/Navigation button WPS button Factory reset button Micro USB charging port Note: Your mobile hotspot’s screens are subject to change . This user guide uses sample images only . - Page 7 Part Description • Press once to turn the screen on . • Press and hold for three (3) seconds to turn your mobile hotspot on or off . Power/Navigation • From home screen, press one time to scroll through the button main screens . • From main screens, press two times to access the details of each main screen .
-
Page 8: Installation
Installation Install the SIM card A SIM card is pre-inserted . If the SIM card needs to be replaced, follow the below steps: 1 . Gently remove the back cover via the notch indicated by the arrow . Back removal notch 2 . - Page 9 3 . Remove the current SIM by pressing down on the clip and sliding the SIM card out . 4 . Insert a replacement SIM by pressing down on the clip and sliding the SIM card into the SIM slot with the gold contacts facing downward and the cut corner on the bottom left .
-
Page 10: Install The Battery
Install the battery 1 . Insert the battery by aligning the battery contacts with the terminals in the battery compartment . Battery contacts 2 . Reattach the back cover and press firmly around sides and all four corners until it snaps into place . Charge your mobile hotspot 1 . -
Page 11: Turn On Your Mobile Hotspot
Turn on your mobile hotspot Press and hold the Power/Navigation button for three (3) seconds to turn on your mobile hotspot . Check the wireless signal Wait a few seconds for the signal strength icon to display on the screen, which will confirm that your device is connected to the cellular network . -
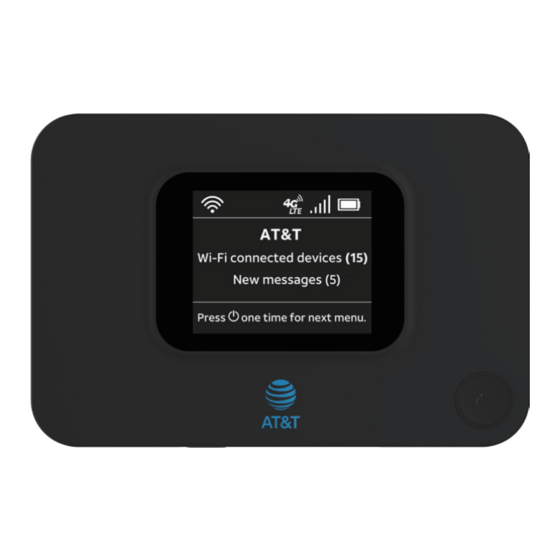
Page 12: Lcd Display Screen
LCD display screen Home screen USB connected Network indicator Wi-Fi indicator Battery indicator Notifications indicator Signal strength indicator Number of connected devices Number of new messages Press the Power/Navigation button one time to scroll through the main screens Note: Display screen will timeout after 1 minute of inactivity to save power . Press the Power/Navigation button one time to wake the screen . - Page 13 Indicator Name Function/Service Wi-Fi indicator Wi-Fi on Notifications indicator New notifications received USB connected USB connected for tethering Network indicator Network information Indicates the signal strength . More Signal strength signal bars indicates higher signal indicator strength . Show battery status: • White: High Battery indicator • Yellow: Medium...
-
Page 14: Other Main Screens
Indicator Name Function/Service Press the Power/Navigation button Press one time for one time to scroll through the main next menu screens Other main screens Press the Power/Navigation button one time to scroll through the main screens, press it two times to access the details of each main screen . Wi-Fi screen Messages screen Notifications screen... -
Page 15: Wi-Fi Info Screen
Wi-Fi Info screen From the Home screen, press the Power/Navigation button one time to access the Wi-Fi Info screen . From the Wi-Fi Info screen, press the Power/Navigation button two times to access the Wi-Fi Info details screen to view your Wi-Fi network name and password . -
Page 16: Messages Screen
Messages screen From the Wi-Fi Info screen, press the Power/Navigation button one time to access the Messages screen . From the Messages screen, press the Power/Navigation button two times to access the Messages details screen to view the latest unread message . Current message/ total number of unread messages... -
Page 17: Device Info Screen
Notifications will disappear automatically when the user has performed the corresponding actions and changed the device status . Notifications indicator Current notification/ total number of notifications Notification contents Press two times If a notification is too long to display in one screen, press the Power/ Navigation button one time to view the next screen of the current notification . -
Page 18: At&T Wi-Fi Manager
AT&T Wi-Fi Manager The AT&T Wi-Fi Manager allows you to easily manage your mobile hotspot . You can: • Customize settings • Change your Wi-Fi network name and password • Check signal strength and important messages from AT&T • Get help and information Access the AT&T Wi-Fi Manager via the Wi-Fi network connection 1 . - Page 19 device label . Note: You can customize the login that is used to access the AT&T Wi-Fi Manager by going to System > Administration . If you have changed the login and have forgotten the new one, you must restore the device to the factory default settings .
- Page 20 Status indicators In addition to the indicators on the LCD display screen of your mobile hotspot, you can find information about your mobile hotspot’s current status at the top of the AT&T Wi-Fi Manager screen . Battery level Green: High Network status indicator Yellow: Medium Technology Icon: 4G LTE...
-
Page 21: Internet Access
Internet access You are required to purchase a Wireless Internet Data plan . Connect via Wi-Fi You can simultaneously connect up to fifteen (15) devices, including smartphones, tablets, and laptops, to your mobile hotspot . 1 . Open the Wi-Fi network manager on your Wi-Fi enabled device that you would like to connect to your mobile hotspot . -
Page 22: Changing Wi-Fi Network Name And Password
Changing Wi-Fi network name and password You can customize your mobile hotspot’s Wi-Fi network name (SSID) and password using the AT&T Wi-Fi Manager . 1 . On any device that is connected to the mobile hotspot, enter http://attwifimanager or http://192 .168 .1 .1 directly into your browser address field . -
Page 23: Hide Wi-Fi Network Name And Password
Hide Wi-Fi network name and password Your Wi-Fi network and password are set as visible by default on your mobile hotspot’s Wi-Fi Info details screen . You can hide them using the AT&T Wi-Fi Manager . 1 . Log into the AT&T Wi-Fi Manager . 2 . -
Page 24: Connect Via Wps
Connect via WPS Wi-Fi Protected Setup (WPS) allows WPS-enabled devices to be connected to a Wi-Fi network without having to type a Wi-Fi password . 1 . With your mobile hotspot powered on, press and hold the WPS button for one (1) second . -
Page 25: Device Settings
Device settings The topics in this section will cover your mobile hotspot settings and options using the AT&T Wi-Fi Manager . To access the AT&T Wi-Fi Manager, first connect your device to your mobile hotspot and enter http://attwifimanager or http://192 .168 .1 .1 directly into your browser address field . -
Page 26: Sub-Menu
Sub-menu The Networking and System sections have additional sub-menu displayed horizontally at the top of the screen, for example: Help Click the Help icon on top of any page to access the information on the settings displayed on that page . Device information The Device information page displays an overview of your mobile hotspot’s status such as whether there are unread messages, firmware version, network... -
Page 27: Connected Devices
Connected devices The Connected devices page displays a list of Wi-Fi devices that are currently connected to your mobile hotspot . You can monitor who has access to your network and block (or unblock) devices as required . To block a device, follow the below steps: 1 . -
Page 28: Wi-Fi
Wi-Fi Wi-Fi page displays a summary of the current configuration of the 2 .4 GHz and 5 GHz Wi-Fi settings of your mobile hotspot . Your mobile hotspot does not simultaneously broadcast 2 .4 GHz and 5 GHz Wi-Fi networks . The default Wi-Fi network is 2 .4 GHz . To switch to the 5 GHz Wi-Fi network, select Enable at 5 GHz Wi-Fi section . - Page 29 To make changes to the current configuration, click the EDIT button . Operating frequency • Mode: Display which mode is active for connecting via Wi-Fi . It allows the device to accept connections from devices supporting 802 .11b/g/n (on 2 .4 GHz) or 802 .11a/n/ac (on 5 GHz) .
- Page 30 • Channel: Display the wireless channel that the radio is operating on . In most situations, leaving this as Automatic will work best, but you can manually change the channel selection using this option . • Width: When 802 .11n is selected in mode, width option is displayed . You can select 20MHz or 40MHz for this option .
- Page 31 Show network name and password on device When selected, the network name and password will be visible on your mobile hotspot’s LCD display screen . To hide the network name and password on your mobile hotspot’s LCD display screen, uncheck this checkbox . This checkbox is marked by default .
- Page 32 WPS, or Wi-Fi Protected Setup, is a network security standard that allows for an easy connection to a secure wireless network . This feature is turned on by default . If you change these settings, currently connected devices may be disconnected .
-
Page 33: Messages
Messages The Messages page displays text messages received by your mobile hotspot . This may include messages from AT&T about your service plan . Note: It displays up to 100 messages . When there are more than 100 messages, older messages will be automatically deleted to make room for the new messages . -
Page 34: Networking
Networking Mobile data The Mobile data page lets you enable or disable the mobile data . DHCP These settings affect the Local Area Network connection . - Page 35 • IPv4 address: Display the IPv4 address of your mobile hotspot . By default, this is set to 192 .168 .1 .1 . • IPv4 netmask: Display the IPv4 Netmask of your mobile hotspot . By default, this is set to 255 .255 .255 .0 . • DHCP server: Select to enable or disable the DHCP server on your mobile hotspot .
-
Page 36: Dmz
The DMZ, or Demilitarized Zone, opens up all ports to a specific local host . This means the specified host will not be protected by the built-in firewall . Therefore, this feature should be used with care . DMZ is set to Disable by default . Port forwarding Port forwarding allows remote computers on the Internet to connect to a specific computer or service within the private LAN . - Page 37 To create a new rule, click the ADD button . Enter the below required details: • Rule name: Set a name of the new rule to be added . • Protocol: Select TCP+UDP , TCP , or UDP traffic types to be directed . • External ports: Enter the external port number .
-
Page 38: Mac/Ip/Port Filtering
MAC/IP/Port filtering This feature can be used to allow or block certain users and/or ports from accessing the Internet . Global parameter You can quickly turn the filtering on or off for all rules by selecting Enable or Disable here . Existing rules You can view existing rules here . - Page 39 Enter the below required details: • Rule name: Set a name of the new rule to be added . • Bound: Select Outbound or Inbound to set packet from LAN to WAN, or WAN to LAN . • Source MAC: Enter the source MAC address . • Source IP: Enter the IP address that the traffic will be filtered from .
-
Page 40: Vpn Passthrough
• Protocol: Select ALL, TCP+UDP, TCP, UDP, or ICMP as the traffic types to be filtered . • Source ports: Enter the ports number that traffic will be filtered from . • Destination ports: Enter the ports number to which traffic will be filtered . • Action: Select Drop, Accept, or Reject to deny or allow the access to the Internet . -
Page 41: Security Level
Security level This feature protects the internal network according to the preconfigured security policy . The default setting is disabled . When you select Enable, there are Low, Medium and High security levels for your selection . You can select Customized security to set your own options . Mark the checkboxes to allow traffic on the local network via the specified protocols . -
Page 42: Parental Control
Parental control The Parental control page is used to keep a list of rules to control access to specific websites . Rules can be applied to specific devices on your local area network and at specific times . To create a rule, click the ADD button . - Page 43 Fill the below required details: • Rule name: Enter a name for this rule so that it is easily identifiable . • Device name: Select the local device on your network to create a rule for . • Allow Internet: Select to allow or deny Internet access to this device . • Blocked websites: Enter the domain name of the site you want to block .
-
Page 44: System
System Date & time The Date & time page lets you set the time, time zone, and the Network Time Protocol (NTP) server to use for synchronization . The time on your mobile hotspot is important for accurate logging of messages and parental control . Manual set time To manually set the time, select Manual set time, then use the drop-down lists to select the date and time, and click the SAVE &... -
Page 45: Administration
NTP auto synchronization When selected, it enables the synchronization of the date and time between your device and the system time on the network . You will need to select the time zone that the device is located in by using the Timezone drop-down list . Network auto synchronization When selected, it enables the synchronization of the date and time between your device and the cellular network . -
Page 46: Reset
Reset The Reset page is used to reset your mobile hotspot to the factory default settings . Note: Take care with using this feature as all settings and messages stored on the device will be lost when the device is factory reset . Power saving The Power Saving page lets you set the screen timeout . -
Page 47: Mobile Network
Mobile network The Mobile network page allows you to set a custom APN for your network connection . To use a custom APN, select the ADD and fill in the appropriate information before selecting SAVE & APPLY . The custom APN can be set to the default APN by selecting SET DEFAULT APN . - Page 48 Access point name Enter a corporate account with your own custom APN . Authentication Select the authentication method specified by your service provider . User name If the authentication selection is none, this can be left blank . Otherwise enter the user name provided by your service provider .
-
Page 49: Network Unlock
Network unlock The Network unlock page is used to UNLOCK the network . If the device is locked to AT&T network, follow the below steps to unlock: 1 . Contact AT&T Customer Care to get an unlock code by the following three ways: • Dial 611 from an AT&T cell phone. -
Page 50: Software Update
Software update Software updates are delivered automatically over the mobile network . This page allows you to monitor these updates . Current Software Version Displays the current software version installed on device . Check For Updates Click to check for the latest software update . Continue Update Click to resume software update . -
Page 51: Troubleshooting
Troubleshooting Check below for solutions to common problems you may experience . Problem Possible solutions • Restart the mobile hotspot . The device cannot connect to the • Restart the device you want to connect (laptop, mobile hotspot smartphone, etc .) . • Confirm the Wi-Fi network name (SSID) and password (KEY) and establish a new connection to the mobile hotspot . - Page 52 Problem Possible solutions Forgot the The default password to your Wi-Fi network can be password to the easily found on the mobile hotspot’s Wi-Fi Info details Wi-Fi network screen, see “Wi-Fi Info screen” on page 15 . If you need to change your Wi-Fi password, see “Changing Wi-Fi network name and password”...
- Page 53 Problem Possible solutions Forgot the The default password to the AT&T Wi-Fi Manager can be password to easily found on the device label located underneath the AT&T Wi-Fi the battery of your mobile hotspot . Manager If you need to change your AT&T Wi-Fi Manager password, see “Administration”...
-
Page 54: Specifications
Specifications The following tables list your mobile hotspot’s specifications . Specification Description Weight Approx . 111g . (3 .92 oz .) Dimensions (L x W x H) 109mm x 73mm x 13 .5mm Display 1 .77”, 128 x 160 Single-core, Cortex-A7, 1 .3 GHz, Processor Qualcomm MDM9207 Memory... -
Page 55: Safety And Use
Safety and use The topics in this section will introduce how to use your mobile hotspot safely . Please read before proceeding THE BATTERY IS NOT FULLY CHARGED WHEN YOU TAKE IT OUT OF THE BOX . DO NOT REMOVE THE BATTERY PACK WHEN THE DEVICE IS CHARGING . Important health information and safety precautions When using this product, the safety precautions below must be taken to avoid... -
Page 56: Safety Precautions For Power Supply Unit
When connecting with a USB cable to desktop or notebook computers, be sure your computer is properly grounded (earthed) before connecting this product to the computer . The power supply cord of a desktop or notebook computer has an equipment grounding conductor and a grounding plug . The plug must be plugged into an appropriate outlet that is properly installed and grounded in accordance with all local codes and ordinances . - Page 57 To reduce the risk of fire or burns, do not disassemble, crush, puncture, short circuit the external contacts, expose to temperature above 113°F (45°C), or dispose of in fire or water . Replace only with specified batteries . Recycle or dispose of used batteries according to the local regulations or guide supplied with your product .
- Page 58 • Replace the battery only with another battery that has been qualified with the system per this standard: IEEE-Std-1725 . Use of an unqualified battery may present a risk of fire, explosion, leakage, or other hazards . • Promptly dispose of used batteries in accordance with local regulations . • Avoid dropping the device or battery .
- Page 59 Safety in aircraft Due to possible interference caused by this product to an aircraft's navigation system and its communications network, using this device on board an airplane is against the law in most countries . If you want to use this device while on board an aircraft, remember to turn off the device .
- Page 60 Safety precautions for RF exposure • Avoid using your device near metal structures (for example, the steel frame of a building) . • Avoid using your device near strong electromagnetic sources, such as microwave ovens, sound speakers, TV, and radio . • Use only original manufacturer-approved accessories or accessories that do not contain any metal .
- Page 61 Non-ionizing radiation Your device has an internal antenna . This product should be operated in its normal-use position to ensure the radioactive performance and safety of the interference . As with other mobile radio transmitting equipment, users are advised that for satisfactory operation of the equipment and for the safety of personnel, it is recommended that no part of the human body be allowed to come too close to the antenna during operation of the equipment .
- Page 62 Faulty and damaged products • Do not attempt to disassemble the device or its accessories . • Only qualified personnel may service or repair the device or its accessories . General precautions You alone are responsible for how you use your device and any consequences of its use .
-
Page 63: Protect Your Device
Protect your device • Always treat your device and its accessories with care and keep them in a clean and dust-free environment . • Do not expose your device or its accessories to open flames or lit tobacco products . • Do not expose your device or its accessories to liquid, moisture, or high humidity . - Page 64 • The product does not operate normally when you follow the operating instructions . Avoid hot areas The product should be placed away from heat sources such as radiators, heat registers, stoves, or any device producing heat . Avoid wet areas Never use the product in a wet location .
- Page 65 Mounting accessories Do not use the product on an unstable table, cart, stand, tripod, or bracket . Any mounting of the product should follow the manufacturer's instructions and should use a mounting accessory recommended by the manufacturer . Avoid unstable mounting Do not place the product with an unstable base .
-
Page 66: Fcc Regulations
Regulatory agency identifications FCC Regulations This mobile hotspot complies with Part 15 of the FCC Rules . Operation is subject to the following two conditions: (1) This device may not cause harmful interference, and (2) this device must accept any interference received, including interference that may cause undesired operation . -
Page 67: Rf Exposure Information (Sar)
RF Exposure Information (SAR) This mobile hotspot meets the government's requirements for exposure to radio waves . This device is designed and manufactured not to exceed the emission limits for exposure to radio frequency (RF) energy set by the Federal Communications Commission of the U .S . -
Page 68: Warranty
the ear, position the handset a minimum of 1 .5 cm from your body when the device is switched on . Warranty With this manufacturer’s warranty (hereinafter: the “Warranty”), Emblem Solutions (hereinafter: the “Manufacturer”) guarantees this product against any material, design and manufacturing defects . The duration of this Warranty is specified in article 1 below . - Page 69 Implementation of the Warranty If your product is faulty under normal conditions of use and maintenance, in order to benefit from the present warranty, please contact the Returns Center at 1(800) 801-1101 for assistance . The customer support center will then provide you with instructions on how to return the product for support under warranty .
- Page 70 6 . Defects and damage due to the exposure of the product to humidity, extreme temperatures, corrosion, oxidation, or to any spillage of food or liquids, chemicals and generally any substance likely to alter the product . 7 . Any failure of embedded services and applications that have not been developed by Manufacturer and whose functioning is the exclusive responsibility of their designers .
Need help?
Do you have a question about the Velocity 3 and is the answer not in the manual?
Questions and answers