
Related Manuals for Echogear EGSF1


Summary of Contents for Echogear EGSF1
- Page 1 EGSF1 INSTRUCTION MANUAL We’ll Make It Stress-Free If you have any questions along the way, contact us at www.echogear.com. We’re ready to help!
- Page 2 This mount is NOT compatible. 25 lbs. with the maximum weights indicated. Use with products weigh MORE than Visit echogear.com to fi nd a compatible heavier than the maximum weights indicated may result (11.3 kg) in collapse of the mount and its accessories, causing 25 lbs.
-
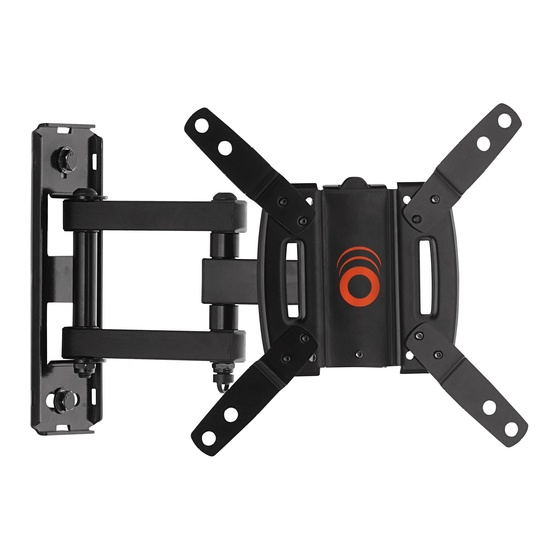
Page 3: Wall Plate
Dimensions TV INTERFACE 7.87in 200mm .35in 8.8mm 3.94in 100mm 7.87in 200mm WALL PLATE TOP VIEW - EXTENDED SIDE VIEW - EXTENDED 2.80in 16deg DOWN TILT 71mm 10.47in 265.9mm 6.40in 8.15in 162.6mm 207.1mm 30deg 30deg 4deg UP TILT 30° SWIVEL LEFT AND RIGHT WITH AN APPROXIMATE 32" TV SIDE VIEW - RETRACTED FULLY ASSEMBLED MOUNT TOP VIEW - RETRACTED... - Page 4 STEP 1 Attach TV Bracket to TV STEP 1 Parts and Hardware WARNING: This product contains small items that could be a choking hazard if swallowed. Before starting assembly, verify all parts are included and undamaged. If any parts are missing or damaged, do not return the damaged item to your dealer;...
- Page 5 1.1 Measure TV hole pattern 1.2 Assemble Your TV Bracket 100 mm = 10 cm ≈ 4 in. 7.5 x 7.5 130 mm = 13 cm ≈ 5 1/8 in. 10.0 x 10.0 200 mm = 20 cm ≈ 7 7/8 in. 300 mm = 30 cm ≈...
- Page 6 20.0 x 20.0 20.0 x 10.0 20.0 cm 20.0 cm 20.0 cm 10.0 cm...
- Page 7 1.3 Select TV Screws 1.4 Spacers? Long Screw crew Washer Short Screw Bracket Washer Bracket Spacer...
- Page 8 1.5 Attach TV Bracket CAUTION: Ensure TV bracket is securely fastened before moving on to the next step. TV Bracket Confi gurations Flat Back NOTE: 04 05 06 07 For 20.0 x 20.0 cm or 20.0 x 10.0 cm hole patterns, you may need to loosen the screws to align the bracket extenders After bracket extenders...
- Page 9 Lag Screws 5/16 x 2¾ in. Concrete Installation Kit CMK1 (NOT INCLUDED) Contact Customer Service at www.echogear.com to have these additional pieces shipped directly to you. 5/16 x 2¾ in. 5/16 x 2¾ in. .695 x .350 x .075 in.
- Page 10 STEP 2A Wood Stud Option Min. Wood Stud Size: nominal 2 in. (51 mm) actual 1 ½ in. (38 mm) Min. Wood Stud Size: Max. 5/8 in. (16 mm) nominal 4 in. (102 mm) actual 3 ½ in. (89 mm)
- Page 11 2¾ in. (70 mm) 7/32 in. (5.5 mm)
- Page 12 CAUTION: Avoid potential personal injury or property damage! All lag screws MUST BE firmly tightened to prevent unwanted movement of the wall plate assembly. Ensure the wall plate assembly is securely fastened to the wall before continuing on to the next step. NOTE : If needed, you can make small level adjustments to the wall plate assembly...
- Page 13 Concrete Installation Kit CMK1 is not included (see page 9) damage! Mount the wall plate directly onto the concrete surface. Contact Customer Service at www.echogear.com to have the additional hardware shipped directly to you. CAUTION: Never drill into the mortar between blocks.
- Page 14 MUST BE firmly tightened to prevent unwanted movement of the wall plate assembly. Ensure the wall plate assembly is securely fastened to the wall before continuing on to the next step. Contact Customer Service at www.echogear.com to have the Concrete Installation Kit shipped directly to you.
- Page 15 STEP 3 Hang TV onto Wall Plate STEP 3 Parts and Hardware Additional Parts and Hardware Securement Screw Cable Ties Securement Washer Tilt Tension Adjustment Wrench 7/32 in.
- Page 16 HEAVY! You may need assistance with this step. CAUTION: Avoid potential personal injuries and property damage! This securement screw must be installed to secure the TV onto the wall plate assembly Top Support...
-
Page 17: Manage Cables
Manage Cables IMPORTANT: Fully extend the arm of wall plate assembly to ensure you have enough slack in the cables for full TV movement. -
Page 18: Tilt Adjustment
TV Adjustments TILT ADJUSTMENT LEVEL ADJUSTMENT REMOVING THE TV To remove your TV from the wall plate Your TV should adjust easily when moved, To adjust the leveling of your TV, loosen then stay in place. assembly , disconnect all cables and the securement screw , level your If your TV is too loose or too tight, adjust the... - Page 19 Features Fully articulating arm with 3 Adjustments allow fi ngertip control pivot points creates optimal of TV or restriction of TV movement viewing positions TV bracket expands to fi t TV hole patterns from 75 x 75 mm up to 200 x 200 mm Level adjustments...
- Page 20 Milestone assumes no responsibility for accuracy, completeness or suffi ciency of the information contained in this document. ©2016 Milestone AV Technologies. All rights reserved. ECHOGEAR is a Milestone brand. ECHOGEAR and the ECHOGEAR logo are trademarks of Milestone.
Need help?
Do you have a question about the EGSF1 and is the answer not in the manual?
Questions and answers