Table of Contents
Advertisement
Available languages
Available languages
Advertisement
Table of Contents

Subscribe to Our Youtube Channel
Related Manuals for NEO TOOLS 90-093


Summary of Contents for NEO TOOLS 90-093
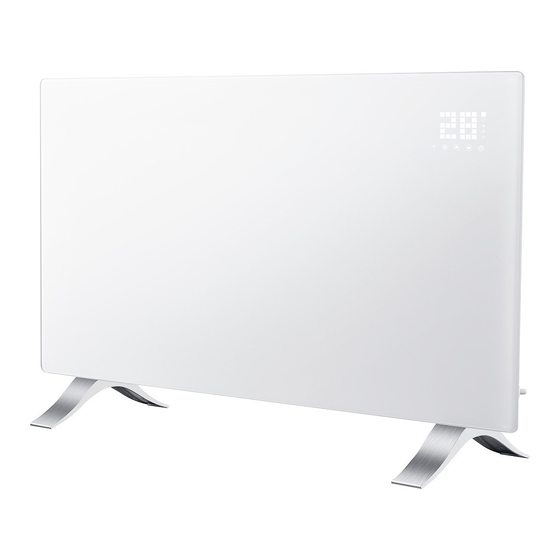
- Page 1 PANEL GRZEWCZY PANEL HEATER PANELHEIZUNG PANEL FŰTŐ ÎNCĂLZITOR PANEL OHŘEV PANELU OHRIEVAČE PANELU PANELĖS ŠILDYTUVAS Paneļa sildītājs RISCALDATORE A PANNELLO PANEELVERWARMING PANNEAU CHAUFFANT MODEL: 90-093/90-094/90-095...
- Page 2 INSTRUKCJA ORYGINALNA (OBSŁUGI) PANEL GRZEWCZY 90-093 / 90-094 / 90-095 UWAGA: PRZED PRZYSTĄPIENIEM DO UŻYTKOWANIA SPRZĘTU NALEŻY UWAŻNIE PRZECZYTAĆ NINIEJSZĄ INSTRUKCJĘ I ZACHOWAĆ JĄ DO DALSZEGO WYKORZYSTANIA. OSOBY, KTÓRE NIE PRZECZYTAŁY INSTRUKCJI NIE POWINNY PRZEPROWADZAĆ MONTAŻU, REGULACJI LUB OBSŁUGIWAĆ URZĄDZENIA.
-
Page 3: Zawartość Opakowania
INSTRUKCJA MONTAŻU Model L mm H mm 90-093 90-094 90-095 Otwórz opakowanie i wyciągnij panel grzewczy wraz z zestawem do montażu. Zaznacz i wywierć w ścianie otwory w odpowiednim miejscu. Upewnij się, że odległość między otworami odpowiada wspornikom z tyłu panelu grzewczego. -
Page 4: Instrukcja Użytkowania
INSTRUKCJA UŻYTKOWANIA Panel sterowania Wylot powietrza Włącznik Podstawka Panel sterowania/Pilot zdalnego sterowania Wskaźnik Timera Ustawienia Zwiększ Jednostka temperatury Wyświetlacz temperatury Zmniejsz 10 - Włącz/Wyłącz 11 - Tryb ECO Sygnalizacja pracy elementu grzejnego 12 - Zmiana mocy grzewczej Wskaźnik WiFi (jeżeli połączone wskaźnik podświetlony, Niska moc grzewcza 13 - jeżeli niepołączone wskaźnik miga) - Page 5 W trybie wyłączonego grzania naciśnij przycisk 1 dwukrotnie aby ustawić Timer (0H do 24H) oraz przyciski 2 i 3 aby ustawić temperaturę. Po zakończeniu wykonywania ustawień wskaźnik 8 będzie świecił do momentu upłynięcia czasu. Wyświetlacz wskaże aktualną temperaturę otoczenia. Urządzenie rozpocznie prace z wysoką mocą grzewczą. Czas zakończenia grzania W trybie grzania (wysoka lub niska moc grzewcza) naciśnij przycisk 1 dwukrotnie aby ustawić...
-
Page 6: Wymiana Baterii
Obsługa aplikacji Poziom ogrzewania Ustawianie temperatury Temperatura otoczenia Ogrzewanie Zmniejsz temperaturę Wysoka Niska Średnia Włącz / Wyłącz Tryb Funkcje Zabezpieczenie przed dziećmi Zwiększ temperaturę Blokada rodzicielska Odliczanie °C / F Harmonogram WYMIANA BATERII Aby odblokować pokrywę baterii należy delikatnie pociągnąć pokrywę. Włóż... - Page 7 Identyfikator(-y) modelu: 90-093 Oznaczenie Wartość Parametr Jednostka Parametr Jednostka Sposób doprowadzania ciepła wyłącznie w przypadku elektrycznych akumulacyjnych miejscowych ogrzewaczy pomieszczeń (należy wybrać Moc cieplna jedną opcję) Ręczny regulator doprowadzania ciepła z wbudowanym Nominalna moc cieplna [nie] termostatem Ręczny regulator doprowadzania ciepła z pomiarem Minimalna moc cieplna 0.5.
- Page 8 Regulacja temperatury w pomieszczeniu z wykrywaniem [nie] obecności Regulacja temperatury w pomieszczeniu z wykrywaniem [tak] otwartego okna Z regulacją na odległość [tak] Z adaptacyjną regulacją startu [nie] Z ograniczeniem czasu pracy [nie] Z czujnikiem ciepła promieniowania [tak] Dane kontaktowe Grupa Topex Sp. z o. o. Sp. k. Ul. Pograniczna 2/4, 02-285 Warszawa Podsumowanie: W przypadku miejscowych elektrycznych ogrzewaczy pomieszczeń...
-
Page 9: Technical Specifications
27. Children should be supervised to ensure that they do not play with the appliance. 28. If the heater has been dropped or damaged in any manner. Return it to authorized service facility for examination, electrical or mechanical adjustment, or repair. TECHNICAL SPECIFICATIONS Model 90-093 90-094 90-095 Rated power 500W/1000W... -
Page 10: Packing List
ASSEMBLY INSTRUCTION Model L mm H mm 90-093 90-094 90-095 Unpack your package and find the heater together with the wall mounting accessories pack. Mark the positions of the four holes to be drilled on the wall, and Drill the holes with the drill bit. Make sure the distance between each holes is same as the round holes on the brackets at back of the heater. -
Page 11: Using Instructions
USING INSTRUCTIONS Control panel/Remote control Setting Button Timer Indicator Up Button Temperature Indicator Down Button 10. LED Number Display Power Button 11. ECO function Heating Element Working Indicator 12. Low/High Heating Selection Low Heating Indicator 13. WiFi indicator (If connected OK, wifi indicator lights on; if failed) High heating Indicator Starting −... - Page 12 In off-heating mode, press 1 twice to set timer( 0H to 24H), and 2&3 to set temperature. After setting, it shows area temperature. Indicator 8 lights on in timer period and off when timer ends, then heater starts heating at high level. Timer Stop Heating Time In heating mode( high or low level), press 1 twice to set timer and 2 3 to set temperature.
-
Page 13: Battery Change
Information on utilization can be provided by the product vendor or the local authorities. Waste electrical and electronic equipment contains substances that are not neutral to the natural environment. Equipment that is not recycled constitutes a potential hazard to the environment and to human health. Model identifier(s): 90-093 Item Symbol... - Page 14 With electronic room temperature control [no] Electronic room temperature control plus day timer [no] Electronic room temperature control plus week timer [yes] Other control options (multiple selections possible) Room temperature control, with presence detection [no] Room temperature control, with open window detection [yes] With distance control option [yes]...
-
Page 15: Technische Spezifikationen
Wenn die Heizung heruntergefallen oder auf irgendeine Weise beschädigt wurde. Senden Sie es zur Prüfung, elektrischen oder mechanischen Einstellung oder Reparatur an eine autorisierte Serviceeinrichtung zurück. TECHNISCHE SPEZIFIKATIONEN Modell 90-093 90-094 90-095 750 W / 1500 1000 W / 2000 Nennleistung 500 W / 1000 W. - Page 16 − 2x Unterstützung − 8x Metallschraube für Stützen BAUANLEITUNG Modell 90-093 90-094 90-095 Packen Sie Ihr Paket aus und suchen Sie die Heizung zusammen mit dem Zubehörpaket für die Wandmontage. Markieren Sie die Positionen der vier Löcher, die an der Wand gebohrt werden sollen, und bohren Sie die Löcher mit dem Bohrer.
- Page 17 Heben Sie die Heizung an und richten Sie die runden Löcher in den Halterungen an der Rückseite der Heizung auf die Schrauben an der Wand. Schieben Sie die Heizung 10 mm nach rechts Stellen Sie sicher, dass der Abstand zwischen der Unterseite der Heizung und dem Boden bei der Installation der Heizung mindestens 10 cm beträgt VERWENDUNG VON ANWEISUNGEN Bedienfeld / Fernbedienung...
- Page 18 Drücken Sie die Taste 1 , die Temperaturanzeige blinkt und die Einstellung wird aktiviert. Drücken Sie 2 oder 3, um die Temperatur einzustellen, und 1, um sie zu speichern, oder lassen Sie sie einfach 5 Sekunden lang. Die Einstellung wird automatisch gespeichert. Drücken Sie 2/3 auf dem Remoter, um die gewünschte Temperatur zu erhalten, und speichern Sie die Einstellung mit OK.
-
Page 19: Reinigung Und Wartung
Informationen zur Nutzung können vom Produktanbieter oder den örtlichen Behörden bereitgestellt werden. Elektro- und Elektronikaltgeräte enthalten Stoffe, die für die natürliche Umwelt nicht neutral sind. Geräte, die nicht recycelt werden, stellen eine potenzielle Gefahr für die Umwelt und die menschliche Gesundheit dar. Modellkennung (en): 90-093 Artikel Symbol... - Page 20 Im Standby-Modus 0. 4 Zwei oder mehr manuelle Stufen, keine Raumtemperaturregelung [Nein] Mit mechanischer Thermostat-Raumtemperaturregelung [Nein] Mit elektronischer Raumtemperaturregelung [Nein] Elektronische Raumtemperaturregelung plus Tagestimer [Nein] Elektronische Raumtemperaturregelung plus Wochenzeitschaltuhr [Ja] Andere Steuerungsoptionen (Mehrfachauswahl möglich) Raumtemperaturregelung mit Anwesenheitserkennung [Nein] Raumtemperaturregelung mit Erkennung offener Fenster [Ja] Mit Abstandsregelung [Ja]...
-
Page 21: Műszaki Adatok
A gyermekeket felügyelni kell annak biztosítása érdekében, hogy ne játsszanak a készülékkel. Ha a melegítő leesett vagy bármilyen módon megsérült. Helyezze vissza a hivatalos szervizbe, hogy ellenőrizze, elektromos vagy mechanikusan beállítsa vagy javítsa. MŰSZAKI ADATOK Modell 90-093 90-094 90-095 750W 1000W / 2000W Névleges teljesítmény... - Page 22 − 2x támogatás − 8x fém csavar a tartókhoz ÖSSZESZERELÉSI ÚTMUTATÓ Modell 90-093 90-094 90-095 Csomagolja ki a csomagot, és keresse meg a melegítőt a falra szerelhető kiegészítő csomaggal együtt. Jelölje meg a négy fúrható lyuk helyzetét a falon, és fúrja be a lyukakat a fúróval. Ügyeljen arra, hogy az egyes lyukak közötti távolság megegyezzen a fűtőtest hátulján lévő...
- Page 23 UTASÍTÁSOK HASZNÁLATA Vezérlőpult / távirányító Időzítő jelző Beállító gomb Hőmérséklet jelző Fel gombra LED számkijelző Le gomb Bekapcsológomb ECO funkció A fűtőelem működési jelzője Alacsony / magas fűtés választás Alacsony fűtési jelző WiFi jelző (Ha a csatlakozás rendben van, a wifi jelzőfény világít; Magas fűtésjelző...
- Page 24 Az időzítő fűtési ideje A ki - fűtés üzemmódban , nyomja meg az 1 kétszer beállított időzítő ( 0H a 24H ), és a 2 és 3 a beállított hőmérsékletet . A beállítás után , ez azt mutatja, a területen a hőmérséklet . A 8. jelzőfény az időzítő időszakban világít, és az időzítés végén kialszik , majd a fűtőelem magas szintű fűtést indít .
- Page 25 A felhasználásra vonatkozó információkat a termék forgalmazója vagy a helyi hatóságok nyújthatják. Az elektromos és elektronikus hulladékok olyan anyagokat tartalmaznak, amelyek nem semlegesek a természetes környezettel szemben. A nem újrafeldolgozott berendezések potenciális veszélyt jelentenek a környezetre és az emberi egészségre. Modell azonosító (k): 90-093 Tétel Szimbólum Érték Mértékegység Tétel Mértékegy...
- Page 26 Egyfokozatú hőteljesítmény és szobahőmérséklet-szabályozás [nem] Minimális hőteljesítmény mellett 0,478 nélkül Két vagy több kézi fokozat, szobahőmérséklet-szabályozás [nem] Készenléti állapotban nélkül Mechanikus termosztát helyiséghőmérséklet-szabályozással [nem] Elektronikus szobahőmérséklet-szabályozással [nem] Elektronikus szobahőmérséklet-szabályozás plusz nappali [nem] időzítő Elektronikus szobahőmérséklet-szabályozás plusz heti időzítő [Igen] Egyéb vezérlési lehetőségek (több választás lehetséges) Szobahőmérséklet-szabályozás jelenlét-érzékeléssel [nem] Szobahőmérséklet-szabályozás, nyitott ablak érzékeléssel...
- Page 27 Elektronikus szobahőmérséklet-szabályozás plusz heti időzítő [Igen] Egyéb vezérlési lehetőségek (több választás lehetséges) Szobahőmérséklet-szabályozás jelenlét-érzékeléssel [nem] Szobahőmérséklet-szabályozás, nyitott ablak érzékeléssel [Igen] Távolságvezérlő opcióval [Igen] Adaptív indításvezérléssel [nem] A munkaidő korlátozásával [nem] Fekete izzó érzékelővel [Igen] Elérhetőségeit: Grupa Topex Sp. z oo Sp. k. Ul. Pograniczna 2/4, 02-285 Warszawa Megjegyzés: Elektromos helyiségfűtő...
-
Page 28: Specificatii Tehnice
Copiii trebuie supravegheați pentru a se asigura că nu se joacă cu aparatul. Dacă încălzitorul a fost căzut sau deteriorat în vreun fel. Întoarceți-l la unitatea de service autorizată pentru examinare, reglare electrică sau mecanică sau reparație. SPECIFICATII TEHNICE Model 90-093 90-094 90-095 750W 1000W / 2000W Putere nominală... - Page 29 Despachetați pachetul și găsiți încălzitorul împreună cu pachetul de accesorii de montaj pe perete. Marcați pozițiile celor patru găuri care urmează să fie găurite pe perete și găuriți găurile cu burghiu. Asigurați-vă că distanța dintre fiecare orificiu este aceeași cu orificiile rotunde de pe suporturi din spatele încălzitorului. Introduceți șinele de plastic care se potrivesc în găuri.
- Page 30 Indicator de temperatură Buton sus Afișaj număr LED Buton jos Funcția ECO Butonul de pornire Indicator de lucru al elementului de încălzire Selecție de încălzire joasă / înaltă Indicator de încălzire scăzut Indicator WiFi (Dacă este conectat OK, indicatorul wifi se Indicator de încălzire ridicat aprinde;...
-
Page 31: Schimbarea Bateriei
Aplicația va afișa opțiunile de „intermitere rapidă” și „intermitere lentă”. Selectați „intermitent rapid” sau aplicația va căuta dispozitivul în sine după un timp. După stabilirea conexiunii dintre aplicație și dispozitiv, numele dispozitivului va apărea în aplicație. Selectați selecția dispozitivului, apoi panoul de control va apărea în aplicație. Aplicația este gata să... - Page 32 Identificator (e) de model: 90-093 Articol Simbol Valoare Unitate Articol Tipul de intrare de căldură, numai pentru încălzitoarele spațiale locale de Puterea de căldură stocare electrică (selectați una) Control manual de încărcare a căldurii cu termostat integrat Puterea nominală de căldură...
- Page 33 În cazul încălzitorilor locali electrici, eficiența energetică de încălzire a spațiului sezonier măsurată nu poate fi mai mică decât valoarea declarată la puterea de căldură nominală a unității. Identificator (e) de model: 90-095 Articol Simbol Valoare Unitate Articol Tipul de intrare de căldură, numai pentru încălzitoarele spațiale locale de Puterea de căldură...
-
Page 34: Technické Specifikace
Děti by měly být pod dozorem, aby se zajistilo, že si se zařízením nebudou hrát. Pokud ohřívač nějakým způsobem upadl nebo byl poškozen. Vraťte jej do autorizovaného servisního zařízení za účelem kontroly, elektrického nebo mechanického seřízení nebo opravy. TECHNICKÉ SPECIFIKACE Modelka 90-093 90-094 90-095 750 W / 1500 1 000 W / 2 000 Jmenovitý... - Page 35 Modelka 90-093 90-094 90-095 Vybalte balíček a najděte topné těleso spolu se sadou příslušenství pro montáž na zeď. Označte pozice čtyř otvorů, které mají být vyvrtány na zdi, a vyvrtejte otvory vrtákem. Ujistěte se, že vzdálenost mezi jednotlivými otvory je stejná jako kulaté otvory v držácích na zadní straně ohřívače.
- Page 36 Ovládací panel / dálkové ovládání Tlačítko nastavení Indikátor časovače Tlačítko Nahoru Ukazatel teploty Tlačítko dolů Zobrazení čísla LED Tlačítko napájení Funkce ECO Pracovní indikátor topného článku Výběr nízkého / vysokého topení Indikátor nízkého zahřívání Indikátor WiFi (Pokud je připojení OK, indikátor WiFi se rozsvítí; Indikátor vysokého vytápění...
- Page 37 Ve vypnutém - režimu vytápění , stisknutím tlačítka 1 dvakrát pro nastavení časovače ( 0H až 24H ), a 2 a 3 na nastavenou teplotu . Po nastavení , to ukazuje, teplota okolí . Kontrolka 8 se rozsvítí v časovém období a zhasne, jakmile časovač skončí , poté se topení zahřívá na vysokou úroveň...
-
Page 38: Čištění A Údržba
Informace o využití může poskytnout prodejce produktu nebo místní úřady. Odpadní elektrická a elektronická zařízení obsahují látky, které nejsou neutrální vůči přirozenému prostředí. Zařízení, které není recyklováno, představuje potenciální riziko pro životní prostředí a lidské zdraví. Identifikátory modelu: 90-093 Položka Hodnota Jednotka Položka... - Page 39 V pohotovostním režimu Dva nebo více manuálních stupňů, bez regulace teploty místnosti [Ne] S mechanickou regulací teploty v místnosti [Ne] S elektronickou regulací pokojové teploty [Ne] Elektronická regulace teploty v místnosti plus denní časovač [Ne] Elektronická regulace teploty v místnosti plus týdenní časovač [Ano] Další...
-
Page 40: Technické Špecifikácie
Deti by mali byť pod dozorom, aby sa zaistilo, že sa so spotrebičom nehrajú. Ak ohrievač spadol alebo bol akýmkoľvek spôsobom poškodený. Vráťte ho do autorizovaného servisu na kontrolu, elektrické alebo mechanické nastavenie alebo opravu. TECHNICKÉ ŠPECIFIKÁCIE Model 90-093 90-094 90-095... -
Page 41: Pokyny Pre Montáž
− 2x podpora − 8x kovová skrutka pre podpery POKYNY PRE MONTÁŽ Model 90-093 90-094 90-095 Rozbaľte svoj obal a nájdite ohrievač spolu s balíkom príslušenstva na montáž na stenu. Označte polohy štyroch otvorov, ktoré sa majú vyvŕtať na stenu a vyvŕtajte otvory vrtákom. Skontrolujte, či je vzdialenosť medzi jednotlivými otvormi rovnaká... -
Page 42: Pokyny Na Použitie
Zdvihnite ohrievač a kruhové otvory na konzolách v zadnej časti ohrievača nasmerujte na skrutky na stene a posuňte ohrievač 10 mm doprava Po inštalácii ohrievača sa uistite, že vzdialenosť medzi spodkom ohrievača a podlahou nie je menšia ako 10 cm POKYNY NA POUŽITIE Ovládací... - Page 43 Stlačte 2/3 na diaľkovom ovládači na požadovanú teplotu a uložte nastavenie pomocou OK. Nastavenie časovača Časovač Začiatok Čas ohrevu Vo vypnutom - režimu vykurovania , stlačením tlačidla 1 dvakrát pre nastavenie časovača ( 0H až 24H ), a 2 a 3 na nastavenú teplotu . Po nastavení...
-
Page 44: Čistenie A Údržba
Informácie o použití môže poskytnúť predajca produktu alebo miestne úrady. Odpad z elektrických a elektronických zariadení obsahuje látky, ktoré nie sú neutrálne voči prírodnému prostrediu. Zariadenie, ktoré nie je recyklované, predstavuje potenciálne nebezpečenstvo pre životné prostredie a ľudské zdravie. Identifikátor (-y) modelu: 90-093 položka hodnota jednotka položka symbol Druh tepelného príkonu, iba pre elektrické... - Page 45 Elektronická regulácia tepelného nabíjania so spätnou väzbou z miestnosti a / Maximálny trvalý tepelný výkon 0.96 alebo vonkajšej teploty Tepelný výkon pomocou ventilátora Pomocná spotreba elektrickej energie Pri menovitom tepelnom výkone 0,966 Typ regulácie tepelného výkonu / izbovej teploty (vyberte jeden) Jednostupňový...
- Page 46 Minimálny tepelný výkon Manuálne ovládanie nabíjania tepla so spätnou väzbou z miestnosti [No] (orientačný) a / alebo vonkajšej teploty Elektronická regulácia tepelného nabíjania so spätnou väzbou z [No] Maximálny trvalý tepelný výkon 1,98 miestnosti a / alebo vonkajšej teploty Pomocná spotreba elektrickej energie [No] Pri menovitom tepelnom výkone 1,985...
-
Page 47: Techninės Specifikacijos
Jei maitinimo laidas yra pažeistas, jį turi pakeisti gamintojas, jo aptarnavimo agentas ar panašios kvalifikacijos asmenys, kad būtų išvengta pavojaus. Prie to paties elektros lizdo, kaip ir ventiliatoriaus šildytuvo, negalima prijungti kitų prietaisų. Įsitikinkite, kad šildytuvas visada yra prižiūrimas, o vaikai ir gyvūnai - nuo jo; Kai ilgą... -
Page 48: Naudojimo Instrukcija
Išpakuokite savo pakuotę ir raskite šildytuvą kartu su sieninių priedų pakuote. Pažymėkite keturių gręžiamų skylių vietas ant sienos ir gręžkite skyles gręžtuvu. Įsitikinkite, kad atstumas tarp kiekvienų skylių yra toks pat kaip apvalių skylių ant laikiklių, esančių šildytuvo gale. Įkiškite į skylutes plastikinius bėgelius. Į... - Page 49 Aukštyn mygtukas Temperatūros indikatorius Mygtukas žemyn LED skaičiaus ekranas Įjungimo mygtukas EKO funkcija Šildymo elemento darbinis indikatorius Žemo / aukšto šildymo pasirinkimas Žemo šildymo indikatorius „WiFi“ indikatorius (jei prijungtas gerai, „WiFi“ indikatorius Aukšto šildymo indikatorius užsidega; jei nepavyko) Pradedant Atsargiai išimkite šildytuvą iš dėžutės. Išsaugokite dėžutę saugojimui ne sezono metu. ...
-
Page 50: Valymas Ir Priežiūra
Programa parodys „greitai mirksinčio“ ir „lėto mirksinčio“ parinktis. Pasirinkite „greitai mirksi“, jei programa po kurio laiko ieškos paties įrenginio. Užmezgus ryšį tarp programos ir prietaiso, prietaiso pavadinimas pasirodys programoje. Pasirinkite įrenginio pasirinkimą, tada programoje pasirodys valdymo skydas. Programa yra paruošta kontroliuoti radiatorių nustatymus! „TuyaSmart“... - Page 51 Modelio identifikatorius (-ai): 90–093 Vertė Vienetas Punktas Punktas Simbolis Vienetas Šilumos sąnaudų tipas, skirtas tik vietiniams vietos šildytuvams laikyti Šilumos išeiga elektrinius (pasirinkite vieną) Nominali šilumos išeiga Rankinis šilumos krūvio valdymas su integruotu termostatu [ne] Mažiausia šilumos išeiga Rankiniu būdu kontroliuojamas šilumos krūvis su kambario ir (arba) [ne] (orientacinė) lauko temperatūros atsiliepimais...
- Page 52 Dvi ar daugiau rankinių pakopų, nekontroliuojama kambario [ne] Laukimo režime 0. 4 temperatūra Su mechaniniu termostato kambario temperatūros valdymu [ne] Su elektronine kambario temperatūros kontrole [ne] Elektroninis kambario temperatūros valdymas ir dienos laikmatis [ne] Elektroninis kambario temperatūros valdymas ir savaitės laikmatis [taip] Kitos valdymo parinktys (galimi keli pasirinkimai) Kambario temperatūros valdymas su buvimo nustatymu...
-
Page 53: Tehniskās Specifikācijas
Bērni ir jāuzrauga, lai pārliecinātos, ka viņi nespēlē ar ierīci. Ja sildītājs ir nokritis vai jebkādā veidā bojāts. Nododiet to autorizētā servisa centrā pārbaudei, elektriskai vai mehāniskai noregulēšanai vai labošanai. TEHNISKĀS SPECIFIKĀCIJAS Modelis 90-093 90-094 90-095 750W 1000W / 2000W Nominālā... - Page 54 Izsaiņojiet iepakojumu un atrodiet sildītāju kopā ar sienas stiprinājumu piederumu komplektu. Atzīmējiet četru urbjamo urbumu vietas uz sienas un urbjiet caurumus ar urbjmašīnu. Pārliecinieties, ka attālums starp katru caurumu ir tāds pats kā apaļie caurumi uz stiprinājumiem sildītāja aizmugurē. Ievietojiet caurumos ietilpstošās plastmasas sliedes. Ievietojiet metāla skrūves plastmasas sliedēs.
- Page 55 Poga augšup Temperatūras indikators Lejupvērstā poga LED skaitļu displejs Ieslēgšanas poga ECO funkcija Sildīšanas elementa darba indikators Zemas / augstas sildīšanas izvēle Zems sildīšanas indikators WiFi indikators (ja savienojums ir labs, wifi indikators iedegas; ja Augstas sildīšanas indikators neizdodas) Sākot ...
-
Page 56: Tīrīšana Un Apkope
Lietojumprogramma parādīs opcijas "ātri mirgojoša" un "lēni mirgojoša". Atlasiet “ātri mirgojošs”, jo pēc kāda laika lietojumprogramma meklēs pati ierīci. Pēc savienojuma izveidošanas starp programmu un ierīci lietojumprogrammā parādīsies ierīces nosaukums. Atlasiet ierīces izvēli, pēc tam lietojumprogrammā parādīsies vadības panelis. Lietojumprogramma ir gatava kontrolēt radiatora iestatījumus! Lietojumprogramma "TuyaSmart"... - Page 57 Modeļa identifikators (-i): 90-093 Vērtība Vienība Lieta Lieta Simbols nīb Siltuma ievades veids tikai vietējiem telpu sildītājiem (izvēlieties vienu) Siltuma jauda Nominālā siltuma jauda Manuāla siltuma uzlādes kontrole ar integrētu termostatu [Nē] Manuāla siltuma uzlādes kontrole ar atgriezenisko saiti telpas un / vai āra [Nē]...
- Page 58 Divas vai vairākas manuālas pakāpes, istabas temperatūras kontrole [Nē] Gaidīšanas režīmā 0. 4 nav iespējama Ar mehāniskā termostata istabas temperatūras kontroli [Nē] Ar elektronisku istabas temperatūras kontroli [Nē] Elektroniska istabas temperatūras kontrole un dienas taimeris [Nē] Elektroniska istabas temperatūras kontrole un nedēļas taimeris [Jā] Citas vadības iespējas (iespējamas vairākas izvēles) Telpas temperatūras kontrole ar klātbūtnes noteikšanu...
-
Page 59: Specifiche Tecniche
I bambini devono essere sorvegliati per assicurarsi che non giochino con l'apparecchio. Se il riscaldatore è caduto o è stato danneggiato in qualsiasi modo. Restituirlo a un centro di assistenza autorizzato per esame, regolazione elettrica o meccanica o riparazione. SPECIFICHE TECNICHE Modello 90-093 90-094 90-095 750W 1000W / 2000W... -
Page 60: Istruzioni Per L'uso
Disimballare la confezione e trovare la stufa insieme al pacchetto di accessori per il montaggio a parete. Contrassegnare le posizioni dei quattro fori da praticare sul muro e praticare i fori con la punta del trapano. Assicurarsi che la distanza tra i fori sia la stessa dei fori rotondi sulle staffe sul retro del riscaldatore. Inserire le guide di plastica che si adattano ai fori. - Page 61 Pulsante su Indicatore di temperatura Pulsante Giù Visualizzazione del numero di LED Pulsante di alimentazione Funzione ECO Indicatore di funzionamento dell'elemento Selezione riscaldamento basso / alto riscaldante Indicatore Wi-Fi (se collegato correttamente, l'indicatore Wi-Fi si Indicatore di riscaldamento basso accende; se fallito) Indicatore di riscaldamento elevato Di partenza −...
-
Page 62: Pulizia E Manutenzione
Collegare il riscaldatore alla rete elettrica. Accendi il riscaldamento. Sul pannello di controllo, tenere premuto il pulsante "M", fino a quando il LED blu accanto al contrassegno Wi-Fi, lampeggerà rapidamente. Quindi fare clic su "Avanti" nell'applicazione. L'applicazione mostrerà le opzioni di "lampeggio veloce" e "lampeggio lento". Seleziona "lampeggio veloce" o l'applicazione cercherà... - Page 63 Le informazioni sull'utilizzo possono essere fornite dal venditore del prodotto o dalle autorità locali. I rifiuti di apparecchiature elettriche ed elettroniche contengono sostanze che non sono neutre per l'ambiente naturale. Le apparecchiature non riciclate costituiscono un potenziale pericolo per l'ambiente e per la salute umana. Identificativi del modello: 90-093 Articolo Simbolo Valore Unità...
- Page 64 Per gli apparecchi per il riscaldamento d'ambiente locale elettrici, l'efficienza energetica stagionale del riscaldamento d'ambiente misurata ηs non può essere peggiore del valore dichiarato alla potenza termica nominale dell'unità. Identificativi del modello: 90-095 Articolo Simbolo Valore Unità Articolo tà Tipo di apporto di calore, solo per apparecchi per il riscaldamento d'ambiente Potenza termica locale ad accumulo elettrico (selezionare uno) Controllo manuale della carica di calore con termostato integrato...
-
Page 65: Technische Specificaties
Kinderen moeten onder toezicht staan om ervoor te zorgen dat ze niet met het apparaat spelen. Als de kachel is gevallen of op enigerlei wijze is beschadigd. Retourneer het naar een geautoriseerd servicepunt voor onderzoek, elektrische of mechanische afstelling of reparatie. TECHNISCHE SPECIFICATIES Model 90-093 90-094 90-095 750W 1000W / 2000W... - Page 66 Model 90-093 90-094 90-095 Pak uw pakket uit en zoek de kachel samen met het pakket met accessoires voor wandmontage. Markeer de posities van de vier te boren gaten op de muur en boor de gaten met de boor. Zorg ervoor dat de afstand tussen de gaten hetzelfde is als de ronde gaten op de beugels aan de achterkant van de kachel.
- Page 67 Bedieningspaneel / afstandsbediening Instelknop Timer-indicator Knop Omhoog Temperatuurindicator Omlaag-knop LED-nummerweergave Aanknop ECO-functie Werkindicator verwarmingselement Selectie van lage / hoge verwarming Indicator lage verwarming WiFi-indicator (indien aangesloten OK, wifi-indicator licht op; Indicator hoge verwarming indien mislukt) Beginnend − Haal de kachel voorzichtig uit de doos. Bewaar de doos voor opslag buiten het seizoen. −...
- Page 68 In uit - verwarmingsmodus , druk tweemaal op 1 om de timer in te stellen ( 0H tot 24H ), en 2 &3 om de temperatuur in te stellen . Na instelling , toont temperatuurzone . Indicator 8 licht op tijdens de timerperiode en gaat uit wanneer de timer afloopt , waarna de verwarming op hoog niveau begint te verwarmen .
-
Page 69: Batterij Vervangen
Afgedankte elektrische en elektronische apparatuur bevat stoffen die niet neutraal zijn voor de natuurlijke omgeving. Apparatuur die niet wordt gerecycled, vormt een potentieel gevaar voor het milieu en de menselijke gezondheid. Modelidentificatie (s): 90-093 Item Symbool Waarde Eenheid Item... - Page 70 Door ventilator ondersteunde warmteafgifte [Nee Extra elektriciteitsverbruik Bij nominale warmteafgifte 0.966 Type warmteafgifte / kamertemperatuurregeling (selecteer een) Eentraps warmteafgifte en geen regeling van de kamertemperatuur [Nee Bij minimale warmteafgifte 0,478 Twee of meer handmatige trappen, geen regeling van de [Nee In standby-modus 0.
- Page 71 Handmatige regeling van de warmtebelasting met geïntegreerde [Nee Nominale warmteafgifte thermostaat Handmatige regeling van de warmtebelasting met kamer- en / of [Nee Minimale warmteafgifte (indicatief) buitentemperatuur-feedback Elektronische regeling van de warmtebelasting met feedback over de kamer- [Nee Maximale continue warmteafgifte 1,98 en / of buitentemperatuur [Nee...
-
Page 72: Spécifications Techniques
Si le radiateur est tombé ou est endommagé de quelque manière que ce soit. Renvoyez-le à un centre de service autorisé pour examen, réglage électrique ou mécanique ou réparation. SPÉCIFICATIONS TECHNIQUES Modèle 90-093 90-094 90-095 750 W / 1500 1000 W / 2000 W... -
Page 73: Instructions D'utilisation
Déballez votre colis et trouvez le radiateur avec le pack d'accessoires de montage mural. Marquez les positions des quatre trous à percer sur le mur et percez les trous avec le foret. Assurez-vous que la distance entre chaque trou est la même que celle des trous ronds sur les supports à l'arrière du radiateur. Insérez les rails en plastique dans les trous. - Page 74 Bouton de réglage Indicateur de minuterie Bouton haut Indicateur de température Bouton bas Affichage du nombre de LED Bouton marche Fonction ECO Indicateur de fonctionnement de l'élément Sélection de chauffage bas / haut chauffant Indicateur WiFi (si connecté OK, le voyant wifi s'allume; en cas Indicateur de faible chauffage d'échec) Indicateur de chauffage élevé...
- Page 75 Appuyez sur les boutons de réglage 1 et 3 pendant 3 s (ou appuyez sur le bouton 11 de la télécommande), la fonction ECO s'exécute. Dans ce mode, l'écran affiche uniquement certains indicateurs (en fonction du réglage du rasage effectué avant ECO) Méthodes de verrouillage de la fonction ECO Appuyez sur n'importe quel bouton de l'écran 2) Appuyez sur le bouton ECO 11 de la télécommande.
-
Page 76: Changement De Batterie
Les déchets d'équipements électriques et électroniques contiennent des substances qui ne sont pas neutres pour l'environnement naturel. Les équipements non recyclés constituent un danger potentiel pour l'environnement et la santé humaine. Identificateur (s) du modèle: 90-093 Article symbole Valeur Unité Article Unité... - Page 77 minimale ambiante et / ou (indicative) extérieure Contrôle électronique de [non] Puissance la charge thermique avec thermique 0,96 rétroaction de la continue température ambiante et maximale / ou extérieure Production de chaleur [non] Consommation électrique auxiliaire assistée par ventilateur À la Type de puissance de chauffage / contrôle de la température ambiante (sélectionnez-en un) puissance 0,966...
- Page 78 Avec contrôle électronique de la température ambiante [non] Contrôle électronique de la température ambiante et minuterie de jour [non] Contrôle électronique de la température ambiante et minuterie [Oui] hebdomadaire Autres options de contrôle (plusieurs sélections possibles) Contrôle de la température ambiante, avec détection de présence [non] Contrôle de la température ambiante, avec détection de fenêtre ouverte [Oui]...
Need help?
Do you have a question about the 90-093 and is the answer not in the manual?
Questions and answers