Cognivue clarity User Manual
Hide thumbs
Also See for clarity:
- User manual (41 pages) ,
- Installation manual (9 pages) ,
- User manual (26 pages)
Table of Contents
Advertisement
Quick Links
Advertisement
Table of Contents

Related Manuals for Cognivue clarity


Summary of Contents for Cognivue clarity
- Page 1 User Manual © 2021 COGNIVUE, INC. 7911 Rae Blvd | Victor, NY 14564 585.203.1969...
-
Page 2: Table Of Contents
3.3 Power Alert ..........................5 Recommendations for Use ........................6 4.1 General Testing Location ......................6 4.2 Positioning of Cognivue Clarity® and the Patient ..............6 4.3 Cleaning and Disinfecting Cognivue Clarity® ................6 4.4 Use of Personal Protective Equipment ..................7 Network Connectivity.......................... - Page 3 Support personnel can be reached from 9-5 pm ET at 1- 585-433-2992 support@cognivue.com. UM-410-M Cognivue Clarity® User Manual, 09/10/2021 © 2021 Cognivue, Inc. | 7911 Rae Blvd | Victor, NY 14564 | 585.203.1969 © 2021 Cognivue, Inc. UM-410-M Page 2...
-
Page 4: About Cognivue Clarity
1.1 Disclaimers Cognivue Clarity® is indicated for use as an adjunctive tool for evaluating cognitive function. It is not a stand-alone diagnostic tool. The device results are to be assessed and interpreted by a licensed clinician. -
Page 5: Device Description
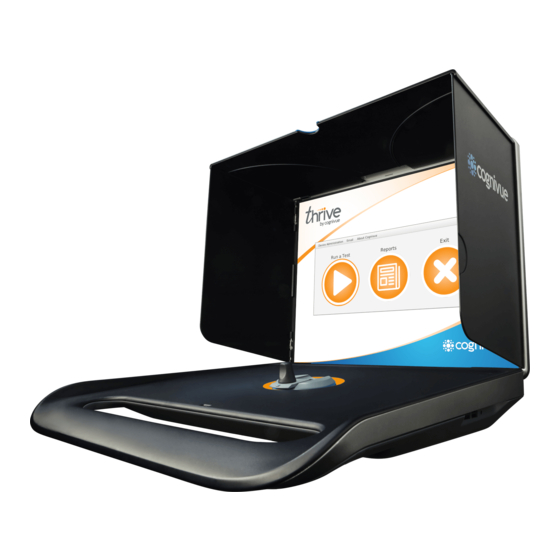
Cognivue Clarity® User Manual 2.0 Device Description The Cognivue Clarity® is a portable, battery-powered, laptop-like device that includes a wireless keyboard with a touchpad, a rotary CogniWheel®, and a CogniCover®. The CogniWheel® is the sole patient input device. The CogniCover® is designed for privacy and to reduce distraction and light reflections on the computer screen. -
Page 6: Power Management
Green 3.1 Screen Sleep When the Cognivue device is not in use for a period of 10 minutes, the screen will go into sleep mode. 3.2 Screen Wake When the screen is asleep, it can be awakened by pressing a key on the keyboard. -
Page 7: Recommendations For Use
Put the device on a flat, stable surface that is ergonomically comfortable for the patient (see below). The patient should be able to comfortably reach and manipulate the CogniWheel® and view the computer screen. Avoid placing the Cognivue Clarity® in a location where there may be distractions behind the device which are visible to the patient. -
Page 8: Use Of Personal Protective Equipment
In Deleted: 4.3 Cleaning and Disinfecting Cognivue Clarity® the event that it is not possible to sanitize the device between patients, Cognivue recommends operators and patients use disposable gloves. -
Page 9: Basic Wired Connection
5.2 Basic Wired Connection 1. Connect one end of a standard network cable to an active network jack at your location 2. Connect the other end to the network port on the back of the Cognivue Clarity® device (see figure 2.2). -
Page 10: Connection Details
Cognivue Clarity® User Manual 5.3 Connection Details When logged on to a Cognivue Clarity® device, administrators can view and test the current network configuration information on the Network Configuration window. Figure 5.3 Network Configuration window To open the Network Configuration window Log in (see 6.1... - Page 11 Cognivue Clarity® User Manual 1. Click on the connection named for your SSID 2. Click the Gear icon. Gear icon Network Connections wizard 3. On the pop-up window that appears, click on the IPV4 Settings tab. Network Configuration Editor © 2021 Cognivue, Inc.
- Page 12 Cognivue Clarity® User Manual 4. Click the Method drop-down-menu button and select Manual. Network Configuration Editor 5. Click the Add button. 6. In the Address field, enter your static or reserved IP (obtained from your network team). 7. In the Netmask field, enter the Subnet mask (obtained from your network team).
-
Page 13: Security
Cognivue Clarity® User Manual 11. On the Network Configuration window, click the Refresh button to display the new settings 12. Then click the Test Connection button to confirm connectivity to the Cognivue back-end systems 6.0 Security 6.1 Logging on to Cognivue Clarity®... -
Page 14: Shutting Down
Note: This is the preferred way to shut down the device. The physical power button should be used only if necessary. 7.0 Managing User Accounts Each Cognivue Clarity® user should have their own user account to ensure audit trail and safety of patient data. User accounts can be assigned as an Administrator or Operator. -
Page 15: Managing User Accounts
Cognivue Clarity® User Manual 7.4 Managing User Accounts User accounts must be managed directly on the Cognivue Clarity® device. To reach the user management screen 1. Log in as an Administrator user (like the one created during device Configuration, See Installation Guide) 2. -
Page 16: Creating User Accounts
Cognivue Clarity® User Manual 7.5 Creating User Accounts 1. Click on the Add User button to display the Create Account window. Create Account window 2. Fill out form 3. Click Save 4. Click Yes to confirm when prompted 5. Error messages will prevent saving if there are any issues with the entered data 6. -
Page 17: Modifying User Accounts
Cognivue Clarity® User Manual 7.6 Modifying User Accounts 1. Click on a user in the list 2. Click the Modify User button Modify Account window 3. Make the desired changes 4. Click the Save button 7. Click the Yes button on the Confirmation dialog to complete the changes. - Page 18 Cognivue Clarity® User Manual Modify Account window 3. Click the Set Password button 4. Click the Save button 5. Click the Yes button on the Confirmation dialog to complete the changes. 6. Error messages will prevent saving if there are any issues with the entered data 7.
-
Page 19: Disabling User Accounts
Disable User Confirmation dialog 7.9 Password Expiration Some organizations have password change policies. To enable this, Cognivue provides the ability to expire user passwords. This feature is off by default and when turned on, is on for all accounts. Users are warned about password expiration for three days before it expires. Once expired, the user will be forced to change their passwords before they can log in. -
Page 20: System Information
Cognivue Clarity® User Manual 8.0 System Information Basic system information about Cognivue Clarity® is available to any logged-in user in the About window (accessed by clicking About >> About on the Primary window). The information displayed here will be useful when contacting support. -
Page 21: Report Emailing
Cognivue Clarity® User Manual 9.1 Report Emailing Cognivue Clarity® provides the ability to send the test report via an encrypted email to a patient following completion of a test (see 14.0 Emailing Reports). This feature is enabled by default. Formatted: Font: Italic Deleted: Emailing Reports An Administrator can disable this functionality by unchecking the Enable Report Emailing checkbox. - Page 22 Cognivue Clarity® User Manual Physician Information: It provides general information about the normalized ranges for the overall score. Clinical Formatted: Font: Not Bold contextualization is required. Formatted: Caption, Centered, No bullets or numbering, Don't keep with next Formatted: Font: Bold, Check spelling and grammar Formatted: List Paragraph, Left, Numbered + Level: 1 + Numbering Style: 1, 2, 3, …...
- Page 23 Cognivue Clarity® User Manual Patient Report © 2021 Cognivue, Inc. UM-410-M Page 22...
- Page 24 Cognivue Clarity® User Manual 4. Physician Information: It provides general information about the normalized ranges for the overall score. Clinical contextualization is required. Deleted: Patient Report: This report is intended for the patient. It will contain an overall average score. Clinical contextualization is required.¶...
-
Page 25: Video Options
Cognivue Clarity® User Manual 9.3 Video Options This screen allows Practitioners to ensure certain videos will always be shown to patients. If the option is unchecked here, the choice is left to the Operator who sets up the test for the patient. -
Page 26: Practice Information
Cognivue Clarity® User Manual 9.4 Practice Information To add practice information to a Cognivue Clarity® test 1. Fill out the form on the Practice tab of the Systems Settings page 2. Check Include on report 3. Click Save For more information on how this appears on the report, see 12.0 Finding and Viewing Reports. - Page 27 Cognivue Clarity® User Manual Deleted: Security6.1 Logging on to Cognivue Clarity® 6.1 Logging on to Cognivue Clarity®) 3. Click the Run a Test button 4. Fill out patient data (Name, gender/sex, date of birth) 5. Select the patients preferred language for the test (English or Spanish) 6.
- Page 28 Formatted: Font: Italic verify it by entering it a second time. Note: by checking this box, a patient is opting in to receive email Deleted: Emailing Reports from Cognivue. For more detail on emailing patient reports see 14.0 Emailing Reports.
-
Page 29: Video Volume Control
Cognivue Clarity® User Manual When finished viewing/printing the report, the Operator can click the Close Report button on the header bar of the report viewer to close the report viewer and return to the Main Menu Screen. 11.0 Video Volume Control In order to control the volume of video playback, the volume control keys on the keyboard can be used. - Page 30 Cognivue Clarity® User Manual The test report consists of two pages. Note: appropriate clinical contextualization is required. 5. Physician Report: This report is intended for the physician. It displays the average test score and the scores in various areas of cognitive function and health. Clinical contextualization is required.
- Page 31 Cognivue Clarity® User Manual 6. Reaction Time and Speed Processing: This page is intended for the physician. It provides scores for reaction time and speed processing of the test taker. Clinical contextualization is required. Reaction Time and Speed Processing © 2021 Cognivue, Inc.
- Page 32 Cognivue Clarity® User Manual 7. Patient Report: This report is intended for the patient. It will contain an overall average score. Clinical contextualization is required. Patient Report © 2021 Cognivue, Inc. UM-410-M Page 31...
-
Page 33: Printing Reports
Cognivue Clarity® User Manual 8. Physician Information: It provides general information about the normalized ranges for the overall score. Clinical contextualization is required. Physician Information 13.0 Printing Reports Test reports may be printed from the device whenever a report is opened in the report viewer (see 10.0... -
Page 34: Emailing Reports
Cognivue Clarity® User Manual Printer Configuration window Press the Refresh button to discover network printers (please work with your IT team to connect your printer to your network). Right-click on the desired printer to open a drop-down menu and select the Set as Default option. -
Page 35: Csv Data Export
Cognivue Clarity® User Manual 15.0 CSV Data Export Administrator users may export test results to CSV files, which are accessible through the Csv shared drive. For additional information on how to map a shared drive, please refer to the Installation Guide FAQ section. -
Page 36: Technical Specifications
Cognivue Clarity® User Manual CSV Export Success Message 16.0 Technical Specifications Operating Environment 10 to 30 degrees C (50 to 86 degrees F) Power Input 19V DC, 3.5 A Nominal Weight 4.2 kg (9lbs 2oz) Intel Dual Band Wireless-AC 3168 Wireless Communications 20 dBm max output power for 2.4 GHz 802.11b/g/n... -
Page 37: Safety Precautions And Compliance
WARNING: Portable RF communications equipment should be used no closer than 30 cm (12 inches) to any part of Cognivue Clarity®. Otherwise, degradation of the performance of this equipment could result.
Need help?
Do you have a question about the clarity and is the answer not in the manual?
Questions and answers