KROHNE OPTIWAVE 7300 C Quick Start Manual
Non-contact radar (fmcw) level meter
Hide thumbs
Also See for OPTIWAVE 7300 C:
- Handbook (200 pages) ,
- Quick start manual (36 pages) ,
- Supplementary instructions manual (28 pages)
Table of Contents
Advertisement
Quick Links
Advertisement
Table of Contents

Related Manuals for KROHNE OPTIWAVE 7300 C


Summary of Contents for KROHNE OPTIWAVE 7300 C
- Page 1 OPTIWAVE 7300 C Quick Start Non-contact Radar (FMCW) Level Meter...
-
Page 2: General Safety Notes
CD-ROM and enclose it with the device. Unless this form is completely filled out, it will unfortunately not be possible for KROHNE to perform repair or inspection. Respect general and local electrical safety requirements. -
Page 3: Scope Of Delivery
OPTIWAVE 7300 C ::::::::::::::::::::::::::::::: ::::::::::::::::::::::::::::::: ::::::::::::::::::::::::::::::: ::::::::::::::::::::::::::::::: Scope of delivery Scope of delivery Scope of delivery Scope of delivery Signal converter and antenna in compact version Antenna extensions for the long antenna (option) Quick Start CD-ROM (including Handbook, Quick Start, Technical Datasheet, and related software) -
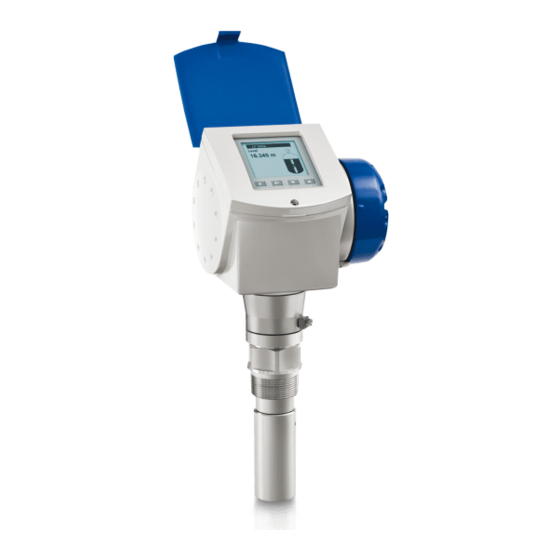
Page 4: Visual Check
OPTIWAVE 7300 C OPTIWAVE 7300 C OPTIWAVE 7300 C OPTIWAVE 7300 C ::::::::::::::::::::::::::::::: ::::::::::::::::::::::::::::::: ::::::::::::::::::::::::::::::: ::::::::::::::::::::::::::::::: Visual check Visual check Visual check Visual check Altometer, Dordrecht NL - 3313 LC OPTIWAVE 7300 C VF70xxxxxxxxxxxxxxxxxxxxxxxxxxxx Order Nr. xxx xxxxxx xxx Manufactured: 2007 Tag Nr. - Page 5 OPTIWAVE 7300 C ::::::::::::::::::::::::::::::: ::::::::::::::::::::::::::::::: ::::::::::::::::::::::::::::::: ::::::::::::::::::::::::::::::: How to attach antenna extensions (long antennas only) How to attach antenna extensions (long antennas only) How to attach antenna extensions (long antennas only) How to attach antenna extensions (long antennas only) •...
- Page 6 OPTIWAVE 7300 C OPTIWAVE 7300 C OPTIWAVE 7300 C OPTIWAVE 7300 C ::::::::::::::::::::::::::::::: ::::::::::::::::::::::::::::::: ::::::::::::::::::::::::::::::: ::::::::::::::::::::::::::::::: How to turn or remove the converter How to turn or remove the converter How to turn or remove the converter How to turn or remove the converter...
- Page 7 OPTIWAVE 7300 C ::::::::::::::::::::::::::::::: ::::::::::::::::::::::::::::::: ::::::::::::::::::::::::::::::: ::::::::::::::::::::::::::::::: Transport Transport Transport Transport Remove the converter before you lift the instrument with a hoist www.krohne.com...
-
Page 8: Pressure And Temperature Ranges
OPTIWAVE 7300 C OPTIWAVE 7300 C OPTIWAVE 7300 C OPTIWAVE 7300 C ::::::::::::::::::::::::::::::: ::::::::::::::::::::::::::::::: ::::::::::::::::::::::::::::::: ::::::::::::::::::::::::::::::: Pressure and temperature ranges Pressure and temperature ranges Pressure and temperature ranges Pressure and temperature ranges Flange temperature FKM/FPM: -40...200°C / -40...390°F; Kalrez 6375: -20...200°C / -5...390°F... -
Page 9: Installation Recommendations
OPTIWAVE 7300 C ::::::::::::::::::::::::::::::: ::::::::::::::::::::::::::::::: ::::::::::::::::::::::::::::::: ::::::::::::::::::::::::::::::: Installation recommendations Installation recommendations Installation recommendations Installation recommendations We recommend that you prepare the installation when the tank is empty. Do not tilt the instrument more than 2° If there are too many objects in the radar beam, do an empty spectrum scan (refer to the hand- book) or install a bypass chamber or stilling well 2.5 mm / 0.1"... - Page 10 OPTIWAVE 7300 C OPTIWAVE 7300 C OPTIWAVE 7300 C OPTIWAVE 7300 C ::::::::::::::::::::::::::::::: ::::::::::::::::::::::::::::::: ::::::::::::::::::::::::::::::: ::::::::::::::::::::::::::::::: Electrical installation: outputs 1 and 2 Electrical installation: outputs 1 and 2 Electrical installation: outputs 1 and 2 Electrical installation: outputs 1 and 2...
- Page 11 OPTIWAVE 7300 C ::::::::::::::::::::::::::::::: ::::::::::::::::::::::::::::::: ::::::::::::::::::::::::::::::: ::::::::::::::::::::::::::::::: Wiring procedure Wiring procedure Wiring procedure Wiring procedure NOTE! NOTE! NOTE! NOTE! If the instrument has the second current output option, use a separate power supply to energize terminal 2. Obey the instructions that follow: •...
-
Page 12: Electrical Connection For Current Output
OPTIWAVE 7300 C OPTIWAVE 7300 C OPTIWAVE 7300 C OPTIWAVE 7300 C ::::::::::::::::::::::::::::::: ::::::::::::::::::::::::::::::: ::::::::::::::::::::::::::::::: ::::::::::::::::::::::::::::::: Electrical connection for current output Electrical connection for current output Electrical connection for current output Electrical connection for current output Non-Ex Non-Ex Non-Ex Non-Ex... - Page 13 OPTIWAVE 7300 C ::::::::::::::::::::::::::::::: ::::::::::::::::::::::::::::::: ::::::::::::::::::::::::::::::: ::::::::::::::::::::::::::::::: Ex d Ex d Ex d Ex d Power supply ® Resistor for HART communication Non-Ex zone Ex zone U ≤ 5 V 20...36 VDC for an output of 22mA at the terminal (refer to caution) 10...30 VDC for an output of 22mA at the terminal...
-
Page 14: Protection Category
OPTIWAVE 7300 C OPTIWAVE 7300 C OPTIWAVE 7300 C OPTIWAVE 7300 C ::::::::::::::::::::::::::::::: ::::::::::::::::::::::::::::::: ::::::::::::::::::::::::::::::: ::::::::::::::::::::::::::::::: Protection category Protection category Protection category Protection category NOTE! NOTE! NOTE! NOTE! The instrument fulfills all requirements per protection class IP 67. DANGER! DANGER! -
Page 15: User Interface
OPTIWAVE 7300 C ::::::::::::::::::::::::::::::: ::::::::::::::::::::::::::::::: ::::::::::::::::::::::::::::::: ::::::::::::::::::::::::::::::: User interface User interface User interface User interface Information for the operator Information for the operator Information for the operator Information for the operator TAGNO01234567890 TAGNO01234567890 Level Level 9.1000 m 9.1000 m TAGNO01234567890... - Page 16 OPTIWAVE 7300 C OPTIWAVE 7300 C OPTIWAVE 7300 C OPTIWAVE 7300 C ::::::::::::::::::::::::::::::: ::::::::::::::::::::::::::::::: ::::::::::::::::::::::::::::::: ::::::::::::::::::::::::::::::: Hot keys in measurement mode Hot keys in measurement mode Hot keys in measurement mode Hot keys in measurement mode Press a button for more than one second to get access to the hot key functions.
Need help?
Do you have a question about the OPTIWAVE 7300 C and is the answer not in the manual?
Questions and answers