Download Print this page

Advertisement

Quick Links

LW2730 & LW2930 LIVE SD+ Series -
Frequently Asked Questions
Relevant Models / Series: LW2730 Series (LW2732, LW2731), LW2930 Series (LW2932)
Q: How do I install USB drivers for remote viewing using Skype™?
Q: How do I setup remote viewing using Skype™?
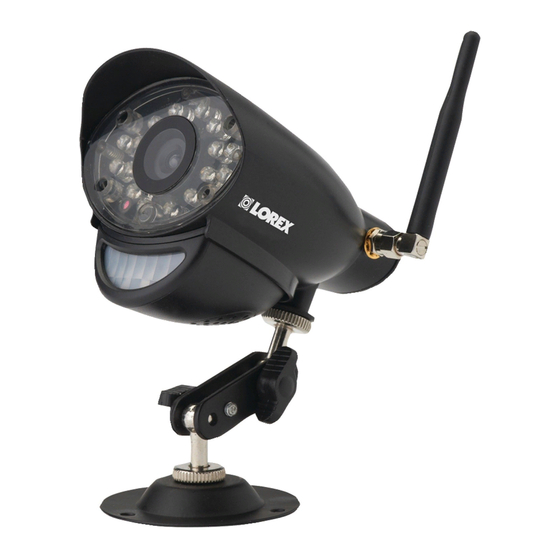
Q: How do I pair cameras?
Q: The screen on my video monitor is blank. What do I do?
Q: My computer already has a webcam. How do I get Skype™ to use the video monitor
instead?
Q: How do I change the camera that is shown through Skype™?
Q: I have a Lorex product with Skype™ compatibility. Can I connect to my cameras
remotely with Skype™ on Windows 8?
Q: How do I turn off the Alarm ('beeping') sound?
Q: How do I use motion recording?
Q: How does the motion recording feature work?
Q: Can I install the camera indoors looking out of a window?
Q: How do I listen to audio from the cameras?
Q: I am having trouble pairing my accessory camera. How can I connect it to the video
monitor?
Q: How do I upload photos to the video monitor for digital picture frame mode?
Q: How do I install USB drivers for remote viewing using
Skype™?
A: USB drivers for Skype™ remote viewing on PC are available as a free download. The driver
for PC now has separate versions for 32-bit and 64-bit operating systems.
NOTE: Due to changes in Skype™ for Mac, the drivers for LW2730/LW2930 SD+ Series are
no longer compatible with current versions of Skype™ for Mac. Unfortunately, this means we
can no longer support remote connections using Mac for these products.
To install USB driver for PC:
1. Determine whether your computer system type is 32-bit or 64-bit:
a. Press
+ E on the keyboard to open Windows Explorer.

Advertisement

loading

Summary of Contents for Lorex LIVE SD+ LW2730 Series

  • Page 1  instead? Q: How do I change the camera that is shown through Skype™?  Q: I have a Lorex product with Skype™ compatibility. Can I connect to my cameras  remotely with Skype™ on Windows 8?  Q: How do I turn off the Alarm ('beeping') sound? ...
  • Page 2 b. Right-click Computer on the left-side panel in Windows Explorer. c. Click Properties. d. Under System, check the System type. The system type description will specify whether your system is 32-bit or 64-bit.
  • Page 3 2. Download the USB driver for PC from the Downloads tab (click here). 3. Double-click the .zip file to extract the contents. 4. Open the extracted folder and double-click dpinstX86 if you have a 32-bit system or dpinstX64 for 64-bit. Follow the on-screen instructions to install. Q: How do I setup remote viewing using Skype™? A: See the Instruction Manual for setup instructions for PC.
  • Page 4 3. Select Only allow people in my Contact list to call me (recommended). This will prevent the device from accepting Skype calls from anyone who is not in the contact list for its account. NOTE: You may also select Allow anyone to call me to allow anyone with a Skype account to call the device and access your camera.
  • Page 5 2. Press on the video monitor. 3. From the Main Menu, press left and right to select Pairing and press the OK button. 4. Select a channel and press the OK button. The video monitor will indicate that you have 30 seconds to press the Pair button on the camera.
  • Page 6 Q: My computer already has a webcam. How do I get Skype™ to use the video monitor instead? A: Follow the steps below to change the primary camera in Skype to the video monitor. To change the primary camera to the video monitor in Skype on PC: 1.
  • Page 7 3. Under Select Webcam, select Wireless Monitoring System to make the video monitor the primary camera. 4. Click Save. NOTE: You will have to reselect your webcam under Select webcam to use it for regular Skype video calls. Q: How do I change the camera that is shown through Skype™? A: Viewing through Skype does not allow you to change channels remotely;...
  • Page 8 I have a Lorex product with Skype™ compatibility. Can I connect to my cameras remotely with Skype™ on Windows Yes. The latest driver software allows you to connect to your cameras using the Skype™ app from the Windows Store as well as Skype™ for desktop.
  • Page 9 2. Scroll down to the bottom of the Downloads page and click "Learn about Skype for Windows desktop".
  • Page 10 3. Click on the green button labeled "Get Skype for Windows desktop". 4. Follow the on-screen steps to install Skype for Windows desktop. 5. Use the steps in your instruction manual to remotely connect to your cameras. Q: How do I turn off the alarm ('beeping') sound? A: Follow the steps below.
  • Page 11 "MOTION" will turn off on the video monitor. Q: How does the motion recording feature work? A: This Lorex system uses dual motion detection technology. This helps to ensure the accuracy of the motion detection and minimizes false alarms. The cameras have built-in PIR sensor that track heat from body movements to detect movement up to a maximum range of 21 feet (6.5...
  • Page 12 The system also uses video motion detection, which looks for changes in video images (frames) to detect motion. Video motion detection allows for motion detection beyond the range of the PIR sensors and in extremely hot temperatures. Video motion detection is highly accurate, but may trigger recording from changes in light or moving trees, leaves, etc.
  • Page 13 Camera pointed out of a window (daytime) Camera pointed out of a window (nighttime)  Installing the camera looking out of a window will severely impact the accuracy of motion detection. The PIR motion sensors cannot sense changes in temperature through the window itself, which masks temperature changes occurring outside.
  • Page 14 Then, during live viewing, use the volume (+/-) buttons on the video monitor to change the volume for audio. Use the white volume icons on the on-screen display to help you set the audio volume. NOTE: The audio volume is different from the alarm/buzzer volume found in the Main Menu (Main Menu>Settings>Alarm Volume).
  • Page 15 1. Press and hold the joystick on the rear panel of the video monitor. Keep the joystick held down and connect the mini-USB cable between the monitor and your PC. Do not release the joystick until "USB PC MASS STORAGE MODE" appears on the monitor. NOTE: If "USB PC CAMERA MODE"...
  • Page 16 3. Double-click the PHOTORUN file. The PhotoRun application opens. 4. Click then select the folder where the images you would like to upload are stored and click OK. 5. All images in the folder are added to the top area of the screen. Check ALL to select all the images in the folder or check any images you would like to add and click upload them to the SD card.
  • Page 17 NOTE: Images are uploaded into the Family folder by default. During Screen Saver mode, press UP/DOWN to select the folder. Each folder can store up to a maximum 256 images. 6. Saved images appear in the lower portion of the screen. If you want to delete images from the SD card, click to delete the selected image or click to delete all the...
  • Page 18 7. When you are finished uploading or deleting images, click X to close the PhotoRun application and then disconnect the USB cable from the video monitor. To activate digital picture frame mode: 1. Press on the video monitor. 2. Press RIGHT/LEFT to select Screen Saver and press OK. 3.