
Related Manuals for Taser AXON Flex


Summary of Contents for Taser AXON Flex
- Page 1 ® TASER ™ AXON Flex System User Manual IMPORTANT SAFETY INSTRUCTIONS. Read all warnings and instructions. Save these instructions. MMU0040 Rev: C...
-
Page 2: Table Of Contents
16 Installing the EVIDENCE Sync Software onto your Computer 17 Assigning Your AXON Flex Equipment Chapter 4: Setting up AXON Flex for the Offline Mode 18 Allowing an Agency’s Flex Cameras to Be Set to Offline Mode Setting AXON Flex Cameras to Offline... - Page 3 Checking AXON Flex Camera Status on Your Smart Device Playing Recorded Video on Your Smart Device 39 Viewing Live Video from the AXON Flex Camera on Your Smart Device Adding Video Descriptions Chapter 8: Uploading Data and Recharging AXON Flex Devices (Online)
-
Page 4: Chapter 1: Introduction
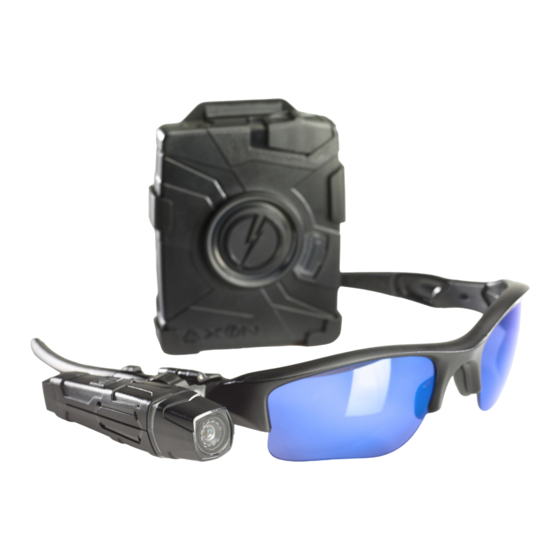
What Is the AXON Flex System? The AXON Flex system is a wearable camera system incorporating an audio and video recording device to be worn by you while performing your job duties. Multiple mounting options are available to tailor the system to your needs. -
Page 5: Chapter 2: Hardware
Volume/Pairing Button – This button is used to adjust the volume of audio prompts coming from the camera. It also is used to pair the AXON Flex system with a smart phone; see Pairing AXON Flex Hardware with Your Smart Device. This button does not control the volume of recorded audio. -
Page 6: Axon Flex Controller
AXON Flex Controller The controller enables you to turn the unit on, begin recording of an event, stop recording, and turn the unit off. The controller features LEDs to indicate the operating mode and battery capacity. NOTE: You can turn off the controller LEDs, if necessary. See Turning off the Controller LEDs for instructions. -
Page 7: Etm System Components
Battery Button – When pressed, momentarily indicates the remaining battery capacity only (it does not indicate the operating mode). Pressing buttons causes the AXON Flex system to emit audio alerts (beeps) to indicate system actions. See Chapter 12: Audio Prompts for more information. -
Page 8: Equipment Mount Options
The drawing below shows an ETM with all pucks removed and ready for customization. Equipment Mount Options The AXON Flex system provides you with multiple ways to wear your camera and carry your controller. See Chapter 5: Hardware Details for information on assembling the camera mounting systems. -
Page 9: Oakley Eyewear Mount
Oakley Eyewear Mount The AXON Flex camera can be attached to Oakley Flak Jacket® glasses. With this system, the camera is designed to directly capture your point of view because it is mounted at eye level. Low Rider Headband Designed for use with the Flex system, the Low Rider headband provides a comfortable frame to wear the camera on your head. -
Page 10: Hat Mount
Hat Mount The camera can be worn with headgear, including baseball caps. One magnetic clip is placed on the inside of the baseball cap, while the rest of the assembly goes on the outside, held in place by magnetic attraction. Collar Mount The universal magnetic clip is compatible with most uniform shirt collars. - Page 11 A collar support bar also is available. It consists of an inside magnetic clip combined with a metal band designed to wrap underneath the collar, towards the back of the neck. Chapter 2 Hardware...
-
Page 12: Epaulette Mount
Epaulette Mount If your uniform shirt has epaulettes, you can attach the AXON Flex camera to them. The drawing shows the camera worn above the epaulette, but the mount can be positioned to place the camera below the epaulette, if desired. -
Page 13: Adhesive Mount
Always follow your agency’s guidance and procedures for the use of motor vehicle equipment and helmets. Equipment Connection Options The controller and camera connect with cables specifically designed for the AXON Flex system. Chapter 2 Hardware... -
Page 14: Axon Flex Cables And Connectors
Ensure that your cables are inserted properly into your AXON Flex camera and controller. If the camera’s battery is low, and the cable is disconnected, your recorded video will be lost. -
Page 15: Usb Cable
¤ ¥ ¦ Do NOT connect your AXON Flex camera to your computer before you have installed the EVIDENCE Sync software. EVIDENCE Sync software is required to download videos to your computer or upload videos to EVIDENCE.com. See Chapter 3: Account Setup for EVIDENCE.com for more information. -
Page 16: Chapter 5: Hardware Details
Preparing the Magnetic Clip Assembly The most basic way to mount the Flex camera to clothing involves two magnetic pieces. The two magnetic clips pictured below are the foundation for many Flex camera mounting options. Each clip features a set of teeth on one side and a ring on the other. -
Page 17: Mounting The Flex Camera To Your Shirt Collar
The magnetic clip is designed to allow some rotation up or down, so you can adjust the camera’s angle after it is mounted on your shirt or cap. Mounting the Flex Camera to Your Shirt Collar Push the two parts of the universal magnetic clip together on each side of your collar. Tug on the parts slightly to confirm the connection is secure. - Page 18 Tug on the parts slightly to confirm the connection is secure. Route the cable to your controller. Ensure that the cable does not obstruct the motion of your head. Chapter 5 Hardware Details...
-
Page 19: Chapter 6: Basic Operations
Because the system does not capture audio in BUFFERING mode, the first 30 seconds of a recorded event will be video-only. Buffering mode starts only after the AXON Flex controller is turned on. The system does not record when the controller is turned off. -
Page 20: Battery Status
To end a recording and turn off the system, move the on/off switch to the “off” position. When you end a recording with the on/off switch you will not go into BUFFERING mode, instead the system will turn off completely. NOTE: An event not recorded by the AXON Flex system cannot be played back or downloaded to your computer. Battery Status Press the Battery button to determine the percentage remaining in the controller battery. -
Page 21: Turning Off The Controller Leds
The Operation LED flashes red, yellow, and then green before shutting down the lights. Pressing the Battery button will momentarily light both the Operation LED and the Battery LED, displaying the current operating mode and battery level. For interpreting the LED colors, see AXON Flex Controller in Chapter 2: Hardware. -
Page 22: Chapter 7: Axon Mobile
AXON Mobile AXON Mobile enables you to play back footage from your AXON Flex camera on a smart phone or smart device equipped with the Android® or iOS® (Apple® products) operating system. Installing AXON Mobile Software on Your Android Smart Device To use your device with the AXON Flex system, first install the free AXON Mobile software on your device. -
Page 23: Pairing Axon Flex Hardware With Your Smart Device
Pairing AXON Flex Hardware with Your Smart Device After installing the AXON Mobile software on your device, connect it to your AXON Flex hardware through a process called pairing. On your device’s applications page, press AXON Mobile to launch the application. - Page 24 Press and hold the volume/pairing button on the camera. Volume/Pairing Button While holding the volume/pairing button on the camera, turn the controller ON. Step-by-step instructions will display on your device screen to help you. Hold the volume/pairing button on the camera until the LED on the camera starts blinking. Then release the volume/paring button.
- Page 25 Press Scan for devices. NOTE: The device (camera) name will be “TASER” and include the last 4 digits of the AXON Flex camera’s serial number. Press Pair with this device on your device. Chapter 7 AXON Mobile...
- Page 26 The system will begin scanning and then connecting your device with the AXON Flex camera. Press the Back button on your device. The Pairing succeeded message displays. Chapter 7 AXON Mobile...
-
Page 27: Signing In To Your Evidence.com Account Within The Axon Mobile Application
Signing in to Your EVIDENCE.com Account within the AXON Mobile Application To add categories to your AXON Flex video files, you must sign in to your EVIDENCE.com account. In order to do so, follow these steps: Ensure that your AXON Flex system is turned on and is paired with your device. - Page 28 Enter your email address and press Submit. Select your agency and press Save. Press the menu button. Press Sign in. Type your EVIDENCE.com username and password. Chapter 7 AXON Mobile...
-
Page 29: Adjusting Application Settings
Press your device’s menu button. Press Settings. If you want GPS data from the device to be embedded in the video recorded by the AXON Flex camera, press Automatic GPS Tagging. NOTE: GPS is not directly accessible when you are using your AXON Flex camera in the Offline mode. - Page 30 If you want to standardize case numbers prefixes, press Case Number Prefix and go to step 5. If you want a PIN number to view the videos, press Require PIN to view Evidence and go to step 6. Use the keyboard to type the number in ID Prefix box. Press OK.
-
Page 31: Checking Axon Flex Camera Status On Your Smart Device
In the Confirm PIN box, type the number again. Click Submit. Checking AXON Flex Camera Status on Your Smart Device Ensure that your AXON Flex system is turned on and paired to your device. On your device’s application list, press AXON Mobile. Press Flex Details. -
Page 32: Playing Recorded Video On Your Smart Device
This procedure does not store data on your smart device. The device can only view videos currently stored on your AXON Flex camera. You cannot delete or alter original video files on the camera from your smart device. Ensure that your AXON Flex system is turned on and paired to your device. - Page 33 Press the thumbnail of the video to play it. Press the play button. Chapter 7 AXON Mobile...
-
Page 34: Viewing Live Video From The Axon Flex Camera On Your Smart Device
Viewing Live Video from the AXON Flex Camera on Your Smart Device You can use your smart device to watch video while the AXON Flex camera is recording or buffering. This is useful for ensuring that your camera is pointing in the right direction. -
Page 35: Adding Video Descriptions
(Online) and visible on EVIDENCE.com. This information will not be accessible with videos saved in Offline mode. Ensure that your AXON Flex system is turned on and paired to your device. On your device’s application list, press AXON Mobile. Press Evidence List. - Page 36 If you have not already signed into your EVIDENCE.com account, you will be prompted to do so. NOTE: You are not required to sign into your EVIDENCE.com account to view videos or edit video details; however, you will not be able to edit video categories unless you are signed in. Enter your email address and press Submit.
- Page 37 Press Submit. Press the Title button. On the keyboard, type the title. Use the Category drop-down to select the appropriate category. Press the Case ID box. Type the case ID. Press Save. Chapter 7 AXON Mobile...
-
Page 38: Chapter 8: Uploading Data And Recharging Axon Flex Devices (Online)
Ensure the ETM is plugged into a power supply, is connected to the internet, and is powered on. Dock the AXON Flex camera and controller in the ETM. The docking bays plug into the back of the camera and the top of the controller. - Page 39 When you dock your AXON Flex camera to the ETM, all videos on the camera will automatically begin to upload to EVIDENCE.com sequentially based on file size (smallest to largest). An LED on the camera will display the status. At first, the LED will display red, but the color will change to indicate the camera’s stage in the uploading process.
-
Page 40: Advanced Checkout For Shared Cameras
Disconnect the camera from the computer. The camera is ready for use. Using Your Computer to Upload Videos If you do not have an ETM, you must use a computer to download files from the AXON Flex camera. Chapter 8... -
Page 41: Chapter 10: Care And Maintenance
20 percent of the battery capacity remains. Always recharge a depleted battery as soon as reasonably possible. You can use an ETM, wall charger, or computer to charge the battery. Using a non-TASER approved wall charger may degrade device performance. -
Page 42: Chapter 11: Troubleshooting
Troubleshooting If you experience difficulty with your AXON Flex devices, first power the device(s) down, disconnect the cables, and then reconnect the cables to ensure a proper connection. If experiencing difficulty with the AXON Mobile application, power down the mobile device, turn the device back on, and re-pair your smart phone with the AXON Flex camera. - Page 43 THIS MODEL DEVICE MEETS THE GOVERNMENT’S REQUIREMENTS FOR EXPOSURE TO RADIO WAVES. Declaration of Conformity TASER International declares that this AXON Flex system is in compliance with the essential requirements and other relevant provisions of Directive 1999/5/EC. A copy of the original eclaration of onformity can be found at www.TASER.com.
-
Page 44: Chapter 12: Audio Prompts
Audio Prompts The AXON Flex system emits beeping sounds called audio prompts to notify you of the system status. These audio prompts usually occur after you perform an action with the AXON Flex system. NOTE: The camera must be connected to the controller for audio prompts to be heard. If the camera and controller are connected and you still do not hear the audio prompts, check the camera’s volume. - Page 45 Bluetooth SIG, Inc. Flak Jacket® is a registered trademark of Oakley, Inc. iOS® is a trademark or registered trademark of Cisco in the U.S. and other countries. Windex® is a registered trademark of S.C. Johnson & Son, Inc. AXON Flex™ and AXON™ Mobile are trademarks of TASER International, Inc., and TASER® and are registered trademarks of TASER International, Inc., registered in the U.S.
Need help?
Do you have a question about the AXON Flex and is the answer not in the manual?
Questions and answers