Table of Contents
Advertisement
Quick Links
Advertisement
Table of Contents

Related Manuals for Olympia TREK


Summary of Contents for Olympia TREK
- Page 1 TREK Outdoor Smartphone Operating Manual...
-
Page 2: Table Of Contents
Content First Steps Page 4 Notations Page 4 Intended Use Page 6 Safety Instructions Page 6 Other Information: Page 8 Tips Concerning the Battery Page 9 Package Contents Page 10 Accessories Page 10 Overview - Front Side Page 12 Overview - Rear Side Page 13 1.10 Putting the Mobile Phone into Operation... - Page 3 Mobile Phone Settings Page 47 Organisation of the Menu Settings Page 47 Useful Functions Page 50 Setting Up a Google Account Page 50 Setting Up the SmartKey Button Page 51 Blocked Numbers Page 52 Setting Up E-mail Accounts Page 52 Calendar Page 53 5.6...
-
Page 4: First Steps
First Steps Read the operating manual carefully and pay attention to the information when using your mobile phone. Keep the manual in a safe place for future reference. If the mobile phone is handed over to third parties, hand over all the documents with it. Notations The following notations are used in this operating manual: Lists... - Page 5 1.1.1 Display Texts In this operating manual, important functions are explained with the help of texts, illustrations and examples. You will find display texts illustrated in many sections of this oper- ating manual. These display texts correspond to the texts which appear on the screen of your mobile phone. Framed texts are provided in the following operating steps. These frames indicate texts which can appear in the display of the mobile phone.
-
Page 6: Intended Use
Intended Use The TREK mobile phone, subsequently referred to as mobile phone, is designed for use within a mobile phone network. The mobile phone is only intended for private use. Any other use is considered unintended use. Unauthorised mod- ifications or reconstructions are not permitted and lead to loss of rights to claims under the terms of guarantee. - Page 7 CAUTION! Reduce exposure to radio waves! Use an appropri- ate headset in the case of longer calls. Do not keep the mobile phone near your head. CAUTION! Risk of injury to the retina. The LED for the torch is very bright and could cause damage to eyes. Never look directly into the LED torch beam when the torch is switched on.
-
Page 8: Other Information
Other Information: Observe the following information when operating the mobile phone: ● The descriptions in this operating manual are based on the mo- bile phone being set to its default factory settings. The screen displays illustrated are purely examples. Displays and menus can change in appearance and functionality due to automatic updates on the mobile phone. -
Page 9: Tips Concerning The Battery
Tips Concerning the Battery The following tips and information help to ensure the mobile phone battery works properly: ● Only use the power adapters approved by the manufacturer, otherwise the battery could be damaged. ● To prevent unnecessary power consumption via the power adapter plug, disconnect the power adapter plug from the power socket when the battery is not being charged. -
Page 10: Package Contents
Package Contents Before starting up the mobile phone, check the package contents. If anything is missing or damaged, please contact our Service Department. ● TREK mobile phone ● USB-C cable ● Power adapter ● Quick Reference Guide ● SIM card needle... -
Page 12: Overview - Front Side
Overview - Front Side The illustration shows details of the front side of the mobile phone. Familiarise yourself with all the operating elements before starting to use the mobile phone. USB port On/Off button Loudspeaker Display Camera (front) Smart key Volume buttons SIM and SD card compartment... -
Page 13: Overview - Rear Side
Overview - Rear Side The illustration shows details of the rear side of the mobile phone. Familiarise yourself with all the operating elements before starting to use the mobile phone. Torch LED Fixture for wrist strap 1 5 12 Camera (rear) Flash 1 2 10 1 6 13... -
Page 14: Putting The Mobile Phone Into Operation
1.10 Putting the Mobile Phone into Operation This section provides information on how to put your mobile phone into operation. Your mobile phone is ready for use in just a few steps. Nano-SIM microSD... - Page 15 1.10.1 Inserting the SIM Card Before you can use your mobile phone, you must insert your SIM card (not included). The mobile phone also offers the Dual SIM function, which means that you can install two SIM cards. Since this is a combined slot, the second SIM card must be inserted in the slot for the microSD mem- ory card.
- Page 16 1.10.2 Inserting a MicroSD Memory Card (Option) If you want to increase the memory capacity of the mobile phone, you can insert a microSD memory card (not included in the equip- ment supplied) with a memory of up to 64 GB in the mobile phone. Since this is a combined slot, the second microSD memory card must be inserted in the slot for the second SIM card .
- Page 17 1.10.3 Charging the Mobile Phone (Power Adapter) You can charge the mobile phone using the USB cable and pow- er adapter plug contained in the package purchased. Open the cover of the USB port Connect the USB cable to the power adapter. Connect the USB cable to the USB port on the mobile phone.
-
Page 18: Operating The Mobile Phone
Operating the Mobile Phone The mobile phone is generally operated using the touch-sensitive display. Touch and swipe your fingers directly on the screen in order to navigate through the menus and start functions. Alterna- tively, you can use an appropriate stylus. The following overview indicates the finger movements to use: Tap your finger on the buttons or elements to start functions. Certain functions are started by tapping on the button and keeping it pressed Swipe your finger through lists and views to scroll in them. -
Page 19: Function Keys
Function Keys The following overview indicates all the function keys and buttons on the mobile phone. The four function keys are located on the sides of the mobile phone. Increase volume button Increase the volume of ringing tones, con- versations and media playback (louder). Lower volume button Lower the volume of ringing tones, conver- sations and media playback (quieter). -
Page 20: Switching On The Mobile Phone
Switching On the Mobile Phone Press the On/Off button for 3 seconds. ▸ The mobile phone is switched on. The start screen appears after a short time. When starting the mobile phone up for the first time, please pro- ceed with the initial installation as described on Page Switching Off the Mobile Phone Press the On/Off button for 3 seconds. -
Page 21: Screen Lock
Screen Lock The screen lock on the mobile phone ensures that functions cannot be accidentally started via the elements in the display. When the screen lock is activated, only the screen is switched off, the mobile phone can still be reached. The standard setting causes the screen lock to be activated automatically after 1 minute if there is no input within that time. -
Page 22: Starting The Mobile Phone For The First Time
Starting the Mobile Phone for the First Time After switching on the mobile phone for the first time, you are assisted by a set-up wizard through all the necessary steps to configure the Android operating system. Press the On/Off button for 3 seconds. Select the language required in the start screen. Optionally: Tap on the ┣Display settings┫ button if you want to zoom the display. -
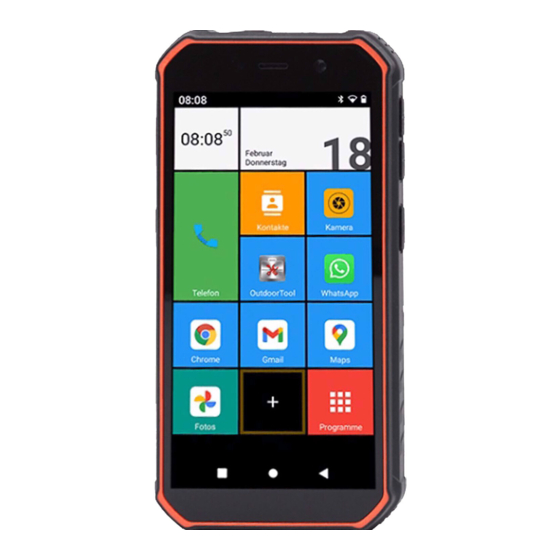
Page 23: Start Screen (Launcher)
Start Screen (Launcher) The start screen of the mobile phone is set at the factory to Square Home - Launcher*. The start screen displays the following elements: Status bar Add new tile (+) Large tile All installed apps Small tile Buttons * Extended functions are available after the expiry of the time-limited trial use through a chargeable activation. - Page 24 2.6.1 Adding Apps to the Start Screen You can add more tiles to the start screen (e.g. apps or widgets). Tap on the Home button. ▸ The start screen appears. Tap on the Add new tile (+) button. ▸ The options regarding adding new tiles appear.
- Page 25 Tap on the function required (e.g. app). Tap on the app required. ▸ The new tile, together with the app selected, appears on the start screen.
- Page 26 2.6.2 Adapting and Deleting Apps on the Start Screen You can adapt the tiles on the start screen, with regard to size, shape and function, and delete or replace them. Tap on the Home button. ▸ The start screen appears. Tap and hold the required tile.
- Page 27 If necessary, tap on the Settings button and adapt the behaviour of the tile. If necessary, tap on the Scale button and adapt the size and shape of the tile. If necessary, tap on the Waste bin button to delete it from the start screen.
- Page 28 2.6.3 Changing Other Settings on the Start Screen You can use other settings to adapt the start screen of the mobile phone to meet your individual requirements. Navigate to ┣Applications┫ > ┣Home options┫. The Launcher settings appear in the display. ▸...
- Page 29 2.6.4 Changing the Launcher (Appearance of the Start Screen) You can change the appearance and operation of the start screen on the mobile phone. The start screen of the mobile phone is set at the factory to Square Home - Launcher: Windows Style.
-
Page 30: Status Bar
Status Bar The status bar is at the top margin of the screen and displays mes- sages and provides quick access to selected functions. The following overview shows some of the status indicators: Mobile phone network Indicates the connection quality of the mobile phone network. More bars = better connection. - Page 31 Data transfer (Download/Upload) Indicates that data transfer is in progress via the mobile network or wifi connection. Error/Warning message Indicates that a problem has occurred. The message contains further information regarding the cause of the problem. Charge status indicator Indicates the current charge status of the battery. No SIM card Indicates that no SIM card has been installed or that the SIM card has not been detected.
- Page 32 2.7.1 Opening the Quick Access Menu You can use the status bar to open out the Quick Access menu and view further information on notifications and define more settings: Tap a finger on the status bar and swipe downwards on the screen. ▸ The Quick Access menu opens out.
- Page 33 Tap a finger on the Quick Access menu and swipe down- wards on the screen. The Quick Access menu is extended and displays even more functions.
-
Page 34: Screen Keyboard
Screen Keyboard In order to enter characters and digits, you can use the screen keyboard which appears in the display. The screen keyboard appears in the mobile phone display as soon as you tap on a corresponding input field. Tap on any input field on the screen. ▸ The screen keyboard appears. Tap on the screen keyboard to enter the relevant characters and digits. -
Page 35: Mobile Phone Menu
Mobile Phone Menu The main mobile phone menu is divided into topically organised groups (submenus). The following descriptions always assume that the starting point for the operation is the mobile phone's start screen (tap on the Home button). Many apps (applications) can be found directly on the start screen. -
Page 36: Using The Main Functions
Using the Main Functions This chapter explains how to use the main functions of the mobile phone. Information on other useful functions is provided in Chapter Useful Functions on Page Information on the settings defined for the mobile phone is provid- ed in Chapter 4 Mobile Phone Settings on Page The sections below describe the functions and indicate the sym- bols assigned to the individual apps. This simplifies orientation when using the mobile phone. -
Page 37: Making A Call
Making a Call Tap on the ┣Telephone┫ button. ▸ The phone app appears. Tap on the ┣Dial pad┫ button. ▸ The dialling keypad (dialpad) appears. Enter the required phone number using the keys on the dial- pad. INFO: Incorrect entries can be cleared using ┣X┫ button. Tap on the ┣Call┫... -
Page 38: Taking A Call
Taking a Call The mobile phone need not be unlocked in order to take a call. Swipe your finger from the bottom to the top of the screen. ▸ The incoming call is taken. -
Page 39: Rejecting A Call
Rejecting a Call The mobile phone need not be unlocked in order to reject incom- ing calls. Swipe your finger from the middle to the bottom of the screen. ▸ The incoming call is rejected. The caller hears the busy signal. -
Page 40: Functions Available During A Call
Functions Available During a Call While a call is in progress, it is possible to change the volume, activate the handsfree function, mute the microphone and activate a conference with other call participants. 3.4.1 Adapting the Volume During a Call Adapt the volume during a call by pressing the Increase vol- or Lower volume button. - Page 41 3.4.4 Putting a Call on Hold You can select whether to put the call in progress on hold. Putting a call on hold means putting it into holding mode. bringen. The caller is put on hold enabling you to call someone else. The first caller cannot hear this call.
-
Page 42: Contacts (Phone Book)
Contacts (Phone Book) You can store contacts in the phone book provided by the mobile phone. The contacts stored are arranged in alphabetical order. 3.5.1 Adding a Contact You can store contacts in the phone book provided on the mobile phone. - Page 43 3.5.3 Assigning a Picture to the Contact You can assign a picture to the contact. The picture is then dis- played in the event of a call and in the phone book. Navigate to ┣Applications┫ > ┣Contacts┫. Select the required contact. Tap on the ┣Edit contact┫...
-
Page 44: Messages (Sms/Mms)
Messages (SMS/MMS) The mobile phone can compile data in the form of SMS (Short Message Service) as well as MMS (Multimedia Messaging Service). 3.6.1 Writing Messages (SMS/MMS) Navigate to ┣Applications┫ > ┣Messages┫. Tap on the ┣Start chat┫ button. Enter the name or phone number of the recipient using the screen keyboard. -
Page 45: Using The Camera
Using the Camera The camera in the mobile phone can be used to take photos and record videos. When using the camera, observe local regulations and respect other peoples' rights of privacy. 3.7.1 Using the Camera (Photos) Navigate to ┣Applications┫ > ┣Camera┫. ▸... - Page 46 3.7.2 Using the Camera (Video) Tap on the ┣Camera┫ button. ▸ The camera app opens. The subject in front of the camera lens appears on the mobile phone screen. Tap on the ┣Video┫ button. ▸ The camera activates the video mode. INFO: Tap on the Flash button in order to set the flash func- tion as required (Off / Automatic / On).
-
Page 47: Mobile Phone Settings
Mobile Phone Settings This chapter explains which settings you can define in the mobile phone menu. Organisation of the Menu Settings Menu Description Network & Internet Settings and information regarding wifi (WLAN), mobile networks, data usage, hotspots and SIM cards Connected devices Settings for Bluetooth and NFC Apps & Notifications Settings for the apps installed (e.g. notifications in the status bar) Rechargeable battery Current battery charge and remaining... - Page 48 Data protection Settings and information on permis- sions related to apps, account activi- ties, personal data Location Switch location tracking on/off, apps with location tracking access Security Screen lock (PIN, pattern, fingerprint) Accounts Account overview (Email, social media etc.), switch auto- matic synchronisation of data on/off Operating assistance Reading aids, display gesture control, settings for persons with dyschro- matopsia or other sight disorders Managing applications...
- Page 49 SmartKey Define the function (e.g. Torch or SOS) assigned when pressing the SmartKey button Settings for the SOS function (Smart- Key) System Language, gestures, date and time, backup, resetting to factory settings About the phone Model and hardware, IMEI numbers, legal information, Android version NOTE: Please note that the name and position of settings could be altered by automatic update of the Android operating system.
-
Page 50: Useful Functions
Useful Functions Your mobile phone provides other useful functions. Setting Up a Google Account You can set-up a Google account at a later date in order to receive further helpful functions and have access to other apps via Google Play. Navigate to ┣Applications┫... -
Page 51: Setting Up The Smartkey Button
Setting Up the SmartKey Button You can define the function of the SmartKey button. When you press the SmartKey button, the function defined is executed. Navigate to ┣Applications┫ > ┣Settings┫ > ┣SmartKey┫. Tap on the ┣LongPress┫ button. Select one of the following functions: ● Torch ● Camera ● Outdoor Tools ● ●... -
Page 52: Blocked Numbers
Blocked Numbers It is possible to select phone numbers and block them, whereby you cannot then receive calls or texts from the blocked numbers. Navigate to ┣Applications┫ > ┣Contacts┫. Tap on the Menu button. Tap on the ┣Settings┫ button. Swipe your finger through the menu to the bottom and then tap on the ┣Blocked numbers┫... -
Page 53: Calendar
Calendar A calendar is already installed on your mobile phone. Navigate to ┣Applications┫ > ┣Calendar┫. Tap on the button and select the view required. 5.5.1 Entering Events in the Calendar You can enter various forthcoming events in the calendar and set- up a reminder for them, if required. -
Page 54: Calculator
Calculator A calculator is already installed on your mobile phone. Navigate to ┣Applications┫ > ┣Calculator┫. Tap on the required operation. NOTE: The blue arrow enables you to use the functions assigned to a scientific calculator. Youtube The Youtube app is already installed on your mobile phone. This means you have direct access to videos and streams from You- tube. -
Page 55: Torch
Torch The mobile phone is equipped with an integrated torch which can be switched on and off directly using the Smart Key . A condition for this is that the corresponding to function (factory setting: Torch) has been switched on (see Page 51). CAUTION! Risk of injury to the retina. The LED for the torch is very bright and could cause damage to eyes. -
Page 56: Whatsapp
5.10 WhatsApp WhatsApp is already installed on the mobile phone. WhatsApp is a messenger service with which to send messages to your con- tacts, similarly to using the short texts function (SMS). The messag- es are sent via an active data connection. NOTE: To avoid extra costs, you need access to a wireless network (WIFI/WLAN) or a reasonable tariff from your mobile phone provider. -
Page 57: Outdoortool
5.12 OutdoorTool The OutdoorTool app is already installed on the mobile phone. This app enables access to useful tools for home improvements: ● Libelle: for measuring descents and ascents. ● Noise Test: for measuring noise levels. ● Compass: for determining cardinal directions. ●... -
Page 58: Troubleshooting
Troubleshooting Even in the case of the mobile phone, it is possible that something does not work as it should. The following information should help to solve the problem. Restarting the Mobile Phone Press the On/Off button for 3 seconds. Tap on the ┣Restart┫... -
Page 59: Questions And Answers (Faq)
Questions and Answers (FAQ) This section contains answers to frequently asked questions and possible solutions to problems. The mobile phone cannot be switched on. The battery is not charged sufficiently. Charge the battery (see Page 14). If the battery charge drops below a minimum status, the mobile phone switches off automatically. Charge the battery in the mo- bile phone. Neither the signal strength nor my mobile phone net- work are displayed on the start screen. - Page 60 The display of my mobile phone has "frozen" and the mobile phone does not react when keys are pressed. Your mobile phone can occasionally crash. Restart your mobile phone (see Page 58). The battery cannot be charged or is empty within a short time.
- Page 61 How can I activate the wifi or Bluetooth function on the mobile phone? The settings for wifi (WLAN) or Bluetooth are in various menus. To switch the wifi system on and define settings, navigate to ┣Applications┫ > ┣Settings┫ > ┣Network & Internet┫. To switch Bluetooth on and define settings, navigate to ┣Applications > ┣Settings┫ > ┣Connected devices┫. How can I find a specific setting in the mobile phone? The mobile phone has a convenient Search function which ena- bles you to access the required setting quickly.
- Page 62 How can I change the notification sound (e.g. SMS text) of the mobile phone? Navigate to ┣Applications┫ > ┣Settings┫ > ┣Sound┫. Tap on the ┣Default notification sound┫ button and select the notification sound required. The respective notification sound selected plays briefly. Confirm the selection by tapping the ┣OK┫ button. How can I switch the vibration function of the mobile phone on or off? Navigate to ┣Applications┫...
- Page 63 How can I transfer data and apps from my old mo- bile phone to my new mobile phone? If your old mobile phone has an Android operating system with an active Google account, it is sufficient to register the existing Google account on your new mobile phone (see Page 50). If, however, you have not used a Google account on your old mo- bile phone, you can transfer the data via Bluetooth.
-
Page 64: Appendix
Appendix This section contains further important information related to the mobile phone. Symbols The following symbols are provided on the packaging of the mo- bile phone. The symbols and their significance are listed below: Android 10 NFC for non-contact data exchange Fingerprint sensor to lock/unlock the display Waterproof and dustproof (IP68) -
Page 65: Disposal
Disposal The adjacent symbol indicates that electrical and electronic apparatus and batteries no longer required must be disposed of separate from domestic waste in accordance with legal directives. Packaging materials must be disposed of accord- ing to local regulations. Declaration of Conformity GO Europe GmbH, Zum Kraftwerk 1, 45527 Hattingen, Germa- ny hereby declares that this mobile phone fulfils the basic require- ments and other relevant provisions stipulated in the Directive... -
Page 66: Queries And Service
Queries and Service Dear Customers, We are delighted that you have chosen to purchase this product. If it does not function as you would expect or it is defective, please contact the sales outlet where you purchased the product. Care Instructions Clean the housing surfaces and screen of the mobile phone with a soft, fluff-free cloth. Do not use any solvents or cleaning agents. -
Page 67: Technical Properties
Technical Properties WCDMA 850/900/1800/1900 MHz Mobile communication LTE 900/2100 MHz frequency range Mobile communication 100 Mbps download, 50 Mbps upload transmission rate 2G: 900 MHz 31 dBm, 1800 MHz 29 dBm, Mobile communication 3G: 2100 MHz 21dbm, 900 MHz 20 dBm transmission power LTE: BAND1 20 dBm, BAND3 20.1 dBm, BAND7 19.8 dBm, BAND8 20 dBm, BAND20 20 dBm... - Page 68 Subject to change without prior notice. GO Europe GmbH Zum Kraftwerk 1 Art. No. 2288 (black/orange) D-45527 Hattingen Germany Version 03.2021...
Need help?
Do you have a question about the TREK and is the answer not in the manual?
Questions and answers