
Related Manuals for Olympia NEO MINI


Summary of Contents for Olympia NEO MINI
- Page 1 neo-mini_print_de_en_it.indb 1 neo-mini_print_de_en_it.indb 1 16.10.2023 13:40:43 16.10.2023 13:40:43...
- Page 2 D Senioren Smartphone Kurzanleitung..............Seite 3 G Senior Smartphone Quick Reference Guide..........Page 63 I Smartphone per anziani Istruzioni sommarie..........pagina 124 Die vollständigen Bedienungsanleitung finden Sie im Internet unter: A full version of the operating manual is available online at: Le istruzioni d’uso complete sono disponibili su internet visitando: www.go-europe.com neo-mini_print_de_en_it.indb 2 neo-mini_print_de_en_it.indb 2...
-
Page 3: Table Of Contents
Inhalt Sicherheitshinweise ......6 Weitere Hinweise......12 Bestimmungsgemäße Verwendung . - Page 4 Smartphone bedienen ......30 Funktionstasten ..........32 Smartphone einschalten .
- Page 5 Nützliche Funktionen ......49 Applikationen (Apps) auf dem Startbildschirm anpassen ... . 49 Google-Konto einrichten .
-
Page 6: Sicherheitshinweise
Sicherheitshinweise Bewahren Sie sich beim Umgang mit Ihrem Smartphone vor körperlichen Schäden und beachten Sie die folgenden Sicherheitshinweise: ! Es besteht die Gefahr eines elektrischen Schlags! arnung • Niemals selbst das Smartphone oder Komponenten öffnen oder reparie- ren. • Niemals blanke Kontakte mit metallischen Gegenständen berühren. •... - Page 7 ! Es besteht Erstickungsgefahr durch Batterien/Akkus. arnung • Halten Sie Kinder von Batterien/Akkus fern. • Suchen Sie im Falle eines Verschluckens umgehend einen Arzt auf. ! Es bestehen unterschiedliche Gefahren im Umgang mit Batte- orsicht rien/Akkus. • Versuchen Sie niemals, nicht aufladbare Batterien wieder aufzuladen, schließen Sie Batterien/Akkus nicht kurz und/oder öffnen Sie Batterien/ Akkus nicht.
- Page 8 • Die Anschlussklemmen dürfen nicht kurzgeschlossen werden. • Werfen Sie Batterien/Akkus niemals in Feuer oder Wasser. • Setzen Sie Batterien/Akkus keiner mechanischen Belastung aus. • Auslaufende Batterien/Akkus können das Gerät beschädigen. Im Falle eines Auslaufens der/s Batterie/Akkus entfernen Sie diese sofort aus dem Gerät, um Beschädigungen zu vermeiden.
- Page 9 • Unterschiedliche Batterietypen/Akkutypen oder neue und gebrauchte Batterien/Akkus dürfen nicht zusammen benutzt werden. • Batterien/Akkus sind mit der richtigen Polarität einzusetzen. • Schalten Sie das Gerät aus und entnehmen Sie die Batterien/Akkus, wenn Sie das Gerät längere Zeit nicht nutzen. •...
- Page 10 ! Verletzungsgefahr für die Netzhaut. Die LED der Taschenlampe orsicht ist sehr hell und kann Ihre Augen schädigen. • Blicken Sie nicht direkt in die LED der Taschenlampe, wenn die Taschenlam- pe eingeschaltet ist. ! Der Rufton wird über den Lautsprecher wiedergegeben. orsicht •...
- Page 11 ! Bei der Absicherung für Notfälle nicht allein auf das Smartphone ichtig verlassen! Aus technischen Gründen ist es nicht möglich, in jeder Situation sichere Verbindungen zu garantieren. ! Schützen Sie Ihr Gerät gegen Nässe, Staub, Flüssigkeiten, ichtig Chemikalien, Dämpfe, Hitze und direkte Sonneneinstrahlung. •...
-
Page 12: Weitere Hinweise
Weitere Hinweise Beachten Sie bei der Bedienung Ihres Smartphones die folgenden Hinweise: ● Die Beschreibungen in dieser Kurzanleitung basieren auf den Werkseinstellungen Ihres Smartphones. ● Wenn Sie die Funktionen Ihres Smartphones erweitern möchten, ist es erforder- lich, ein Google-Konto einzurichten. Ein Google-Konto bietet Ihnen nützliche Funktionen, wie z. - Page 13 rungen können aber unter Umständen dazu führen, dass Applikationen (Apps) nicht mehr ordnungsgemäß funktionieren oder sich Funktionen ändern oder wegfallen. Wenden Sie sich im Zweifelsfall an den Hersteller der entsprechenden App. ● Manuelle Veränderung der auf Ihrem Smartphone vorinstallierten Applikationen (Apps) oder des Betriebssystems Android können zu Beschädigungen an Ihrem Smartphone führen.
-
Page 14: Bestimmungsgemäße Verwendung
Bestimmungsgemäße Verwendung Ihr Smartphone NEO MINI - im Folgenden Smartphone - ist geeignet für die Ver- wendung innerhalb eines Mobilfunknetzes. Jede andere Verwendung gilt als nicht bestimmungsgemäß. Eigenmächtige Veränderungen oder Umbauten sind nicht zulässig und führen zu Garantieverlust. Öffnen Sie das Smartphone in keinem Fall selbst und führen Sie keine eigenen Reparaturversuche durch. -
Page 15: Verpackungsinhalt
Verpackungsinhalt Prüfen Sie den Verpackungsinhalt Ihres Smartphones, bevor Sie Ihr Smartphone in Betrieb nehmen. Sollte etwas fehlen oder beschädigt sein, wenden Sie sich an unseren Service. ● Smartphone NEO MINI ● Netzteiladapter ● Akku ● Ladeschale ● USB-C-Kabel ● Kurzanleitung Zubehör... -
Page 16: Übersicht - Vorderseite
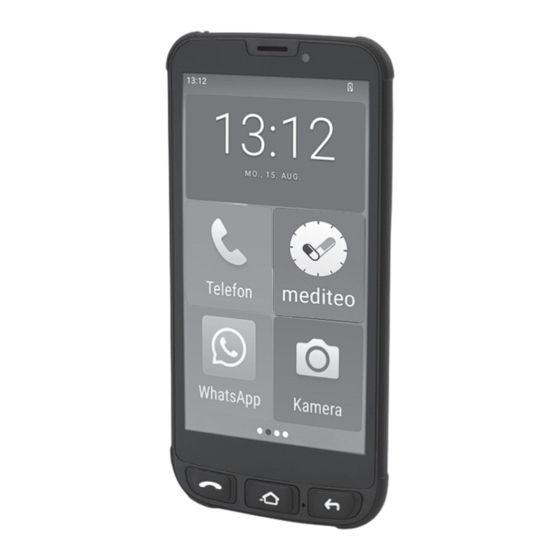
Übersicht - Vorderseite Die nebenstehende Abbildung zeigt Ihnen die Vorderseite Ihres Smartphones im De- tail. Machen Sie sich mit allen Bedienelementen vertraut, bevor Sie Ihr Smartphone in Betrieb nehmen. Tasten Lautstärke Taste Anruf Taste Ein/Ausschalten Display Taste Zurück Lautsprecher Taste Home Kamera (vorne) Ladekontakte neo-mini_print_de_en_it.indb 16... - Page 17 neo-mini_print_de_en_it.indb 17 neo-mini_print_de_en_it.indb 17 16.10.2023 13:40:45 16.10.2023 13:40:45...
-
Page 18: Übersicht - Rückseite
Übersicht - Rückseite Die nebenstehende Abbildung zeigt Ihnen die Rückseite Ihres Smartphones im De- tail. Machen Sie sich mit allen Bedienelementen vertraut, bevor Sie Ihr Smartphone in Betrieb nehmen. 1 10 Taste Notruf 1 2 11 Akkufachabdeckung 1 3 12 USB-C-Anschluss 1 4 13 Kamera (hinten) - Page 19 neo-mini_print_de_en_it.indb 19 neo-mini_print_de_en_it.indb 19 16.10.2023 13:40:46 16.10.2023 13:40:46...
-
Page 20: Smartphone In Betrieb Nehmen
Smartphone in Betrieb nehmen Bevor Sie Ihr Smartphone verwenden können, müssen Sie es wie in den folgenden Abschnitten beschrieben, in Betrieb nehmen. SIM-Karte einsetzen Bevor Sie Ihr Smartphone verwenden können, müssen Sie Ihre SIM-Karte (nicht im Lieferumfang enthalten) in Ihr Smartphone einsetzen. Ihr Smartphone bietet die Funk- tion Dual-SIM, das heißt, dass Sie zwei SIM-Karten parallel nutzen können. - Page 21 Nano Micro neo-mini_print_de_en_it.indb 21 neo-mini_print_de_en_it.indb 21 16.10.2023 13:40:46 16.10.2023 13:40:46...
-
Page 22: Microsd-Speicherkarte Einsetzen (Optional)
microSD-Speicherkarte einsetzen (optional) Wenn Sie den Speicher Ihres Smartphones erweitern möchten, können Sie eine microSD-Speicherkarte (nicht im Lieferumfang enthalten) mit bis zu 128 GB Speicher in Ihr Smartphone einsetzen. Eine microSD-Speicherkarte benötigen Sie beispielsweise, wenn Sie sehr viele Fotos oder Videos mit der Kamera machen möchten. Setzen Sie die microSD-Speicherkarte wie abgebildet mit den Kontakten nach unten in den Steckplatz ein. - Page 23 microSD neo-mini_print_de_en_it.indb 23 neo-mini_print_de_en_it.indb 23 16.10.2023 13:40:46 16.10.2023 13:40:46...
-
Page 24: Akku Einsetzen
Akku einsetzen Bevor Sie Ihr Smartphone verwenden können, müssen Sie den mitgelieferten Akku in Ihr Smartphone einsetzen. Setzen Sie den Akku wie abgebildet ein. Achten Sie auf die Ausrichtung des Akkus. Setzen Sie die Akkufachabdeckung 1 11 auf. Die Akkufachabdeckung 1 11 rastet hörbar ein. - Page 25 neo-mini_print_de_en_it.indb 25 neo-mini_print_de_en_it.indb 25 16.10.2023 13:40:47 16.10.2023 13:40:47...
-
Page 26: Smartphone Aufladen (Netzteiladapter)
Smartphone aufladen (Netzteiladapter) Sie können Ihr Smartphone mit dem USB-Kabel und dem Netzteiladapter aus dem Lieferumfang aufladen. Verbinden Sie das USB-Kabel mit dem Netzteiladapter. Schließen Sie das USB-Kabel am USB-Anschluss 3 12 Ihres Smartphones an. Schließen Sie den Netzstecker des Netzteiladapters an eine ordnungsgemäß installierte Steckdose an. - Page 27 neo-mini_print_de_en_it.indb 27 neo-mini_print_de_en_it.indb 27 16.10.2023 13:40:47 16.10.2023 13:40:47...
-
Page 28: Smartphone Aufladen (Ladeschale)
Smartphone aufladen (Ladeschale) Sie können Ihr Smartphone mit der Ladeschale aus dem Lieferumfang aufladen. Verbinden Sie das USB-Kabel mit dem Netzteiladapter. Schließen Sie das USB-Kabel an der Ladeschale an. Schließen Sie den Netzstecker des Netzteiladapters an eine ordnungsgemäß installierte Steckdose an. Stellen Sie Ihr Smartphone mit den Ladekontakten nach unten zeigend in die Ladeschale. - Page 29 neo-mini_print_de_en_it.indb 29 neo-mini_print_de_en_it.indb 29 16.10.2023 13:40:48 16.10.2023 13:40:48...
-
Page 30: Smartphone Bedienen
Smartphone bedienen Sie bedienen Ihr Smartphone primär über das berührungssensitive Display. Tippen und streichen Sie mit Ihren Fingern direkt auf dem Display, um durch Menüs zu navigieren und Aktionen auszuführen. Alternativ nutzen Sie einen dafür geeigneten Eingabestift. Die folgende Übersicht zeigt die möglichen Gesten: Tippen Sie mit dem Finger auf Schaltflächen oder Elemente, um eine Funktion auszuführen. - Page 31 Ziehen Sie Elemente oder Anzeigen mit zwei Fingern aus- einander, um sie zu vergrößern. Diese Geste ist nicht in allen Applikationen verfügbar. Ziehen Sie Elemente oder Anzeigen mit zwei Fingern zusammen, um sie zu verkleinern. Diese Geste ist nicht in allen Applikationen verfügbar.
-
Page 32: Funktionstasten
Funktionstasten Die folgende Übersicht zeigt die vorhandenen Funktionstasten, zusätzlich befindet sich die Taste Notruf auf der Rückseite Ihres Smartphones. Taste Anruf Telefonfunktion öffnen, Anrufe annehmen und laufende Gespräche beenden. Taste Home Zum Startbild wechseln und zwischen Applikationen wech- seln (gedrückt halten). Taste Zurück Einen Menüschritt zurück navigieren. - Page 33 Taste Lautstärke erhöhen Lautstärke von Klingeltönen, Gesprächen oder Medien erhöhen (lauter). Taste Lautstärke verringern Lautstärke von Klingeltönen, Gesprächen oder Medien verringern (leiser). Taste Ein/Ausschalten Smartphone Ein- oder Ausschalten, Neustarten oder Bild- schirmfoto erstellen. neo-mini_print_de_en_it.indb 33 neo-mini_print_de_en_it.indb 33 16.10.2023 13:40:48 16.10.2023 13:40:48...
-
Page 34: Smartphone Einschalten
Smartphone einschalten Drücken Sie die Taste Ein/Ausschalten für 3 Sekunden. Ihr Smartphone schaltet sich ein. Anschließend wird der Startbildschirm angezeigt. Beim ersten Start Ihres Smartphones, siehe Seite 38. Smartphone ausschalten Drücken Sie die Taste Ein/Ausschalten für 3 Sekunden. Tippen Sie auf die Schaltfläche ┣Ausschalten┫. ►... - Page 35 Display sperren Drücken Sie kurz die Taste Ein/Ausschalten ► Das Display erlischt, die Displaysperre ist eingeschaltet. Display entsperren Drücken Sie kurz eine beliebige Taste. ► Der Sperrbildschirm wird angezeigt. Abhängig von Ihrer ausgewählten Art der Displaysperre: - Zeichnen Sie Ihr festgelegtes Muster ein. - Geben Sie Ihren PIN oder Ihr Passwort ein.
-
Page 36: Der Erste Start Ihres Smartphones
Der erste Start Ihres Smartphones Nach dem ersten Einschalten Ihres Smartphones werden Sie von einem Einrichtungs- assistenten durch alle notwendigen Einrichtungsschritte Ihres Smartphones geführt. Drücken Sie die Taste Ein/Ausschalten für 3 Sekunden. Geben Sie den PIN Ihrer SIM-Karte ein. Info: Den PIN Ihrer SIM-Karte finden Sie in den Vertragsunterlagen Ihres Mobilfunk- anbieters. - Page 37 Wenn Sie sich im Bereich eines kabellosen Heimnetzwerks (WLAN) befinden, wählen Sie das gewünschte WLAN aus und melden Sie sich an. Tippen Sie an- schließend auf die Schaltfläche ┣Verbinden┫. Anschließend sucht Ihr Smartphone nach Aktualisierungen. Dieser Vorgang kann einige Minuten dauern. Optional: Kopieren Sie Apps und Daten von einem anderen Smartphone auf Ihr neues Smartphone.
- Page 38 neo-mini_print_de_en_it.indb 38 neo-mini_print_de_en_it.indb 38 16.10.2023 13:40:49 16.10.2023 13:40:49...
-
Page 39: Bildschirmtastatur
Bildschirmtastatur Zur Eingabe von Zeichen und Ziffern nutzen Sie die auf dem Display angezeigte Bildschirmtastatur. Die Bildschirmtastatur wird auf dem Display Ihres Smartphones angezeigt, sobald Sie auf ein entsprechendes Eingabefeld tippen. Tippen Sie auf ein beliebiges Eingabefeld auf dem Display. Die Bildschirmtasta- tur wird angezeigt. -
Page 40: Statusanzeige
Statusanzeige Die Statusanzeige befindet sich am oberen Rand des Displays und zeigt Benachrich- tigungen an und gibt Ihnen Schnellzugriff auf ausgewählte Funktionen. Die folgende Übersicht zeigt die vorhandenen Statusanzeigen: Mobilnetz Zeigt die Verbindungsqualität zum Mobilnetz an. Mehr Balken = bessere Verbindung. WLAN Zeigt die Verbindungsqualität zum WLAN (kabelloses Heim- netzwerk) an. - Page 41 GPS Zeigt die Verbindung zum globalen Navigationssatellitensystem zur Positionsbestimmung. Wichtig für Navigations-Apps. Laufendes Telefonat Zeigt ein laufendes Telefonat an. Verpasster Anruf Zeigt einen oder mehrere verpasste Telefonanrufe an. Anrufweiterleitung Zeigt eine eingeschaltete Anrufweiterleitung an. Sprechgarnitur (mit Mikrofon) Zeigt eine angeschlossene Sprechgarnitur (Headset) an. Kopfhörer (ohne Mikrofon) Zeigt einen angeschlossenen Kopfhörer an.
- Page 42 Fehler-/Warnmeldung Zeigt ein aufgetretenes Problem an. Die Meldung enthält weitere Informationen zur Ursache des Problems. Ladezustandsanzeige Zeigt den aktuellen Ladezustand des Akkus an. Keine SIM-Karte Zeigt an, dass keine SIM-Karte eingelegt ist oder die SIM-Karte nicht erkannt wird. Firmware-Aktualisierung verfügbar Zeigt eine verfügbare Aktu- alisierung der Firmware des Android Betriebssystems an.
- Page 43 Roaming Zeigt an, dass Ihr Smartphone mit einem anderen Mobilfunk- netz verbunden ist. Dies ist beim Aufenthalt im Ausland der Fall. Vibration Zeigt an, dass Ihr Smartphone bei Anrufen nicht klingelt, sondern vibriert. Ein Anruf wird zusätzlich auf dem Display angezeigt. Lautlos Zeigt an, dass Ihr Smartphone bei Anrufen weder klingelt noch vibriert.
-
Page 44: Anrufen
Anrufen Drücken Sie die Taste Anruf . Die Telefonie-App wird angezeigt. Geben Sie die gewünschte Rufnummer über das angezeigte Wählfeld ein. Falsche Eingaben löschen Sie mit der Schaltfläche ┣X┫. Tippen Sie auf die Schaltfläche ┣Wählen┫. ► Die Rufnummer wird gewählt. Anruf annehmen Ihr Smartphone muss nicht entsperrt sein um eingehende Anrufe zu empfangen. -
Page 45: Anruf Ablehnen
Anruf ablehnen Wischen Sie mit dem Finger auf dem Display von der Mitte nach unten. ► Der eingehende Anruf wird abgelehnt. Nachricht (SMS/MMS) schreiben Tippen Sie auf die Schaltfläche ┣SMS/MMS┫ und abschließend auf die Schaltflä- che ┣Schreiben┫. Geben Sie den Namen oder die Rufnummer des Empfängers über die Bild- schirmtastatur ein. -
Page 46: Bildkurzwahl
Bildkurzwahl Über die Bildkurzwahl können Sie Ihre favorisierten Kontakte bequem direkt auswäh- len. Sie können bis zu sechs Kontakte für die Bildkurzwahl festlegen. Drücken Sie die Taste Home ► Der Startbildschirm wird angezeigt. Wischen Sie mit dem Finger auf dem Display einmal von links nach rechts. Die Bildkurzwahl wird angezeigt. -
Page 47: Sos-Taste (Notruf-Funktion)
SOS-Taste (Notruf-Funktion) Sie können mit der SOS-Taste einen Notruf auslösen. Zuerst ertönt ein SOS-Signal. Dann werden SOS-Nachrichten nacheinander an die festgelegten Rufnummern gesendet. Anschließend werden diese über die Freisprechfunktion nacheinander an- gerufen. Der Notruf-Funktion können bis zu 5 Rufnummern zugewiesen werden. Hinweis: Weisen Sie niemals offiziellen Notrufnummern (112) zu. -
Page 48: Internet Nutzen
Internet nutzen Auf Ihrem Smartphone ist bereits ein Webbrowser (Chrome) vorhanden, mit dem Sie Webseiten besuchen können. Hinweis: Voraussetzung für die Nutzung des Internets ist, dass sich Ihr Smartphone in einem kabellosen Heimnetzwerk (WLAN) befindet oder die eingelegte SIM-Karte mit einen passenden Mobilfunktarif ausgestattet ist. Navigieren Sie in den Bereich ┣Alle Apps┫... -
Page 49: Nützliche Funktionen
Nützliche Funktionen Ihr Smartphone bietet Ihnen weitere nützliche Funktionen. Applikationen (Apps) auf dem Startbildschirm anpassen Sie können die auf dem Startbildschirm angezeigten Applikationen anpassen. Wählen Sie weitere Applikationen aus, die angezeigt werden sollen oder entfernen Sie vorhandene Applikationen vom Startbildschirm. Drücken Sie die Taste Home . -
Page 50: Google-Konto Einrichten
Google-Konto einrichten Richten Sie nachträglich ein Google-Konto ein, um nützliche Funktionen und Zugriff auf weitere Applikationen (Apps) über Google Play zu erhalten. Navigieren Sie in den Bereich ┣Alle Apps┫ > ┣Einstellungen┫ > ┣Konten┫. Tippen Sie auf die Schaltfläche ┣Konto hinzufügen┫. Tippen Sie auf die Schaltfläche ┣Google┫. -
Page 51: Einstellungen Anpassen
Einstellungen anpassen Sie können Ihr Smartphone in vielen Bereichen Ihren Wünschen entsprechend ein- stellen. Stellen Sie z. B. die Lautstärke der Töne oder die Helligkeit des Displays ein. Navigieren Sie in den Bereich ┣Alle Apps┫ > ┣Einstellungen┫. Nehmen Sie die Einstellungen Ihren Wünschen entsprechend vor. Bildschirmfoto (Screenshot) erstellen Drücken Sie die Taste Ein/Ausschalten für 3 Sekunden. -
Page 52: Fehlerbehebung
Fehlerbehebung Auch bei Ihrem Smartphone kann mal etwas nicht so funktionieren wie es soll. Die folgenden Hinweise helfen Ihnen, das Problem zu beheben. Smartphone neu starten Drücken Sie die Taste Ein/Ausschalten für 3 Sekunden. Tippen Sie auf die Schaltfläche ┣Neu starten┫. Ihr Smartphone wird neu gestartet. Warten Sie, bis das Display die Startseite anzeigt. -
Page 53: Werkseinstellungen Wiederherstellen
Werkseinstellungen wiederherstellen Wenn sich das Problem nicht anders beheben lässt, kann die Wiederherstellung auf Werkseinstellungen hilfreich sein. Beachten Sie, dass Ihr Smartphone im Anschluss neu eingerichtet werden muss. Navigieren Sie in den Bereich ┣Alle Apps┫ > ┣Einstellungen┫ > ┣System┫ > ┣Erweitert┫... -
Page 54: Anhang
Anhang Dieser Abschnitt enthält weitere wichtige Informationen zu Ihrem Smartphone. Symbole Die folgenden Symbole finden Sie auf der Verpackung Ihres Smartphones. Die folgende Übersicht zeigt die vorhandenen Symbole und deren Bedeutung: Hörgerätekompatibel (HAC) Android13 Medikamenten-Erinnerungs-App SOS-Funktion (mediteo) vorinstalliert Verwenden Sie den Netzteiladapter nur in Innenräumen. neo-mini_print_de_en_it.indb 54 neo-mini_print_de_en_it.indb 54 16.10.2023 13:40:52... - Page 55 Das Symbol gibt an, dass die Bauart des Produkts der Schutzklasse II entspricht (doppelte Isolierung). Ein Sicherheitsanschluss an die elektrische Erdung (Masse) ist nicht erforderlich. Personenbezogene Daten löschen Löschen Sie alle personenbezogenen Daten von Ihrem Gerät, bevor Sie das Gerät entsorgen.
- Page 56 Defekte oder verbrauchte Batterien müssen gemäß Richtlinie 2006/66/EG und deren Änderungen recycelt werden. Geben Sie Batterien und/oder das Gerät über die angebotenen Sammeleinrichtungen zurück. Beachten Sie die Kennzeichnung des Verpackungsmaterials bei der Abfalltrennung, diese sind gekennzeichnet mit Abkürzungen (b) und Nummern (a) mit folgender Bedeutung: 1–7: Kunststoffe / 20–22: Papier und Pappe / 80–98: Verbundstoffe.
- Page 57 Fragen und Service Lieber Kunde, wir freuen uns, dass Sie sich für dieses Gerät entschieden haben. Bei Fragen und Problemen steht Ihnen unsere Service-Hotline unter der Telefonnum- mer +49 (0)180 5 007514 (Kosten aus dem dt. Festnetz bei Drucklegung: 14ct/ Min., mobil maximal 42ct/Min.) zur Verfügung.
- Page 58 neo-mini_print_de_en_it.indb 58 neo-mini_print_de_en_it.indb 58 16.10.2023 13:40:53 16.10.2023 13:40:53...
- Page 59 Pflegehinweise Reinigen Sie die Gehäuseoberflächen mit einem weichen, trockenen, fusselfreien Tuch. Verwenden Sie keine Reinigungs- oder Lösungsmittel. Hersteller GO Europe GmbH Zum Kraftwerk 1 D-45527 Hattingen Deutschland www.go-europe.com neo-mini_print_de_en_it.indb 59 neo-mini_print_de_en_it.indb 59 16.10.2023 13:40:53 16.10.2023 13:40:53...
- Page 60 Rechtliche Hinweise Google, Android, Google Play und andere Marken sind Warenzeichen von Google LLC. neo-mini_print_de_en_it.indb 60 neo-mini_print_de_en_it.indb 60 16.10.2023 13:40:53 16.10.2023 13:40:53...
-
Page 61: Technische Eigenschaften
Technische Eigenschaften Mobilfunk-Frequenzbereich WCDMA 850/900/1800/1900 MHz (B1/B5/B8) LTE 900/2100 MHz (B1/B3/B7/B8/B20) Mobilfunk-Übertragungsrate 100 MBps Download, 50 MBps Upload Mobilfunk-Sendeleistung 2G: 900 MHz 31 dBm, 1800 MHz 29 dBm, 3G: 2100 MHz 21dbm, 900 MHz 20 dBm LTE: BAND1 20 dBm, BAND3 20,1 dBm, BAND7 19,8 dBm, BAND8 20 dBm, BAND20 20 dBm WLAN Standard IEEE 802.11n... - Page 62 Bluetooth Frequenzbereich 2,402 GHz - 2,480 GHz Bluetooth Übertragungsrate 24 MBps Bluetooth Sendeleistung 1 mW GPS-Empfänger GPS mit 1575,42 MHz Kamera 2 MP (Vorne), 5 MP (Hinten) Prozessor (CPU) Modell: MT6739, 4 Kerne @ 1,3 GHz Arbeitsspeicher (RAM) 2 GB Speicher 16 GB (intern), bis zu 128 GB (extern) USB-Schnittstelle...
- Page 63 Contents Safety Instructions ......65 Other Information: ......71 Intended Use .
- Page 64 Operating the Smartphone ....89 Function Keys ..........91 Switching the Smartphone On .
- Page 65 Useful Functions ......108 Adapting the Apps on the Start Screen ......108 Setting Up a Google Account .
-
Page 66: Safety Instructions
Safety Instructions Pay attention to the following safety instructions to protect yourself from any possible personal injury when handling and using the smartphone: ! There is a risk of an electric shock! arning • Never attempt to open and repair the smartphone or components yourself. •... - Page 67 ! Risk of suffocation through batteries. arning • Keep batteries out of reach of children. • Seek medical attention from a doctor immediately should a battery be swallowed. ! There are different risks involved when dealing with batteries. aution • Never attempt to recharge standard batteries, never short circuit batteries and/or open batteries.
- Page 68 • Ensure the connection terminals are not short-circuited. • Never throw batteries into a fire or water. • Never expose batteries to any mechanical loads. • Leaking batteries could cause damage to the device. If a battery should start to leak, remove it from the device immediately to prevent any further damage.
- Page 69 • Ensure batteries are inserted with the correct polarity. • If the device will not be used for a longer period, switch the device off and remove the batteries. • Remove empty batteries from the device and dispose of them according to the applicable directives.
- Page 70 ! The ring tone is issued via the loudspeaker. aution • Take an incoming call first and then hold the smartphone to your ear. This prevents any possible hearing damage. ! Do not use the smartphone in prohibited areas! Prohibited mportant areas could include hospitals, petrol stations, aeroplanes, etc.
- Page 71 ! Only use original accessories. mportant • Only connect accessories approved by the manufacturer to the device. ! Telephoning while driving is only permitted when the applica- mportant ble legal regulations are observed. neo-mini_print_de_en_it.indb 71 neo-mini_print_de_en_it.indb 71 16.10.2023 13:40:54 16.10.2023 13:40:54...
-
Page 72: Other Information
Other Information: Observe the following information when operating the smartphone: ● The descriptions in this quick start guide are based on the smartphone being set to its default factory settings. ● If you want to extend the functions provided by the smartphone, you must set-up a Google account. - Page 73 stances, updates can lead to apps (applications) no longer working properly or functions being changed or discarded. In the case of doubt, please contact the manufacturer of the respective app. ● Manual modification of the apps (applications) preinstalled on the smartphone or the Android operating system can lead to damage to the smartphone.
-
Page 74: Intended Use
Intended Use The NEO MINI smartphone, subsequently referred to as the smartphone, is de- signed for use within a smartphone network. Any other use is considered unintended use. Unauthorised modification or alterations are not permitted; doing so leads to loss of rights of claims under the terms of guarantee and warranty. Under no circum- stances open the smartphone or try and complete any repair work yourself. -
Page 75: Package Contents
Package Contents Check the package contents of the smartphone carefully before putting the smart- phone into operation. If anything is missing or damaged, please contact our Service Department. ● NEO MINI smartphone ● Power adapter ● Battery ● Charging cradle ●... -
Page 76: Overview - Front Side
Overview - Front Side The adjacent illustration shows details of the front side of the smartphone. Familiarise yourself with all the operating elements before starting to use the smartphone. Volume buttons Call button On/Off button Display Back button Loudspeaker Home key Camera (front) Charge contacts neo-mini_print_de_en_it.indb 76... - Page 77 neo-mini_print_de_en_it.indb 77 neo-mini_print_de_en_it.indb 77 16.10.2023 13:40:55 16.10.2023 13:40:55...
-
Page 78: Overview - Rear Side
Overview - Rear Side The adjacent illustration shows details of the rear side of the smartphone. Familiarise yourself with all the operating elements before starting to use the smartphone. 1 10 SOS key 1 2 11 Battery compartment cover 1 3 12 USB-C port 1 4 13 Camera (rear) - Page 79 neo-mini_print_de_en_it.indb 79 neo-mini_print_de_en_it.indb 79 16.10.2023 13:40:56 16.10.2023 13:40:56...
-
Page 80: Putting The Smartphone Into Operation
Putting the Smartphone Into Operation Before you can start to use the smartphone, you must set it up for operation as described in the following sections. Inserting the SIM Card Before you can use your smartphone, you must insert your SIM card (not included in the package purchased). - Page 81 Nano Micro neo-mini_print_de_en_it.indb 81 neo-mini_print_de_en_it.indb 81 16.10.2023 13:40:56 16.10.2023 13:40:56...
-
Page 82: Inserting A Microsd Memory Card (Option)
Inserting a MicroSD Memory Card (Option) If you want to increase the memory capacity of the smartphone, you can insert a microSD memory card (not included in the package purchased) with a memory of up to 128 GB in the smartphone. You need a microSD memory card, for example, if you want to take lots of photos or record lots of videos with the camera. - Page 83 microSD neo-mini_print_de_en_it.indb 83 neo-mini_print_de_en_it.indb 83 16.10.2023 13:40:56 16.10.2023 13:40:56...
-
Page 84: Inserting The Battery
Inserting the Battery Before you can use your smartphone, you must insert the rechargeable battery supplied. Insert the battery as shown. When doing so, ensure the battery is aligned correctly. Replace the battery compartment cover 1 11 . The battery compartment cover 1 11 latches audibly into place. - Page 85 neo-mini_print_de_en_it.indb 85 neo-mini_print_de_en_it.indb 85 16.10.2023 13:40:56 16.10.2023 13:40:56...
-
Page 86: Charging The Smartphone (Power Adapter)
Charging the Smartphone (Power Adapter) You can charge the smartphone using the USB cable and power adapter plug con- tained in the package purchased. Connect the USB cable to the power adapter. Connect the USB cable to the USB port 3 12 on the smartphone. - Page 87 neo-mini_print_de_en_it.indb 87 neo-mini_print_de_en_it.indb 87 16.10.2023 13:40:56 16.10.2023 13:40:56...
-
Page 88: Charging The Smartphone (Charging Cradle)
Charging the Smartphone (Charging Cradle) You can charge the smartphone using the charging cradle contained in the package purchased. Connect the USB cable to the power adapter. Connect the USB cable to the charging cradle. Connect the plug on the power adapter to a properly installed power socket. Insert the smartphone in the charging cradle with the charge contacts facing down. - Page 89 neo-mini_print_de_en_it.indb 89 neo-mini_print_de_en_it.indb 89 16.10.2023 13:40:57 16.10.2023 13:40:57...
-
Page 90: Operating The Smartphone
Operating the Smartphone The smartphone is generally operated using the touch-sensitive display. Touch and swipe your fingers directly on the screen in order to navigate through the menus and start functions. Alternatively, you can use an appropriate stylus. The following overview indicates the finger movements to use: Tap your finger on the buttons or elements to start functions. - Page 91 Draw two fingers apart on an element or view on the screen to zoom in. This finger movement is not avail- able in all applications. Move two fingers towards each other on an element or view on the screen to zoom out. This finger movement is not available in all applications.
-
Page 92: Function Keys
Function Keys The following overview illustrates the function available; the SOS button is also available on the rear of the smartphone. Call button Open the telephone function, take a call and end a call in progress. Home key Switch to the start screen and switch between applications (keep pressed). - Page 93 Increase volume button Increase the volume of ringing tones, conversations and media playback (louder). Lower volume button Lower the volume of ringing tones, conversations and media playback (quieter). On/Off button Switch the smartphone on/off, restart it or create a screen- shot.
-
Page 94: Switching The Smartphone On
Switching the Smartphone On Press the On/Off button for 3 seconds. The smartphone is switched on. The start screen appears after a short time. When switching the smartphone on for the first time, see Page 98. Switching the Smartphone Off Press the On/Off button for 3 seconds. - Page 95 Locking the Screen Press the On/Off button briefly. ► The screen goes out, the screen lock is activated. Unlocking the Screen Press any button briefly. ► The screen lock display appears. Depending on the type of screen lock you have selected: - draw the pattern you have defined.
-
Page 96: Starting The Smartphone For The First Time
Starting the Smartphone for the First Time After switching on the smartphone for the first time, you are assisted by a set-up wizard through all the necessary steps to configure the smartphone. Press the On/Off button for 3 seconds. Enter the PIN for your SIM card. Info: The PIN for your SIM card is enclosed with the contractual documents provided by your mobile service provider. -
Page 97: Start Screen
If you are within the connection range of a wireless home network (WIFI), select the required wifi network and log on. Then tap on the ┣Connect┫ button. The smart- phone then searches for updates. This process can take a few minutes. Option: Transfer apps and data from a different smartphone to your new smart- phone. - Page 98 neo-mini_print_de_en_it.indb 98 neo-mini_print_de_en_it.indb 98 16.10.2023 13:40:58 16.10.2023 13:40:58...
-
Page 99: Screen Keyboard
Screen Keyboard In order to enter characters and digits, you can use the screen keyboard which appears in the display. The screen keyboard appears in the smartphone display as soon as you tap on a corresponding input field. Tap on any input field on the screen. The screen keyboard appears. Tap on the screen keyboard to enter the relevant characters and digits. -
Page 100: Status Bar
Status Bar The status bar is at the top margin of the screen and displays messages and pro- vides quick access to selected functions. The following overview indicates the icons which can appear: Smartphone network Indicates the connection quality of the smart- phone network. - Page 101 GPS Indicates a connection to the global navigation satellite system for determining your position. Important for navigation apps. Call in progress Indicates that a call is currently in progress. Missed call Indicates that one or more phone calls have been missed. Call forwarding Indicates that call forwarding is activated.
- Page 102 Error/Warning message Indicates that a problem has occurred. The message contains further information regarding the cause of the problem. Charge status indicator Indicates the current charge status of the battery. No SIM card Indicates that no SIM card has been installed or that the SIM card has not been detected.
- Page 103 Unread messages Indicates that one or more messages received (SMS, MMS) have not been read. Roaming Indicates that the smartphone is connected to a different smartphone network. This occurs when abroad, for example. Vibration Indicates that the smartphone will vibrate, not ring, when a call is received.
-
Page 104: Making A Call
Making a Call Press the Call button. The phone app appears. Enter the required phone number using the dialpad displayed. Incorrect digits can be deleted using the ┣X┫ button. Tap on the ┣Dial┫ button. ► The phone number is dialled. Taking a Call The smartphone need not be unlocked in order to receive a call. -
Page 105: Rejecting A Call
Rejecting a Call Swipe your finger from the middle to the bottom of the screen. ► The incoming call is rejected. Writing Messages (SMS/MMS) Tap on the ┣SMS/MMS┫ button and then on the ┣Write┫ button. Enter the name or phone number of the recipient using the screen keyboard. Alternatively, tap on the ┣+┫... -
Page 106: Speed Dialling Via Picture
Speed Dialling Via Picture The speed dialling via picture function enables you to call your favourite contacts conveniently and directly. You can define up to six contacts for the speed dialling via picture function. Press the Home button. ► The start screen appears. Swipe your finger from left to right on the screen. -
Page 107: Sos Key (Emergency Call Function)
SOS Key (Emergency Call Function) You can initiate an emergency call by using the SOS key. You will hear an SOS signal first of all. Then the SOS messages are sent to the phone numbers defined in succession. Following that, the numbers are then dialled, in succession,via the hands- free function. -
Page 108: Using Internet
Using Internet A web browser (Chrome) is already installed on the smartphone and can be used to open websites. Note: A condition for using the internet is that the smartphone is logged on in a wireless network (WIFI) or the SIM card installed is provided with an appropriate mobile tariff. -
Page 109: Useful Functions
Useful Functions Your smartphone provides other useful functions. Adapting the Apps on the Start Screen You can adapt the apps displayed on the start screen. Select other apps which you want to display on the start screen or delete from the start screen. -
Page 110: Setting Up A Google Account
Setting Up a Google Account You can set-up a Google account at a later date in order to receive further helpful functions and have access to other apps via Google Play. Navigate to the ┣All Apps┫ > ┣Settings┫ > ┣Accounts┫ menu option. Tap on the ┣Add Account┫... -
Page 111: Adjusting Settings
Adjusting Settings You can adjust various settings defined in the smartphone to meet your own re- quirements. You can adjust the volume level of ringing tones or the brightness of the display, for example. Navigate to the ┣All Apps┫ > ┣Settings┫ menu option. Adjust the settings in order to meet your needs. -
Page 112: Troubleshooting
Troubleshooting Even in the case of the smartphone, it is possible that something does not work as it should. The following information should help to solve the problem. Restarting the Smartphone Press the On/Off button for 3 seconds. Tap on the ┣Restart┫ button. The smartphone is restarted. Wait until the start screen appears in the display. -
Page 113: Restoring The Default Factory Settings
Restoring the Default Factory Settings If the problem cannot be solved otherwise, it may be helpful to reset the default factory settings. Please note that after being reset the smartphone must be set-up and configured again. Navigate to ┣All Apps┫ > ┣Settings┫ > ┣System┫ > ┣Advanced┫ > ┣Reset Options┫ menu option. -
Page 114: Appendix
Appendix This section contains further important information related to the smartphone. Symbols The following symbols are provided on the packaging of the smartphone. The sym- bols and their significance are listed below: Hearing aid compatible Android13 (HAC) Medication reminder app (medit- SOS function eo) is preinstalled Only use the power adapter indoors. - Page 115 The symbol indicates that the design of the product complies with Protection Class II (double insulation). A safety connection to the electrical earthing (ground) is not necessary. Deleting Personal Data Delete any personal data on the device before disposing of it. Disposal Familiarize yourself with the options available concerning the return of old equipment and used batteries free of charge through your dealer.
- Page 116 Defective and used batteries must be recycled in accordance with the Directive 2006/66/EC and its amendments. Return batteries and/or the device via the collection points provided. Pay attention to the identifications on the packaging materials when sorting waste; they are identified by the abbreviations (b) and numbers (a) which have the following significance: 1–7: plastics / 20–22: paper and card- board / 80–98: composite materials.
- Page 117 neo-mini_print_de_en_it.indb 117 neo-mini_print_de_en_it.indb 117 16.10.2023 13:41:02 16.10.2023 13:41:02...
- Page 118 Care Instructions Clean the housing surfaces of the device with a soft, dry, lint-free cloth. Do not use any cleaning agents or solvents. Manufacturer GO Europe GmbH Zum Kraftwerk 1 D-45527 Hattingen Germany www.go-europe.com Legal Information Google, Android, Google Play and other brands are trademarks of Google LLC. neo-mini_print_de_en_it.indb 118 neo-mini_print_de_en_it.indb 118 16.10.2023 13:41:02...
-
Page 119: Technical Properties
Technical Properties Mobile communication frequency range WCDMA 850/900/1800/1900 MHz (B1/B5/B8) LTE 900/2100 MHz (B1/B3/B7/B8/B20) Mobile communication transmission rate 100 MBps download; 50 MBps upload Mobile communication transmission power 2G: 900 MHz 31 dBm, 1800 MHz 29 dBm, 3G: 2100 MHz 21 dBm, 900 MHz 20 dBm LTE: BAND1 20 dBm, BAND3 20.1 dBm, BAND7 19.8 dBm, BAND8 20 dBm, BAND20 20 dBm Wifi standard... - Page 120 Bluetooth transmission rate 24 MBps Bluetooth transmission power 1 mW GPS receiver GPS with 1575.42 MHz Camera 2 MP (front), 5 MP (rear) Processor (CPU) Model: MT6739, 4 cores @ 1.3 GHz Working memory (RAM) 2 GB Memory 16 GB (internal), up to 128 GB (external) USB port Type C Display...
- Page 121 Contenuto Indicazioni di sicurezza ..... . 123 Ulteriori indicazioni ......129 Uso conforme .
- Page 122 Comandare lo smartphone ....147 Tasti funzione ..........149 Accendere lo smartphone .
- Page 123 Funzioni utili ....... 166 Configurare le applicazioni (app) sulla schermata iniziale ..166 Creare un Google account .
-
Page 124: Indicazioni Di Sicurezza
Indicazioni di sicurezza Durante l'uso dello smartphone, evitare lesioni fisiche e osservare le seguenti indica- zioni di sicurezza: ! Pericolo di scossa elettrica! VVertenza • Non aprire o riparare mai autonomamente lo smartphone o suoi compo- nenti. • Non sfiorare mai i contatti a nudo con oggetti metallici. •... - Page 125 ni. I bambini piccoli potrebbero ingerire componenti minuti o batterie. • In caso si sospetti l'ingestione di una batteria, consultare immediatamente un medico. ! Pericolo di soffocamento dovuto a pile/batterie. VVertenza • Tenere lontano le pile/batterie dalla portata dei bambini. •...
- Page 126 per l'ambiente (Cd = cadmio, Hg = mercurio, Pb = piombo). Pertanto, lo smaltimento e il riciclaggio separati delle batterie esauste sono essenziali per preservare l'ambiente e la salute. • I terminali non devono essere cortocircuitati. • Non gettare le pile/batterie nel fuoco o in acqua. •...
- Page 127 condizioni e temperature estreme con un possibile effetto sulle pile/bat- terie, ad es. non poggiandole su termosifoni o non esponendole ai raggi solari diretti. • Utilizzare esclusivamente pile/batterie dello stesso tipo. • Non è consentito utilizzare insieme pile/batterie di tipo differente o mi- schiare fra loro pile/batterie nuove e usate.
- Page 128 ! Ridurre le sollecitazioni dovute alle onde radio. ttenzione • Utilizzare durante la conduzione di lunghe conversazioni un auricolare idoneo. Non conservare lo smartphone vicino alla testa. ! Pericolo di lesioni per la retina. Il LED della torcia è molto ttenzione luminoso e può...
- Page 129 ! Non affidarsi unicamente al funzionamento dello smartphone mportante per assicurare possibili interventi d'emergenza! Per motivi tecnici non sempre è possibile garantire un corretto collegamento in qualsiasi circostanza e situazione. ! Proteggere l'apparecchio da umidità, polvere, liquidi, mportante sostanze chimiche, vapori, calore e raggi solari diretti. •...
-
Page 130: Ulteriori Indicazioni
Ulteriori indicazioni Durante l'uso dello smartphone, osservare le seguenti indicazioni: ● Quanto descritto nelle presenti istruzioni sommarie si riferisce sempre alla confi- gurazione standard dello smartphone. ● Volendo estendere le funzioni del proprio smartphone, sarà necessario confi- gurare un Google account. Un Google account offre utili funzioni, come ad es. il back-up automatico dei contatti memorizzati sul dispositivo. - Page 131 Gli aggiornamenti possono però anche far sì che le applicazioni (app) non funzionino più correttamente o che determinate funzioni cambino o non siano ulteriormente disponibili. In tal caso si prega di contattare direttamente il fornitore dell'app interessata. ● Modifiche manuali alle applicazioni (app) preinstallate sullo smartphone o al sistema operativo Android possono causare danni al proprio smartphone.
-
Page 132: Uso Conforme
Uso conforme Lo smartphone NEO MINI - qui di seguito lo smartphone - è preposto all'uso in una rete di telefonia mobile. Qualsiasi altro impiego è considerato improprio. Non sono ammesse modifiche o trasformazioni non autorizzate che comportano la perdita della garanzia. -
Page 133: Contenuto Della Confezione
Verificare il contenuto della confezione dello smartphone prima di metterlo in funzio- ne. In caso dovesse mancare qualcosa o risultare danneggiato, si prega di rivolgersi al nostro servizio di assistenza. ● Smartphone NEO MINI ● Adattatore di rete ● Batteria ●... -
Page 134: Vista D'insieme - Lato Anteriore
Vista d'insieme - Lato anteriore La seguente figura visualizza in dettaglio il lato anteriore dello smartphone. Si consiglia di familiarizzare con gli elementi di comando prima di mettere in funzione lo smartphone. Tasti volume Tasto chiamata Tasto Accensione/Spegnimento Display Tasto indietro Altoparlante Tasto home Fotocamera (anteriore) - Page 135 neo-mini_print_de_en_it.indb 135 neo-mini_print_de_en_it.indb 135 16.10.2023 13:41:03 16.10.2023 13:41:03...
-
Page 136: Vista D'insieme - Lato Posteriore
Vista d'insieme - Lato posteriore La seguente figura visualizza in dettaglio il lato posteriore dello smartphone. Si consiglia di familiarizzare con gli elementi di comando prima di mettere in funzione lo smartphone. 1 10 Tasto chiamata d'emergenza 1 2 11 Copertura del vano batteria 1 3 12 Porta USB-C... - Page 137 neo-mini_print_de_en_it.indb 137 neo-mini_print_de_en_it.indb 137 16.10.2023 13:41:04 16.10.2023 13:41:04...
-
Page 138: Mettere In Funzione Lo Smartphone
Mettere in funzione lo smartphone Prima di poter utilizzare lo smartphone è necessario procedere alla messa in funzio- ne per come descritto nelle seguenti sezioni. Inserire la scheda SIM Prima di poter utilizzare lo smartphone è necessario inserire la propria scheda SIM (non inclusa nella confezione) nello smartphone. - Page 139 Nano Micro neo-mini_print_de_en_it.indb 139 neo-mini_print_de_en_it.indb 139 16.10.2023 13:41:04 16.10.2023 13:41:04...
-
Page 140: Inserire Una Scheda Memoria Microsd (Opzione)
Inserire una scheda memoria microSD (opzione) Per ampliare la memoria del proprio smartphone, è possibile inserire nello smartpho- ne una scheda memoria microSD supplementare (non inclusa nella confezione) con fino a 128 GB di memoria. La scheda memoria microSD è ad esempio necessaria in caso si riprendano molte foto o molti video con la foto/videocamera. - Page 141 microSD neo-mini_print_de_en_it.indb 141 neo-mini_print_de_en_it.indb 141 16.10.2023 13:41:05 16.10.2023 13:41:05...
-
Page 142: Inserire La Batteria
Inserire la batteria Prima di poter utilizzare lo smartphone è necessario inserire nello smartphone la batteria fornita in dotazione. Inserire la batteria secondo quanto raffigurato. Tenere conto dell'orientamento della batteria. Rimontare il coperchio del vano batteria 1 11 . Il coperchio del vano batteria 1 11 scatta in posizione in maniera udibile. - Page 143 neo-mini_print_de_en_it.indb 143 neo-mini_print_de_en_it.indb 143 16.10.2023 13:41:05 16.10.2023 13:41:05...
-
Page 144: Caricare Lo Smartphone (Adattatore Di Rete)
Caricare lo smartphone (adattatore di rete) Per ricaricare lo smartphone, utilizzare il cavo USB e l'alimentatore di rete forniti entrambi in dotazione. Collegare il cavo USB all'alimentatore di rete. Collegare il cavo USB alla porta USB 3 12 del proprio smartphone. Collegare la spina di alimentazione dell'alimentatore di rete ad una presa di corrente installata correttamente. - Page 145 neo-mini_print_de_en_it.indb 145 neo-mini_print_de_en_it.indb 145 16.10.2023 13:41:05 16.10.2023 13:41:05...
-
Page 146: Caricare Lo Smartphone (Basetta Di Carica)
Caricare lo smartphone (basetta di carica) Lo smartphone si lascia caricare mediante la basetta di carica fornita in dotazione. Collegare il cavo USB all'alimentatore di rete. Collegare il cavo USB alla basetta di carica. Collegare la spina di alimentazione dell'alimentatore di rete ad una presa di corrente installata correttamente. - Page 147 neo-mini_print_de_en_it.indb 147 neo-mini_print_de_en_it.indb 147 16.10.2023 13:41:05 16.10.2023 13:41:05...
-
Page 148: Comandare Lo Smartphone
Comandare lo smartphone Il comando dello smartphone avviene principalmente attraverso il display sensitivo allo sfioramento. Premere e sfiorare con le dita sul display per navigare nei menu ed eseguire azioni. In alternativa è possibile servirsi di un'apposita penna di input. La seguente panoramica riassume i movimenti possibili: Per selezionare una funzione, premere con il dito il pulsan- te o l'elemento interessato. - Page 149 Per ingrandire un elemento o una schermata visualizzata, allargare la porzione interessata con due dita. Questa funzione non è disponibile in tutte le applicazioni. Per rimpicciolire un elemento o una schermata visualizzata, restringere la porzione interessata con due dita. Questa funzione non è...
-
Page 150: Tasti Funzione
Tasti funzione La seguente vista d'insieme visualizza i tasti funzione presenti, in più sul lato posterio- re dello smartphone è presente il tasto Chiamata d'emergenza. Tasto chiamata Aprire la funzione telefono, accettare la chiamata e conclu- dere chiamate in corso. Tasto home Passare dalla schermata iniziale e navigare tra le applica- zioni (tenendo premuto). - Page 151 Tasto Aumenta volume Aumentare il volume di suonerie, conversazioni o media. Tasto Riduci volume Ridurre il volume di suonerie, conversazioni o media. Tasto Accensione/Spegnimento Inserire o disinserire lo smartphone, compiere un riavvio o creare una foto di fondo. neo-mini_print_de_en_it.indb 151 neo-mini_print_de_en_it.indb 151 16.10.2023 13:41:06 16.10.2023 13:41:06...
-
Page 152: Accendere Lo Smartphone
Accendere lo smartphone Premere il tasto Accensione/Spegnimento per 3 secondi. Lo smartphone si accende. Una volta acceso, viene visualizzata la schermata inizia- le. Per i primi passi con lo smartphone vedi a pagina 156. Spegnere lo smartphone Premere il tasto Accensione/Spegnimento per 3 secondi. - Page 153 Bloccare il display Premere brevemente il tasto Accensione/Spegnimento ► Il display si spegne, la schermata di blocco risulta attivata. Sbloccare il display Premere brevemente un tasto a piacere. ► Compare la schermata di blocco. In base al tipo di blocco display selezionato: - Tracciare la sequenza definita.
-
Page 154: Primi Passi Con Lo Smartphone
Primi passi con lo smartphone Dopo aver acceso lo smartphone la prima volta, un assistente di setup guida l'utente attraverso tutti i passaggi di configurazione necessari del sistema operativo dello smartphone. Premere il tasto Accensione/Spegnimento per 3 secondi. Immettere il PIN della propria scheda SIM. Nota: Il PIN per la scheda SIM viene fornito dal proprio provider di telefonia mobile insieme alla documentazione del contratto. - Page 155 Premere il pulsante ┣INIZIA┫. Se ci si trova nell'area di copertura di una rete domestica wireless (WiFi), sele- zionare la rete WiFi desiderata ed effettuare il login. Premere infine sul pulsante ┣Connetti┫. Lo smartphone scorre quindi la rete per eventuali aggiornamenti. Questa procedura può...
- Page 156 neo-mini_print_de_en_it.indb 156 neo-mini_print_de_en_it.indb 156 16.10.2023 13:41:07 16.10.2023 13:41:07...
-
Page 157: Tastiera Su Schermo
Tastiera su schermo La tastiera su schermo visualizzata sul display consente di immettere caratteri e cifre. La tastiera su schermo viene visualizzata sul display del proprio smartphone appena si sfiora un campo di immissione. Premere un campo di immissione a piacere sul display. Compare la tastiera su schermo. -
Page 158: Barra Di Stato
Barra di stato L'indicatore di stato è integrato nel bordo superiore del display e visualizza i mes- saggi di stato, inoltre consente un accesso rapido a funzioni predefinite. La seguente vista d'insieme visualizza i messaggi di stato: Rete mobile Visualizza la qualità della connettività alla rete di telefo- nia mobile. - Page 159 GPS Visualizza il collegamento con un sistema di navigazione satellita- re globale. Importante per applicazioni di navigazione. Chiamata in corso Indica la presenza di una chiamata in corso. Chiamata persa Indica uno o più numeri telefonici persi. Inoltro di chiamata Indica che l'inoltro di chiamata è...
- Page 160 Messaggio di errore/Segnalazione Indica il subentro di un problema. La segnalazione contiene ulteriori informazioni relative alla causa del problema. Indicazione stato di carica Indica lo stato di carica attuale della batteria. Niente scheda SIM Indica la mancanza o il mancato rilevamento della scheda SIM.
- Page 161 Messaggio non letto Indica la presenza di uno o più messaggi (SMS, MMS) non letti. Roaming Indica che lo smartphone è collegato ad un'altra rete di telefonia mobile. Questo è il caso quando ci si trova all'estero. Vibrazione Indica che, in caso di chiamata, lo smartphone non squilla bensì...
-
Page 162: Effettuare Telefonate
Effettuare telefonate Premere il tasto Chiamata . Viene visualizzata l'app relativa alla telefonia. Immettere il numero telefonico richiesto attraverso il campo di selezione visualiz- zato. Cancellare l'immissione errata tramite il pulsante ┣X┫. Premere il pulsante ┣Chiama┫. ► Il numero di chiamata è selezionato. Accettare una chiamata Lo smartphone deve essere sbloccato per poter ricevere chiamate in arrivo. -
Page 163: Respingere Una Chiamata
Respingere una chiamata Scorrere con il dito sul display dal centro verso il basso. ► La chiamata in arrivo viene respinta. Scrivere un messaggio (SMS/MMS) Premere il pulsante ┣SMS/MMS┫ e quindi il pulsante ┣Scrivi┫. Immettere mediante la tastiera su schermo il nome o il numero telefonico del de- stinatario. -
Page 164: Chiamata Contatto Con Foto
Chiamata contatto con foto La funzione Chiamata contatto con foto consente di selezionare comodamente e subito i propri contatti preferiti. È possibile memorizzare fino a sei contatti per la chiamata contatto con foto. Premere il tasto Home ► Compare la schermata iniziale. Scorrere con il dito sul display una volta da sinistra a destra. -
Page 165: Tasto Sos (Funzione Di Chiamata D'emergenza)
Tasto SOS (funzione di chiamata d'emergenza) Premendo sul tasto SOS è possibile lanciare una chiamata d'emergenza. Innanzitutto si avverte un segnale di allarme (SOS). Il dispositivo procede quindi all'inoltro, uno dopo l'altro, dei messaggi di allarme (SOS) ai numeri telefonici precedentemente impostati. -
Page 166: Connettersi A Internet
Connettersi a internet La configurazione standard prevede la presenza di un web browser (Chrome) prein- stallato sullo smartphone, che consente di visitare siti web. Nota: Requisito per l'uso di internet è la precedente connessione dello smartphone alla propria rete domestica wireless (WiFi) o la presenza di una scheda SIM inserita nel dispositivo con rispettiva tariffa per l'uso di internet. -
Page 167: Funzioni Utili
Funzioni utili Lo smartphone offre una serie di funzioni utili. Configurare le applicazioni (app) sulla schermata iniziale Le applicazioni visualizzate sulla schermata iniziale possono essere configurate a piacere. Selezionare altre applicazioni da visualizzare o eliminare applicazioni presenti dalla schermata iniziale. Premere il tasto Home . -
Page 168: Creare Un Google Account
Creare un Google account Creare successivamente un Google account per usufruire di utili funzioni e accedere ad altre applicazioni (app) attraverso Google Play. Navigare alla voce ┣Applicazioni┫ > ┣Impostazioni┫ > ┣Account┫. Premere il pulsante ┣Aggiungi account┫. Premere il pulsante ┣Google┫. Effettuare il login al proprio Google account già... -
Page 169: Configurare Le Impostazioni
Configurare le impostazioni Lo smartphone si lascia configurare individualmente e quindi personalizzare sotto numerosi aspetti. Impostare ad es. il volume dei toni o la luminosità del display. Navigare alla voce ┣Applicazioni┫ > ┣Impostazioni┫. Compiere le impostazioni in base alle proprie esigenze e preferenze. Creare una foto di fondo (screenshot) Premere il tasto Accensione/Spegnimento per 3 secondi. -
Page 170: Eliminazione Di Guasti
Eliminazione di guasti Anche il nuovo smartphone potrebbe non sempre funzionare correttamente. Le seguenti indicazioni guidano l'utente nella circoscrizione del problema. Riavviare lo smartphone Premere il tasto Accensione/Spegnimento per 3 secondi. Premere il pulsante ┣Riavvia┫. Lo smartphone viene riavviato. Attendere finché sul display viene visualizzata la schermata iniziale. Se il riavvio secondo le modalità... -
Page 171: Ripristinare La Configurazione Iniziale
Ripristinare la configurazione iniziale Qualora non dovesse essere possibile rimediare al problema diversamente, è possibi- le resettare il dispositivo ripristinando la configurazione iniziale. Si tenga presente che il tal caso lo smartphone andrà riconfigurato. Navigare alla voce ┣Applicazioni┫ > ┣Impostazioni┫ > ┣Sistema┫ > ┣Avanzate┫ > ┣Opzioni di reimpostazione┫. -
Page 172: Appendice
Appendice Questa sezione contiene ulteriori informazioni importanti riguardo il proprio smartphone. Simboli La confezione del proprio smartphone riporta i seguenti simboli. La seguente vista d'insieme visualizza i simboli e il loro significato: Compatibile con apparecchi Android13 acustici (HAC) App promemoria per assunzione Funzione SOS farmaci (mediteo) preinstallata Utilizzare l'adattatore di rete solo in ambienti interni. - Page 173 Il simbolo indica che il design costruttivo del prodotto corrisponde alla classe di protezione II (doppio isolamento). Non è necessario prevede- re un collegamento di sicurezza con messa a terra (massa). Cancellare dati personali Cancellare tutti i propri dati personali prima di smaltire lo smartphone. Smaltimento Presso il proprio rivenditore è...
- Page 174 Pile difettose o scariche vanno riciclate conformemente a quanto prescritto dalla direttiva 2006/66/CE e relative modifiche. Consegnare le pile e/o l'apparecchio nei punti di raccolta indicati. Osservare in sede di raccolta differenziata i codici riportati sui materiali d'imballo, composti da sigle (b) e cifre (a) con il seguente significato: 1–7: materiale plastico / 20–22: carta e cartone / 80–98: materiali compositi.
- Page 175 neo-mini_print_de_en_it.indb 175 neo-mini_print_de_en_it.indb 175 16.10.2023 13:41:10 16.10.2023 13:41:10...
- Page 176 Consigli per la cura Pulire le superfici dell'involucro esterno con un panno morbido, asciutto e antipeluc- chi. Non utilizzare mai detergenti o solventi. Produttore GO Europe GmbH Zum Kraftwerk 1 D-45527 Hattingen Germania www.go-europe.com Note legali Google, Android, Google Play e altri marchi sono marchi registrati di Google LLC.
-
Page 177: Dati Tecnici
Dati tecnici Banda di frequenza WCDMA 850/900/1800/1900 MHz (B1/B5/B8) LTE 900/2100 MHz (B1/B3/B7/B8/B20) Velocità di trasmissione telefonia 100 MBps in download, 50 MBps in upload mobile Potenza di trasmissione telefonia 2G: 900 MHz 31 dBm, 1800 MHz 29 dBm, mobile 3G: 2100 MHz 21dbm, 900 MHz 20 dBm LTE: BAND1 20 dBm, BAND3 20,1 dBm, BAND7 19,8 dBm, BAND8 20 dBm, BAND20 20 dBm... - Page 178 Banda di frequenza Bluetooth 2,402 GHz - 2,480 GHz Velocità di trasmissione Bluetooth 24 MBps Potenza di trasmissione Bluetooth 1 mW Ricevitore GPS GPS con 1575,42 MHz Foto/videocamera 2 MP (frontale), 5 MP (posteriore) Processore (CPU) Modello: MT6739, 4 nuclei @ 1,3 GHz Memoria di lavoro (RAM) 2 GB Memoria...
- Page 179 neo-mini_print_de_en_it.indb 179 neo-mini_print_de_en_it.indb 179 16.10.2023 13:41:11 16.10.2023 13:41:11...
- Page 180 Wir behalten uns inhaltliche und technische Änderungen vor. Art.-Nr.: 2289 Subject to change without prior notice. Art. No.: 2289 Con riserva di modifiche tecniche e al contenuto. Codice: 2289 V 1.15.2 | 10.2023 ID: 2289 www.go-europe.com neo-mini_print_de_en_it.indb 180 neo-mini_print_de_en_it.indb 180 16.10.2023 13:41:11 16.10.2023 13:41:11...
Need help?
Do you have a question about the NEO MINI and is the answer not in the manual?
Questions and answers