Advertisement
Available languages
Available languages
Quick Links
ENGLISH
INSTRUCTION MANUAL
600A AC/DC Auto-Ranging
Digital Clamp Meter
True RMS
Measurement
Technology
-26° –
538° C
• NON-CONTACT
VOLTAGE TESTER
• LOW IMPEDANCE
• DATA & RANGE HOLD
• AUDIBLE CONTINUITY
• DIODE TEST
• CAPACITANCE &
FREQUENCY
1000V
600A
60M
Ω
한국어
日本語
2 m
IP40
pg. 17
pg. 33
CL800A
4007177
Advertisement

Related Manuals for Klein Tools CL800A


Summary of Contents for Klein Tools CL800A
- Page 1 ENGLISH CL800A INSTRUCTION MANUAL 600A AC/DC Auto-Ranging Digital Clamp Meter True RMS Measurement Technology -26° – 538° C • NON-CONTACT VOLTAGE TESTER • LOW IMPEDANCE • DATA & RANGE HOLD • AUDIBLE CONTINUITY • DIODE TEST • CAPACITANCE & FREQUENCY...
- Page 2 ENGLISH GENERAL SPECIFICATIONS Klein Tools CL800A is an automatically ranging true root mean square (TRMS) digital clamp-meter that measures AC/DC current via the clamp, measures AC/DC voltage, resistance, continuity, frequency, capacitance, and tests diodes via test-leads, and temperature via a thermocouple probe.
- Page 3 ELECTRICAL SPECIFICATIONS Function Range Resolution Accuracy (50/60 Hz) 6.000V ±(1.5% + 5 digits) 60.00V 10mV AC Voltage ±(1.2% + 5 digits) (V AC) 600.0V 100mV 1000V ±(1.5% + 5 digits) 600mV 0.1mV ±(1.0% + 8 digits) 6.000V DC Voltage 60.00V 10mV ±(1.0% + 3 digits) (V DC)
- Page 4 ENGLISH ELECTRICAL SPECIFICATIONS FREQUENCY (AUTO-RANGING) 9.999Hz 0.001Hz 99.99Hz 0.01Hz 999.9Hz 0.1Hz ±(1.0% + 5 digits) 9.999kHz 99.99kHz 10Hz 500.00kHz 100Hz Sensitivity: > 8V RMS Maximum Input: 600V DC or 600V AC RMS DUTY CYCLE 1% to 99.9% 0.1% ±(1.2% + 2 digits) Pulse width: 0.1 –...
- Page 5 WARNINGS • Ensure meter leads are fully seated, and keep fingers away from the metal probe contacts when making measurements. • Do not open the meter to replace batteries while the probes are connected. • Use caution when working with voltages above 25V AC RMS or 60V DC.
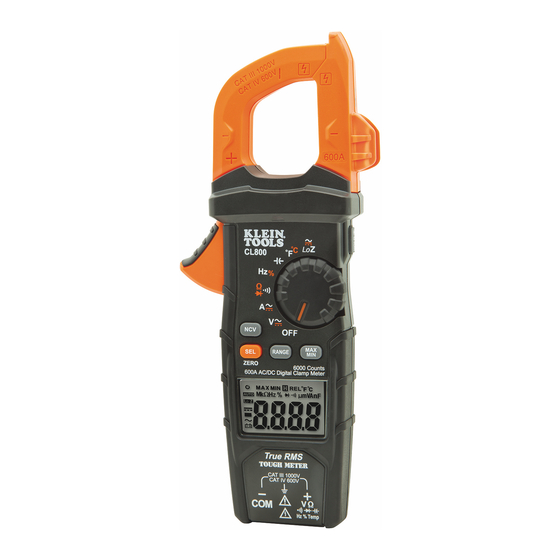
- Page 6 ENGLISH FEATURE DETAILS (back of meter) NOTE: There are no user-serviceable parts inside meter. 6000 count LCD display "MAX/MIN" button Function selector switch "SEL" (select) button Clamp Clamp trigger (press to open clamp) "COM" jack Arrow markings "VΩ" jack Non-Contact Voltage Testing Button Data Hold / Backlight / Test lead holder for test probe Worklight button...
- Page 7 FUNCTION BUTTONS ON/OFF To power ON the meter, rotate the Function Selector switch from the OFF setting to any measurement setting. To power OFF the meter, rotate the Function Selector switch to the OFF setting. By default, the meter will automatically power OFF after 30 minutes of inactivity. If the meter automatically powers OFF while in a measurement setting, rotate Function Selector switch to any other setting...
- Page 8 ENGLISH FUNCTION BUTTONS MAX/MIN When the "MAX/MIN" button is pressed, the meter keeps track of the Maximum and Minimum values and the difference between the Maximum and Minimum values as the meter continues to take samples. 1. When measuring, press "MAX/MIN" button to toggle between the Maximum value (MAX) and the Minimum value (MIN).
- Page 9 OPERATING INSTRUCTIONS CONNECTING TEST LEADS Do not test if leads are improperly seated. Results could cause intermittent display readings. To ensure proper connection, firmly press leads into the input jack completely. CORRECT INCORRECT TESTING IN CAT III / CAT IV MEASUREMENT LOCATIONS Ensure the test lead shield is pressed firmly in place.
- Page 10 ENGLISH OPERATING INSTRUCTIONS AC/DC CURRENT (LESS THAN 600A) AC Current is measured by pressing the clamp trigger to open the clamp and placing it around a current-carrying wire. When measuring, care should be taken to ensure that the clamp completely closed with trigger fully released, and that the wire passes perpendicularly through the center of the clamp in line...
- Page 11 OPERATING INSTRUCTIONS AC/DC VOLTAGE (LESS THAN 1000V) 1. Insert RED test lead into VΩ jack , and BLACK test lead into COM jack , and rotate function selector switch to the AC/DC voltage V setting. The meter defaults to AC measurement. To measure DC, press the "SEL"...
- Page 12 ENGLISH OPERATING INSTRUCTIONS CONTINUITY 1. Insert RED test lead into VΩ jack , and BLACK test lead into COM jack , and rotate function selector switch to the Continuity/Resistance/Diode-Test setting. NOTE: The meter defaults to Continuity testing in this mode. Ensure that the Continuity Testing icon is visible on the display.
- Page 13 OPERATING INSTRUCTIONS DIODE TEST 1. Insert RED test lead into VΩ jack , and BLACK test lead into COM jack , and rotate function selector switch to the Continuity/Resistance/Diode-Test setting. NOTE: The meter defaults to Continuity testing in this mode. Press the "SEL"...
- Page 14 ENGLISH OPERATING INSTRUCTIONS 2. Remove power from circuit. 3. Measure capacitance by connecting test leads across the capacitor. The meter will auto-range to display the measurement in the most appropriate range. Black lead Red lead TEMPERATURE 1. Insert K-type thermocouple (with adapter) into the VΩ jacks (observe polarity markings on thermocouple and meter), and rotate function selector switch to the...
- Page 15 MAINTENANCE BATTERY REPLACEMENT When indicator is displayed on LCD, batteries must be replaced. 1. Remove screw from battery door. 2. Replace 2 x AAA batteries (note proper polarity). 3. Replace battery door and fasten securely with screw. To avoid risk of electric shock, disconnect leads from any voltage source before removing battery door.
- Page 16 WARRANTY www.kleintools.com/warranty DISPOSAL / RECYCLE Do not place equipment and its accessories in the trash. Items must be properly disposed of in accordance with local regulations. CUSTOMER SERVICE KLEIN TOOLS, INC. 450 Bond Street Lincolnshire, IL 60069, USA international@kleintools.com www.kleintools.com...
- Page 17 한국어 CL800A 사용 설명서 600A AC/DC 자동 범위 조정 디지털 클램프 미터 트루 측정 기술 -26° – 538° C • 비접촉식 전압 테스터 • 저 임피던스 • 데이터 및 범위 고정 • 도통 상태 신호음 • 다이오드 테스트 • 정전용량 및 주파수...
- Page 18 한국어 일반 사양 Klein Tools CL800A 는 클램프를 통해 AC/DC 전류를 측정하고 , 테스트 리드를 통해 AC/DC 전압 , 저항 , 통전성 , 주파수 , 정전 용량을 측정하고 , 다이오드를 테스트하고 , 열전대 프로브를 통해 온도를 측정하는 자동 범위 조정 실평균제곱근...
- Page 19 전기적 사양 기능 범위 분해능 정확도 (50/60 Hz) 자리 6.000V ±(1.5% + 5 전압 자리 60.00V 10mV ±(1.2% + 5 (V AC) 600.0V 100mV 자리 1000V ±(1.5% + 5 자리 600mV 0.1mV ±(1.0% + 8 6.000V 전압 자리 60.00V 10mV ±(1.0% + 3 (V DC) 600.0V...
- Page 20 한국어 전기적 사양 주파수 ( 자동 범위 설정 ) 9.999Hz 0.001Hz 99.99Hz 0.01Hz 999.9Hz 0.1Hz 자리 ±(1.0% + 5 9.999kHz 99.99kHz 10Hz 500.00kHz 100Hz 감도 : > 8V RMS 최대 입력 또는 : 600V DC 600V AC RMS 듀티 사이클 자리...
- Page 21 경고 미터 리드가 완전히 장착되도록 하고 측정할 때는 금속 • 프로브 접촉부에 손가락이 닿지 않도록 하십시오 프로브가 연결된 상태에서 배터리 교체를 위해 미터를 열지 • 마십시오 또는 를 초과하는 전압을 측정할 때는 • 25V AC RMS 60V DC 주의하십시오 이러한 전압은 감전 위험이 있습니다 감전으로...
- Page 22 한국어 기능 세부사항 미터 뒷면 참고 미터 내부에는 사용자가 수리할 수 있는 부품이 없습니다 카운트 디스플레이 최대 최소 버튼 6000 "MAX/MIN( )" 기능 선택 스위치 선택 버튼 "SEL"( 클램프 클램프 트리거 눌러서 클램 프를 여십시오 잭 화살표 표시 "COM" Ω 잭...
- Page 23 기능 버튼 ON/OFF 미터의 전원을 켜려면 기능 선택 스위치 를 OFF 설정에서 측정 설정으로 돌립니다 . 미터의 전원을 끄려면 기능 선택 스위치 를 OFF 설정으로 돌립니다 . 기본적으로 미터를 30 분 동안 사용하지 않으면 자동으로 전원이 꺼집니다 . 측정 설정에 있는...
- Page 24 한국어 기능 버튼 MAX/MIN( 최대 / 최소 ) "MAX/MIN( 최대 / 최소 )" 버튼 을 누른 경우 , 미터가 샘플을 계속 측정하면서 측정값의 최대값 및 최소값을 비롯하여 최소값과 최대값의 차이를 추적합니다 측정할 때 "MAX/MIN( 최대 / 최소 )" 버튼을 누르면 최대값...
- Page 25 작동 지침 테스트 리드 연결 리드가 적절하게 장착되지 않은 경우에는 테스트하지 마십시오 . 이런 경우에도 테스트하면 간헐적인 디스플레이 판독값이 나타날 수 있습니다 . 올바르게 연결하려면 리드를 입력 잭에 힘껏 눌러서 꽂으십시오 올바름 잘못됨 CAT III/CAT IV 측정 위치에서 테스트 테스트 리드 쉴드가 제자리에서 단단히 눌러져 고정되었는지 확인하십시오...
- Page 26 한국어 작동 지침 AC/DC 전류 (600A 미만 ) 클램프 트리거 를 눌러서 클램프 를 열고 전류가 흐르는 전선 주위에 클램프를 놓으면 AC 전류를 측정할 수 있습니다 . 측정할 때 , 트리거 가 완전히 해제된 상태로 클램프 가 완전히 닫혀 있고 , 전선이...
- Page 27 작동 지침 AC/DC 전압 (1000V 미만 ) 빨간색 테스트 리드를 V Ω 잭 에 삽입하고 , 검정색 테스트 리드를 COM 잭 에 삽입하고 , 기능 선택 스위치 를 AC/DC 전압 V 설정으로 돌립니다 . 미터의 기본값은 AC 측정입니다 . DC 를 측정하려면 , "SEL( 선택 )" 버튼 을...
- Page 28 한국어 작동 지침 통전성 1. 빨간색 테스트 리드를 V Ω 잭 에 삽입하고 , 검정색 테스트 리드를 COM 잭 에 삽입하고 , 기능 선택 스위치 를 통전성 / 저항 / 다이오드 테스트 설정으로 돌립니다 참고 : 기본적으로 이 모드에서 미터는 통전성 테스트로 설정됩니다...
- Page 29 작동 지침 다이오드 테스트 1 . 빨간색 테스트 리드를 V Ω 잭 에 삽입하고 , 검정색 테스트 리드를 COM 잭 에 삽입하고 , 기능 선택 스위치 를 통전성 저항 / 다이오드 테스트 설정으로 돌립니다 참고 : 기본적으로 이 모드에서 미터는 통전성 테스트로 설정됩니다...
- Page 30 한국어 작동 지침 2. 회로에서 전원을 제거합니다 . 3 . 커패시터 양쪽에 테스트 리드를 연결해서 정전용량을 측정합니다 . 미터는 자동으로 범위를 조정해서 측정값을 가장 적절한 범위로 표시합니다 검정색 리드 빨간색 리드 온도 1. V Ω 및 잭에 K 형 열전대 ( 어댑터 사용 ) 를 삽입하고...
- Page 31 유지보수 배터리 교체 LCD 에 표시기가 표시되면 배터리를 교체해야 합니다 1 . 배터리 도어에서 나사를 제거합니다 . 2. 2 개의 AAA 배터리를 교체합니다 ( 극성에 유의하십시오 ). 3. 배터리 도어를 다시 닫고 나사로 단단히 조입니다 감전 위험을 피할 수 있도록 , 배터리...
- Page 32 전에 미터가 정상 작동 상태로 돌아갈 수 있도록 하십시오 보증 www.kleintools.com/warranty 폐기 / 재활용 장비 및 액세서리를 휴지통에 버리지 마십시오 품목은 지역 규정에 따라 적절하게 폐기되어야 합니다 고객 서비스 KLEIN TOOLS, INC. 450 Bond Street Lincolnshire, IL 60069, USA international@kleintools.com www.kleintools.com...
- Page 33 日本語 CL800A 取扱説明書 600A AC/DC 自動レン ジ切替式デジタルクラ ンプメーター 真の実効値 測定テク ノロジー -26° – 538° C • 非接触電圧テスター • 低インピーダンス • データ & レンジ ホールド • 可聴導通 • ダイオードテスト • キャパシタンス & 周波数 1000V 600A Ω IP40 4007177...
- Page 34 日本語 一般仕様 Klein Tools CL800A は、 自動レンジ切替機能を備えた真の 実効値 ( TRMS: true root mean square ) 型デジタルクランプ メーターであり、 クランプによる AC/DC 電流の測定、 テス ト リードによる AC/DC 電圧、 抵抗、 導通、 周波数、 キャパシタンス の測定、 テストリードによるダイオードテスト、 および熱電対 プローブによる温度測定が可能です。 このメーターは、 ゴー ス ト電圧や漂遊電圧を識別して排除するための低インピー ダンス ( LoZ ) モードも備えています。...
- Page 35 電気的仕様 ファンクシ レンジ 分解能 精度 ( ) 50/60 Hz ョン ( 桁) 6.000V ± 1.5% + 5 電圧 ( 桁) 60.00V 10mV ( ) ± 1.2% + 5 V AC 600.0V 100mV ( 桁) 1000V ± 1.5% + 5 ( 桁)...
- Page 36 日本語 電気的仕様 周波数 (自動レンジ切替) 9.999Hz 0.001Hz 99.99Hz 0.01Hz 999.9Hz 0.1Hz ( 桁) ± 1.0% + 5 9.999kHz 99.99kHz 10Hz 500.00kHz 100Hz 感度 超 : 8V RMS 最大入力 または : 600V DC 600V AC RMS デューティーサイクル ~ ( 桁) 0.1% 99.9% ±...
- Page 37 警告 測定時には、 リードがメーターにしっかりと接続されていることを • 確認して、 金属製のプローブ接触部に指を近付けないでください。 プローブが接続されている状態では、 電池カバーを開けないでく • ださい。 または 以上の電圧下で作業する際は注意 • 25V AC RMS 60V DC してください。 このような高い電圧は感電事故の原因となります。 感電事故につながる測定値の誤表示を防止するために、 電池残 • 少のインジケーターが表示されたら電池を交換してください。 電流が流れている回路で抵抗や導通を測定しようとしないでくだ • さい。 該当の地域や国で定められた安全規定に常に従ってください。 危 • 険な通電導体が露出している場所では、 感電やアークブラストに よる負傷を防止するために個人用防護具を使用してください。 メーター上のシンボル AC/DC 抵抗 (オーム) 可聴導通 二重絶縁クラス アース ダイオード...
- Page 38 日本語 各部の名称 (メーター背面) 注意 当メーター内部の部品にユーザーが保守可能な部品はあり ません。 カウン ト ディ ス [ (最大値 最小値) ] 6000 MAX/MIN プレイ ボタン ファンクション選択スイッチ [ ( 選択) ] ボタン クランプ クランプトリガー (押すとクラン プが開きます) [ ] ジャ ック 矢印マーク [ Ω] ジャ ック 非接触電圧テス トボタン データホールド バックライ...
- Page 39 各ボタンの説明 電源のオン オフ メーターの電源をオンにするには、 ファンクション選択スイッチ 2 を回して [ ] 設定から任意の測定設定に合わせます。 メー ターの電源をオフにするには、 ファンクション選択スイッチ 2 を 回して [ ] 設定に合わせます。 初期設定では、 メーターを使用 していない状態で 分経過すると自動的に電源がオフになり ます。 いずれかの測定設定に合わせている状態で、 メーターの電 源が自動的にオフになった場合は、 ファンクション選択スイッチ 2 を回して他の任意の設定 ( [ ] 設定以外) に合わせると、 メーターの電源がオンになり ます。 自動電源オフ機能を無効にするには、 [ (選択) ] ボタン 9 を押したまま、 ファンクション選択スイッチを [...
- Page 40 日本語 各ボタンの説明 最大値 / 最小値 [ MAX/MIN (最大値 / 最小値) ] ボタン を押すと、 当メー ターによ ってサンプルが取得され続けている間、 最大値と最 小値が記録され続けるとともに、 最大値と最小値の差が記 録され続けます。 1 . 測定時に、 [ MAX/MIN (最大値 / 最小値) ] ボタン を押し て、 最大値 ( MAX ) と最小値 ( MIN ) を切り替えます。 新たな 最大値または最小値が生じた場合は、...
- Page 41 使い方 テストリードの接続 リードが正し く接続されていない状態ではテス トを行わない でください。 このような状態では、 測定値の表示が途切れる 場合があります。 正し く接続するには、 リードを入力ジャ ック にしっかりと押し込んで完全に装着して ください。 正しい 正しくない CAT III/CAT IV 測定場所でのテスト テス トリードシールドがしっかりとはめ込まれていることを 確認します。 CAT III/CAT IV シールドを使用しないと、 アーク フラッシュのリスクが高まります。 5/32" (4 mm) CAT II 測定場所でのテスト CAT II の場所では、 CAT III/CAT IV シールドを取り外してもか まいません。...
- Page 42 日本語 使い方 AC/DC 電流 ( 600A 未満) AC 電流を測定するには、 クランプトリガー を押してクラ ンプ を開き、 通電しているワイヤをクランプで挟み込みま す。 測定時には、 トリガー を完全に放してクランプ が 完全に閉じられた状態であること、 および 2 つの矢印マーク を結ぶ直線上のクランプ 中心を垂直方向にワイヤが 通っていることを確認するように注意して ください。 電流を測定するには 1 . ファンクション選択スイッチ を回して AC/DC 電流 [ ] 設定に合わせます。 注意 : 初期設定では、 AC 測定モードになっています。 [ SEL (選択)...
- Page 43 使い方 電圧 ( 未満) AC/DC 1000V 赤のテストリードを [ Ω] ジャ ック に差し込み、 黒のテストリー ドを [ ] ジャ ック に差し込んで、 ファンクション選択スイッ チ を回して 電圧 [ ] 設定に合わせます。 初期設定 AC/DC では、 測定モードになっています。 を測定するには、 [ (選択) ] ボタン を押して、 モードと モードを切り替え ます。 液晶画面の アイコンや...
- Page 44 日本語 使い方 導通 . 赤のテス トリードを [ Ω] ジャ ック に差し込み、 黒のテス トリー ドを [ ] ジャ ック に差し込んで、 ファンクシ ョン選択スイ ッチ を回して導通 抵抗 ダイオードテス ト [ ] 設定に合わせます。 注意 このモードでは、 初期設定で導通テストが行われます。 導通テ ストアイコン [ ] がディ スプレイに表示されていることを確認してく ださい。 表示されていない場合は、 [ (...
- Page 45 使い方 ダイオードテスト 1. 赤のテストリードを [ V Ω] ジャ ック に差し込み、 黒のテ ス トリードを [ COM ] ジャ ック に差し込んで、 ファンクシ ョン選択スイッチ を回して導通 / 抵抗 / ダイオードテス ト [ ] 設定に合わせます。 注意 : このモードでは、 初期設定で導通テストが行われます。 [ SEL ( 選択) ] ボタン を...
- Page 46 日本語 使い方 2. 回路への通電を停止します。 3. テス トリードをコンデンサの両端に接続して、 キャパシタ ンスを測定します。 メーターの自動レンジ切替機能が働い て、 最適なレンジで測定値が表示されます。 黒のリード 赤のリード 温度 1. K 型熱電対 (アダプター装着) を [ V Ω] ジャ ックと [ COM ] ジャ ックに差し込んで (熱電対とメーターの +/- 表示を合わせて ください) 、 ファンクション選択スイッ チ を回して温度 [ ] 設定に合わせます。 注意...
- Page 47 メンテナンス 電池の交換 インジケーターが液晶画面に表示されたら、 電池を交換 する必要があります。 1 . 電池カバーのネジを取り外します。 2. 2 本の単 4 電池を交換します ( +/- の向きに注意して くだ さい) 。 3 . 電池カバーを元通りに取り付けて、 ネジをしっかりと締め てカバーを固定します。 感電事故を防止するために、 リードを電圧源から取り外 してから、 電池カバーを開けてください。 感電事故を防止するために、 電池カバーを開けている 状態で、 メーターを操作しないでください。...
- Page 48 は使用しないでください。 保管 メーターを長期間使用しないときは、 電池を取り出して くだ さい。 メーターを高温や高湿度の環境で保管しないでくださ い。 「 一般仕様」 セクションに記載している許容範囲外の厳し い環境で保管した後は、 メーターを通常の動作状態に戻し てからご使用ください。 保証 www.kleintools.com/warranty 廃棄 / リサイクル 当機器と付属品をごみ箱に捨てないでください。 該 当地域の規則に従ってこれらを適切に廃棄する必 要があります。 カスタマーサービス KLEIN TOOLS, INC. 450 Bond Street Lincolnshire, IL 60069, USA international@kleintools.com www.kleintools.com 1390282 Rev 12/18 B...
Need help?
Do you have a question about the CL800A and is the answer not in the manual?
Questions and answers