Table of Contents
Advertisement
Quick Links
Advertisement
Table of Contents

Related Manuals for Tektronix PRISM


Summary of Contents for Tektronix PRISM
- Page 1 PRISM Media Analysis Platform User Manual *P077129001* 077-1290-01...
- Page 3 PRISM Media Analysis Platform User Manual This document supports software version 1.1 and above. www.tek.com 077-1290-01...
- Page 4 Copyright © Tektronix. All rights reserved. Licensed software products are owned by Tektronix or its subsidiaries or suppliers, and are protected by national copyright laws and international treaty provisions. Tektronix products are covered by U.S. and foreign patents, issued and pending. Information in this publication supersedes that in all previously published material.
- Page 5 Tektronix, with shipping charges prepaid. Tektronix shall pay for the return of the product to Customer if the shipment is to a location within the country in which the Tektronix service center is located. Customer shall be responsible for paying all shipping charges, duties, taxes, and any other charges for products returned to any other locations.
-
Page 7: Table Of Contents
Application display information ................. Waveform application display................Picture application display................... Audio application display..................Video Session application display ................Event Log application display................IP Status application display................. IP Session application display................IP Graphs application display ................PRISM Media Analysis Platform User Manual... - Page 8 PTP introduction ....................The five basic PTP timing messages................ Profiles and domains ..................One-step and two-step operation ................Multicast, Unicast, and Mixed Communication modes ..........BMCA operation....................Compensating for causes of asymmetric delay ............Index PRISM Media Analysis Platform User Manual...
- Page 9 MPI-RACK-MW dual rack cabinet................Figure 4: Installing two MPI monitors in the MPI-RACK-MM dual rack cabinet......Figure 5: Connecting the cabinet USB and audio cables to the PRISM monitor......Figure 6: Connecting the power cord to the instrument............Figure 7: Disconnecting the power cord ................
- Page 10 Figure 51: IP Graphs application – Total Bit Rate and Session Bit Rate graphs ......Figure 52: IP Graphs application – PIT and RTP Sequence Error graphs ........Figure 53: IP Graphs application – Video CRC Error and TS-DF graphs ........Figure 54: PIT Histogram application display ..............PRISM Media Analysis Platform User Manual...
- Page 11 List of Tables Table i: Product documentation.................. Table 1: Clearance requirements for the dual rack cabinet ............ Table 2: Supplied hardware ..................Table 3: Instrument settings that are reset by recalling the Factory preset ........PRISM Media Analysis Platform User Manual...
-
Page 12: Important Safety Information
Read the safety sections of the other component manuals for warnings and cautions related to operating the system. When incorporating this equipment into a system, the safety of that system is the responsibility of the assembler of the system. PRISM Media Analysis Platform User Manual... - Page 13 Do not operate in wet/damp conditions. Be aware that condensation may occur if a unit is moved from a cold to a warm environment. Do not operate in an explosive atmosphere. Keep product surfaces clean and dry. Remove the input signals before you clean the product. PRISM Media Analysis Platform User Manual...
-
Page 14: Service Safety Summary
Be sure your work area meets applicable ergonomic standards. Consult with an ergonomics professional to avoid stress injuries. Use only the Tektronix rackmount hardware specified for this product. Service safety summary The Service safety summary section contains additional information required to safely perform service on the product. -
Page 15: Terms In This Manual
find out the nature of the potential hazards and any actions which have to be taken to avoid them. (This symbol may also be used to refer the user to ratings in the manual.) The following symbol(s) may appear on the product: PRISM Media Analysis Platform User Manual... - Page 16 Important safety information PRISM Media Analysis Platform User Manual...
-
Page 17: Preface
Preface Preface This manual contains information to help you use the Tektronix PRISM Media Analysis Platform. This information includes the following: How to operate the instrument using the front panel or remote connection. How to use the various displays for monitoring SDI or IP video signals. -
Page 18: Conventions Used In This Manual
Preface Conventions used in this manual The PRISM Media Analysis Platform is also referred to as the “PRISM monitor” throughout this manual. PRISM Media Analysis Platform User Manual... -
Page 19: Getting Started
Getting started This section will help you set up and begin to use the PRISM Media Analysis Platform. It is divided into the following four sections: Product description describes your instrument and provides a list of key features. Controls and connectors shows you how to verify that you have received all of the parts of your instrument and provides a list of standard and optional accessories and a list of options that are available for your instrument. -
Page 20: Product Description
Quality of Service (QoS) levels in an increasingly complex broadcast environment involving compressed / uncompressed video transmission through SDI/IP signal paths. PRISM is an ideal solution for monitoring SDI/IP hybrid environments including master control rooms, production studios, OB vans, and signal contribution/distribution centers. -
Page 21: Rackmount Installation
Getting started Rackmount installation There are two optional dual rack cabinets (19”, 3RU) available for the PRISM monitor: MPI-RACK-MM. Allows you to install one PRISM monitor or two PRISM monitors side-by-side. Each side of the cabinet front panel has two USB ports and a headphone jack for each PRISM monitor. -
Page 22: Table 2: Supplied Hardware
SCREW, MACHINE; 10-32X.750 OVAL HEAD, POZI 381-0251-01 NUT BAR; 10-32 X 3.0 X 0.375 X 0.120 407-3752-00 BRACKET, EXT; 2.5 X 8.06 X 0.06, STEEL; SAFETY CONTROLLED 407-6011-00 RACK MOUNT, INSTRUMENT MTG BRACKET, 5000 SERIES PRISM Media Analysis Platform User Manual... - Page 23 7. Repeat steps 5 and 6 to install the second guide bracket to the other side of the cabinet. 8. Tighten all of the attaching screws that were left loose in the previous steps. PRISM Media Analysis Platform User Manual...
-
Page 24: Figure 2: Installing One Mpi Monitor And One Wfm52X0 Waveform Monitor In The Mpi-Rack-Mw Dual
Getting started Figure 2: Installing one MPI monitor and one WFM52x0 waveform monitor in the MPI-RACK-MW dual rack cabinet PRISM Media Analysis Platform User Manual... -
Page 25: Figure 3: Installing One Mpi Monitor And One Wfm7200 Or Wfm8X00 Waveform Monitor In The Mpi-Rack-Mw Dual Rack Cabinet
Getting started Figure 3: Installing one MPI monitor and one WFM7200 or WFM8x00 waveform monitor in the MPI-RACK-MW dual rack cabinet PRISM Media Analysis Platform User Manual... -
Page 26: Figure 4: Installing Two Mpi Monitors In The Mpi-Rack-Mm Dual Rack Cabinet
Getting started Figure 4: Installing two MPI monitors in the MPI-RACK-MM dual rack cabinet PRISM Media Analysis Platform User Manual... - Page 27 USB cables to either set of USB ports on the rear panel. d. Connect power, signal, and Ethernet cables to the instrument as needed. See the PRISM Installation and Safety Instructions manual for information about making signal connections to the instrument.
-
Page 28: Power-On And Power-Off Procedures
Getting started Figure 5: Connecting the cabinet USB and audio cables to the PRISM monitor Power-on and power-off procedures This section describes how to apply power to the instrument and how to power-on and power-off the instrument. Power cord installation This instrument is powered by the DC output of an AC power adapter. -
Page 29: Figure 6: Connecting The Power Cord To The Instrument
Getting started Figure 6: Connecting the power cord to the instrument PRISM Media Analysis Platform User Manual... -
Page 30: Figure 7: Disconnecting The Power Cord
1. Apply power to the instrument. (See page 10, Power cord installation.) NOTE. If the PRISM monitor was previously powered off by a power interruption or by removing the power cord from the rear of the instrument, the instrument will power on when power is reapplied. - Page 31 AC adapter be disconnected from the AC power source before the adapter is disconnected from the instrument. 2. To completely remove power from the instrument, disconnect the power cord from the instrument. (See page 12, Power cord removal.) PRISM Media Analysis Platform User Manual...
-
Page 32: Sfp+ Module Installation
SFP+ module transportation CAUTION. To prevent static damage to the SFP+ module, if you remove the SFP+ module from the instrument, always transport the SFP+ module in a anti-static bag or container. PRISM Media Analysis Platform User Manual... -
Page 33: Network Installation
Getting started Network installation See the PRISM Installation and Safety Instructions manual that shipped with your instrument for basic installation instructions. After your instrument is physically installed, you might want to connect it directly to a PC or to a network. The following information can help you do that. -
Page 34: Figure 10: Setting Network Parameters
To connect your instrument to a network and access it with a remote PC, do the following: 1. On the PRISM monitor, touch the Settings icon to display the Settings menu. 2. Touch Network to open the Network submenu. 3. Touch CONTROL IP PORT to open the Control IP Port submenu. -
Page 35: Connectors
IN – REF – OUT. The REF IN connector is for future use. The REF OUT connector outputs a 1 PPS (Pulse Per Second) signal when the instrument is locked to a PTP reference. DC power input. Power connector for 48 VDC input. Display port (DP). Two display port outputs for external monitors. PRISM Media Analysis Platform User Manual... - Page 36 firmware. The ports comply with USB 1.1 and USB 2.0 Full and Low-Speed specifications. Audio input. This connector is for future use. Audio output. This connector is for future use. Mic input. This connector is for future use. PRISM Media Analysis Platform User Manual...
-
Page 37: Display Elements
Application tabs. Some applications have selectable tabs (highlighted readouts) you can use to display additional information. Application tile 4. Application tile 2. The application panels can be shown in four-tile mode or in full screen mode. PRISM Media Analysis Platform User Manual... -
Page 38: Diagnostics Report
2. Select Utilities to open the Utilities submenu. 3. Select Diagnostics to open the Diagnostics submenu. 4. Insert a USB device into one of the USB ports on the PRISM monitor. 5. Select Save Diagnostics to save the diagnostics report to the USB device. -
Page 39: Methods Of Operation
Remote control via VNC Remote control via API commands Front panel touchscreen operation The following figure shows the instrument display with an open menu for one of the applications. Figure 13: PRISM display in four-tile mode PRISM Media Analysis Platform User Manual... -
Page 40: Figure 14: Selecting An Application To Display
3. Swipe the application list up or down to locate the desired application. 4. Touch the name of the desired application to display that application. 5. If available, touch or tap the icon in the menu bar to open the settings menu for the application. PRISM Media Analysis Platform User Manual... -
Page 41: Keyboard And Mouse Operation
You can use an external touchscreen display to control the instrument. Two connections are required: Connect the Display Port output from the PRISM monitor to the input on the external device. Connect the output of the external device to one of the USB ports on the PRISM monitor. - Page 42 3. This opens a login Web page as shown below. 4. In the Control bar, click the Settings icon to open the Settings dialog. 5. In the Settings dialog, use the Scaling Mode drop-down list to select Local Scaling, and then click Apply. PRISM Media Analysis Platform User Manual...
- Page 43 Methods of operation 6. In the Control bar, click the Connect icon to open the Connect dialog. 7. In the Settings dialog, enter the default password PRISM (case sensitive), and then click Connect. NOTE. You can use the WEB REMOTE tab of the PRISM Settings > Network menu to change the default password for the remote Web connection.
-
Page 44: Remote Control Via Api Commands
Use the following steps to access the API documentation: 1. On the PRISM monitor, open the Settings > Network page to view the Control IP Port address of the instrument to which you are going to connect. -
Page 45: How To Configure The Instrument
Firmware upgrade (See page 43, How to upgrade the instrument firmware.) NOTE. Some of the configuration settings require you to enter values. A USB keyboard can be used to enter these values instead of using the touchscreen keypad on the instrument. PRISM Media Analysis Platform User Manual... -
Page 46: How To Configure Signal Inputs
How to configure the instrument How to configure signal inputs The PRISM monitor allows you to configure up to four signal inputs. Use the Input icon to select which of the four input signals to monitor. Perform the following procedure to configure a signal input: 1. -
Page 47: Figure 17: Renaming A Signal Input
Use the 123 and abc keys to toggle between accessing letters and numbers/symbols. e. When you are done editing the input name, touch the Enter key. When you are done editing the input, touch Save to save your changes. PRISM Media Analysis Platform User Manual... -
Page 48: Figure 18: Ip Input Configuration - St2022-6 Streams
Figure 18.). b. If you will be monitoring ASPEN (Adaptive Sample Picture Encapsulation) streams, select ASPEN (See Figure 19.). Figure 18: IP input configuration – ST2022-6 streams Figure 19: IP input configuration – ASPEN streams PRISM Media Analysis Platform User Manual... -
Page 49: Figure 20: Editing An Ip Input Address
Use the backspace key to delete characters by backspacing over them. e. When you are done editing the IP parameter, touch the Enter key. Edit each parameter as necessary. g. When you are done editing the parameters, touch Save to save your changes. PRISM Media Analysis Platform User Manual... -
Page 50: How To Configure Ptp Reference Settings
Multicast and Unicast. NOTE. On the SMPTE profile mixed mode, the PTP Announce and Sync messages are sent as Multicast. However, the Delay request and Delay Response messages are sent as Unicast. PRISM Media Analysis Platform User Manual... -
Page 51: Figure 22: Editing The Ptp Domain Setting
Use the backspace key to delete characters by backspacing over them. 8. When you are done editing the domain number, touch the Enter key. 9. Repeat steps 4 to 6 for each PTP profile. PRISM Media Analysis Platform User Manual... -
Page 52: How To Set And Recall Instrument Presets
2. Save the instrument settings as a preset: a. Touch the Presets ( ) icon to open the Preset selection controls at the bottom of the PRISM display. Figure 23: Preset selection controls (Group B shown) PRISM Media Analysis Platform User Manual... -
Page 53: Figure 24: Assigning A Preset
Preset<number>, where the number is the preset position within the preset group. (See Figure 27.) Touch the Home icon ( ) or touch anywhere within an application tile to close the Preset selection controls. PRISM Media Analysis Platform User Manual... -
Page 54: Figure 25: Presets Rename Submenu
Select Rename to open the Presets Rename submenu shown below. Figure 25: Presets Rename submenu d. Select the Preset group at the top of the submenu that corresponds to the preset you just saved. The example above shows Group B being selected. PRISM Media Analysis Platform User Manual... -
Page 55: Figure 26: Editing A Preset Name
When you are done editing the preset name, touch the Enter key. NOTE. You can also assign a user-defined name to the selected preset group by touching inside the Group Name box. PRISM Media Analysis Platform User Manual... -
Page 56: Figure 27: Preset Selection Controls (Group B Shown)
The selected preset button will highlight and the instrument settings will change to those assigned to the selected preset. 4. Touch the Home icon ( ) or touch anywhere within an application tile to close the Preset selection controls. PRISM Media Analysis Platform User Manual... -
Page 57: Figure 28: Presets Rename Submenu
Tile 3 application Picture Tile 4 application Audio SDI-In 1 input configuration SDI-In 1 Input name Input type SDI 1 Input connector SDI-In 2 input configuration SDI-In 2 Input name Input type SDI 2 Input connector PRISM Media Analysis Platform User Manual... - Page 58 Input connector SDI-In 4 input configuration SDI-In 4 Input name Input type SDI 4 Input connector PTP reference configuration Enabled PTP Logging to the Event Log ST2059 Selected Profile ST2059 domain Multicast ST2059 communication mode PRISM Media Analysis Platform User Manual...
-
Page 59: How To Set The Time And Date
4. In the TIME AND DATE tab, adjust the time and date using the up and down arrows to adjust each parameter as needed. The time setting uses a 24 hour clock, so no AM/PM setting is required. PRISM Media Analysis Platform User Manual... -
Page 60: Figure 30: Time Zone Submenu
Touch Reboot to reboot the instrument immediately and implement the changes. Touch Later to delay implementing the time and date changes until the next time the instrument is rebooted. Figure 31: Time and date change reboot message PRISM Media Analysis Platform User Manual... -
Page 61: How To Upgrade The Instrument Firmware
Instrument Firmware version number 3. Verify the latest version of firmware at the Tektronix Web site: a. Use the Web browser on a PC to navigate to the following Tektronix Web site: http://www.tektronix.com/downloads b. On the Downloads Finder Web page, search by model number (such as PRISM) and filter by software and software type to locate the... -
Page 62: Figure 32: Selecting The Firmware Upgrade File
Once the instrument has started the upgrade process, DO NOT remove power from the instrument. If you do so, the instrument flash will be corrupted. The instrument will have to be sent to a Tektronix factory service center to have the system firmware restored. -
Page 63: Figure 33: Upgrade Installation In Process Message Box
Figure 33: Upgrade Installation In Process message box 8. When the upgrade is complete, the following message box appears. Perform one of the following actions: Touch Reboot Now to reboot the PRISM monitor and complete the installation of the upgrade. NOTE. -
Page 64: How To Upgrade The Software License
Perform the following procedure to obtain a software license upgrade file from Tektronix: upgrade file 1. On the PRISM monitor you want to upgrade, make a note of the instrument serial number. The serial number is located on the instrument rear panel. NOTE. -
Page 65: Figure 35: Prism License Installation Web Page - Initial View
Perform the following procedure to install the software license upgrade: upgrade 1. On the PRISM monitor, open the Settings > Network menu page to view the Control IP Port address of the instrument which you are going to upgrade. 2. Copy the software license upgrade file you downloaded to a location on the hard drive of your computer. -
Page 66: Figure 36: Prism License Installation Web Page - License Upgrade Information Review
Review license information box. The example below shows an instrument that is being upgraded with two software options: MPI-IP-STD and MPI-IP-MEAS. Figure 36: PRISM License Installation Web page – license upgrade information review 8. If the license information is correct, click Install to start the license installation. -
Page 67: Figure 37: Prism License Installation Web Page - License Install Message
How to configure the instrument Figure 37: PRISM License Installation Web page – license install message 10. After the upgrade is installed, close the PRISM License Installation Web page. Verify the software license Perform the following procedure to verify the software license upgrade: upgrade 1. -
Page 68: Application Display Information
Application display information Application display information This section describes each of the available applications on the PRISM monitor. All applications can be viewed in four-tile mode as well as full-screen mode. Double tap in an application to toggle between these two modes. - Page 69 : Indicates that the signal parameter was in an error condition but the error has now cleared. : Indicates that the signal parameter is currently in an error condition. : Indicates that the signal parameter is not being monitored for an error condition. PRISM Media Analysis Platform User Manual...
-
Page 70: Waveform Application Display
YPbPr. Lists the default display format, which shows the Luma (Y) and color difference (Pb, Pr) components of the video signal. application display Scale and units. By default, the vertical units are in mV (0 mV to 700 mV). PRISM Media Analysis Platform User Manual... -
Page 71: Picture Application Display
This decimation may cause some artifacts. This behavior may be evident on a sweep signal. Figure 40: Picture display of a Big Buck Bunny video PRISM Media Analysis Platform User Manual... -
Page 72: Audio Application Display
Test level is also known as Reference level or Line-up level. Level meter scale and units: By default, the units are in dB relative to full scale (dBFS). The 0 dB mark is digital Full scale. PRISM Media Analysis Platform User Manual... - Page 73 NOT PRESENT. Indicates that an audio bar is not present in the current audio input. This can be present if a Dolby Digital input has a coding mode indicating a reduced number of channels. PRISM Media Analysis Platform User Manual...
-
Page 74: Video Session Application Display
VPID 352. Use this tab to view the status of the SMPTE352M VPID on the input signal. For 3G-SDI signals, VPID is required on the primary link (Link A). PRISM Media Analysis Platform User Manual... - Page 75 For information about the errors in this section, view the help file in your instrument: while the Video Session is active in a tile, press the HELP button. Status: Shows the status of the associated error as either OK, Invalid, Missing, or Error. PRISM Media Analysis Platform User Manual...
- Page 76 Link A1 and lists the VPID values in hex. Link A2: Appears only for 3G-SDI Level B signals. Indicates the presence and status of a SMPTE 352M payload on Link A2 and lists the VPID values in hex. PRISM Media Analysis Platform User Manual...
- Page 77 C Stuck Bits: Displays which of the chrominance video bits are stuck. If the readout is "- - - - - - - - ", then none of the bits are stuck. PRISM Media Analysis Platform User Manual...
- Page 78 CRC status can be used to verify integrity through a system. An error means that the C Channel embedded CRC value does not match the calculated CRC value, which indicates that a transmission error has occurred. PRISM Media Analysis Platform User Manual...
- Page 79 Err Fields: The number of fields, since the last reset, that contained at least one error. % Err Fields: Shows a calculated number showing the percentage of all fields since the last reset that contained at least one error. PRISM Media Analysis Platform User Manual...
-
Page 80: Event Log Application Display
Application display information Event Log application display The Event Log application provides a view of detected errors. The display buffer for the application holds 100 log entries. Figure 46: Event Log application display PRISM Media Analysis Platform User Manual... - Page 81 (rising and falling edge) items indicate a momentary error that requires no action. White items are informational and identify a change in instrument state. Source: Shows the inputs on which the errors have occurred. PRISM Media Analysis Platform User Manual...
-
Page 82: Ip Status Application Display
IP Status Session. The time is displayed as "DD, HH:MM:SS", where DD is the number of days, HH is the number of hours, MM is the number of minutes, and SS is the number of seconds. PRISM Media Analysis Platform User Manual... - Page 83 Source IP: Shows the source IP address and port number of the monitored stream in the form <source IP address>:<port number>. Dest IP: Shows the destination IP address and port number of the monitored stream in the form <destination IP address>:<port number>. PRISM Media Analysis Platform User Manual...
-
Page 84: Ip Session Application Display
Layer 2 (L2). Use this tab to view the status of various signal parameters in the Link layer. Video. Use this tab to view the status of the video in the stream. PTP. Use this tab to view PTP parameters. PRISM Media Analysis Platform User Manual... - Page 85 The Layer 2 (L2) display is also divided into the following two columns: STATUS: Shows the status of the associated statistic as OK or ERROR. ERR SECS: Increments for each second that an active error condition persists. PRISM Media Analysis Platform User Manual...
- Page 86 Indicates that padding octets have been added to the RTP packet that are not part of the payload. Extension: Indicates whether an extension is present. Possible values are: false: Indicates no extension is present. true: Indicates an extension is present. PRISM Media Analysis Platform User Manual...
- Page 87 Video Source ID: Identifies the video source: Primary (0x0): Indicates a primary stream. Protect (0x1): Indicates a protected stream. Reserved (n): When n is a number other than 0 or 1, indicates that a reserved value is being used. PRISM Media Analysis Platform User Manual...
- Page 88 Direct (0x0), LevelB (0x1), 2xHD (0x2), or Reserved (n). FRAME: Identifies the raster size. Possible values are: Unspecified (0x0), 720x480i (0x10), 720x576i (0x11), 1920x1080i (0x20), 1920x1080p (0x21), 1920x1080sf (0x22), 2048x1080p (0x23), 2048x1080sf (0x24), or 1280x720p (0x30). PRISM Media Analysis Platform User Manual...
- Page 89 This timestamp is fixed at the transmitter to the first information contained in the datagram. Header Extension: Indicates the number of 4-octet Header Extension words which follow the HBRMT payload. PRISM Media Analysis Platform User Manual...
- Page 90 This ID is also used in the BMCA as a tiebreaker when all of the parameters match down through priority 2. Steps Removed: Shows the number of communication paths traversed between the local clock and the Grandmaster clock. PRISM Media Analysis Platform User Manual...
- Page 91 NOTE. The PRISM monitor currently supports only Multicast communication mode. In later firmware releases, other communication modes will be supported. Grandmaster BCMA Values: Lists the following values for the Grandmaster BCMA (Best Master Clock Algorithm) in order of precedence: Priority 1: This parameter defines which clocks are allowed to be...
- Page 92 Multicast, Unicast, and mixed Multicast and Unicast. For full Multicast or Unicast modes, all of the PTP messages are sent in the selected mode type. NOTE. The PRISM monitor currently supports only the Multicast communication mode. For some profiles, such as some telecom profiles and the SMPTE ST2059 profile, a mixture of Multicast and Unicast are allowed.
-
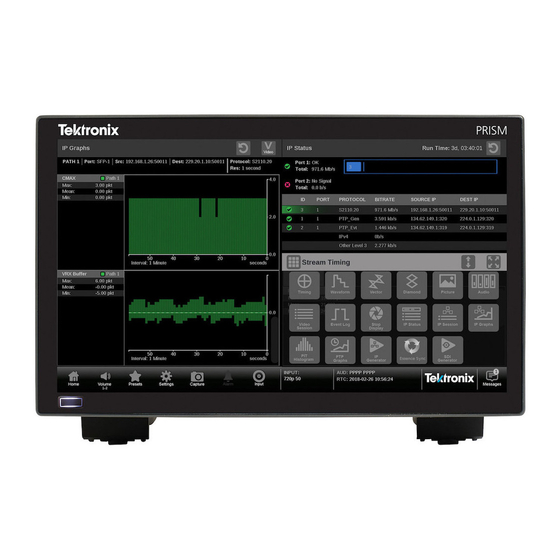
Page 93: Ip Graphs Application Display
Free Min/Max: Shows the minimum and maximum available bandwidth that is not being consumed by data. Session Bit Rate graph The Session Bit Rate graph shows the data rate of the currently selected input stream. (See Figure 51.) PRISM Media Analysis Platform User Manual... - Page 94 Figure 52: IP Graphs application – PIT and RTP Sequence Error graphs RTP Sequence Error graph The RTP Sequence Error graph shows the RTP sequence information and reports if any packet is received out of order. (See Figure 52.) PRISM Media Analysis Platform User Manual...
- Page 95 EBU Tech 3337, which is a method for measuring network jitter in RTP streams. (See Figure 53.) The graph uses yellow highlighting to indicate an error condition. The example image above is from a stream with timestamp errors. PRISM Media Analysis Platform User Manual...
-
Page 96: Pit Histogram Application Display
Figure 54: PIT Histogram application display Elements of the PIT Source/Dest: Lists the source and destination addresses of the IP stream. Histogram display Protocol: Lists the protocol being used by the monitored stream. PRISM Media Analysis Platform User Manual... -
Page 97: Ptp Operational Overview
Priority 1 and Priority 2 parameters are set by the user to influence the choice of a master: NOTE. The PRISM monitor has no role in setting the priority parameters or in providing information to the BMCA. Priority 1. This parameter defines which clocks are allowed to be considered as masters. -
Page 98: The Five Basic Ptp Timing Messages
Once the slave receives the delay response, it has the second pair of timestamps needed to calculate the second delay measurement of the slave to master delay. PRISM Media Analysis Platform User Manual... - Page 99 PTP operational overview Message timing The following figure show the relationships between the five PTP timing messages. PRISM Media Analysis Platform User Manual...
-
Page 100: Profiles And Domains
The profile defines the default and range of each parameter, and defines with options are required, allowed or prohibited. In the Prism monitor, the user should select the PTP profile (General, ST2059, or AES67). The user can then modify the profile parameters and save as part of an instrument preset. -
Page 101: Multicast, Unicast, And Mixed Communication Modes
Ideally, the slave will use that value to set the delay request rate although some slave set this rate independently. The delay request rate is typically the same as the sync rate, but may be higher or lower. PRISM Media Analysis Platform User Manual... - Page 102 For SMPTE mixed mode, the Announce, Sync, and Follow up messages are configured as Multicast, whereas the delay requests can be Multicast, Unicast, or Unicast without negotiation. To use this combination with a Tektronix SPG8000A master clock generator, set the master and slave to any of the modes: Multicast, Mixed, or Mixed without negotiation.
-
Page 103: Bmca Operation
Conversely for a 1 Gb/s input and 100 Mb/s output, the entire packet is quickly read in at the faster rate, so then the output can start sooner, albeit at a lower rate. PRISM Media Analysis Platform User Manual... - Page 104 The PTP system is incapable of removing this effect, so the best way to prevent this is to use high-quality cable with a minimum variation in the physical propagation delay. PRISM Media Analysis Platform User Manual...
-
Page 105: Index
22 Warnings Picture application, 53 Documentation In level bars, 55 Presets, 34 purposes of, xi Waveform factory, 39 application, 52 recalling, 38 renaming, 34 Event Log application, 62 saving, 34 Factory preset recall, 39 PRISM Media Analysis Platform User Manual...
Need help?
Do you have a question about the PRISM and is the answer not in the manual?
Questions and answers