Table of Contents
Advertisement
Quick Links
Advertisement
Table of Contents

Related Manuals for Viessmann VITOWELL comfort


Summary of Contents for Viessmann VITOWELL comfort
- Page 1 Installation And Operation Manual STORAGE ELECTRIC WATER HEATER Contents...
-
Page 2: Table Of Contents
Contents Safety-------------------------------------------------------------------------------2 General warnings-------------------------------------------------------------------------------------2 Key to symbols----------------------------------------------------------------------------------------4 General safety norms--------------------------------------------------------------------------------5 Specific safety norms for this appliance---------------------------------------------------------7 Appliance description---------------------------------------------------------8 Appliance profile--------------------------------------------------------------------------------------8 Appliance norms-------------------------------------------------------------------------------------12 Appliance installation--------------------------------------------------------13 Packing list--------------------------------------------------------------------------------------------13 Installation norms (for the installer) ------------------------------------------------------------14 Installing the appliance----------------------------------------------------------------------------15 Installation steps------------------------------------------------------------------------------------16 User instructions--------------------------------------------------------------20 Advice for user---------------------------------------------------------------------------------------20 Control and operating instructions--------------------------------------------------------------21 Wiring diagram and technical parameters----------------------------27 Wiring diagram---------------------------------------------------------------------------------------27... -
Page 3: Safety
Safety Safety General warnings 1. This manual is an integral and essential part of the appliance. It should be preserved with care and transferred alongside the appliance if the latter is transferred to another owner or user and/or moved to another location. 2. - Page 4 Safety Safety 8. This appliance is not intended for use by persons (including children) with reduced physical, sensory or mental capabilities, or lack of experience and knowledge, unless they have been given supervision or instruction concerning use of the appliance by a person responsible for their safety.
-
Page 5: Key To Symbols
Safety Safety Key to symbols Symbol Meaning Failure to comply with this warning implies the risk of personal injury and even death in some circumstances. Failure to comply with this warning implies the risk of damage and even serious damages to property, plants or animals in some circumstances. It is obliged to keep to the general safety norms and appliance specifications. -
Page 6: General Safety Norms
Safety Safety General safety norms Ref. Warning Risk Symbol The heater must be fitted with Electrocution reliable grounding. Do not use the heater without reliable grounding. Do not connect the grounding wire to the zero line or water pipe. open remove Electrocution from live components;... - Page 7 Safety Safety Ref. Warning Risk Symbol Do not damage the power supply Electrocution from live unsheathed cable. wires. Do not leave anything on top of the Personal injury from an object falling appliance. off the appliance following vibrations Damage to the appliance or any objects underneath it due to the object falling off following vibrations.
-
Page 8: Specific Safety Norms For This Appliance
Safety Safety Ref. Warning Risk Symbol Reset all the safety and control Damage shutdown functions affected by any intervention appliance due to out-of-control performed on the appliance and operation. make sure they operate correctly before re-using the appliance. Specific safety norms for this appliance Ref. -
Page 9: Appliance Description
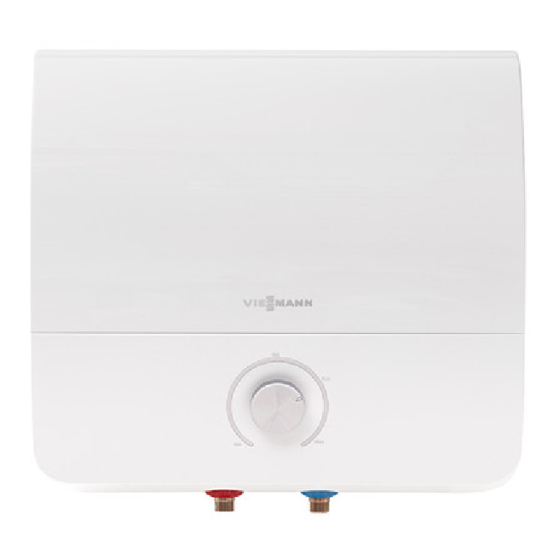
Appliance description Appliance description Appliance profile Cube Series Cube type C1 (Comfort): Upper panel Hot water outlet Cold water inlet Bottom panel Housing-rear Temperature knob Model 15L Cube 390mm 360mm 340mm 100mm 84mm 30L Cube 471mm 439mm 395mm 100mm 100mm... - Page 10 Appliance description Appliance description Cube type P1 (Premium): Upper panel Hot water outlet Cold water inlet Bottom panel Housing-rear Temperature knob Model 15L Cube P1 390mm 360mm 340mm 100mm 84mm 30L Cube P1 471mm 439mm 395mm 100mm 100mm...
- Page 11 Appliance description Appliance description Cube type D1 (Deluxe): Upper panel Hot water outlet Bottom panel Cold water inlet Control panel Housing-rear Model 15L Cube 390mm 360mm 340mm 100mm 84mm 30L Cube 471mm 439mm 395mm 100mm 100mm...
- Page 12 Appliance description Appliance description Slim Series Slim type C1 (Comfort): Left panel Right panel Magnesium anode connector Temperature knob Hot water outlet Cold water inlet Housing-rear Model 20L Slim C1 630mm 280mm 280mm 100mm 140mm...
-
Page 13: Appliance Norms
Appliance description Appliance description Appliance norms Implementation norms IEC60335-1 Safety of household and similar electrical appliances---General requirements IEC60335-2-21 Household and similar electrical appliances---Safety---Particular requirements for storage water heaters... -
Page 14: Appliance Installation
Appliance installation Appliance installation Packing list All water heaters are shipped with the following items. Please check them before installation. Component description Qty. Water heater 1 set User’s manual 1 copy User service guide 1 copy Expansion tube 2 pcs(Slim:3pcs) 2 pcs (Slim:3pcs)... -
Page 15: Installation Norms (For The Installer)
Appliance installation Appliance installation Installation norms (for the installer) Follow the general warnings and the safety norms listed at the beginning of the text and keep to all the instructions given under all circumstances. The installation and set-up of the water heater must be carried out by a competent person in conformity with the applicable norms in force and with any provisions set forth by local authorities and public health bodies. -
Page 16: Installing The Appliance
Appliance installation Appliance installation Installing the appliance This appliance is designed to be installed only inside buildings in compliance with the applicable norms in force. Furthermore, installers are requested to keep to the following advice in the presence of: ■ Damp: do not install the appliance in closed (unventilated) and damp rooms. ■... -
Page 17: Installation Steps
Appliance installation Appliance installation Installation steps 1. Installing the expansion-bolt hooks Cube type Drill two Φ 10mm x 85mm holes in the wall as shown in the figure. Insert the expansion pipe into the hole, put the screw through the hanging plate, and tighten the screw with a screwdriver, and the hanging plate direction is vertical upward (as shown in the figure). - Page 18 Appliance installation Appliance installation 2. Removing the baffle plate Pry up the plastic baffle plate covering hanging holes with a slotted screwdriver, as shown in the right figure, and keep hanging holes visible. 3. Hanging the water heater Lift the water heater, align the square holes on the back with the hooks and attach them.
- Page 19 Appliance installation Appliance installation 4. Hydraulic connection Connect the water heater’s inlet and outlet with pipes or fittings that are able to withstand temperature in excess of 80° C at a pressure above the working pressure. Therefore, we advise against the use of any materials which cannot resist such high temperatures.
- Page 20 Appliance installation Appliance installation 5. Electrical connection Before performing any operations, disconnect the appliance from the electricity mains using the external switch. For greater safety, authorize qualified personnel to carry out a careful inspection of the electrical system, ensuring it complies with the applicable norms in force, because the appliance manufacturer will not be held responsible for any damage caused by the lack of earthing of the system or for improper wiring.
-
Page 21: User Instructions
User instructions User instructions Warning! Follow the general warnings and the safety norms listed at the beginning of the text and keep to all the instructions given under all circumstances. Advice for user ■ Do not power the appliance until the tank is filled with water. Otherwise, the appliance may be damaged. -
Page 22: Control And Operating Instructions
User instructions User instructions Control and operating instructions (Cube type) Turning on or off the appliance Turn on the power at heater switch on the wall. The red color power LED keeps bright as long as the appliance is powered. Adjusting the temperature To adjust the temperature, rotate the knob on the front of the cover. - Page 23 User instructions User instructions Cube type C1 ■ The LED on the panel turns red during the heating process. ■ The LED on the panel will be off when the setting temperature has been reached. Cube type P1 ■ The LED on the panel turns red during the heating process. ■...
- Page 24 User instructions User instructions Control and operating instructions (D1 types) Turning on or off the appliance Turn on the power at heater switch on the wall. The power LED near the power plug keeps bright as long as the appliance is powered. To start the appliance, switch on the power supply and press To stop a working appliance, press and hold for 3 seconds.
- Page 25 User instructions User instructions Setting the temperature The initial temperature (default) of the appliance is 72℃. The setting range is between 35℃ and 80℃. After switching on the appliance: Press ▲ or ▼ to start setting a desired temperature. The digit will blink. The setting value increases or decreases by 1℃...
- Page 26 User instructions User instructions Timing mode The appliance provides the following default times: ■ Time 1: 18:00-22:00, one calendar day. ■ Time 2: 5:00-9:00, one calendar day ■ The setting temperature is 72℃. Calibrating the standard time Please check the appliance for the correctness of standard time before timing. If the standard time is wrong, calibrate the time first.
- Page 27 User instructions User instructions Timing After switching on the appliance,press SET to light up the digit 1, 2 or digits 1 and 2 to activate Time 1, Time 2 or Time 1 and Time 2, or turn off digits 1 and 2 to deactivate the timing mode.
-
Page 28: Wiring Diagram And Technical Parameters
Wiring diagram and technical parameters Wiring diagram and technical parameters Wiring diagram C type P type D type... -
Page 29: Technical Parameters
Wiring diagram and technical parameters Wiring diagram and technical parameters Technical parameters Model C1 R15 1,5KW-SG P1 R15 1,5KW-SG D1 R15 2,5KW-SG Capacity Power 1,5KW 1,5KW 2,5KW Voltage 230V 230V 230V Max Working Pressure 0.8MPa 0.8MPa 0.8MPa Max Operating 75℃ 75℃... - Page 30 Wiring diagram and technical parameters Wiring diagram and technical parameters Model C1 S20 C1 R30 P1 R30 D1 R30 2,5KW-SG 1,5KW-SG 1,5KW-SG 2,5KW-SG Capacity Power 2,5KW 1,5KW 1,5KW 2,5KW Voltage 230V 230V 230V 230V Working 0.8MPa 0.8MPa 0.8MPa 0.8MPa Pressure Operating 75℃...
-
Page 31: Maintenance Instructions
Maintenance instructions Maintenance instructions Maintenance regulations (for competent persons) Warning! Follow the general warnings and the safety norms listed at the beginning of the text and keep to all the instructions given under all circumstances. All maintenance operations and service visits should be performed by a competent person (who has the skills required by the applicable norms in force). -
Page 32: Periodic Maintenance
Maintenance instructions Maintenance instructions Periodical maintenance ■ To ensure the best performance from this appliance, descale the heating element once every two years. ■ If you prefer not to use special descaling acids for this operation, simply crumble away the lime deposit without damaging the heating element. ■... -
Page 33: Troubleshooting
Troubleshooting Troubleshooting Do not attempt to service this appliance on your own. Please contact your competent service technicians. Before calling your Technical Servicing Centre, check that the fault is not due to lack of water or power failure. In case of abnormal water heating, a thermic safety switch, according to the CEI-EN regulations, breaks the circuit in both feeding phases to the heating element. -
Page 34: Fault Analysis
Troubleshooting Troubleshooting Fault analysis Fault Possible cause Remedy Water leakage Connections between Tighten seals. components are sealed poorly. The tank leaks. Switch off the electricity mains contact Technical Servicing Center. No hot water or low The appliance is not Switch on the electricity mains. water temperature powered. - Page 35 Troubleshooting Troubleshooting Fault Possible cause Remedy LED off Appliance is not powered. Switch on the electricity mains. internal wiring Switch off the electricity mains and incorrect. contact our Technical Servicing Center. The LED fails. Switch off the electricity mains and contact our Technical Servicing Center.
Need help?
Do you have a question about the VITOWELL comfort and is the answer not in the manual?
Questions and answers